1、JdbcTemplate
1.1、搭建环境
1.2、配置DBCP
1.3、配置c3p0
1.4、对dao层的upadate()方法进行测试
1.5、使用JdbcDaoSupport
2、案例
1、JdbcTemplate <--返回目录
spring提供用于操作JDBC工具类,类似:DBUtils。依赖 连接池DataSource (数据源)
1.1、搭建环境 <--返回目录
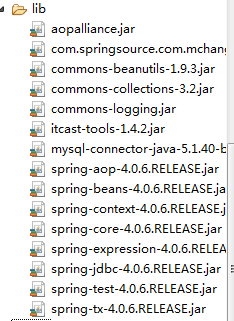
- 4个核心+1个依赖
- mysql驱动
- spring-jdbc-3.2.0.RELEASE.jar
- spring-tx-3.2.0.RELEASE.jar
- 连接池
com.springsource.com.mchange.v2.c3p0-0.9.1.2.jar c3p0包
或 com.springsource.org.apache.commons.dbcp-1.2.2.osgi.jar dbcp核心包和依赖
com.springsource.org.apache.commons.pool-1.5.3.jar
创建实体类javabean
public class User {
    private Integer id;
    private String username;
    private String password;
}
使用api进行测试(了解)
public static void main(String[] args) {
    //1 创建数据源(连接池) dbcp
    BasicDataSource dataSource = new BasicDataSource();
    // 基本4项
    dataSource.setDriverClassName("com.mysql.jdbc.Driver");
    dataSource.setUrl("jdbc:mysql://localhost:3306/db_test1");
    dataSource.setUsername("root");
    dataSource.setPassword("xxx");

    //2 创建模板
    JdbcTemplate jdbcTemplate = new JdbcTemplate();
    jdbcTemplate.setDataSource(dataSource);

    //3 通过api操作
    jdbcTemplate.update("insert into t_user(username,password) values(?,?);", "tom","998");
}
从API的使用,我们知道,jdbcTemplate.update("insert into t_user(username,password) values(?,?);", "tom","998"); 应该写到dao层,并且依赖jdbcTemplate;而jdbcTemplate和数据源都由spring容器提供;
dao层使用JdbcTemplate
public class UserDao{
    private JdbcTemplate jdbcTemplate;
    public void setJdbcTemplate(JdbcTemplate jdbcTemplate){
        this.jdbcTemplate = jdbcTemplate;
    }
    //添加
    public void update(User user){
        jdbcTemplate.update("insert into t_user(username,password) values(?,?);", user.getUsername(),user.getPassword());
    }
    //查询所有
    public List<User> findAll(){
        String sql = "select * from t_user";
        return jdbcTemplate.update(sql, ParameterizedBeanPropertyRowMapper.newInstance(User.class));
    }
}
在sping配置文件中配置dao:dao依赖jdbcTemplate,所以要配置jdbcTemplate;jdbcTemplate依赖datasource,所以要配置datesource;
1.2、配置DBCP <--返回目录
<!-- 创建数据源 -->
<bean id="dataSourceId" class="org.apache.commons.dbcp.BasicDataSource">
    <property name="driverClassName" value="com.mysql.jdbc.Driver"></property>
    <property name="url" value="jdbc:mysql://localhost:3306/db_day02_1"></property>
    <property name="username" value="root"></property>
    <property name="password" value=""></property>
</bean>

<!-- 创建模板 ,需要注入数据源-->
<bean id="jdbcTemplateId" class="org.springframework.jdbc.core.JdbcTemplate">
    <property name="dataSource" ref="dataSourceId"></property>
</bean>

<!-- 配置dao -->
<bean id="userDao" class="com.itheima.dao.UserDao">
    <property name="jdbcTemplate" ref="jdbcTemplate"></property>
</bean>
1.3、配置c3p0 <--返回目录
<!-- 创建数据源 c3p0-->
<bean id="dataSourceId" class="com.mchange.v2.c3p0.ComboPooledDataSource">
    <property name="driverClass" value="com.mysql.jdbc.Driver"></property>
    <property name="jdbcUrl" value="jdbc:mysql://localhost:3306/db_day02_1"></property>
    <property name="user" value="root"></property>
    <property name="password" value=""></property>
</bean>

<!-- 创建模板, 需要注入数据源-->
<bean id="jdbcTemplateId" class="org.springframework.jdbc.core.JdbcTemplate">
    <property name="dataSource" ref="dataSourceId"></property>
</bean>

<!-- 配置dao,需要注入模板-->
<bean id="userDao" class="com.itheima.dao.UserDao">
    <property name="jdbcTemplate" ref="jdbcTemplate"></property>
</bean>
1.4、对dao层的upadate()方法进行测试 <--返回目录
@Test
public void fun2(){
    String xmlPath = "applicationContext.xml";
    ApplicationContext applicationContext = new ClassPathXmlApplicationContext(xmlPath);

    User user = new User();
    user.setUsername("zhangsan");
    user.setPassword("123");

    UserDao userDao = (UserDao) applicationContext.getBean("userDaoId");
    userDao.update(user);
}
1.5、使用JdbcDaoSupport
JdbcDaoSupport封装了以下代码:以后,dao类只要继承JdbcDaoSupport就可以了。
private JdbcTemplate jdbcTemplate;
public void setJdbcTemplate(JdbcTemplate jdbcTemplate){
    this.jdbcTemplate = jdbcTemplate;
}
修改如下
public class UserDao extends JdbcDaoSupport {
    //添加
    public void update(User user){
        String sql = "insert into t_user(username,password) values(?,?);";
        this.getJdbcTemplate().update(sql, user.getUsername(),user.getPassword());
    }
    //查询所有
    public List<User> findAll(){
        String sql = "select * from t_user";
        return this.getJdbcTemplate().query(sql, ParameterizedBeanPropertyRowMapper.newInstance(User.class));
    }
}
dao 继承 JdbcDaoSupport,之后只需要注入数据源,底层将自动创建模板。所以,修改配置文件:
<!-- 创建数据源 c3p0-->
<bean id="dataSourceId" class="com.mchange.v2.c3p0.ComboPooledDataSource">
    <property name="driverClass" value="com.mysql.jdbc.Driver"></property>
    <property name="jdbcUrl" value="jdbc:mysql://localhost:3306/db_day02_1"></property>
    <property name="user" value="root"></property>
    <property name="password" value=""></property>
</bean>
<!-- 配置dao,需要注入数据源-->
<bean id="userDao" class="com.itheima.e_jdbcdaosupport.UserDao">
    <property name="dataSource" ref="dataSource"></property>
</bean>
如果想把applicationContext.xml数据源4大参数存放到properties文件中,做下面步骤:
1) 新建一个jdbcinfo.properties
jdbc.driverClass=com.mysql.jdbc.Driver
jdbc.jdbcUrl=jdbc:mysql://localhost:3306/ee19_spring_day02
jdbc.user=root
jdbc.password=1234
2) 修改applicationContext.xml
<!-- 加载配置文件
    "classpath:"前缀表示 src下 (spring的约定)
    在配置文件之后通过  ${key} 获得内容
-->
<context:property-placeholder location="classpath:com/itheima/f_properties/jdbcInfo.properties"/>

<!-- 创建数据源 c3p0-->
<bean id="dataSourceId" class="com.mchange.v2.c3p0.ComboPooledDataSource">
    <property name="driverClass" value="${jdbc.driverClass}"></property>
    <property name="jdbcUrl" value="${jdbc.jdbcUrl}"></property>
    <property name="user" value="${jdbc.user}"></property>
    <property name="password"  value="${jdbc.password}"></property>
</bean>
<!-- 配置dao,需要注入数据源-->
<bean id="userDao" class="com.itheima.e_jdbcdaosupport.UserDao">
    <property name="dataSource" ref="dataSource"></property>
</bean>
2、案例 <--返回目录

sql
create database db_test1 default character set utf8;
use db_test1;

create table t_user(
    id int primary key auto_increment,
    username varchar(50),
    password varchar(50),
    group_id int
)engine innodb;

insert into t_user(username,password,group_id) values('jack','1234',1);
insert into t_user(username,password,group_id) values('rose','5678',2);
insert into t_user(username,password,group_id) values('张三','123',1);

# 在cmd窗口查看前先设置编码
set names gbk;

# 查看所有用户
select * from t_user;

##################################
create table t_group(
    id int primary key auto_increment,
    name varchar(50)
)engine innodb;

insert into t_group(name) values('一组');
insert into t_group(name) values('二组');
insert into t_group(name) values('三组');
lib

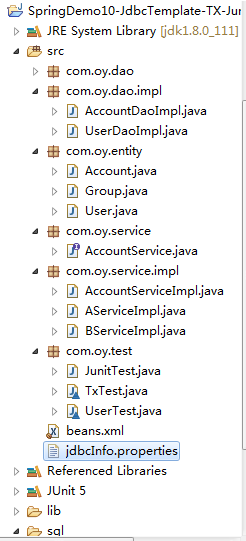
beans.xml
<?xml version="1.0" encoding="UTF-8"?>
<beans xmlns="http://www.springframework.org/schema/beans"
    xmlns:xsi="http://www.w3.org/2001/XMLSchema-instance"
    xmlns:context="http://www.springframework.org/schema/context"
    xmlns:tx="http://www.springframework.org/schema/tx"
    xsi:schemaLocation="http://www.springframework.org/schema/beans
        http://www.springframework.org/schema/beans/spring-beans.xsd
        http://www.springframework.org/schema/context
        http://www.springframework.org/schema/context/spring-context.xsd
        http://www.springframework.org/schema/tx
        http://www.springframework.org/schema/tx/spring-tx.xsd">

    <!-- 组件扫描 -->
    <context:component-scan base-package="com.oy"></context:component-scan>

    <!-- 加载配置文件 -->
    <context:property-placeholder location="classpath:jdbcInfo.properties"/>

    <!-- 创建数据源 c3p0-->
    <bean id="dataSource" class="com.mchange.v2.c3p0.ComboPooledDataSource">
        <property name="driverClass" value="${jdbc.driverClass}"></property>
        <property name="jdbcUrl" value="${jdbc.jdbcUrl}"></property>
        <property name="user" value="${jdbc.user}"></property>
        <property name="password"  value="${jdbc.password}"></property>
    </bean>

    <!-- 配置Jdbc模板 -->
    <bean id="jdbcTemplate" class="org.springframework.jdbc.core.JdbcTemplate">
        <property name="dataSource" ref="dataSource"></property>
    </bean>

    <!-- xml方式管理实现事务管理3步:
        1.配置事务管理器
        2.<tx:annotation-driven transaction-manager="transactionManager"/>
        3.注解@Transacional -->
      <!-- 配置事务管理器 -->
    <bean id="transactionManager" class="org.springframework.jdbc.datasource.DataSourceTransactionManager">
        <property name="dataSource" ref="dataSource"/>
    </bean>

    <tx:annotation-driven transaction-manager="transactionManager"/>

</beans>
jdbcInfo.properties
jdbc.driverClass=com.mysql.jdbc.Driver
jdbc.jdbcUrl=jdbc:mysql://localhost:3306/db_test1?useUnicode=true&characterEncoding=UTF-8
jdbc.user=root
jdbc.password=
User

package com.oy.entity;

/**
 * 用户实体类
 * @author oy
 * @version 1.0
 * @date 2018年12月30日
 * @time 下午11:16:57
 */
public class User {
    private Integer id;
    private String username;
    private String password;
    private Group group;

    public Integer getId() {
        return id;
    }

    public void setId(Integer id) {
        this.id = id;
    }

    public String getUsername() {
        return username;
    }

    public void setUsername(String username) {
        this.username = username;
    }

    public String getPassword() {
        return password;
    }

    public void setPassword(String password) {
        this.password = password;
    }

    public Group getGroup() {
        return group;
    }

    public void setGroup(Group group) {
        this.group = group;
    }

    @Override
    public String toString() {
        return "User [id=" + id + ", username=" + username + ", password=" + password + ", group=" + group + "]";
    }
}
Group

package com.oy.entity;

/**
 * @author oy
 * @version 1.0
 * @date 2018年12月31日
 * @time 下午7:56:36
 */
public class Group {
    private Integer id;
    private String name;

    public Integer getId() {
        return id;
    }

    public void setId(Integer id) {
        this.id = id;
    }

    public String getName() {
        return name;
    }

    public void setName(String name) {
        this.name = name;
    }

    @Override
    public String toString() {
        return "Group [id=" + id + ", name=" + name + "]";
    }
}
Account

package com.oy.entity;

/**
 * @author oy
 * @version 1.0
 * @date 2018年12月31日
 * @time 下午10:26:00
 */
public class Account {
    private Integer id;
    private String username;
    private Integer money;

    public Integer getId() {
        return id;
    }
    public void setId(Integer id) {
        this.id = id;
    }
    public String getUsername() {
        return username;
    }
    public void setUsername(String username) {
        this.username = username;
    }
    public Integer getMoney() {
        return money;
    }
    public void setMoney(Integer money) {
        this.money = money;
    }
}
UserDao
package com.oy.dao;

import java.util.List;
import java.util.Map;
import com.oy.entity.User;

public interface UserDao {
    int add(User user);

    int update(User user);

    int delete(Integer id);

    List<User> findAll();

    List<User> find(User user);

    long count(User user);

    User findById(Integer id);

    Map<String, Object> findUserWithGroupByid(Integer id);

    User findUserWithGroupByid2(Integer id);

}
UserDaoImpl
package com.oy.dao.impl;

import java.sql.ResultSet;
import java.sql.SQLException;
import java.util.List;
import java.util.Map;

import javax.annotation.Resource;

import org.springframework.jdbc.core.JdbcTemplate;
import org.springframework.jdbc.core.RowCallbackHandler;
import org.springframework.jdbc.core.simple.ParameterizedBeanPropertyRowMapper;
import org.springframework.stereotype.Repository;

import com.oy.dao.UserDao;
import com.oy.entity.Group;
import com.oy.entity.User;

@Repository("userDao")
public class UserDaoImpl implements UserDao{
    @Resource
    private JdbcTemplate jdbcTemplate;

    /**
     * 添加
     */
    @Override
    public int add(User user) {
        String sql = "insert into t_user(username,password) values(?,?)";
        Object[] params = {user.getUsername(),user.getPassword()};
        return jdbcTemplate.update(sql, params);
    }

    /**
     * 修改
     */
    @Override
    public int update(User user) {
        String sql = "update t_user set username=?,password=?,group_id=? where id=?";
        Object[] params = {user.getUsername(),user.getPassword(),user.getGroup().getId(),user.getId()};
        return jdbcTemplate.update(sql, params);
    }

    /**
     * 根据id删除
     */
    @Override
    public int delete(Integer id) {
        String sql = "delete from t_user where id=?";
        return jdbcTemplate.update(sql, id);
    }

    /**
     * 查询所有
     */
    @Override
    public List<User> findAll() {
        String sql = "select * from t_user";
        return jdbcTemplate.query(sql, ParameterizedBeanPropertyRowMapper.newInstance(User.class));
    }

    /**
     * 模糊查询
     */
    @Override
    public List<User> find(User user) {
        String sql = "select * from t_user where username like ? and password like ?";
        String username = "%" + user.getUsername() + "%";
        String password = "%" + user.getPassword() + "%";
        return jdbcTemplate.query(sql, ParameterizedBeanPropertyRowMapper.newInstance(User.class),
                username, password);
    }

    /**
     * 带条件查询总记录数
     */
    @Override
    public long count(User user) {
        String sql = "select count(*) from t_user where username like ? and password like ?";
        String username = "%" + user.getUsername() + "%";
        String password = "%" + user.getPassword() + "%";

        // queryForObject()方法是返回一个对象
        // 该方法第二个参数Class<T> requiredType是指定返回对象的类型
        return jdbcTemplate.queryForObject(sql, Long.class, username, password);

        // 下面这句也可以实现同样功能,但是不推荐使用queryForLong()方法
        // return jdbcTemplate.queryForLong(sql, username, password);
    }

    /**
     * 根据id查询
     */
    @Override
    public User findById(Integer id) {
        String sql = "select * from t_user where id = ?";
        return jdbcTemplate.queryForObject(sql, ParameterizedBeanPropertyRowMapper.newInstance(User.class), id);
    }

    /**
     * 关联查询
     */
    @Override
    public Map<String, Object> findUserWithGroupByid(Integer id) {
        //这种方法弊端:User类和Group类不能有同名属性
        String sql = "select u.id,u.username,u.password,g.name from t_user u ,t_group g where u.group_id = g.id and u.id = ?";
        return jdbcTemplate.queryForMap(sql, id);
    }

    /**
     * 关联查询
     */
    @Override
    public User findUserWithGroupByid2(Integer id) {
        User user = new User();
        Group group = new Group();
        String sql = "select u.id,u.username,u.password,u.group_id,g.name from t_user u ,"
                + "t_group g where u.group_id = g.id and u.id = ?";

        jdbcTemplate.query(sql, new RowCallbackHandler() {

            @Override
            public void processRow(ResultSet rs) throws SQLException {
                user.setId(rs.getInt("id"));
                user.setUsername(rs.getString("username"));
                user.setPassword(rs.getString("password"));

                group.setId(rs.getInt("group_id"));
                group.setName(rs.getString("name"));
                user.setGroup(group);
            }

        }, id);

        return user;
    }

}
AccountDao
package com.oy.dao;

public interface AccountDao {
    int update(String username, int moneyChange);
}
AccountDaoImpl
package com.oy.dao.impl;

import javax.annotation.Resource;

import org.springframework.jdbc.core.JdbcTemplate;
import org.springframework.stereotype.Repository;

import com.oy.dao.AccountDao;

@Repository
public class AccountDaoImpl implements AccountDao {
    @Resource
    private JdbcTemplate jdbcTemplate;

    @Override
    public int update(String username, int moneyChange) {
        String sql = "update t_account set money = money + ? where username = ?";
        return jdbcTemplate.update(sql, moneyChange, username);
    }

}
AccountService
package com.oy.service;

public interface AccountService {
    void transfer(String from, String to, int money);
}
AccountServiceImpl
package com.oy.service.impl;

import javax.annotation.Resource;

import org.springframework.stereotype.Service;
import org.springframework.transaction.annotation.Transactional;

import com.oy.dao.AccountDao;
import com.oy.service.AccountService;

@Service("accountService")
public class AccountServiceImpl implements AccountService {
    @Resource
    private AccountDao accountDao;

    @Transactional
    @Override
    public void transfer(String from, String to, int money) {
        accountDao.update(from, -money);
        System.out.println(1/0);
        accountDao.update(to, money);
    }

}
user 相关CRUD测试
package com.oy.test;

import java.util.HashMap;
import java.util.List;
import java.util.Map;
import java.util.Scanner;

import org.junit.jupiter.api.AfterEach;
import org.junit.jupiter.api.BeforeEach;
import org.junit.jupiter.api.Test;
import org.springframework.context.support.ClassPathXmlApplicationContext;
import org.springframework.dao.EmptyResultDataAccessException;

import com.oy.dao.UserDao;
import com.oy.entity.Group;
import com.oy.entity.User;

import cn.itcast.commons.CommonUtils;

/**
 * 功能:测试JdbcTemplate模板的使用*/
class UserTest {
    ClassPathXmlApplicationContext ctx = null;
    UserDao userDao = null;

    @BeforeEach
    public void setUp() throws Exception {
        ctx = new ClassPathXmlApplicationContext("beans.xml");
        userDao = (UserDao)ctx.getBean("userDao");
    }

    @AfterEach
    public void tearDown() throws Exception {
        ctx.close();
    }

    /**
     * 添加
     */
    @Test
    public void test1() {
        User user = new User();
        user.setUsername("小张三");
        user.setPassword("124");
        userDao.add(user);
    }

    /**
     * 修改
     */
    @Test
    public void test2() {
        // 没有id=3的记录。如果修改id=3的用户,也不报错
        User user = new User();
        user.setId(1);
        user.setUsername("jack2");
        user.setPassword("222");

        Group group = new Group();
        group.setId(3);
        user.setGroup(group);

        userDao.update(user);
    }

    /**
     * 根据id删除
     */
    @Test
    public void test3() {
        userDao.delete(3);
    }

    /**
     * 查询所有
     */
    @Test
    public void test4() {
        List<User> userList = userDao.findAll();
        for (User u : userList) {
            System.out.println(u);
        }
    }

    /**
     * 多条件模糊查询
     */
    @Test
    public void test5() {
        User user = new User();
        user.setUsername("a");
        user.setPassword("2");
        List<User> userList = userDao.find(user);
        if (userList.size() == 0) {
            System.out.println("没有查询出结果。。。");
            return;
        }
        for (User u : userList) {
            System.out.println(u);
        }
    }

    /**
     * 带条件查询总记录数
     */
    @Test
    public void test6() {
        User user = new User();
        user.setUsername("张");
        user.setPassword("2");
        long count = userDao.count(user);
        System.out.println("count:" + count);
    }

    /**
     * 根据id查询
     */
    @Test
    public void test7() {
        // 查询id=3的用户,由于t_user没有id=3的记录,报错
        // EmptyResultDataAccessException:Incorrect result size:expected 1, actual 0
        // EmptyResultDataAccessException这个类在spring-tx.jar里面
        // 所以,使用JDBCTemplate时要同时导入spring-jdbc.jar和spring-tx.jar两个包
        User u = null;
        Scanner sc = new Scanner(System.in);
        System.out.println("请输入一个正整数:");
        Integer id = sc.nextInt();

        try {
            u = userDao.findById(id);
        } catch (EmptyResultDataAccessException e) {
            System.out.println("异常类型:" + e.getClass().getName());
            System.out.println("异常消息:" + e.getMessage());
        }

        if (u == null) {
            System.out.println("查询id=" + id + "的用户:" + "没有该用户");
        } else {
            System.out.println("查询id=" + id + "的用户:" + u);
        }

        sc.close();
    }

    /**
     * 关联查询方法1:将关联查询sql语句查询出的结果集封装成Map,
     * 然后将Map映射成两个实体。
     * 这种方法弊端:User类和Group类不能有同名属性
     */
    @Test
    public void test8() {
        Map<String, Object> map = new HashMap<String, Object>();
        map = userDao.findUserWithGroupByid(1);

        //User类和Group类有同名属性id,所有查询结果集字段id被自动填充给了User类和Group类的id属性
        User user = null;
        Group group = null;
        user = CommonUtils.toBean(map, User.class);
        group = CommonUtils.toBean(map, Group.class);
        user.setGroup(group);

        // User [id=1, username=jack2, password=222, group=Group [id=1, name=三组]]
        // 数据库group的id为3
        // 因为User类和Group类有同名属性id,导致映射出错。
        System.out.println(user);
    }

    /**
     * 关联查询方法2:将关联查询sql语句查询出的结果集手动封装进两个实体(推荐)
     */
    @Test
    public void test9() {
        User user = userDao.findUserWithGroupByid2(1);
        System.out.println(user);//User [id=1, username=jack2, password=222, group=Group [id=3, name=三组]]
    }
}
account 测试事务
package com.oy.test;

import org.junit.jupiter.api.AfterEach;
import org.junit.jupiter.api.BeforeEach;
import org.junit.jupiter.api.Test;
import org.springframework.context.support.ClassPathXmlApplicationContext;

import com.oy.service.AccountService;
import com.oy.service.impl.AServiceImpl;

/*
 * 功能:测试事务
 *
 * xml方式管理实现事务管理3步:
        1.配置事务管理器
        2.<tx:annotation-driven transaction-manager="transactionManager"/>
        3.注解@Transacional
 */
class TxTest {

    ClassPathXmlApplicationContext ctx = null;
    AccountService accountService = null;

    @BeforeEach
    public void setUp() throws Exception {
        ctx = new ClassPathXmlApplicationContext("beans.xml");
        accountService = (AccountService)ctx.getBean("accountService");
        aServiceImpl = (AServiceImpl)ctx.getBean("aService");
    }

    @AfterEach
    public void tearDown() throws Exception {
        ctx.close();
    }

    /**
     * 测试事务
     */
    @Test
    void test1() {
        accountService.transfer("jack", "rose", 100);
    }
}
测试spring整合junit
package com.oy.test;

import org.junit.Test;
import org.junit.runner.RunWith;
import org.springframework.beans.factory.annotation.Autowired;
import org.springframework.test.context.ContextConfiguration;
import org.springframework.test.context.junit4.SpringJUnit4ClassRunner;

import com.oy.service.AccountService;

/**
 * 功能:测试spring整合junit
 *
 * TxTest类中使用JUnit5测试包,@Test类型:org.junit.jupiter.api.Test;
 * 本类使用@Test的类型:org.junit.Test;如果使用org.junit.jupiter.api.Test会报错。*/
@RunWith(value=SpringJUnit4ClassRunner.class)
@ContextConfiguration(locations="classpath:beans.xml")
public class JunitTest {

    @Autowired
    AccountService accountService;

    @Test
    public void test1() {
        accountService.transfer("jack", "rose", 100);
    }
}
---
