1、Java NIO 简介
2、NIO主要组件介绍
2.1、Buffer
2.2、Channel
2.3、Selector
3、缓冲区(Buffer)的数据存取
3.1、缓冲区中的四个核心属性
3.2、flip() 方法和 clear() 方法
3.3、Buffer常用方法
3.4、直接缓冲区与非直接缓冲区
4、通道(Channel)
4.1、通道的主要实现类
4.2、获取通道 三种方式
4.3、利用通道完成文件的复制
4.4、分散(Scatter)与聚集(Gather)
4.5、字符集:Charset
5、NIO 非阻塞原理
5.1、使用 NIO 完成网络通信的三个核心
5.2、阻塞 TCP 编程
5.3、非阻塞 TCP 编程
5.4、非阻塞 UDP 编程
5.5、Pipe.SinkChannel 和 Pipe.SourceChannel
1、Java NIO 简介 <--返回目录
Java NIO(New IO,Non-Blocking IO)是从java1.4 版本开始引入的一个新的 IO API,可以替代标准的 Java IO API。NIO 与原来的 IO 有同样的作用和目的,但是使用的方式完全不同,NIO 支持面向缓冲区的、基于通道的 IO 操作。NIO 将以更加高效的方式进行文件的读写操作。
Java NIO有两种解释:一种叫非阻塞 IO(Non-blocking I/O),另一种也叫新的 IO(New I/O),其实是同一个概念。它是一种同步非阻塞的 I/O 模型,也是 I/O 多路复用的基础,已经被越来越多地应用到大型应用服务器,成为解决高并发与大量连接、I/O处理问题的有效方式。
NIO 是一种基于通道和缓冲区的 I/O 方式,它可以使用 Native 函数库直接分配堆外内存(区别于 JVM 的运行时数据区),然后通过一个存储在 Java 堆里面的 DirectByteBuffer 对象作为这块内存的直接引用进行操作。这样能在一些场景显著提高性能,因为避免了在 Java 堆和 Native 堆中来回复制数据。
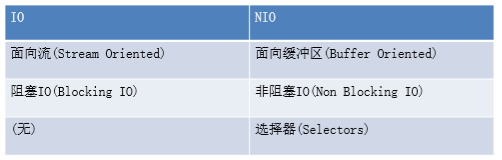
NIO 与 IO 的主要区别:
1)BIO 以流的方式处理数据,而NIO 以块的方式处理数据,块 I/O 的效率比流 I/O 高很多;
2)BIO 是阻塞的,NIO 是非阻塞的;
3)BIO 基于字节流和字符流进行操作,而 NIO 基于 Channel(通道)和 Buffer(缓冲区)进行操作,数据总是从通道读取到缓冲区中,或者从缓冲区写入到通道中。Selector(选择器)用于监听多个通道的时间(比如:连接请求,数据到达等),因此使用单个线程就可以监听多个客户端通道;
4)BIO 是单向的,如:InputStream, OutputStream;而 NIO 是双向的,既可以用来进行读操作,又可以用来进行写操作。
Java NIO 系统的核心在于:通道(Channel)与缓冲区(Buffer)。通道表示打开到 IO 设备(例如文件、套接字)的连接。若需要使用 NIO 系统,需要获取用于连接 IO 设备的通道以及用于容纳数据的缓冲区。然后操作缓冲区,对数据进行处理。简而言之,Channel 负责传输,Buffer 负责存储。
2、NIO主要组件介绍 <--返回目录
2.1、Buffer <--返回目录
Buffer(缓冲区)是一个用于存储特定基本类型数据的容器。除了 boolean 外,其余每种基本类型都有一个对应的buffer类。
Buffer类的子类有:
- ByteBuffer
- CharBuffer
- DoubleBuffer
- FloatBuffer
- IntBuffer
- LongBuffer
- ShortBuffer
2.2、Channel <--返回目录
Channel(通道)表示到实体,如硬件设备、文件、网络套接字或可以执行一个或多个不同 I/O 操作(如读取或写入)的程序组件的开放的连接。
Channel接口的常用实现类有:
- FileChannel(对应文件IO)
- DatagramChannel(对应UDP)
- SocketChannel 和 ServerSocketChannel(对应TCP的客户端和服务器端)
Channel 和 IO 中的 Stream(流)是差不多一个等级的。
2.3、Selector <--返回目录
Selector(选择器)用于监听多个通道的事件(比如:连接打开,数据到达)。因此,单个的线程可以监听多个数据通道。即用选择器,借助单一线程,就可对数量庞大的活动I/O通道实施监控和维护。
3、缓冲区(Buffer)的数据存取 <--返回目录
缓冲区(Buffer):在 Java NIO 中负责数据的存取。缓冲区就是数组。用于存储不同数据类型的数据。根据数据类型不同(boolean 除外),提供了相应类型的缓冲区:ByteBuffer、CharBuffer、ShortBuffer、IntBuffer、LongBuffer、FloatBuffer、DoubleBuffer。
上述缓冲区的管理方式几乎一致,通过 allocate() 获取缓冲区。
缓冲区存取数据的两个核心方法:
- put() : 存入数据到缓冲区中
- get() : 获取缓冲区中的数据
3.1、缓冲区中的四个核心属性 <--返回目录
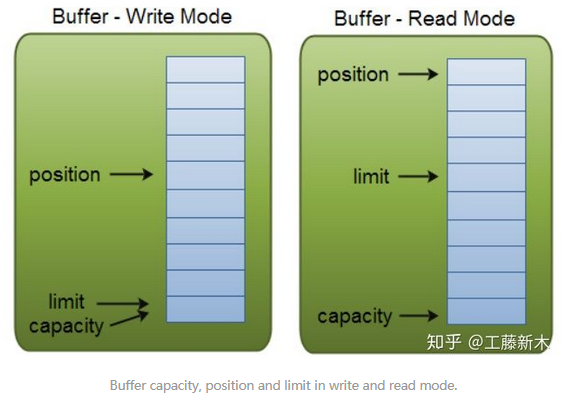
capacity: 容量,表示缓冲区中最大存储数据的容量。一旦声明不能改变。
limit: 界限(游标位置),表示缓冲区中可以操作数据的大小。(limit 后数据不能进行读写)
position: 位置(末尾限定符),表示缓冲区中正在操作数据的位置。初始值为 0,最大值是 capacity - 1。
mark: 标记,表示记录当前 position 的位置。可以通过 reset() 恢复到 mark 的位置
0 <= mark <= position <= limit <= capacity
其中,position 和 limit 的意义依赖于当前 Buffer 是处于读模式还是写模式。capacity 的含义无论读写模式都是相同的。下面是对以上三个属性在读模式和写模式的一个示例:
Capacity(容量)
作为一个内存块,Buffer 有一个固定的大小,我们叫做 “capacity(容量)”。你最多只能向 Buffer 写入 capacity 大小的字节、长整数、字符等。一旦 Buffer 满了,你必须在继续写入数据之前清空它(读出数据,或清除数据)。
Position(游标位置)
当你开始向 Buffer 写入数据时,你必须知道数据将要写入的位置。position 的初始值为 0。当一个字节或长整数等类似数据类型被写入 Buffer 后,position 就会指向下一个将要写入数据的位置(根据数据类型大小计算)。position 的最大值是 capacity - 1。
当你需要从 Buffer 读出数据时,你也需要知道将要从什么位置开始读数据。在你调用 flip 方法将 Buffer 从写模式转换为读模式时,position 被重新设置为 0。然后你从 position 指向的位置开始读取数据,接下来 position 指向下一个你要读取的位置。
Limit(限制)
在写模式下对一个 Buffer 的限制即你能将多少数据写入 Buffer 中。在写模式下,限制等同于 Buffer 的容量(capacity)。
当切换 Buffer 为读模式时,限制表示你最多能读取到多少数据。因此,当切换Buffer为读模式时,限制会被设置为写模式下的 position 值。换句话说,你能读到之前写入的所有数据(限制被设置为已写的字节数,在写模式下就是 position)。
另外还有一个Mark,简单介绍一下:
Mark(标记)
一个备忘地址,作为临时标记 position 位置使用,标记在设定前是未定义的。
Mark 的使用场景:
假设 IntBuffer.allocate(1024),现在 position 位置为10,现在只想发送512到1024之间的缓冲数据,此时我们可以 buffer.mark(buffer.position()) 既将 position 记入 mark 位置,然后buffer.postion(512),此时发送的数据就是 512 到 1024 之间的数据。发送完成后,调用 buffer.reset() 将 mark 临时标记赋值给 position 使得 position=mark。注意如果未设定 mark,而调用了buffer.reset() 方法则会抛出 InvalidMarkException。
几个属性的不变式
0 <= mark <= position <= limit <= capacity
3.2、flip() 方法和 clear() 方法 <--返回目录
开始时,Buffer 的 position 为 0,limit 为 capaticy,程序可以通过 put() 方法向 Buffer 中放入一些数据,每放入一些数据,Buffer 的 position 相应地往后移动。
当 Buffer 装入数据结束后,调用 Buffer 的 flip() 方法,将 Buffer 从写模式转换为读模式,该方法将 limit 设置为 positin 所在位置,将 positin 设为 0,这就使得 Buffer 的读写指针又移到了开始位置。也就是说,Buffer 调用 flip() 方法之后,Buffer 为输出数据做好了准备。
当 Buffer 输出数据结束后,调用 Buffer 的 clear() 方法,clear() 方法不是清空 Buffer 的数据,它仅仅将 postion 置为 0,将 limit 置为 capacity,这样就为再次向 Buffer 装入数据做好准备。
3.3、Buffer常用方法 <--返回目录
建立缓冲区分配容量:allocate(capacity)
装载数据:put() 及其重载方法
改变缓冲区的读写模式:flip()
获取数据:get() 及其重载方法
标记:mark()/reset()
判断:remaining():返回当前位置与限制之间的元素数;
hasRemaining():判断当前位置与限制之间是否还有元素存在;
isReadOnly():判断此缓冲区是否为只读缓冲区;
clear():清空缓冲区,只是将缓冲区的三个属性恢复到初始状态,其中的数据依然存在。
capatcity/position/limit, get/put, flip/clear 的使用
@Test
public void test1(){
    String str = "abcde";

    //1. 分配一个指定大小的缓冲区
    ByteBuffer buf = ByteBuffer.allocate(1024);

    System.out.println("-----------------allocate()----------------");
    System.out.println(buf.position());
    System.out.println(buf.limit());
    System.out.println(buf.capacity());

    //2. 利用 put() 存入数据到缓冲区中
    buf.put(str.getBytes());

    System.out.println("-----------------put()----------------");
    System.out.println(buf.position());
    System.out.println(buf.limit());
    System.out.println(buf.capacity());

    //3. 切换读取数据模式
    buf.flip();

    System.out.println("-----------------flip()----------------");
    System.out.println(buf.position());
    System.out.println(buf.limit());
    System.out.println(buf.capacity());

    //4. 利用 get() 读取缓冲区中的数据
    byte[] dst = new byte[buf.limit()];
    buf.get(dst);
    System.out.println(new String(dst, 0, dst.length));

    System.out.println("-----------------get()----------------");
    System.out.println(buf.position());
    System.out.println(buf.limit());
    System.out.println(buf.capacity());

    //5. rewind() : 可重复读
    buf.rewind();

    System.out.println("-----------------rewind()----------------");
    System.out.println(buf.position());
    System.out.println(buf.limit());
    System.out.println(buf.capacity());

    //6. clear() : 清空缓冲区. 但是缓冲区中的数据依然存在,但是处于“被遗忘”状态
    buf.clear();

    System.out.println("-----------------clear()----------------");
    System.out.println(buf.position());
    System.out.println(buf.limit());
    System.out.println(buf.capacity());

    System.out.println((char)buf.get());

}
mark 的使用
@Test
public void test2(){
    String str = "abcde";

    ByteBuffer buf = ByteBuffer.allocate(1024);

    buf.put(str.getBytes());

    buf.flip();

    byte[] dst = new byte[buf.limit()];
    buf.get(dst, 0, 2);
    System.out.println(new String(dst, 0, 2));
    System.out.println(buf.position());

    //mark() : 标记
    buf.mark();

    buf.get(dst, 2, 2);
    System.out.println(new String(dst, 2, 2));
    System.out.println(buf.position());

    //reset() : 恢复到 mark 的位置
    buf.reset();
    System.out.println(buf.position());

    //判断缓冲区中是否还有剩余数据
    if(buf.hasRemaining()){
        //获取缓冲区中可以操作的数量
        System.out.println(buf.remaining());
    }
}
3.4、直接缓冲区与非直接缓冲区 <--返回目录
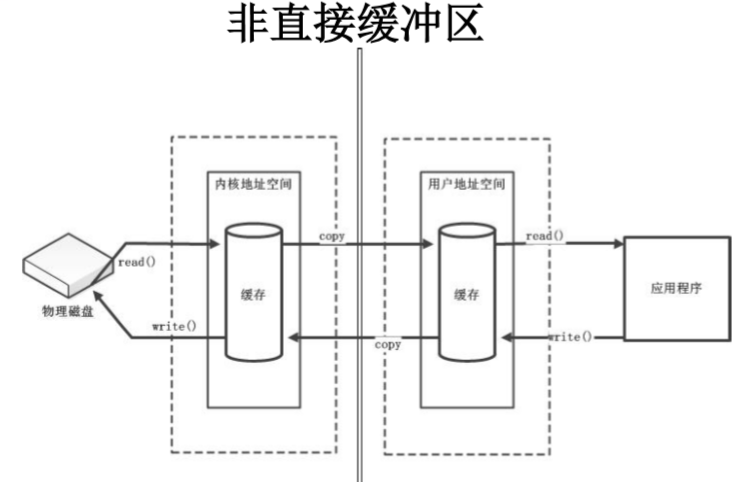
- 非直接缓冲区:通过 allocate() 方法分配缓冲区,将缓冲区建立在 JVM 的内存中。
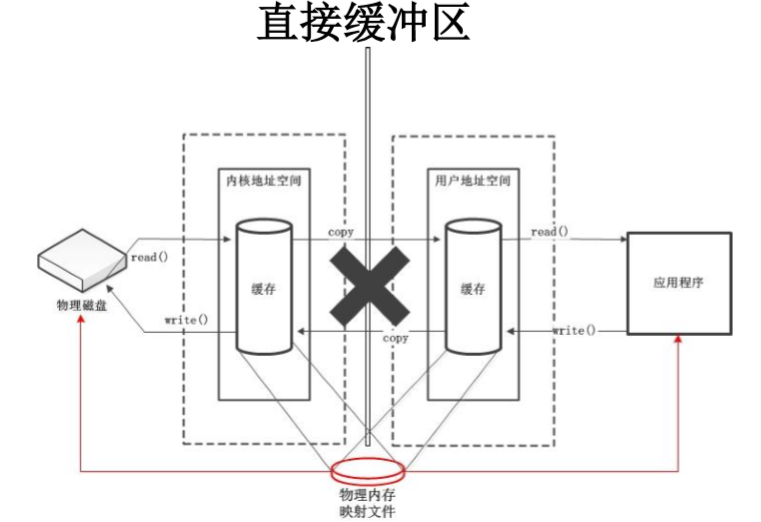
- 直接缓冲区:通过 allocateDirect() 方法分配直接缓冲区,将缓冲区建立操作系统物理内存中。可以提高效率。
直接 Buffer 的创建成本比普通 Buffer 的创建成本高,但效率高。所以,直接 Buffer 适用于长期生存的 Buffer,而不适用于短生存期、一次用完就丢弃的 Buffer。
只有 ByteBuffer 提供了 allocateDirect() 方法。
@Test
public void test3(){
    //分配直接缓冲区
    ByteBuffer buf = ByteBuffer.allocateDirect(1024);

    System.out.println(buf.isDirect());
}
非直接缓冲区读写模型:左边 OS,右边 JVM
直接缓冲区读写模型:
4、通道(Channel) <--返回目录
通道(Channel):用于源节点与目标节点的连接。在 Java NIO 中负责缓冲区中数据的传输。Channel 本身不存储数据,因此需要配合缓冲区进行传输。
4.1、通道的主要实现类 <--返回目录
java.nio.channels.Channel 接口:
- FileChannel
- SocketChannel 用于支持 TCP 网络通信的 Channel
- ServerSocketChannel 用于支持 TCP 网络通信的 Channel
- DatagramChannel 用于支持 UDP 网络通信的 Channel
4.2、获取通道 三种方式 <--返回目录
1) Java 针对支持通道的类提供了 getChannel() 方法
本地 IO:
     FileInputStream/FileOutputStream
     RandomAccessFile

网络IO:
     Socket
     ServerSocket
     DatagramSocket
2) 在 JDK 1.7 中的 NIO.2 针对各个通道提供了静态方法 open()
3) 在 JDK 1.7 中的 NIO.2 的 Files 工具类的 newByteChannel()
4.3、利用通道完成文件的复制 <--返回目录
利用通道完成文件的复制(非直接缓冲区)
//利用通道完成文件的复制(非直接缓冲区)
@Test
public void test1(){
    long start = System.currentTimeMillis();

    FileInputStream fis = null;
    FileOutputStream fos = null;
    //①获取通道
    FileChannel inChannel = null;
    FileChannel outChannel = null;
    try {
        fis = new FileInputStream("d:/1.mkv");
        fos = new FileOutputStream("d:/2.mkv");

        inChannel = fis.getChannel();
        outChannel = fos.getChannel();

        //②分配指定大小的缓冲区
        ByteBuffer buf = ByteBuffer.allocate(1024);

        //③将通道中的数据存入缓冲区中
        while(inChannel.read(buf) != -1){
            buf.flip(); //切换读取数据的模式
            //④将缓冲区中的数据写入通道中
            outChannel.write(buf);
            buf.clear(); //清空缓冲区
        }
    } catch (IOException e) {
        e.printStackTrace();
    } finally {
        if(outChannel != null){
            try {
                outChannel.close();
            } catch (IOException e) {
                e.printStackTrace();
            }
        }

        if(inChannel != null){
            try {
                inChannel.close();
            } catch (IOException e) {
                e.printStackTrace();
            }
        }

        if(fos != null){
            try {
                fos.close();
            } catch (IOException e) {
                e.printStackTrace();
            }
        }

        if(fis != null){
            try {
                fis.close();
            } catch (IOException e) {
                e.printStackTrace();
            }
        }
    }

    long end = System.currentTimeMillis();
    System.out.println("耗费时间为:" + (end - start));

}
使用直接缓冲区完成文件的复制(内存映射文件)
//使用直接缓冲区完成文件的复制(内存映射文件)
@Test
public void test2() throws IOException{
    long start = System.currentTimeMillis();

    FileChannel inChannel = FileChannel.open(Paths.get("d:/1.mkv"), StandardOpenOption.READ);
    FileChannel outChannel = FileChannel.open(Paths.get("d:/2.mkv"), StandardOpenOption.WRITE, StandardOpenOption.READ, StandardOpenOption.CREATE);

    //内存映射文件
    MappedByteBuffer inMappedBuf = inChannel.map(MapMode.READ_ONLY, 0, inChannel.size());
    MappedByteBuffer outMappedBuf = outChannel.map(MapMode.READ_WRITE, 0, inChannel.size());

    //直接对缓冲区进行数据的读写操作
    byte[] dst = new byte[inMappedBuf.limit()];
    inMappedBuf.get(dst);
    outMappedBuf.put(dst);

    inChannel.close();
    outChannel.close();

    long end = System.currentTimeMillis();
    System.out.println("耗费时间为:" + (end - start));
}
通道之间的数据传输(直接缓冲区) transferFrom(),transferTo()
@Test
public void test3() throws IOException{
    FileChannel inChannel = FileChannel.open(Paths.get("d:/1.mkv"), StandardOpenOption.READ);
    FileChannel outChannel = FileChannel.open(Paths.get("d:/2.mkv"), StandardOpenOption.WRITE, StandardOpenOption.READ, StandardOpenOption.CREATE);

    //inChannel.transferTo(0, inChannel.size(), outChannel);
    outChannel.transferFrom(inChannel, 0, inChannel.size());

    inChannel.close();
    outChannel.close();
}
4.4、分散(Scatter)与聚集(Gather) <--返回目录
- 分散读取(Scattering Reads):将通道中的数据分散到多个缓冲区中
- 聚集写入(Gathering Writes):将多个缓冲区中的数据聚集到通道中
//分散和聚集
@Test
public void test4() throws IOException{
    RandomAccessFile raf1 = new RandomAccessFile("1.txt", "rw");

    //1. 获取通道
    FileChannel channel1 = raf1.getChannel();

    //2. 分配指定大小的缓冲区
    ByteBuffer buf1 = ByteBuffer.allocate(100);
    ByteBuffer buf2 = ByteBuffer.allocate(1024);

    //3. 分散读取
    ByteBuffer[] bufs = {buf1, buf2};
    channel1.read(bufs);

    for (ByteBuffer byteBuffer : bufs) {
        byteBuffer.flip();
    }

    System.out.println(new String(bufs[0].array(), 0, bufs[0].limit()));
    System.out.println("-----------------");
    System.out.println(new String(bufs[1].array(), 0, bufs[1].limit()));

    //4. 聚集写入
    RandomAccessFile raf2 = new RandomAccessFile("2.txt", "rw");
    FileChannel channel2 = raf2.getChannel();

    channel2.write(bufs);
}
4.5、字符集:Charset <--返回目录
- 编码:字符串 -> 字节数组
- 解码:字节数组 -> 字符串
//字符集
@Test
public void test6() throws IOException{
    Charset cs1 = Charset.forName("GBK");

    //获取编码器
    CharsetEncoder ce = cs1.newEncoder();

    //获取解码器
    CharsetDecoder cd = cs1.newDecoder();

    CharBuffer cBuf = CharBuffer.allocate(1024);
    cBuf.put("尚硅谷威武!");
    cBuf.flip();

    //编码
    ByteBuffer bBuf = ce.encode(cBuf);

    for (int i = 0; i < 12; i++) {
        System.out.println(bBuf.get());
    }

    //解码
    bBuf.flip();
    CharBuffer cBuf2 = cd.decode(bBuf);
    System.out.println(cBuf2.toString());

    System.out.println("------------------------------------------------------");

    Charset cs2 = Charset.forName("GBK");
    bBuf.flip();
    CharBuffer cBuf3 = cs2.decode(bBuf);
    System.out.println(cBuf3.toString());
}

@Test
public void test5(){
    Map<String, Charset> map = Charset.availableCharsets();

    Set<Entry<String, Charset>> set = map.entrySet();

    for (Entry<String, Charset> entry : set) {
        System.out.println(entry.getKey() + "=" + entry.getValue());
    }
}
5、NIO 非阻塞原理 <--返回目录
NIO 的阻塞和非阻塞:是从线程的角度出发的,这里指的是线程状态。
NIO 非阻塞是针对网络通信而言的。
网络通信中,NIO提供了 SocketChannel 和 ServerSocketChannel 两种不同的套接字通道来实现,可以设置阻塞与非阻塞两种模式,为了实现高负载高并发都采取非阻塞的模式。通道是双向的,可以同时在通道上发送和读取数据。NIO采用可分配大小的缓冲区Buffer实现对数据的读写操作。
服务器仅采用一个线程去处理所有的客户端线程,这就需要创建一个Selector,将 ServerSocketChannel 和想要监控的 SocketChannel 注册到Selector中(用SelectableChannel的register方法,该方法返回一个这个 channel 向 Selector 注册的键,是一个 SelectionKey 实例,它包装了 SelectableChannel 和该通道感兴趣的操作)。
Selector就像一个观察者,不断地获取 Selector 的 select 方法的返回值,返回值是准备就绪的 SelectionKey 的数目,然后就进行处理(通过 Selector 的 selectedKeys 方法返回被选择的SelectionKey 集合,然后处理连接请求和读取数据)。
每个客户端只有一个 SocketChannel,将该 SocketChannel 注册到指定的 Selector 后,监听该 Selector 即可。如果监听到该 Selector 的 select 方法的返回值大于0,表明该 Selector 上有需要进行 IO 处理的 SelectionKey,获取到 SocketChannel 后即可处理请求和数据。
5.1、使用 NIO 完成网络通信的三个核心 <--返回目录
1) 通道(Channel):负责连接
java.nio.channels.Channel 接口:
|--SelectableChannel
|--SocketChannel
|--ServerSocketChannel
|--DatagramChannel
|--Pipe.SinkChannel
|--Pipe.SourceChannel
2) 缓冲区(Buffer):负责数据的存取。
3) 选择器(Selector):是 SelectableChannel 的多路复用器。用于监控 SelectableChannel 的 IO 状况。
5.2、阻塞 TCP 编程 <--返回目录
public class TestBlockingNIO {

    //客户端
    @Test
    public void client() throws IOException{
        //1. 获取通道
        SocketChannel sChannel = SocketChannel.open(new InetSocketAddress("127.0.0.1", 9898));

        FileChannel inChannel = FileChannel.open(Paths.get("1.jpg"), StandardOpenOption.READ);

        //2. 分配指定大小的缓冲区
        ByteBuffer buf = ByteBuffer.allocate(1024);

        //3. 读取本地文件,并发送到服务端
        while(inChannel.read(buf) != -1){
            buf.flip();
            sChannel.write(buf);
            buf.clear();
        }

        //4. 关闭通道
        inChannel.close();
        sChannel.close();
    }

    //服务端
    @Test
    public void server() throws IOException{
        //1. 获取通道
        ServerSocketChannel ssChannel = ServerSocketChannel.open();

        FileChannel outChannel = FileChannel.open(Paths.get("2.jpg"), StandardOpenOption.WRITE, StandardOpenOption.CREATE);

        //2. 绑定连接
        ssChannel.bind(new InetSocketAddress(9898));

        //3. 获取客户端连接的通道
        SocketChannel sChannel = ssChannel.accept();

        //4. 分配指定大小的缓冲区
        ByteBuffer buf = ByteBuffer.allocate(1024);

        //5. 接收客户端的数据,并保存到本地
        while(sChannel.read(buf) != -1){
            buf.flip();
            outChannel.write(buf);
            buf.clear();
        }

        //6. 关闭通道
        sChannel.close();
        outChannel.close();
        ssChannel.close();

    }

}
阻塞 TCP 编程,服务端反馈
public class TestBlockingNIO2 {

    //客户端
    @Test
    public void client() throws IOException{
        SocketChannel sChannel = SocketChannel.open(new InetSocketAddress("127.0.0.1", 9898));

        FileChannel inChannel = FileChannel.open(Paths.get("1.jpg"), StandardOpenOption.READ);

        ByteBuffer buf = ByteBuffer.allocate(1024);

        while(inChannel.read(buf) != -1){
            buf.flip();
            sChannel.write(buf);
            buf.clear();
        }

        sChannel.shutdownOutput();

        //接收服务端的反馈
        int len = 0;
        while((len = sChannel.read(buf)) != -1){
            buf.flip();
            System.out.println(new String(buf.array(), 0, len));
            buf.clear();
        }

        inChannel.close();
        sChannel.close();
    }

    //服务端
    @Test
    public void server() throws IOException{
        ServerSocketChannel ssChannel = ServerSocketChannel.open();

        FileChannel outChannel = FileChannel.open(Paths.get("2.jpg"), StandardOpenOption.WRITE, StandardOpenOption.CREATE);

        ssChannel.bind(new InetSocketAddress(9898));

        SocketChannel sChannel = ssChannel.accept();

        ByteBuffer buf = ByteBuffer.allocate(1024);

        while(sChannel.read(buf) != -1){
            buf.flip();
            outChannel.write(buf);
            buf.clear();
        }

        //发送反馈给客户端
        buf.put("服务端接收数据成功".getBytes());
        buf.flip();
        sChannel.write(buf);

        sChannel.close();
        outChannel.close();
        ssChannel.close();
    }

}
5.3、非阻塞 TCP 编程 <--返回目录
public class TestNonBlockingNIO {

    //客户端
    @Test
    public void client() throws IOException{
        //1. 获取通道
        SocketChannel sChannel = SocketChannel.open(new InetSocketAddress("127.0.0.1", 9898));

        //2. 切换非阻塞模式
        sChannel.configureBlocking(false);

        //3. 分配指定大小的缓冲区
        ByteBuffer buf = ByteBuffer.allocate(1024);

        //4. 发送数据给服务端
        Scanner scan = new Scanner(System.in);

        while(scan.hasNext()){
            String str = scan.next();
            buf.put((new Date().toString() + "
" + str).getBytes());
            buf.flip();
            sChannel.write(buf);
            buf.clear();
        }

        //5. 关闭通道
        sChannel.close();
    }

    //服务端
    @Test
    public void server() throws IOException{
        //1. 获取通道
        ServerSocketChannel ssChannel = ServerSocketChannel.open();

        //2. 切换非阻塞模式
        ssChannel.configureBlocking(false);

        //3. 绑定连接
        ssChannel.bind(new InetSocketAddress(9898));

        //4. 获取选择器
        Selector selector = Selector.open();

        //5. 将通道注册到选择器上, 并且指定“监听接收事件”
        ssChannel.register(selector, SelectionKey.OP_ACCEPT);

        //6. 轮询式的获取选择器上已经“准备就绪”的事件
        while(selector.select() > 0){

            //7. 获取当前选择器中所有注册的“选择键(已就绪的监听事件)”
            Iterator<SelectionKey> it = selector.selectedKeys().iterator();

            while(it.hasNext()){
                //8. 获取准备“就绪”的是事件
                SelectionKey sk = it.next();

                //9. 判断具体是什么事件准备就绪
                if(sk.isAcceptable()){
                    //10. 若“接收就绪”,获取客户端连接
                    SocketChannel sChannel = ssChannel.accept();

                    //11. 切换非阻塞模式
                    sChannel.configureBlocking(false);

                    //12. 将该通道注册到选择器上
                    sChannel.register(selector, SelectionKey.OP_READ);
                }else if(sk.isReadable()){
                    //13. 获取当前选择器上“读就绪”状态的通道
                    SocketChannel sChannel = (SocketChannel) sk.channel();

                    //14. 读取数据
                    ByteBuffer buf = ByteBuffer.allocate(1024);

                    int len = 0;
                    while((len = sChannel.read(buf)) > 0 ){
                        buf.flip();
                        System.out.println(new String(buf.array(), 0, len));
                        buf.clear();
                    }
                }

                //15. 取消选择键 SelectionKey
                it.remove();
            }
        }
    }
}
5.4、非阻塞 UDP 编程 <--返回目录
public class TestNonBlockingNIO2 {

    @Test
    public void send() throws IOException{
        DatagramChannel dc = DatagramChannel.open();

        dc.configureBlocking(false);

        ByteBuffer buf = ByteBuffer.allocate(1024);

        Scanner scan = new Scanner(System.in);

        while(scan.hasNext()){
            String str = scan.next();
            buf.put((new Date().toString() + ":
" + str).getBytes());
            buf.flip();
            dc.send(buf, new InetSocketAddress("127.0.0.1", 9898));
            buf.clear();
        }

        dc.close();
    }

    @Test
    public void receive() throws IOException{
        DatagramChannel dc = DatagramChannel.open();

        dc.configureBlocking(false);

        dc.bind(new InetSocketAddress(9898));

        Selector selector = Selector.open();

        dc.register(selector, SelectionKey.OP_READ);

        while(selector.select() > 0){
            Iterator<SelectionKey> it = selector.selectedKeys().iterator();

            while(it.hasNext()){
                SelectionKey sk = it.next();

                if(sk.isReadable()){
                    ByteBuffer buf = ByteBuffer.allocate(1024);

                    dc.receive(buf);
                    buf.flip();
                    System.out.println(new String(buf.array(), 0, buf.limit()));
                    buf.clear();
                }
            }

            it.remove();
        }
    }

}
5.5、Pipe.SinkChannel 和 Pipe.SourceChannel <--返回目录
public class TestPipe {

    @Test
    public void test1() throws IOException{
        //1. 获取管道
        Pipe pipe = Pipe.open();

        //2. 将缓冲区中的数据写入管道
        ByteBuffer buf = ByteBuffer.allocate(1024);

        Pipe.SinkChannel sinkChannel = pipe.sink();
        buf.put("通过单向管道发送数据".getBytes());
        buf.flip();
        sinkChannel.write(buf);

        //3. 读取缓冲区中的数据
        Pipe.SourceChannel sourceChannel = pipe.source();
        buf.flip();
        int len = sourceChannel.read(buf);
        System.out.println(new String(buf.array(), 0, len));

        sourceChannel.close();
        sinkChannel.close();
    }

}
参考:
1)《疯狂 Java 讲义》---李刚
3)NIO非阻塞原理