1、实现图片验证码
1.1、创建获取图片验证码的 controller
1.2、编写用于校验图片验证码的过滤器
1.3、将图片验证码过滤器添加在 UsernamePasswordAuthenticationFilter 之前
1.4、修改表单登陆页
1.5、测试
2、自动登陆(记住我)
2.1、散列加密方案
2.2、持久化令牌方案
1、实现图片验证码 <--返回目录

1.1、创建获取图片验证码的 controller <--返回目录
要想实现图片验证码,首先需要一个用于获取图片验证码的 API。这里使用 kaptchar 勿用于生产)


<dependency>
    <groupId>com.github.penggle</groupId>
    <artifactId>kaptcha</artifactId>
    <version>2.3.2</version>
</dependency>
配置一个 kaptcha 实例:
@Bean
public Producer imageCode() {
    // 配置图形验证码的基本参数
    Properties properties = new Properties();
    properties.setProperty("kaptcha.image.width", "150");//图片宽度
    properties.setProperty("kaptcha.image.height", "50");//图片高度
    properties.setProperty("kaptcha.textproducer.char.string", "0123456789");//字符集
    properties.setProperty("kaptcha.textproducer.char.length", "4");//字符长度
    Config config = new Config(properties);
    DefaultKaptcha defaultKaptcha = new DefaultKaptcha();
    defaultKaptcha.setConfig(config);
    return defaultKaptcha;
}
创建 ValidateCodeController,用于生成图片验证码
package com.oy.validate;

import java.awt.image.BufferedImage;

import javax.imageio.ImageIO;
import javax.servlet.ServletOutputStream;
import javax.servlet.http.HttpServletRequest;
import javax.servlet.http.HttpServletResponse;

import org.springframework.beans.factory.annotation.Autowired;
import org.springframework.stereotype.Controller;
import org.springframework.web.bind.annotation.GetMapping;

import com.google.code.kaptcha.Producer;

@Controller
public class ValidateCodeController {

    private static final String SESSION_KEY = "SESSION_KEY_IMAGE_CODE";

    @Autowired
    private Producer kaptchaProducer;

    @GetMapping("/code/image")
    public void createCode(HttpServletRequest request, HttpServletResponse response)
            throws Exception {
        response.setContentType("image/jpeg");
        // 创建验证码文本
        String codeText = kaptchaProducer.createText();
        // 将验证码文本设置到 session
        request.getSession().setAttribute(SESSION_KEY, codeText);
        // 根据文本创建图片
        BufferedImage bi = kaptchaProducer.createImage(codeText);
        // 获取响应输出流
        ServletOutputStream out = response.getOutputStream();
        ImageIO.write(bi, "jpg", out);
        // 推送并关闭响应输出流
        try {
            out.flush();
        } finally {
            out.close();
        }
    }

}
访问图片验证码(路径 "/code/image")时不设置权限,在 JavaConfig 配置类中配置
antMatchers("/app/api/**", "/mylogin.html", "/code/image")
.permitAll() // 公开权限
访问 http://localhost:8089/BootDemo/code/image,即可看到返回一张图片验证码。
1.2、编写用于校验图片验证码的过滤器 <--返回目录
虽然 Spring Security 的过滤器对过滤器没有特殊要求,只要继承 Filter 即可,但是在 Spring 体系中,推荐使用 OncePerRequestFilter 来实现,它可以确保一次请求只会通过一次该过滤器(Filter 实际上并不能保证这一点)。
ValidateCodeFIlter
package com.oy.validate;

import java.io.IOException;

import javax.servlet.FilterChain;
import javax.servlet.ServletException;
import javax.servlet.http.HttpServletRequest;
import javax.servlet.http.HttpServletResponse;
import javax.servlet.http.HttpSession;

import org.springframework.security.web.authentication.AuthenticationFailureHandler;
import org.springframework.util.StringUtils;
import org.springframework.web.filter.OncePerRequestFilter;

public class ValidateCodeFIlter extends OncePerRequestFilter {

    private static final String SESSION_KEY = "SESSION_KEY_IMAGE_CODE";

    private AuthenticationFailureHandler myAuthenticationFailureHandler;
    public void setMyAuthenticationFailureHandler(AuthenticationFailureHandler myAuthenticationFailureHandler) {
        this.myAuthenticationFailureHandler = myAuthenticationFailureHandler;
    }

    @Override
    protected void doFilterInternal(HttpServletRequest request, HttpServletResponse response, FilterChain filterChain)
            throws ServletException, IOException {
        System.out.println("ValidateCodeFIlter start, 请求uri:"
            + request.getRequestURI() + ", servletPath:" + request.getServletPath());
        // 非登陆请求不校验验证码
        if (!"/auth/form".equals(request.getServletPath())) {
            filterChain.doFilter(request, response);
            return;
        }

        try {
            doValidateCode(request);
            filterChain.doFilter(request, response);
        } catch(ValidateCodeException e) {
            myAuthenticationFailureHandler.onAuthenticationFailure(request, response, e);
        }
        System.out.println("ValidateCodeFIlter end...");
    }

    private void doValidateCode(HttpServletRequest request) {
        String requestCode = request.getParameter("image_code");
        HttpSession session = request.getSession();
        String sessionCode = (String) session.getAttribute(SESSION_KEY);

        System.out.println("ValidateCodeFIlter, requestCode:"
                + requestCode + " sessionCode:" + sessionCode);

        if (!StringUtils.isEmpty(sessionCode)) {
            // 随手清除 session 中验证码,无论验证成功还是失败
            session.removeAttribute(SESSION_KEY);
        }
        // 校验不通过,抛出异常
        if (StringUtils.isEmpty(requestCode)) {
            throw new ValidateCodeException("验证码输入为空");
        }
        if (StringUtils.isEmpty(sessionCode)) {
            throw new ValidateCodeException("验证码为空");
        }
        if (!requestCode.equals(sessionCode)) {
            throw new ValidateCodeException("验证码输入错误");
        }
        // 没有异常,表示校验通过
    }

}
ValidateCodeException
package com.oy.validate;

import org.springframework.security.core.AuthenticationException;

public class ValidateCodeException extends AuthenticationException {

    private static final long serialVersionUID = 8369364787664640677L;

    public ValidateCodeException(String msg) {
        super(msg);
    }

}
MyAuthenticationFailureHandler
package com.oy.security;

import java.io.IOException;

import javax.servlet.ServletException;
import javax.servlet.http.HttpServletRequest;
import javax.servlet.http.HttpServletResponse;

import org.springframework.security.core.AuthenticationException;
import org.springframework.security.web.authentication.SimpleUrlAuthenticationFailureHandler;
import org.springframework.stereotype.Component;

@Component
public class MyAuthenticationFailureHandler extends SimpleUrlAuthenticationFailureHandler  {

    //@Autowired
    //private ObjectMapper objectMapper;

    @Override
    public void onAuthenticationFailure(HttpServletRequest request, HttpServletResponse response,
            AuthenticationException exception) throws IOException, ServletException {

        System.out.println("登录失败," + exception.getMessage());
        super.onAuthenticationFailure(request, response, exception);

        /*
         * 根据配置项来确定返回 json 还是 按照 Spring Securiy 原来默认进行跳转
        if (LoginResponseType.JSON.equals(securityProperties.getBrowser().getLoginType())) {
            response.setContentType("application/json;charset=UTF-8");
            response.getWriter().write(objectMapper.writeValueAsString(exception.getMessage()));
        } else {
            super.onAuthenticationFailure(request, response, exception);
        }
        */
    }

}
MyAuthenticationSuccessHandler
package com.oy.security;

import java.io.IOException;

import javax.servlet.ServletException;
import javax.servlet.http.HttpServletRequest;
import javax.servlet.http.HttpServletResponse;

import org.springframework.security.core.Authentication;
import org.springframework.security.web.authentication.SavedRequestAwareAuthenticationSuccessHandler;
import org.springframework.stereotype.Component;

@Component
public class MyAuthenticationSuccessHandler extends SavedRequestAwareAuthenticationSuccessHandler {

    //@Autowired
    //private ObjectMapper objectMapper;

    @Override
    public void onAuthenticationSuccess(HttpServletRequest request, HttpServletResponse response,
            Authentication authentication) throws IOException, ServletException {

        System.out.println("登录成功");
        super.onAuthenticationSuccess(request, response, authentication);
        /*
        if (LoginResponseType.JSON.equals(securityProperties.getBrowser().getLoginType())) {
            response.setContentType("application/json;charset=UTF-8");
            response.getWriter().write(objectMapper.writeValueAsString(authentication));
        } else {
            super.onAuthenticationSuccess(request, response, authentication);
        }
    */
    }

}
1.3、将图片验证码过滤器添加在 UsernamePasswordAuthenticationFilter 之前 <--返回目录
WebSecurityConfig
package com.oy;

import java.io.IOException;
import java.util.Properties;

import javax.servlet.ServletException;
import javax.servlet.http.HttpServletRequest;
import javax.servlet.http.HttpServletResponse;

import org.springframework.beans.factory.annotation.Autowired;
import org.springframework.context.annotation.Bean;
import org.springframework.security.config.annotation.web.builders.HttpSecurity;
import org.springframework.security.config.annotation.web.configuration.EnableWebSecurity;
import org.springframework.security.config.annotation.web.configuration.WebSecurityConfigurerAdapter;
import org.springframework.security.core.Authentication;
import org.springframework.security.core.AuthenticationException;
import org.springframework.security.crypto.password.NoOpPasswordEncoder;
import org.springframework.security.crypto.password.PasswordEncoder;
import org.springframework.security.web.authentication.AuthenticationFailureHandler;
import org.springframework.security.web.authentication.AuthenticationSuccessHandler;
import org.springframework.security.web.authentication.UsernamePasswordAuthenticationFilter;

import com.google.code.kaptcha.Producer;
import com.google.code.kaptcha.impl.DefaultKaptcha;
import com.google.code.kaptcha.util.Config;
import com.oy.validate.ValidateCodeFIlter;

@EnableWebSecurity
public class WebSecurityConfig extends WebSecurityConfigurerAdapter {

    @Autowired
    private AuthenticationFailureHandler myAuthenticationFailureHandler;
    @Autowired
    private AuthenticationSuccessHandler myAuthenticationSuccessHandler;
    @Override
    protected void configure(HttpSecurity http) throws Exception {
        ValidateCodeFIlter validateCodeFIlter = new ValidateCodeFIlter();
        validateCodeFIlter.setMyAuthenticationFailureHandler(myAuthenticationFailureHandler);

        // 将图片验证码过滤器添加在 UsernamePasswordAuthenticationFilter 之前
        http.addFilterBefore(validateCodeFIlter, UsernamePasswordAuthenticationFilter.class)
            .formLogin()
            .loginPage("/mylogin.html") // 指定登陆页
            .loginProcessingUrl("/auth/form") // 指定处理登陆请求的路径
            .successHandler(myAuthenticationSuccessHandler)// 指定登陆成功时的处理逻辑
            .failureHandler(myAuthenticationFailureHandler)// 指定登陆失败时的处理逻辑
            .and()
            .authorizeRequests()
                .antMatchers("/admin/api/**").hasRole("admin")
                .antMatchers("/user/api/**").hasRole("user")
                // 登陆页、验证码公开权限
                .antMatchers("/app/api/**", "/mylogin.html", "/code/image")
                .permitAll() // 公开权限
                .anyRequest().authenticated()
                .and()
            .csrf().disable();
    }

    @Bean
    public PasswordEncoder passwordEncoder() {
        return NoOpPasswordEncoder.getInstance();
    }

    @Bean
    public Producer imageCode() {
        // 配置图形验证码的基本参数
        Properties properties = new Properties();
        properties.setProperty("kaptcha.image.width", "150");//图片宽度
        properties.setProperty("kaptcha.image.height", "50");//图片高度
        properties.setProperty("kaptcha.textproducer.char.string", "0123456789");//字符集
        properties.setProperty("kaptcha.textproducer.char.length", "4");//字符长度
        Config config = new Config(properties);
        DefaultKaptcha defaultKaptcha = new DefaultKaptcha();
        defaultKaptcha.setConfig(config);
        return defaultKaptcha;
    }
}
1.4、修改表单登陆页 <--返回目录
<!DOCTYPE html> <html> <head> <meta charset="UTF-8"> <title>Insert title here</title> </head> <body> <h2>自定义表单登陆页</h2> <form action="auth/form" method="post"> 用户名:<input type="text" name="username" /><br/> 密 码:<input type="text" name="password" /><br/> 验证码:<input type="text" name="image_code" /><br/> <img src="code/image" alt="imagecode" height="50px" width="150px" /><br/> <input type="submit" value="提交" /> </form> </body> </html>
1.5、测试 <--返回目录
启动项目,访问 http://localhost:8089/BootDemo/admin/api/1, 控制台打印结果
// 访问:http://localhost:8089/BootDemo/admin/api/1
ValidateCodeFIlter start, 请求uri:/BootDemo/admin/api/1, servletPath:/admin/api/1
ValidateCodeFIlter start, 请求uri:/BootDemo/mylogin.html, servletPath:/mylogin.html
ValidateCodeFIlter start, 请求uri:/BootDemo/code/image, servletPath:/code/image

// 使用 admin/123 登陆,验证码输入错误
ValidateCodeFIlter start, 请求uri:/BootDemo/auth/form, servletPath:/auth/form
ValidateCodeFIlter, requestCode:ff sessionCode:9657
登录失败,验证码输入错误
ValidateCodeFIlter end...

// 登陆失败后,Spring Security 默认行为:跳转到登陆页面
ValidateCodeFIlter start, 请求uri:/BootDemo/mylogin.html, servletPath:/mylogin.html
ValidateCodeFIlter start, 请求uri:/BootDemo/code/image, servletPath:/code/image
2、自动登陆(记住我) <--返回目录
自动登陆时将用户的登陆信息保存在客户端浏览器的 cookie 中,当用户下次访问时,自动实现校验并建立登陆状态的一种机制。
Spring Security 提供了两种令牌:
1)用散列算法加密用户必要的登陆信息并生成令牌;
2)数据库等持久化数据存储机制用的持久化令牌;
2.1、散列加密方案 <--返回目录
如下红色字体的配置
@EnableWebSecurity
public class WebSecurityConfig extends WebSecurityConfigurerAdapter {

    @Autowired
    private AuthenticationFailureHandler myAuthenticationFailureHandler;
    @Autowired
    private AuthenticationSuccessHandler myAuthenticationSuccessHandler;
    @Autowired
    private UserDetailsService myUserDetailsService;
    @Override
    protected void configure(HttpSecurity http) throws Exception {
        ValidateCodeFIlter validateCodeFIlter = new ValidateCodeFIlter();
        validateCodeFIlter.setMyAuthenticationFailureHandler(myAuthenticationFailureHandler);

        // 将图片验证码过滤器添加在 UsernamePasswordAuthenticationFilter 之前
        http.addFilterBefore(validateCodeFIlter, UsernamePasswordAuthenticationFilter.class)
            .formLogin()
                .loginPage("/mylogin.html") // 指定登陆页
                .loginProcessingUrl("/auth/form") // 指定处理登陆请求的路径
                .successHandler(myAuthenticationSuccessHandler)// 指定登陆成功时的处理逻辑
                .failureHandler(myAuthenticationFailureHandler)// 指定登陆失败时的处理逻辑
                .and()
            .rememberMe()
                .userDetailsService(myUserDetailsService)
                .key("rem_key")
                .and()
            .authorizeRequests()
                .antMatchers("/admin/api/**").hasRole("admin")
                .antMatchers("/user/api/**").hasRole("user")
                // 登陆页、验证码公开权限
                .antMatchers("/app/api/**", "/mylogin.html", "/code/image")
                .permitAll() // 公开权限
                .anyRequest().authenticated()
                .and()
            .csrf().disable();
    }

  // 省略
}
表单登陆页,添加 <input type="checkbox" name="remember-me"/> 进行测试。启动项目,访问 http://localhost:8089/BootDemo/admin/api/1, 跳转到登陆页,使用 admin/123 登陆,勾选 “remember me” 复选框。登陆成功后,查看 cookie, 默认过期时间 2 星期。

将该 cookie 的 value 值进行 base64 解码:
YWRtaW46MTU4ODEzMTE3ODE5MzplY2RlYWQxOGNhNzcxM2NjZTk2ZmRhZjM4NzI5YTk4YQ==
=== base64 解码 ===>
admin:1588131178193:ecdead18ca7713cce96fdaf38729a98a
验证最后那串 hash 字符串,可以看到打印结果符合预期(注:DigestUtils 是 commons-codec.commons-codec.1.14 提供)
public void demo() {
    String hash = DigestUtils.md5Hex("admin:1588131178193:123:rem_key");
    System.out.println(hash);//ecdead18ca7713cce96fdaf38729a98a
}
那么,remember-me 这个 cookie 的 value 值是根据什么规则生成的呢?
hashInfo = md5Hex(username + ":" + expirationTime + ":" + password + ":" + key)
rememberCookie = base64(username + ":" + expirationTime  + ":" + hashInfo)
其中,expirationTime 是过期时间;key 是散列盐值,用于防止令牌被修改(防止用户自行修改,因为用户是知道自己的用户和密码的,如果没有这个 key,用户可以自行修改 expirationTime 的值)。
通过这中方式生成 cookie 后,在下次登陆时,Spring Security 首先用 base64 解码,得到用户名、过期时间和加密散列值;然后使用用户名得到密码;接着重新以上面的散列算法正向计算,并将计算结果与从浏览器获取的加密散列值进行对比,从而确定该令牌是否有效。
2.2、持久化令牌方案 <--返回目录
持久化令牌方案的原理
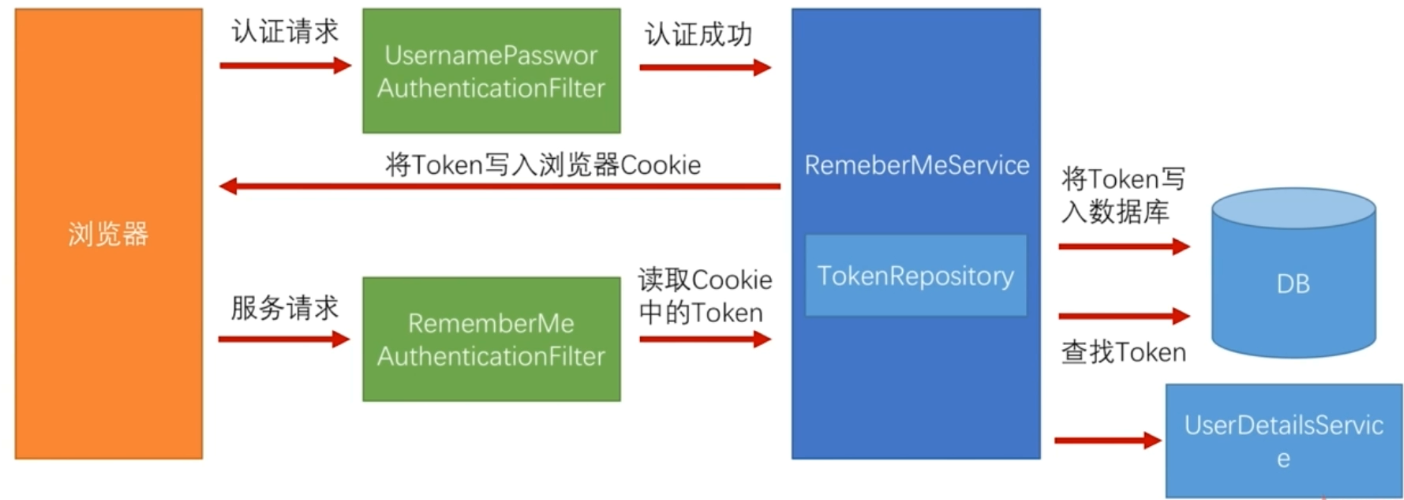
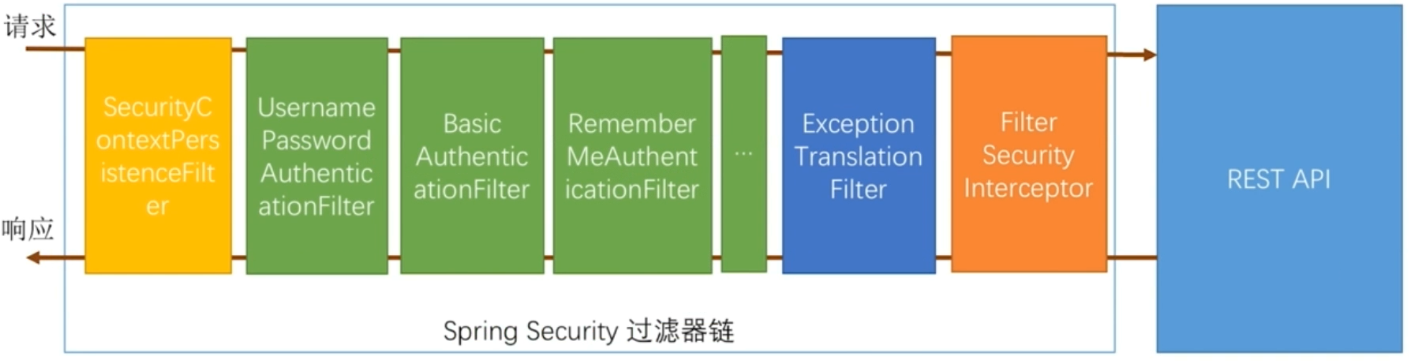
Remember Me 过滤器位置
配置:
@EnableWebSecurity
public class WebSecurityConfig extends WebSecurityConfigurerAdapter {

    @Autowired
    private DataSource dataSource;
    @Bean
    public PersistentTokenRepository persistentTokenRepository() {
        JdbcTokenRepositoryImpl tokenRepository = new JdbcTokenRepositoryImpl();
        tokenRepository.setDataSource(dataSource);
        //tokenRepository.setCreateTableOnStartup(true);// 启动时创建表,第二次启动项目注释掉
        return tokenRepository;
    }
    @Autowired
    private UserDetailsService myUserDetailsService;

    @Autowired
    private AuthenticationFailureHandler myAuthenticationFailureHandler;
    @Autowired
    private AuthenticationSuccessHandler myAuthenticationSuccessHandler;

    @Override
    protected void configure(HttpSecurity http) throws Exception {
        ValidateCodeFIlter validateCodeFIlter = new ValidateCodeFIlter();
        validateCodeFIlter.setMyAuthenticationFailureHandler(myAuthenticationFailureHandler);

        // 将图片验证码过滤器添加在 UsernamePasswordAuthenticationFilter 之前
        http.addFilterBefore(validateCodeFIlter, UsernamePasswordAuthenticationFilter.class)
            .formLogin()
                .loginPage("/mylogin.html") // 指定登陆页
                .loginProcessingUrl("/auth/form") // 指定处理登陆请求的路径
                .successHandler(myAuthenticationSuccessHandler)// 指定登陆成功时的处理逻辑
                .failureHandler(myAuthenticationFailureHandler)// 指定登陆失败时的处理逻辑
                .and()
            .rememberMe()
                .tokenRepository(persistentTokenRepository()) // 持久化 token
                .tokenValiditySeconds(3600 * 24 * 7) // 过期时间, 单位秒
                .userDetailsService(myUserDetailsService) // 使用该 UserDetailsService 校验用户
                .key("rem_key")
                .and()
            .authorizeRequests()
                .antMatchers("/admin/api/**").hasRole("admin")
                .antMatchers("/user/api/**").hasRole("user")
                // 登陆页、验证码公开权限
                .antMatchers("/app/api/**", "/mylogin.html", "/code/image")
                .permitAll() // 公开权限
                .anyRequest().authenticated()
                .and()
            .csrf().disable();
    }

    // 省略
}
参考:
1)《Spring Security 实战》-- 陈木鑫