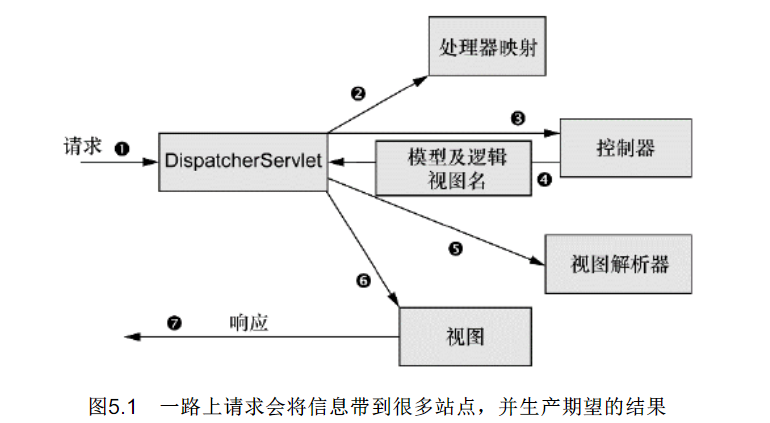
• 第5章 构建Spring Web应用程序


    5.1 Spring Mvc起步


    配置DispatcherServlet

    推荐采用配置类的形式,毕竟现在容器都已经支持servlet3.0了。

    有两种配置方式,传统的配置方式是在web.xml中配置的。

    <?xml version="1.0" encoding="UTF-8"?>
    <web-app xmlns:xsi="http://www.w3.org/2001/XMLSchema-instance"
    xmlns="http://java.sun.com/xml/ns/javaee" xmlns:web="http://java.sun.com/xml/ns/javaee"
    xsi:schemaLocation="http://java.sun.com/xml/ns/javaee http://java.sun.com/xml/ns/javaee/web-app_2_5.xsd"
    id="iepsy" version="2.5">
    <display-name>Cloud School</display-name>
    <context-param>
    <param-name>contextConfigLocation</param-name>
    <param-value>
    classpath:applicationContext-resources.xml
    classpath:applicationContext-dao.xml
    classpath:applicationContext-business.xml
    </param-value>
    </context-param>
    <listener>
    <listener-class>org.springframework.web.context.ContextLoaderListener</listener-class>
    </listener>
    <filter>
    <filter-name>encodingFilter</filter-name>
    <filter-class>org.springframework.web.filter.CharacterEncodingFilter</filter-class>
    <init-param>
    <param-name>encoding</param-name>
    <param-value>UTF-8</param-value>
    </init-param>
    <init-param>
    <param-name>forceEncoding</param-name>
    <param-value>true</param-value>
    </init-param>
    </filter>
    <filter-mapping>
    <filter-name>encodingFilter</filter-name>
    <url-pattern>/*</url-pattern>
    </filter-mapping>
    <servlet>
    <servlet-name>dispatcher</servlet-name>
    <servlet-class>org.springframework.web.servlet.DispatcherServlet</servlet-class>
    <load-on-startup>1</load-on-startup>
    </servlet>
    <servlet-mapping>
    <servlet-name>dispatcher</servlet-name>
    <url-pattern>/</url-pattern>
    </servlet-mapping>
    <session-config>
    <session-timeout>120</session-timeout>
    </session-config>
    <welcome-file-list>
    <!-- <welcome-file>index.jsp</welcome-file> -->
    <welcome-file>school</welcome-file>
    </welcome-file-list>
    <error-page>
    <error-code>403</error-code>
    <location>/error/403</location>
    </error-page>
    <error-page>
    <error-code>404</error-code>
    <location>/error/404</location>
    </error-page>
    </web-app>

    还一种配置方式是采用配置类实现AbstractAnnotationConfigDispatcherServletInitializer的形式来进行配置,不过前提是只能部署到支持Servlet 3.0的服务器中才能正常工作,如Tomcat 7或更高版本。Servlet 3.0规范在2009年12月份就发布了,因此很有可能你会将应用部署到支持Servlet 3.0的Servlet容器之中。

    配置类代替web.xml

    package ch05;

    import ch05.config.WebConfig;
    import org.springframework.web.servlet.support.AbstractAnnotationConfigDispatcherServletInitializer;

    public class SpitrWebAppInitializer extends AbstractAnnotationConfigDispatcherServletInitializer {

       protected Class<?>[] getRootConfigClasses() {
           return new Class[0];
      }

       protected Class<?>[] getServletConfigClasses() {
           return new Class<?>[]{WebConfig.class};
      }

       protected String[] getServletMappings() {
           return new String[]{"/"};
      }
    }

    spring mvc配置类

    package ch05.config;

    import org.springframework.context.annotation.Bean;
    import org.springframework.context.annotation.ComponentScan;
    import org.springframework.context.annotation.Configuration;
    import org.springframework.web.servlet.ViewResolver;
    import org.springframework.web.servlet.config.annotation.DefaultServletHandlerConfigurer;
    import org.springframework.web.servlet.config.annotation.EnableWebMvc;
    import org.springframework.web.servlet.config.annotation.WebMvcConfigurerAdapter;
    import org.springframework.web.servlet.view.InternalResourceViewResolver;

    @Configuration
    @EnableWebMvc
    @ComponentScan(basePackageClasses = {ch05.web.controller.IocPackage.class})
    public class WebConfig extends WebMvcConfigurerAdapter {
       //配置视图解析器
       @Bean
       public ViewResolver viewResolver(){
           InternalResourceViewResolver resourceViewResolver = new InternalResourceViewResolver();
           resourceViewResolver.setPrefix("/WEB-INF/views/");
           resourceViewResolver.setSuffix(".jsp");
           resourceViewResolver.setExposeContextBeansAsAttributes(true);
           return resourceViewResolver;
      }

       //#简单的静态资源处理配置
       /*扩展WebMvcConfigurerAdapter并重写其configureDefaultServletHandling()方法。通过调用DefaultServletHandlerConfigurer的enable()方法,我们要求DispatcherServlet将对静态资源的请求转发到Servlet容器中默认的Servlet上,而不是使用DispatcherServlet本身来处理此类请求。*/

       @Override
       public void configureDefaultServletHandling(DefaultServletHandlerConfigurer configurer) {
           configurer.enable();
      }
    }

    两个应用上下文之间的故事

    DispatcherServlet加载包含Web组件的bean,如控制器、视图解析器以及处理器映射,而ContextLoaderListener要加载应用中的其他bean。这些bean通常是驱动应用后端的中间层和数据层组件。

    实际上,AbstractAnnotationConfigDispatcherServletInitializer会同时创建DispatcherServlet和ContextLoaderListener。GetServlet-ConfigClasses()方法返回的带有@Configuration注解的

    类将会用来定义DispatcherServlet应用上下文中的bean。getRootConfigClasses()方法返回的带有@Configuration注解的类将会用来配置ContextLoaderListener创建的应用上下文中的bean。

    启用 Sping Mvc

    如果采用xml方式的形式配置的话,可以采用<mvc:annotation-driven>进行启用mvc。如果是javaconfig的话采用@EnableWebMvc注解的形式启用mvc。

    5.2 编写基本控制器

    package ch05.web.controller;

    import org.springframework.stereotype.Controller;
    import org.springframework.web.bind.annotation.RequestMapping;
    import org.springframework.web.servlet.ModelAndView;

    @Controller
    public class HomeController {
       @RequestMapping("/")
       public ModelAndView index(){
           ModelAndView mav = new ModelAndView();
           mav.setViewName("index");
           return mav;
      }
    }

    使用@Controller注解标识,这个类是以个控制器,使用@RequestMapping定义请求路径。在方法中使用ModelAndView定义要查找的视图与定义要传递的数据。需要注意的是需要在配置类中把控制器所在包定义为自动扫描

    5.3 接受请求的输入

    Spring MVC允许以多种方式将客户端中的数据传送到控制器的处理器方法中,包括:

    • 查询参数(Query Parameter),?a=5

    • 表单参数(Form Parameter),对用户隐藏。

    • 路径变量(Path Variable),/user/12345

    查询和表单参数都可以使用@RequestParam注解来映射,也可以设置默认值,如

    public ModelAndView query(@RequestParam("id") String id){
       //...
    }

    路径参数可以使用@PathVariable注解来映射,例如:

    @RequestMapping("/user/{userId}")
    public ModelAndView query(@PathVariable String userId){
       //...
    }

    5.4 处理表单

    @RequestMapping(value="/register",method=POST)
    public String processRegistration(Spitter spitter){
       spitterRepository.save(spitter);
       return "redirect:/spitter/"+spitter.getUsername();
    }

    表单提交需要POST请求,声明一个实体属性和表单空间的name一致,则spring会自动创建实例并注入前台传过来的值。

    ::: tip 注意

    当InternalResourceViewResolver看到视图格式中的“redirect:”前缀时,它就知道要将其解析为重定向的规则,而不是视图的名称。InternalResourceViewResolver还能识别“forward:”前缀。当它发现视图格式中以“forward:”作为前缀时,请求将会前往(forward)指定的URL路径,而不再是重定向。

    :::

    校验表单

    使用Spring对Java校验API(Java Validation API,又称JSR-303)的支持。从Spring 3.0开始,在Spring MVC中提供了对Java校验API的支持。在Spring MVC中要使用Java校验API的话,并不需要什么额外的配置。只要保证在类路径下包含这个Java API的实现即可,比如Hibernate Validator。

    @RequestMapping(value="/register",method=POST)
    public String processRegistration(@Valid Spitter spitter,Errors errors){
       if(errors.hasErrors()){
           return "registerForm";
      }
       spitterRepository.save(spitter);
       return "redirect:/spitter/"+spitter.getUsername();
    }

    表5.1 Java校验校验 API所提供的校验注解所提供的校验注解

    注解述描
    @AssertFalse 所注解的元素必须是Boolean类型,并且值为false
    @AssertTrue 所注解的元素必须是Boolean类型,并且值为true
    @DecimalMax 所注解的元素必须是数字,并且它的值要小于或等于给定的BigDecimalString值
    @DecimalMin 所注解的元素必须是数字,并且它的值要大于或等于给定的BigDecimalString值
    @Digits 所注解的元素必须是数字,并且它的值必须有指定的位数
    @Future 所注解的元素的值必须是一个将来的日期
    @Max 所注解的元素必须是数字,并且它的值要小于或等于给定的值
    @Min 所注解的元素必须是数字,并且它的值要大于或等于给定的值
    @NotNull 所注解元素的值必须不能为null
    @Null 所注解元素的值必须为null
    @Past 所注解的元素的值必须是一个已过去的日期
    @Pattern 所注解的元素的值必须匹配给定的正则表达式
    @Size 所注解的元素的值必须是String、集合或数组,并且它的长度要符合给定的范围


    5.5 配置静态资源

    实现WebMvcConfigurerAdapter类,重写addResourceHandlers方法

        @Override
        public void addResourceHandlers(ResourceHandlerRegistry registry) {
            registry.addResourceHandler("/assets/**").addResourceLocations("/assets/");
        }

     xml配置的话需要<mvc:resource>标签

  • 相关阅读:
    分布式系统(五)——容错问题
    分布式系统(四)—— 一致性问题
    分布式系统(三)——选举问题
    分布式系统(二)——互斥问题
    结合中断上下文切换和进程上下文切换分析Linux内核的一般执行过程
    深入理解系统调用
    基于mykernel 2.0编写一个操作系统内核
    微信小程序npm安装pinyin库
    SpringBoot实现下载文件以及前台应当如何对接
    OSX 安装mujoco
  • 原文地址:https://www.cnblogs.com/xuzhen97/p/9287398.html
Copyright © 2020-2023  润新知