1. IOC(DI) - 控制反转(依赖注入)
所谓的IOC称之为控制反转,简单来说就是将对象的创建的权利及对象的生命周期的管理过程交由Spring框架来处理,从此在开发过程中不再需要关注对象的创建和生命周期的管理,而是在需要时由Spring框架提供,这个由spring框架管理对象创建和生命周期的机制称之为控制反转。简单来说就是原来是我们自己在各层创建其他层的对象和销毁对象,容易造成程序层与层之间的耦合,现在spring容器帮我们创建和管理对象,在我们要使用的时候给我们。 而在 创建对象的过程中Spring可以依据配置对对象的属性进行设置,这个过称之为依赖注入,也即DI。
2. IOC的入门案例
a. 下载Spring
访问Spring官网,下载Spring相关的包
b. 解压下载好的压缩包
其中包含着Spring的依赖包
c. 创建一个java项目
spring并不是非要在javaweb环境下才可以使用,一个普通的java程序中也可以使用Spring。
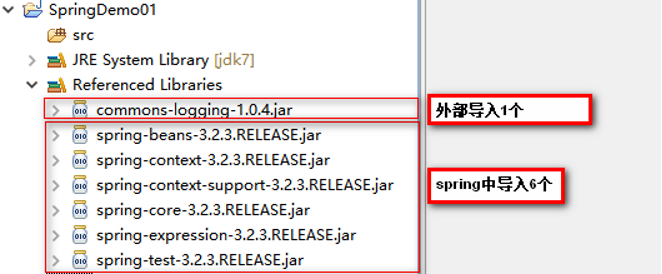
d. 导入Spring的libs目录下IOC相关的jar包

beans是一种根标签
context是上下文
core是核心包包括了c3p0连接池
expression是表达式
a. 创建Spring的配置文件
Spring采用xml文件作为配置文件,xml文件名字任意,但通常都取名为applicationContext.xml,通常将该文件放置在类加载的目录里下(src目录),方便后续使用。
创建bean类,并在spring中进行配置交由spring来管理
            1     <?xml version="1.0" encoding="UTF-8"?>
            2     <beans xmlns="http://www.springframework.org/schema/beans"
            3             xmlns:xsi="http://www.w3.org/2001/XMLSchema-instance"
            4             xsi:schemaLocation="http://www.springframework.org/schema/beans
            5             http://www.springframework.org/schema/beans/spring-beans-3.2.xsd">
            6
            7             <bean id="person" class="domain.Person"></bean>
            8
            9     </beans>
<bean id="person" class="domain.Person"></bean>
1.beanBean理解为类的代理或代言人(实际上确实是通过反射、代理来实现的),这样它就能代表类拥有该拥有的东西了,
2.id代表用于区分bean不可重复
3.class后面的domain.Person是我们通过class.forname(.class)方法反射时需要的参数,forname方法的参数是包名+类名
在程序中通过Spring容器获取对象并使用
.java文件
package cn.tedu.test;

import org.junit.Test;
import org.springframework.context.ApplicationContext;
import org.springframework.context.support.ClassPathXmlApplicationContext;

import cn.tedu.domain.Person;

public class Test01 {

    /**
     * Spring中不可以配置多个id相同的bean,在容器初始化时会抛出异常
     */
    @Test
    public void test(){
        //1.初始化Spring容器
        ApplicationContext context = new ClassPathXmlApplicationContext("applicationContext.xml");
        //2.基于Spring容器创建对象
        Person p1 = (Person) context.getBean("person");
        Person p2 = (Person) context.getBean("person2");
p.say();
System.out.println(p1); System.out.println(p2); }

/** * 1.可以配置多个id不同但类型相同(即反射指向的类是同一个)的bean,spring内存储的是不同的对象
*     2.默认情况下多次获取同一个id的bean得到的是同一个对象
**/
 }
xml文件
<?xml version="1.0" encoding="UTF-8"?>
<beans xmlns="http://www.springframework.org/schema/beans"
    xmlns:xsi="http://www.w3.org/2001/XMLSchema-instance"
    xsi:schemaLocation="http://www.springframework.org/schema/beans
    http://www.springframework.org/schema/beans/spring-beans-3.2.xsd ">
    <bean id="person" class="cn.tedu.domain.Person"></bean>
    <bean id="person2" class="cn.tedu.domain.Person"></bean>
</beans>
3. IOC的实现原理
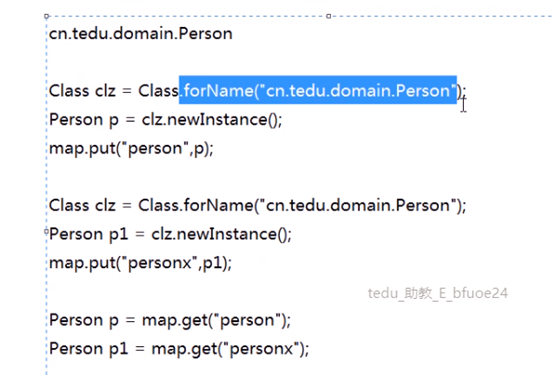
在初始化一个Spring容器时,Spring会去解析指定的xml文件,当解析到其中的<bean>标签时,会根据该标签中的class属性指定的类的全路径名,通过反射创建该类的对象,并将该对象存入内置的Map中管理。其中键就是该标签的id值,值就是该对象。
之后,当通过getBean方法来从容器中获取对象时,其实就是根据传入的条件在内置的Map中寻找是否有匹配的键值,如果有则将该键值对中保存的对象返回,如果没有匹配到则抛出异常。
由此可以推测而知:
默认情况下,多次获取同一个id的bean,得到的将是同一个对象。
即使 是同一个类,如果配置过多个<bean>标签具有不同的id,每个id都会在内置Map中有一个键值对,其中的值是这个类创建的不同的对象
同一个<beans>标签下不允许配置多个同id的<bean>标签,如果配置则启动抛异常
通过反射创建对象

4. IOC获取对象的方式
通过context.getBeans()方法获取bean时,可以通过如下两种方式获取:
传入id值 context.getBeans("person");
传入class类型 context.getBeans("Person.class");
通过class方式获取bean时,如果同一个类配置过多个bean,则在获取时因为无法确定到底要获取哪个bean会抛出异常。
而id是唯一的,不存在这样的问题,所以建议大家尽量使用id获取bean。
        1     @Test
        2     /**
        3      * SpringIOC获取bean的方式
        4      */
        5     public void  test3(){
        6             /*
        7              <bean id="person" class="cn.tedu.beans.Person"></bean>
        8              */
        9             /*
       10              <bean id="person" class="cn.tedu.beans.Person"></bean>
       11              <bean id="personx" class="cn.tedu.beans.Person"></bean>
       12              */
       13             ApplicationContext context = new ClassPathXmlApplicationContext("applicationContext.xml");
       14             //--通过id获取
       15             Person p1 = (Person) context.getBean("person");
       16             p1.say();
       17             //--通过class获取
       18             Person p2 = context.getBean(Person.class);
       19             p2.say();
       20     }
5. 别名标签
在 Spring中提供了别名标签<alias>可以为配置的<bean>起一个别名,要注意的是这仅仅是对指定的<bean>起的一个额外的名字,并不会额外的创建对象存入map。原来的id还是可以用
<alias name="要起别名的bean的id" alias="要指定的别名"/>
@Test
/**
 * SpringIOC中bean别名
 */
public void  test4(){
        /*
                <bean id="person" class="cn.tedu.beans.Person"></bean>
                <alias name="person" alias="personx"/>
         */
        ApplicationContext context = new ClassPathXmlApplicationContext("applicationContext.xml");
        //--通过id获取
        Person p1 = (Person) context.getBean("personx");
        p1.say();
}
6. Spring创建对象的方式
a. 通过类的无法构造方法创建对象
在入门案例中使用的就是这种方式。当用最普通方式配置一个<bean>时,默认就是采用类的无参构造创建对象。在Spring容器初始化时,通过<bean>上配置的class属性反射得到字节码对象,通过newInstance()创建对象
                   Class c = Class .forName("类的全路径名称")
                   Object obj = c.newInstance()
这种方式下spring创建对象,要求类必须有无参的构造,否则无法通过反射创建对象,会抛出异常。
package cn.tedu.beans;

public class Person {
    public Person(String arg) {
        System.out.println("Person的无参构造执行了。。。");
    }
    public void say(){
        System.out.println("person hello spring~");
    }
}
/**
* 如果bean不存在无参构造 ,则通过默认反射方式无法创建对象,Spring容器初始化时会抛出异常
* <bean id="person" class="cn.tedu.domain.Person"/>
*/
@Test
public void test01(){
//1.初始化Spring容器
ApplicationContext context = new ClassPathXmlApplicationContext("applicationContext.xml");
//2.基于Spring容器创建对象
Person p1 = (Person) context.getBean("person");
//3.测试
System.out.println(p1);
会引发异常

b. 通过静态工厂创建对象
很多的时候,我们面对的类是无法通过无参构造去创建的,例如该类没有无参构造、是一抽象类 等等情况 ,此时无法要求spring通过无参构造创建对象,此时可以使用静态工厂 方式创建对象。
package cn.tedu.factory;

import cn.tedu.domain.Person;

public class PersonStaticFactory {
    public static Person getPerson(){
        Person p = new Person("zs");
        return p;
    }
}
测试
    /**
     * 静态工厂
       <bean id="person"
        class="cn.tedu.factory.PersonStaticFactory"
        factory-method="getPerson"/>       factory-method 指明获取到对象的方法
     */
    @Test
    public void test02(){
        //1.初始化Spring容器
        ApplicationContext context = new ClassPathXmlApplicationContext("applicationContext.xml");
        //2.获取bean
        Person p = (Person) context.getBean("person");
        //3.测试
        p.eat();
        p.say();
    }
配置文件
<bean id="person" class="cn.tedu.factory.PersonStaticFactory" factory-method="getPerson"/>
c. 实例工厂创建对象
实例工厂也可以解决类是无法通过无参构造创建的问题,解决的思路和静态 工厂类似,只不过实例工厂提供的方法不是静态的。spring需要先创建出实例工厂的对象,在调用实例工厂对象上指定的普通方法来创建对象。所以实例工厂也需要配置到Spring中管理。
package cn.tedu.factory;

import cn.tedu.domain.Person;

public class PersonInstanceFactory {
    public Person getPerson(){
        Person p = new Person("zs");
        return p;
    }
}
    @Test
    public void test03(){
        //1.初始化Spring容器
        ApplicationContext context = new ClassPathXmlApplicationContext("applicationContext.xml");
        //2.获取bean
        Person p = (Person) context.getBean("person");
        //3.测试
        p.eat();
        p.say();
    }
配置文件
<bean id="pifactory" class="cn.tedu.factory.PersonInstanceFactory"  />     //先创建一个工厂类对象,通过对象调用里面的非静态方法
    <bean id="person" factory-bean="pifactory" factory-method="getPerson"/>  //要创建的对象,factory-bean 指代的是采用哪个工厂类对象,factory-method 对象调用的方法
d. Spring工厂创建对象
Spring内置了工厂接口,也可以通过实现这个接口来开发Spring工厂,通过这个工厂创建对象。
package cn.tedu.factory;

import org.springframework.beans.factory.FactoryBean;

import cn.tedu.domain.Person;

public class PersonSpringFactory implements FactoryBean<Person> { //首先要实现FactoryBean接口 里面的泛型规定的是实际产生的对象

    /**
     * 获取bean
     */
    public Person getObject() throws Exception {
        return new Person("zs");
    }

    /**
     * 获取bean的类型
     */
    public Class<?> getObjectType() {
        return Person.class;
    }

    /**
     * 确定对象是否是单例的
     */
    public boolean isSingleton() {
        return true;
    }

}
    @Test
    public void test04(){
        //1.初始化Spring容器
        ApplicationContext context = new ClassPathXmlApplicationContext("applicationContext.xml");
        //2.获取bean
        Person p = (Person) context.getBean("person"); //返回的是object类型
        //3.测试
        p.eat();
        p.say();
    }
<bean id="person" class="cn.tedu.factory.PersonSpringFactory"/>
7. 单例和多例
Spring容器管理的bean在默认情况下是单例的,也即,一个bean只会创建一个对象,存在内置 map中,之后无论获取多少次该bean,都返回同一个对象。
Spring默认采用单例方式,减少了对象的创建,从而减少了内存的消耗。
但是在实际开发中是存在多例的需求的,Spring也提供了选项可以将bean设置为多例模式。
public class Test01 {
    public static void main(String[] args) {
        new Test01().test01();
    }


    /**
     * Spring容器默认 单例 方式管理bean
     * 可以通过配置bean的scope属性来控制 单例/多例
        <!--
        bean的scope属性:
            singleton:单例方式管理bean,默认就是单例
            prototype:多例方式管理bean
        -->
        <bean id="person" class="cn.tedu.domain.Person" scope="prototype"/>
     */
    @Test
    public void test01(){
        //1.初始化Spring容器
        ApplicationContext context = new ClassPathXmlApplicationContext("applicationContext.xml");
        //2.基于Spring容器创建对象
        Person p1 = (Person) context.getBean("person");
        Person p2 = (Person) context.getBean("person");
        //3.测试
        System.out.println(p1); //单例的话地址值一致,多例不一致
        System.out.println(p2);
    }

}
配置文件
<?xml version="1.0" encoding="UTF-8"?>
<beans xmlns="http://www.springframework.org/schema/beans"
    xmlns:xsi="http://www.w3.org/2001/XMLSchema-instance"
    xsi:schemaLocation="http://www.springframework.org/schema/beans
    http://www.springframework.org/schema/beans/spring-beans-3.2.xsd ">

    <!--
        bean的scope属性:
            singleton:单例方式管理bean,默认就是单例
            prototype:多例方式管理bean
     -->
    <bean id="person" class="cn.tedu.domain.Person" scope="prototype"/>
</beans>
bean在单例模式下的生命周期:
bean在单例模式下,spring容器启动时解析xml发现该bean标签后,直接创建该bean的对象存入内部map中保存,此后无论调用多少次getBean()获取该bean都是从map中获取该对象返回,一直是一个对象。此对象一直被Spring容器持有,直到容器退出时,随着容器的退出对象被销毁。
bean在多例模式下的生命周期:
bean在多例模式下,spring容器启动时解析xml发现该bean标签后,只是将该bean进行管理,并不会创建对象,此后每次使用 getBean()获取该bean时,spring都会重新创建该对象返回,每次都是一个新的对象。这个对象spring容器并不会持有,什么销毁取决于使用该对象的用户自己什么时候销毁该对象。
8. 懒加载机制
Spring默认会在容器初始化的过程中,解析xml,并将单例的bean创建并保存到map中,这样的机制在bean比较少时问题不大,但一旦bean非常多时,spring需要在启动的过程中花费大量的时间来创建bean 花费大量的空间存储bean,但这些bean可能很久都用不上,这种在启动时在时间和空间上的浪费显得非常的不值得。
所以Spring提供了懒加载机制。所谓的懒加载机制就是可以规定指定的bean不在启动时立即创建,而是在后续第一次用到时才创建并将对象放入map中,从而减轻在启动过程中对时间和内存的消耗。
懒加载机制只对单例bean有作用,对于多例bean设置懒加载没有意义。
懒加载的配置方式:
<?xml version="1.0" encoding="UTF-8"?>
<beans xmlns="http://www.springframework.org/schema/beans"
    xmlns:xsi="http://www.w3.org/2001/XMLSchema-instance"
    xsi:schemaLocation="http://www.springframework.org/schema/beans
    http://www.springframework.org/schema/beans/spring-beans-3.2.xsd "
    default-lazy-init="true" //为全局bean配置懒加载机制
    >
    <bean id="person" class="cn.tedu.domain.Person" lazy-init="true"/> //   为指定bean配置懒加载
</beans>
**如果同时设定全局和指定bean的懒加载机制,且配置不相同,则对于该bean局部配置覆盖全局配置。
9. 配置初始化和销毁的方法
在Spring中如果某个bean在初始化之后 或 销毁之前要做一些 额外操作可以为该bean配置初始化和销毁的方法 ,在这些方法中完成要功能。
public class Person{
    public Person() {
        System.out.println("Person创建了..");
    }
    public void personInit(){
        System.out.println("初始化Person...");
    }
    public void personDestory(){
        System.out.println("销毁Person...");
    }
    public void eat(){
        System.out.println("吃...");
    }
    public void say(){
        System.out.println("说...");
    }
}
public class Test01 {
    public static void main(String[] args) {
        new Test01().test01();
    }


    /**
     * 初始化 和 销毁 方法
     */
    @Test
    public void test01(){
        //1.初始化Spring容器
        ClassPathXmlApplicationContext context = new ClassPathXmlApplicationContext("applicationContext.xml");
        //2.基于Spring容器创建对象
        Person p1 = (Person) context.getBean("person");
        //3.测试
        System.out.println(p1);
        //4.关闭容器
        context.close(); //ApplicationContext接口没有close方法,他的实现类    ClassPathXmlApplicationContext 有这个方法
    }

}
配置文件
<?xml version="1.0" encoding="UTF-8"?>
<beans xmlns="http://www.springframework.org/schema/beans"
    xmlns:xsi="http://www.w3.org/2001/XMLSchema-instance"
    xsi:schemaLocation="http://www.springframework.org/schema/beans
    http://www.springframework.org/schema/beans/spring-beans-3.2.xsd "
    >

    <bean id="person" class="cn.tedu.domain.Person"
        init-method="personInit"           //对象初始化的方法
        destroy-method="personDestory"       //对象销毁时的方法
    />

</beans>
**Spring中关键方法的执行顺序:
在Spring创建bean对象时,先创建对象(通过无参构造或工厂),之后立即调用init方法来执行初始化操作,之后此bean就可以哪来调用其它普通方法,而在对象销毁之前,spring容器调用其destory方法来执行销毁操作。
二。DI 依赖注入
1. IOC(DI) - 控制反转(依赖注入)
所谓的IOC称之为控制反转,简单来说就是将对象的创建的权利及对象的生命周期的管理过程交由Spring框架来处理,从此在开发过程中不再需要关注对象的创建和生命周期的管理,而是在需要时由Spring框架提供,这个由spring框架管理对象创建和生命周期的机制称之为控制反转。而在 创建对象的过程中Spring可以依据配置对对象的属性进行设置,这个过称之为依赖注入,也即DI。
2. set方法注入
通常的javabean属性都会私有化,而对外暴露setXxx()getXxx()方法,此时spring可以通过这样的setXxx()方法将属性的值注入对象。
a. Spring普通属性注入:
首先是Person javaBean类
package cn.tedu.domain;

import java.util.List;
import java.util.Map;
import java.util.Properties;
import java.util.Set;


public class Person{
    private int id;
    private String name;
    private List<String> list;
    private Set<String> set;
    private Map<String,String> map;
    private Properties prop;
    private Dog dog;  //属性中包含其他对象
    private Cat cat;

    public int getId() {
        return id;
    }
    public void setId(int id) {
        this.id = id;
    }
    public String getName() {
        return name;
    }
    public void setName(String name) {
        this.name = name;
    }
    public List<String> getList() {
        return list;
    }
    public void setList(List<String> list) {
        this.list = list;
    }
    public Set<String> getSet() {
        return set;
    }
    public void setSet(Set<String> set) {
        this.set = set;
    }
    public Map<String, String> getMap() {
        return map;
    }
    public void setMap(Map<String, String> map) {
        this.map = map;
    }
    public Properties getProp() {
        return prop;
    }
    public void setProp(Properties prop) {
        this.prop = prop;
    }
    public Dog getDog() {
        return dog;
    }
    public void setDog(Dog dog) {
        this.dog = dog;
    }

    public Cat getCat() {
        return cat;
    }
    public void setCat(Cat cat) {
        this.cat = cat;
    }
    @Override
    public String toString() {
        return "Person [id=" + id + ", name=" + name + ", list=" + list
                + ", set=" + set + ", map=" + map + ", prop=" + prop + ", dog="
                + dog + ", cat=" + cat + "]";
    }
}
Dog类 和Cat类
package cn.tedu.domain;

public class Dog {
    private String name;
    private int age;
    public String getName() {
        return name;
    }
    public void setName(String name) {
        this.name = name;
    }
    public int getAge() {
        return age;
    }
    public void setAge(int age) {
        this.age = age;
    }
    @Override
    public String toString() {
        return "Dog [name=" + name + ", age=" + age + "]";
    }
}
package cn.tedu.domain;

public class Cat {
    private String name;
    private int age;
    public String getName() {
        return name;
    }
    public void setName(String name) {
        this.name = name;
    }
    public int getAge() {
        return age;
    }
    public void setAge(int age) {
        this.age = age;
    }
    @Override
    public String toString() {
        return "Cat [name=" + name + ", age=" + age + "]";
    }
}
配置文件中的属性注入
<?xml version="1.0" encoding="UTF-8"?>
<beans xmlns="http://www.springframework.org/schema/beans"
    xmlns:xsi="http://www.w3.org/2001/XMLSchema-instance"
    xsi:schemaLocation="http://www.springframework.org/schema/beans
    http://www.springframework.org/schema/beans/spring-beans-3.2.xsd "
    >

    <bean id="person" class="cn.tedu.domain.Person">
        <property name="id" value="99"></property>
        <property name="name" value="亚瑟"></property>
        <property name="list">
            <list>
                <value>上单</value>
                <value>下单</value>
                <value>打野</value>
                <value>中单</value>
                <value>辅助</value>
            </list>
        </property>
        <property name="set">
            <set>
                <value>s1</value>
                <value>s2</value>
                <value>s3</value>
                <value>s2</value>
                <value>s4</value>
                <value>s5</value>
            </set>
        </property>
        <property name="map">
            <map>
                <entry key="k1" value="v1"></entry>
                <entry key="k2" value="v2"></entry>
                <entry key="k3" value="v3"></entry>
                <entry key="k2" value="v22"></entry>
            </map>
        </property>
        <property name="prop">
            <props>
                <prop key="p1">v1</prop>
                <prop key="p2">v2</prop>
                <prop key="p3">v3</prop>
            </props>
        </property>
        <property name="dog" ref="dog"></property>
        <property name="cat" ref="cat"></property>
    </bean>
    <bean id="dog" class="cn.tedu.domain.Dog">
        <property name="name" value="旺财"></property>
        <property name="age" value="6"></property>
    </bean>
    <bean id="cat" class="cn.tedu.domain.Cat">
        <property name="name" value="汤姆"></property>
        <property name="age" value="5"></property>
    </bean>
</beans>

要先创建属性对象的bean。
在这里要申明一点的是:<property name="age" value="5"></property> 中name的值即age,这是一个javaBean属性即Person javabean中SetXxx()方法的后三个单词xxx,而不是Person中的age成员属性,就比如把age的setAge(int age)方法改成
setAgebbb(int age) ,那么要改成<property name="agebbb" value="5"></property>
    @Test
    public void test01(){
        //1.初始化Spring容器
        ClassPathXmlApplicationContext context = new ClassPathXmlApplicationContext("applicationContext.xml");
        //2.基于Spring容器创建对象
        Person p1 = (Person) context.getBean("person");
        //3.测试
        System.out.println(p1);
        //4.关闭容器
        context.close();
    }
自动装配---支持的是bean对象的注入
在Spring的set方式实现的注入过程中,支持自动装配机制,所谓自动装配机制,会根据要设置的javabean属性的名字 或 类型 到spring中自动寻找对应id 或 类型的<bean>进行设置,从而 省去依次配置的过程,简化了配置。
为 指定<bean>开启自动装配:
<?xml version="1.0" encoding="UTF-8"?>
<beans xmlns="http://www.springframework.org/schema/beans"
    xmlns:xsi="http://www.w3.org/2001/XMLSchema-instance"
    xsi:schemaLocation="http://www.springframework.org/schema/beans
    http://www.springframework.org/schema/beans/spring-beans-3.2.xsd "
    default-autowire="byName"  全局自动装配

    >

    <!--
        autowire自动装配:
            byName:
                根据要注入的属性名寻找同id的bean进行注入
                如果找不到不报错也不注入

            byType:
                根据要注入的属性类型寻找同类型的bean进行注入
                如果存在多个该类型的bean则报错
**byType方式 根据类型进行匹配,可能匹配到多个<bean>,此时会抛出异常。而byName是通过id来寻找<bean>,id没有重复,不会有这方面的问题,所以推荐使用byName方式
-->
    <bean id="person" class="cn.tedu.domain.Person" autowire="byType">  局部自动装配
        <!--
        <property name="dog" ref="dog"></property>
        <property name="cat" ref="cat"></property>
        -->
    </bean>
    <bean id="dogx" class="cn.tedu.domain.Dog">
        <property name="name" value="旺财"></property>
        <property name="age" value="6"></property>
    </bean>
    <bean id="catx" class="cn.tedu.domain.Cat">
        <property name="name" value="汤姆"></property>
        <property name="age" value="5"></property>
    </bean>
</beans>
Person类
package cn.tedu.domain;

public class Person{
    private Dog dog;
    private Cat cat;

    public Dog getDog() {
        return dog;
    }
    public void setDog(Dog dog) {
        this.dog = dog;
    }
    public Cat getCat() {
        return cat;
    }
    public void setCat(Cat cat) {
        this.cat = cat;
    }
    @Override
    public String toString() {
        return "Person [dog=" + dog + ", cat=" + cat + "]";
    }

}
测试
public class Test01 {
    public static void main(String[] args) {
        new Test01().test01();
    }

    @Test
    public void test01(){
        //1.初始化Spring容器
        ClassPathXmlApplicationContext context = new ClassPathXmlApplicationContext("applicationContext.xml");
        //2.基于Spring容器创建对象
        Person p1 = (Person) context.getBean("person");
        //3.测试
        System.out.println(p1);
        //4.关闭容器
        context.close();
    }

}
4. 基于构造方法的注入
对象属性设置的另一种方式是在对象创建的过程中通过构造方法传入并设置对象的属性。spring也可以通过这样的构造方法实现属性的注入
测试
    @Test
    public void test01(){
        //1.初始化Spring容器
        ClassPathXmlApplicationContext context = new ClassPathXmlApplicationContext("applicationContext.xml");
        //2.基于Spring容器创建对象
        Person p1 = (Person) context.getBean("person");
        //3.测试
        System.out.println(p1);
        //4.关闭容器
        context.close();
    }
<?xml version="1.0" encoding="UTF-8"?>
<beans xmlns="http://www.springframework.org/schema/beans"
    xmlns:xsi="http://www.w3.org/2001/XMLSchema-instance"
    xsi:schemaLocation="http://www.springframework.org/schema/beans
    http://www.springframework.org/schema/beans/spring-beans-3.2.xsd "
    >
    <bean id="person" class="cn.tedu.domain.Person">
        <!--
            构造方法方式实现属性注入:
                通过<constructor-arg>可以实现bean的构造方法方式实现注入
                其中的属性:
                    name:限定要为哪个名字的构造方法参数注入
                    index: 为哪个索引位的构造方法参数注入
                    type: 当前注入的参数的类型
                    value: 要为当前参数设定什么值,如果是非自定义bean类型,使用此属性注入
                    ref: 要为当前参数设定哪个自定义bean,如果是自定义bean类型,使用此属性注入

        -->
        <!--
        <constructor-arg name="name" value="zs"></constructor-arg>
        <constructor-arg name="age" value="19"></constructor-arg>
         -->
         <constructor-arg index="0"  value="zs"></constructor-arg>
         <constructor-arg index="1"  value="19"></constructor-arg>
         <constructor-arg index="2" ref="dog"></constructor-arg>
         <constructor-arg index="3" ref="cat"></constructor-arg>
    </bean>
    <bean id="dog" class="cn.tedu.domain.Dog">
        <property name="name" value="旺财"></property>
        <property name="age" value="6"></property>
    </bean>
    <bean id="cat" class="cn.tedu.domain.Cat">
        <property name="name" value="汤姆"></property>
        <property name="age" value="5"></property>
    </bean>
</beans>
通常使用index进行参数注入,因为你通常用的是别人的jar包,没有源代码的情况下,你只能知道参数的个数,以及参数的类型,无法获得参数名。所以这就导致了有些方法你调用的时候参数部分是arg0,arg1,arg2