在Linux学习过程中,可能会遇到根目录存储空间不足的问题,这时候如果只是新增一块硬盘并挂载到某个目录上,还需要将数据转移至新的硬盘中才能缓解存储压力。这种操作未免有些繁琐,那可不可以直接对跟目录进行扩容呢?当然是可以的,接下来就给大家介绍操作步骤:
实验环境:RHEL7系统(默认已部署LVM)、VMware Workstation 12虚拟软件
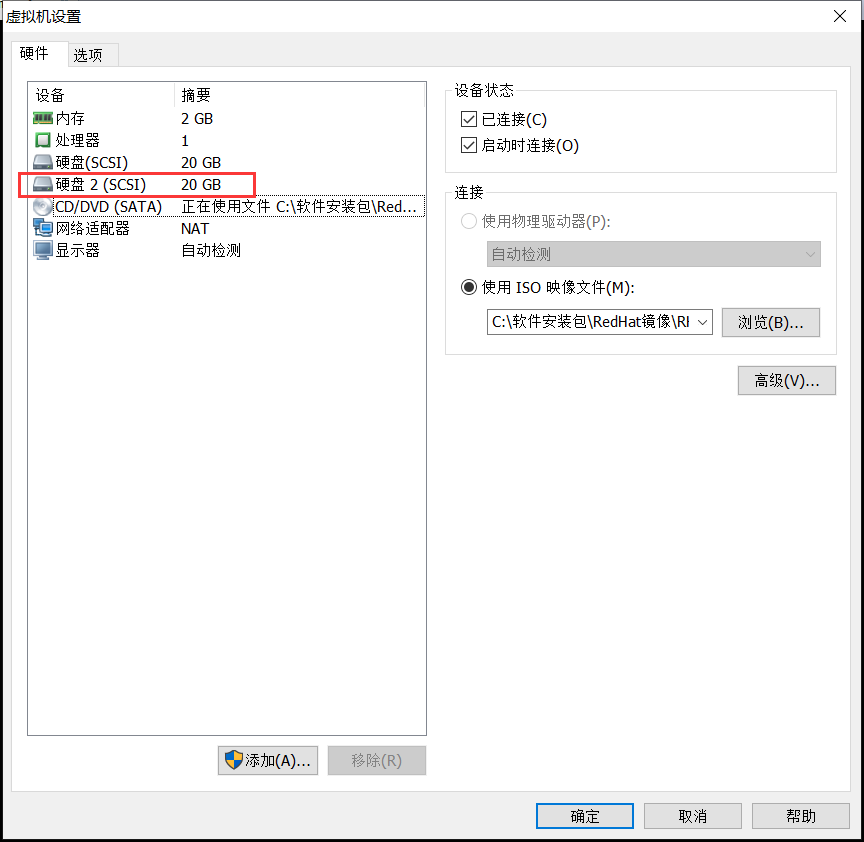
第1步:给虚拟机新增一块20GB的硬盘
第2步:查看系统盘的分区类型,最后记得输入q不保存退出
[root@linuxprobe ~]# fdisk /dev/sda
Welcome to fdisk (util-linux 2.23.2).

Changes will remain in memory only, until you decide to write them.
Be careful before using the write command.


Command (m for help): p      //输入p查看分区信息

Disk /dev/sda: 21.5 GB, 21474836480 bytes, 41943040 sectors
Units = sectors of 1 * 512 = 512 bytes
Sector size (logical/physical): 512 bytes / 512 bytes
I/O size (minimum/optimal): 512 bytes / 512 bytes
Disk label type: dos
Disk identifier: 0x00091636

   Device Boot      Start         End      Blocks   Id  System
/dev/sda1   *        2048     1026047      512000   83  Linux
/dev/sda2         1026048    41943039    20458496   8e  Linux LVM    //分区类型为Linux LVM
Command (m for help): q //输入q不保存退出
第3步:对新硬盘进行分区,并设置分区类型
[root@linuxprobe ~]# fdisk /dev/sdb
Welcome to fdisk (util-linux 2.23.2).

Changes will remain in memory only, until you decide to write them.
Be careful before using the write command.


Command (m for help): n    //添加一个新分区
Partition type:
   p   primary (0 primary, 0 extended, 4 free)
   e   extended
Select (default p): p    //主分区
Partition number (1-4, default 1): 1    //分区编号为1
First sector (2048-41943039, default 2048): <此处按下回车键>
Using default value 2048
Last sector, +sectors or +size{K,M,G} (2048-41943039, default 41943039): +10G    //分区大小为10GB
Partition 1 of type Linux and of size 10 GiB is set

Command (m for help): p    //再次查看分区信息

Disk /dev/sdb: 21.5 GB, 21474836480 bytes, 41943040 sectors
Units = sectors of 1 * 512 = 512 bytes
Sector size (logical/physical): 512 bytes / 512 bytes
I/O size (minimum/optimal): 512 bytes / 512 bytes
Disk label type: dos
Disk identifier: 0x1894a517

   Device Boot      Start         End      Blocks   Id  System
/dev/sdb1            2048    20973567    10485760   83  Linux     //新的分区添加成功,不过分区类型不对

Command (m for help): t   //变更分区的类型
Selected partition 1
Hex code (type L to list all codes): 8e    //输入8e即"Linux LVM"
Changed type of partition 'Linux' to 'Linux LVM'

Command (m for help): p     //再次查看分区信息

Disk /dev/sdb: 21.5 GB, 21474836480 bytes, 41943040 sectors
Units = sectors of 1 * 512 = 512 bytes
Sector size (logical/physical): 512 bytes / 512 bytes
I/O size (minimum/optimal): 512 bytes / 512 bytes
Disk label type: dos
Disk identifier: 0x1894a517

   Device Boot      Start         End      Blocks   Id  System
/dev/sdb1            2048    20973567    10485760   8e  Linux LVM   //分区类型变更成功,与系统分区一致

Command (m for help): w      //最后记得要保存退出
The partition table has been altered!

Calling ioctl() to re-read partition table.
Syncing disks.
第4步:让新添加的硬盘分区支持LVM技术
[root@linuxprobe ~]# pvcreate /dev/sdb1
  Physical volume "/dev/sdb1" successfully created
第5步:查看当前系统的卷组,并将/dev/sdb1硬盘分区加入到卷组中
[root@linuxprobe ~]# vgdisplay
  --- Volume group ---
  VG Name               rhel    //卷组名为"rhel"
  System ID
  Format                lvm2
  Metadata Areas        1
  Metadata Sequence No  3
  VG Access             read/write
  VG Status             resizable
  MAX LV                0
  Cur LV                2
  Open LV               2
  Max PV                0
  Cur PV                1
  Act PV                1
  VG Size               19.51 GiB     //卷组的总容量大小
  PE Size               4.00 MiB
  Total PE              4994
  Alloc PE / Size       4994 / 19.51 GiB
  Free  PE / Size       0 / 0
  VG UUID               mGomiV-U0sF-wKii-YxOh-V7Gw-VEQ4-yIkcRD
[root@linuxprobe ~]# vgextend rhel /dev/sdb1         //把/dev/sdb1硬盘分区加入到rhel卷组中
  Volume group "rhel" successfully extended
[root@linuxprobe ~]# vgdisplay
  --- Volume group ---
  VG Name               rhel
  System ID
  Format                lvm2
  Metadata Areas        2
  Metadata Sequence No  4
  VG Access             read/write
  VG Status             resizable
  MAX LV                0
  Cur LV                2
  Open LV               2
  Max PV                0
  Cur PV                2
  Act PV                2
  VG Size               29.50 GiB      //卷组的容量增大了10GB
  PE Size               4.00 MiB
  Total PE              7553
  Alloc PE / Size       4994 / 19.51 GiB
  Free  PE / Size       2559 / 10.00 GiB
  VG UUID               mGomiV-U0sF-wKii-YxOh-V7Gw-VEQ4-yIkcRD
第6步:查看当前逻辑卷信息
[root@linuxprobe ~]# lvdisplay
  --- Logical volume ---
  LV Path                /dev/rhel/swap    //用来充当SWAP分区,我们这里不管它
  LV Name                swap
  VG Name                rhel
  LV UUID                d2gNWI-6Oin-9Q3r-OGLp-0nf5-0Dun-Z8EvgS
  LV Write Access        read/write
  LV Creation host, time localhost, 2020-02-15 20:19:35 +0800
  LV Status              available
  # open                 2
  LV Size                2.00 GiB
  Current LE             512
  Segments               1
  Allocation             inherit
  Read ahead sectors     auto
  - currently set to     256
  Block device           253:1

  --- Logical volume ---
  LV Path                /dev/rhel/root   //该逻辑卷实际就是Linux系统盘,我们将对它进行扩容
  LV Name                root     //逻辑卷名为root
  VG Name                rhel
  LV UUID                rI6Xvu-eCJx-0WFO-TuUj-LQWM-WuUc-3uE6zc
  LV Write Access        read/write
  LV Creation host, time localhost, 2020-02-15 20:19:35 +0800
  LV Status              available
  # open                 1
  LV Size                17.51 GiB   //逻辑卷的大小,即系统盘大小
  Current LE             4482
  Segments               1
  Allocation             inherit
  Read ahead sectors     auto
  - currently set to     256
  Block device           253:0
第7步:对root逻辑卷进行扩容操作
[root@linuxprobe ~]# lvextend -L +10G /dev/rhel/root
  Extending logical volume root to 27.51 GiB
  Insufficient free space: 2560 extents needed, but only 2559 available   //显示实际空闲容量不足10GB,比10GB稍微小一点点
[root@linuxprobe ~]# lvextend -L +5G /dev/rhel/root    //这里我们先扩容5GB
  Extending logical volume root to 22.51 GiB
  Logical volume root successfully resized
[root@linuxprobe ~]# lvdisplay

----------------省略部分输出内容------------------------

  --- Logical volume ---
  LV Path                /dev/rhel/root
  LV Name                root
  VG Name                rhel
  LV UUID                rI6Xvu-eCJx-0WFO-TuUj-LQWM-WuUc-3uE6zc
  LV Write Access        read/write
  LV Creation host, time localhost, 2020-02-15 20:19:35 +0800
  LV Status              available
  # open                 1
  LV Size                22.51 GiB   //容量已从17.51GB提升至22.51GB
  Current LE             5762
  Segments               2
  Allocation             inherit
  Read ahead sectors     auto
  - currently set to     8192
  Block device           253:0
第8步:重置root逻辑卷的大小。xfs系统不需要先umount操作
[root@linuxprobe ~]# df -h
Filesystem             Size  Used Avail Use% Mounted on
/dev/mapper/rhel-root   18G  3.1G   15G  18% /           //重置之前,先查看当前系统盘的大小,此时显示为18GB
devtmpfs               985M     0  985M   0% /dev
tmpfs                  994M   80K  994M   1% /dev/shm
tmpfs                  994M  8.9M  986M   1% /run
tmpfs                  994M     0  994M   0% /sys/fs/cgroup
/dev/sr0               3.5G  3.5G     0 100% /media/cdrom
/dev/sda1              497M  119M  379M  24% /boot
[root@linuxprobe ~]# xfs_growfs /dev/rhel/root        //重置root逻辑卷大小
meta-data=/dev/mapper/rhel-root  isize=256    agcount=4, agsize=1147392 blks
         =                       sectsz=512   attr=2, projid32bit=1
         =                       crc=0
data     =                       bsize=4096   blocks=4589568, imaxpct=25
         =                       sunit=0      swidth=0 blks
naming   =version 2              bsize=4096   ascii-ci=0 ftype=0
log      =internal               bsize=4096   blocks=2560, version=2
         =                       sectsz=512   sunit=0 blks, lazy-count=1
realtime =none                   extsz=4096   blocks=0, rtextents=0
data blocks changed from 4589568 to 5900288
[root@linuxprobe ~]# df -h
Filesystem             Size  Used Avail Use% Mounted on
/dev/mapper/rhel-root   23G  3.1G   20G  14% /       //系统盘成功扩容至23G,增加了5GB容量,且重启依然生效
devtmpfs               985M     0  985M   0% /dev
tmpfs                  994M   80K  994M   1% /dev/shm
tmpfs                  994M  8.9M  986M   1% /run
tmpfs                  994M     0  994M   0% /sys/fs/cgroup
/dev/sr0               3.5G  3.5G     0 100% /media/cdrom
/dev/sda1              497M  119M  379M  24% /boot
至此,Linux系统盘扩容操作完毕。
知识补充:
1、重置逻辑卷命令 "xfs_growfs /dev/rhel/root" 和 "xfs_growfs /dev/mapper/rhel-root" 效果一样;
2、如果是ext4文件系统,重置命令为"resize2fs /dev/rhel/root";
3、xfs文件系统只能扩容,不允许缩容。
[root@linuxprobe ~]# pvs
  PV         VG   Fmt  Attr PSize  PFree
  /dev/sda2  rhel lvm2 a--  19.51g    0
  /dev/sdb1  rhel lvm2 a--  10.00g 5.00g      //还省5GB空闲容量