1.1. 传统项目中的图片管理
传统项目中,可以在web项目中添加一个文件夹,来存放上传的图片。例如在工程的根目录WebRoot下创建一个images文件夹。把图片存放在此文件夹中就可以直接使用在工程中引用。
优点:引用方便,便于管理
缺点:
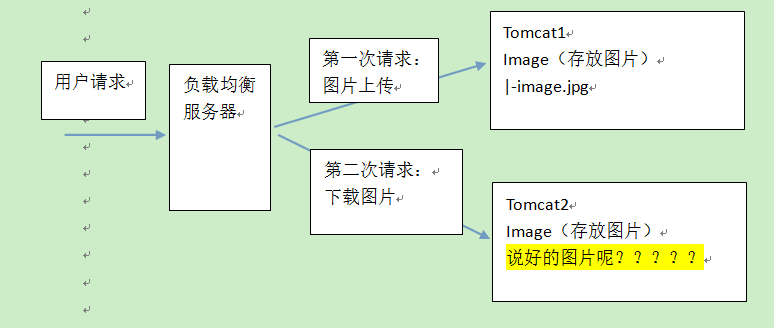
1、如果是分布式环境图片引用会出现问题。
2、图片的下载会给服务器增加额外的压力。
传统图片管理方式在分布式环境中的问题:
1.2. 分布式环境的图片管理

分布式环境一般都有一个专门的图片服务器存放图片。
专门保存图片,不管是哪个服务器接收到图片,都把图片上传到图片服务器。
图片服务器上需要安装一个http服务器,可以使用tomcat、nginx
我们使用虚拟机搭建一个专门的服务器来存放图片。在此服务器上安装一个nginx来提供http服务,安装一个ftp服务器来提供图片上传服务。
1.3. 搭建图片服务器
第一步:安装vsftpd提供ftp服务(注意跟xftp不同,协议与端口都不同)
第二步:安装nginx提供http服务
(这两步请参见这两个文档http://files.cnblogs.com/files/xujingyang/Linux%E4%B8%8Bnginx%E5%92%8Cvsftpd%E5%AE%89%E8%A3%85%E6%89%8B%E5%86%8C.zip)
1.4. 测试图片服务器
1. ftp服务测试。
a)使用ftp客户端

b)使用java程序
ftp可以需要依赖commons-net-3.3.jar包。
 1 package cn.xjy.test ;
 2
 3 import java.io.File ;
 4 import java.io.FileInputStream ;
 5 import org.apache.commons.net.ftp.FTP ;
 6 import org.apache.commons.net.ftp.FTPClient ;
 7 import org.junit.Test ;
 8
 9 public class TestFTP {
10
11     @Test
12     public void testFtp() throws Exception {
13         FTPClient ftpClient = new FTPClient() ;
14         ftpClient.connect("192.168.48.130") ;
15         ftpClient.login("ftpuser", "ftpuser");
16         FileInputStream inputStream=new FileInputStream(new File("src/test/resources/test.txt"));
17
18         ftpClient.setFileType(FTP.BINARY_FILE_TYPE);
19         ftpClient.storeFile("test.txt", inputStream);
20         inputStream.close();
21         ftpClient.logout();
22     }
23 }
2. ftp服务测试
a) 浏览器测试 (火狐)

1.5. SpringMVC中实现图片上传
上传思路:
第一步:
导入common-fileupload的依赖
1 <!-- 文件上传组件 -->
2         <dependency>
3             <groupId>commons-fileupload</groupId>,
4             <artifactId>commons-fileupload</artifactId>
5         </dependency>
第二步:
在SpringMVC配置文件中添加文件上传解析器
1 <!-- 定义文件上传解析器 -->
2     <bean id="multipartResolver"
3         class="org.springframework.web.multipart.commons.CommonsMultipartResolver">
4         <!-- 设定默认编码 -->
5         <property name="defaultEncoding" value="UTF-8"></property>
6         <!-- 设定文件上传的最大值5MB,5*1024*1024 -->
7         <property name="maxUploadSize" value="5242880"></property>
8     </bean>
1.6. Service实现
1. 获取资源配置文件的内容
第一步:
创建资源配置文件

 1 #FTP地址
 2 #FTP端口
 3 FTP_ADDRESS=192.168.31.134
 4 FTP_PORT=21
 5 FTP_USERNAME=ftpuser
 6 FTP_PASSWORD=ftpuser
 7 FTP_BASE_PATH=/home/ftpuser/www
 8 #显示图片使用的url
 9 IMAGE_BASE_URL=http://192.168.31.134
10
11 #rpc协议使用的url
12 RPC_BASE_URL=http://127.0.0.1:8080/rpc
13 RPC_CONTENT_SYNC_URL=/cache/sync/content/
第二步:
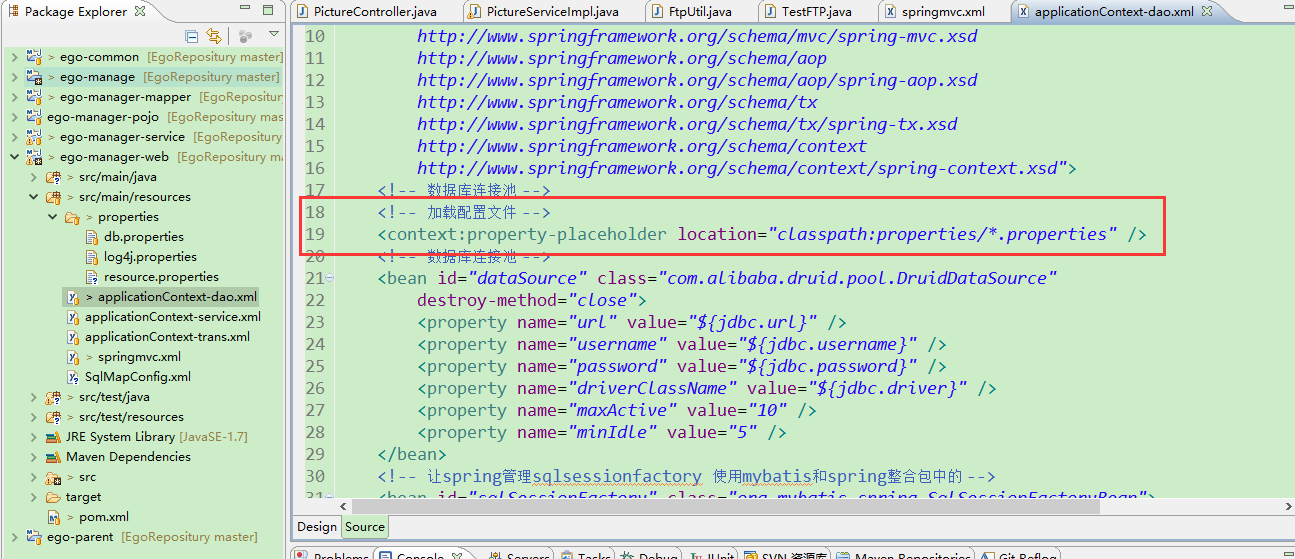
在Spring(applicationContext-dao.xml)容器中加载资源文件

2. 图片名生成策略
时间+随机数:
 1 package cn.xjy.utils ;
 2
 3 import java.util.Random ;
 4
 5 public class NameUtil {
 6
 7     /**
 8      * 图片名生成
 9      */
10     public static String genImageName() {
11         // 取当前时间的长整形值包含毫秒
12         long millis = System.currentTimeMillis() ;
13         // long millis = System.nanoTime();
14         // 加上三位随机数
15         Random random = new Random() ;
16         int end3 = random.nextInt(999) ;
17         // 如果不足三位前面补0
18         String str = millis + String.format("%03d", end3) ;
19
20         return str ;
21     }
22
23 }
或者使用uuid
3. Service实现

 1 package cn.xjy.service ;
 2
 3 import java.util.Date ;
 4 import org.springframework.beans.factory.annotation.Value ;
 5 import org.springframework.stereotype.Service ;
 6 import org.springframework.web.multipart.MultipartFile ;
 7 import cn.xjy.bean.PictureResult ;
 8 import cn.xjy.utils.FtpUtil ;
 9 import cn.xjy.utils.NameUtil ;
10
11 @Service
12 public class PictureServiceImpl implements PictureService {
13
14     @Value("${IMAGE_BASE_URL}")
15     private String    IMAGE_BASE_URL ;
16     @Value("${FTP_BASE_PATH}")
17     private String    FTP_BASE_PATH ;
18     @Value("${FTP_ADDRESS}")
19     private String    FTP_ADDRESS ;
20     @Value("${FTP_PORT}")
21     private Integer    FTP_PORT ;
22     @Value("${FTP_USERNAME}")
23     private String    FTP_USERNAME ;
24     @Value("${FTP_PASSWORD}")
25     private String    FTP_PASSWORD ;
26
27     @Override
28     public PictureResult uploadFile(MultipartFile uploadFile) {
29         // 上传文件功能实现
30         String path ;
31         try {
32             path = savePicture(uploadFile) ;
33             // 数据回显
34             return new PictureResult(0, IMAGE_BASE_URL + path) ;
35         } catch (Exception e) {
36             e.printStackTrace() ;
37         }
38         return null ;
39     }
40
41     @Override
42     public String savePicture(MultipartFile uploadFile) throws Exception {
43         System.out.println("uploadFile"+uploadFile) ;
44         // 判断文件是否为空,如果为空则返回
45         if (uploadFile.isEmpty()) { return null ; }
46
47         // 设置文件上传的目录,以日期为单位,提高访问速度
48         String filePath = "/" + new Date().getYear() + "/" + new Date().getMonth() + "/"
49                 + new Date().getDay() ;
50         System.out.println("filePath"+filePath) ;
51         // 获取原始文件名
52         String originalFilename = uploadFile.getOriginalFilename() ;
53         System.out.println("originalFilename:"+originalFilename) ;
54         // 生成新文件名
55         String newFileName = NameUtil.genImageName()
56                 + originalFilename.substring(originalFilename.lastIndexOf(".")) ;
57         System.out.println("newFileName"+newFileName) ;
58         // 上传文件
59         boolean b = FtpUtil.uploadFile(FTP_ADDRESS, FTP_PORT, FTP_USERNAME, FTP_PASSWORD,
60                 FTP_BASE_PATH, filePath, newFileName, uploadFile.getInputStream())  ;
61         System.out.println("上传结果:"+b) ;
62
63         System.out.println("res"+filePath + "/" + newFileName) ;
64
65         return filePath + "/" + newFileName ;
66
67     }
68 }
4. Controller实现
 1 package cn.xjy.controller ;
 2
 3 import org.springframework.beans.factory.annotation.Autowired ;
 4 import org.springframework.stereotype.Controller ;
 5 import org.springframework.web.bind.annotation.RequestMapping ;
 6 import org.springframework.web.bind.annotation.ResponseBody ;
 7 import org.springframework.web.multipart.MultipartFile ;
 8 import cn.xjy.bean.PictureResult ;
 9 import cn.xjy.service.PictureService ;
10
11 @Controller
12 @RequestMapping("/pic")
13 public class PictureController {
14
15     @Autowired
16     PictureService    pictureService ;
17
18     @RequestMapping("/upload")
19     public @ResponseBody PictureResult upload(MultipartFile uploadFile) {
20         // 上传图片
21         PictureResult result = pictureService.uploadFile(uploadFile) ;
22         return result ;
23     }
24 }
Nginx找不到图片问题:(原因:没有加’user root;’配置,解决:在/usr/local/nginx/conf/nginx.conf 的首行加上 user root;) 步骤如下:

vi /usr/local/nginx/conf/nginx.conf
修改/usr/local/nginx/conf/nginx.conf 文件配置后,service nginx restart


注意:nginx.config中要配置root的指向为ftp的家目录
vim /usr/local/nginx/conf/nginx.conf

