1、步骤一:在Info.plist中,添加"Required background modes"键,value为:App plays audio
或者:
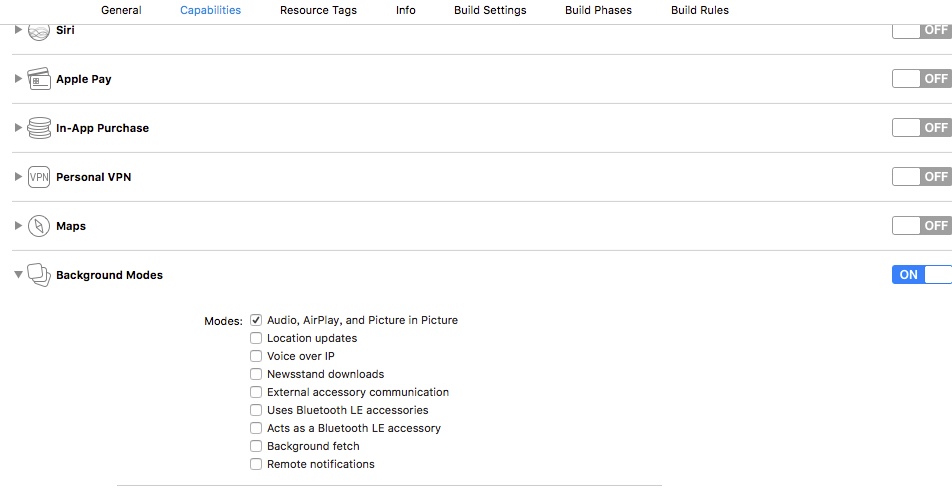
步骤二:
- (BOOL)application:(UIApplication *)application didFinishLaunchingWithOptions:(NSDictionary *)launchOptions
{
self.window = [[[UIWindow alloc] initWithFrame:[[UIScreen mainScreen] bounds]] autorelease];
// Override point for customization after application launch.
NSError *setCategoryErr = nil;
NSError *activationErr = nil;
[[AVAudioSession sharedInstance]
setCategory: AVAudioSessionCategoryPlayback
error: &setCategoryErr];
[[AVAudioSession sharedInstance]
setActive: YES
error: &activationErr];
self.window.backgroundColor = [UIColor whiteColor];
[self.window makeKeyAndVisible];
return YES;
}
步骤三:将以下代码添加到appDelegate文件中的- (void)applicationDidEnterBackground:(UIApplication *)application函数,也可添加到在具体类中注册的应用进入后台后的通知方法
- (void)applicationDidEnterBackground:(UIApplication *)application{
UIApplication* app = [UIApplication sharedApplication];
__block UIBackgroundTaskIdentifier bgTask;
bgTask = [app beginBackgroundTaskWithExpirationHandler:^{
dispatch_async(dispatch_get_main_queue(), ^{
if (bgTask != UIBackgroundTaskInvalid)
{
bgTask = UIBackgroundTaskInvalid;
}
});
}];
dispatch_async(dispatch_get_global_queue(DISPATCH_QUEUE_PRIORITY_DEFAULT, 0), ^{
dispatch_async(dispatch_get_main_queue(), ^{
if (bgTask != UIBackgroundTaskInvalid)
{
bgTask = UIBackgroundTaskInvalid;
}
});
});
}
接下来就是在播放页面进行播放了:
先加入代理:AVAudioPlayerDelegate
    //从budle路径下读取音频文件   这个文件名是你的歌曲名字,mp3是你的音频格式
     NSString *string = [[NSBundle mainBundle] pathForResource:@"has_consult" ofType:@"mp3"];
     //把音频文件转换成url格式
     NSURL *url = [NSURL fileURLWithPath:string];
     //初始化音频类 并且添加播放文件
     NSError *error;
     avAudioPlayer = [[AVAudioPlayer alloc] initWithContentsOfURL:url error:&error];

     //设置初始音量大小
     // avAudioPlayer.volume = 1;

     //设置音乐播放次数  -1为一直循环
     avAudioPlayer.numberOfLoops = -1;
     //预播放
     [avAudioPlayer prepareToPlay];
    NSLog(@"%ld",(long)error.code);


//播放
-(void)play{
    [avAudioPlayer play];

}
//停止
-(void)stop{
    avAudioPlayer.currentTime = 0;  //当前播放时间设置为0
    [avAudioPlayer stop];

}
iOS-使用AudioServices相关接口的连续震动
本文使用底层接口,实现iOS设备上的连续震动,以及连续播放系统声音(不是音乐播放器)
- 主要功能函数
/*!
    @function       AudioServicesAddSystemSoundCompletion
    @abstract       Call the provided Completion Routine when provided SystemSoundID
                    finishes playing.
    @discussion     Once set, the System Sound server will send a message to the System Sound client
                    indicating which SystemSoundID has finished playing.
    @param          inSystemSoundID
                        systemSoundID 自定义的sound(1007系统默认提示音)或者kSystemSoundID_Vibrate(震动)
    @param          inRunLoop
                       没有研究 一般写NULL 有兴趣可以自己研究一下跟大家共享
    @param          inRunLoopMode
                        同上个属性
    @param          inCompletionRoutine
                        这个是指某次震动播放完成后的回调 注意是C的函数 一般我们会在回调中写播放震动的函数 来实现连续震动
    @param          inClientData
                        没有研究啦!!!NULL就行啦
*/
extern OSStatus
AudioServicesAddSystemSoundCompletion(  SystemSoundID               inSystemSoundID,
                                     CFRunLoopRef                         inRunLoop,
                                     CFStringRef                          inRunLoopMode,
                                     AudioServicesSystemSoundCompletionProc  inCompletionRoutine,
                                     void*                                inClientData)
__OSX_AVAILABLE_STARTING(__MAC_10_5,__IPHONE_2_0);- 首先实现上述函数中的回调函数(注意是C)
void soundCompleteCallback(SystemSoundID sound,void * clientData) {
    AudioServicesPlaySystemSound(kSystemSoundID_Vibrate);  //震动
    AudioServicesPlaySystemSound(sound);  // 播放系统声音 这里的sound是我自定义的,不要copy哈,没有的
}- 实现播放声音或震动的代码
    SystemSoundID sound;
    NSString *path = [[NSBundle mainBundle] pathForResource:soundName ofType:nil];
    AudioServicesCreateSystemSoundID((__bridge CFURLRef)[NSURL fileURLWithPath:path], &_sound);

    AudioServicesAddSystemSoundCompletion(_soundID, NULL, NULL, soundCompleteCallback, NULL);
    AudioServicesPlaySystemSound(kSystemSoundID_Vibrate);
AudioServicesPlaySystemSound(_sound);- 至此,就可以顺利的播放声音和震动了,而且是连续的!!!
别忘了! 怎么让他停下来
- 为了方便 我就写了而一个OC的方法来做了
-(void)stopAlertSoundWithSoundID:(SystemSoundID)sound {
    AudioServicesDisposeSystemSoundID(kSystemSoundID_Vibrate);
    AudioServicesDisposeSystemSoundID(sound);
    AudioServicesRemoveSystemSoundCompletion(sound);
}- 这里要详细解说一下需要注意的事项:
AudioServicesAddSystemSoundCompletion(kSystemSoundID_Vibrate, NULL, NULL, systemAudioCallback, NULL);AudioServicesRemoveSystemSoundCompletion(kSystemSoundID_Vibrate);
这两个接口的用途是绑定和取消指定soundID对应的回调方法;kSystemSoundID_Vibrate为soundID类型,其回调方法认准的也是这个soundID,在任何地方使用这个id去执行AudioServicesPlaySystemSound(xxxSoundID)都会调用到该回调方法。而一旦调用remove方法取消回调,同样的在任何地方使用这个id去执行AudioServicesPlaySystemSound(xxxSoundID)都不会调用到这个回调。说的这么绕,其实就是说这俩接口的影响是全局的,威力很大。
我们只要在回调方法里面再调用AudioServicesPlaySystemSound接口,就可以实现连续震动了;当我们想要停止震动时,调用remove接口,ok,回调方法就歇火了。
经过测试发现震动之间太连续,体验不符合要求;所以我们在c回调里面通过单例(全局变量性质的指针)调用到oc的方法进行[self performSelector:@selector(triggerShake) withObject:nil afterDelay:1](triggerShake是震动接口);在停止震动时候我们需要调用
[NSObject cancelPreviousPerformRequestsWithTarget:self selector:@selector(triggerShake) object:nil];停止之前可能的回调;这两个方法的成对使用既好用又简便,对于需要定时调用的场景很适合,也免去维护定时器的麻烦。
这个时候屏幕要是常亮就更好了,不用费脑子了,用这个!!!
[[UIApplication sharedApplication] setIdleTimerDisabled:YES]; // 设置播放时屏幕常亮