在手机屏幕中,Tab也是比较常用的,通常和List结合,例如我们手机的通信录。下面是Tag的结构。
TabHost是整个Tab的容器,包括两部分,TabWidget和FrameLayout。TabWidget就是每个tab的标签,FrameLayout则是tab内容。
如果我们使用extends TabAcitivty,如同ListActivity,TabHost必须设置为@android:id/tabhost
TabWidget必须设置android:id为@android:id/tabs
FrameLayout需要设置android:id为@android:id/tabcontent
例子一:基本的Tag例子
1)Android XML文件
<?xml version="1.0" encoding="utf-8"?>
<TabHost  xmlns:android="http://schemas.android.com/apk/res/android"
  android:id="@+id/c92_tabhost"
  android:layout_width="fill_parent"
  android:layout_height="fill_parent">
  <LinearLayout android:orientation="vertical"
   android:layout_width="fill_parent"
   android:layout_height="fill_parent">
       <TabWidget android:id="@android:id/tabs"
        android:layout_width="fill_parent"
        android:layout_height="wrap_content" />
       <FrameLayout android:id="@android:id/tabcontent"
        android:layout_width="fill_parent"
        android:layout_height="fill_parent">
            <AnalogClock android:id="@+id/c92_tab1"
             android:layout_width="fill_parent"
             android:layout_height="fill_parent"
             android:layout_centerHorizontal="true" />
            <Button android:id="@+id/c92_tab2"
             android:layout_width="fill_parent"
             android:layout_height="fill_parent"
             android:text="A semi-random Button" />
       </FrameLayout>
  </LinearLayout>
</TabHost>
2)源代码
protected void onCreate(Bundle savedInstanceState) {
        super.onCreate(savedInstanceState);
        setContentView(R.layout.chapter_9_test2);
        //步骤1:获得TabHost的对象,并进行初始化setup()
        TabHost tabs = (TabHost)findViewById(R.id.c92_tabhost);
        tabs.setup();
        //步骤2:通过TabHost.TabSpec增加tab的一页,通过setContent()增加内容,通过setIndicator增加页的标签
        /*(1)增加第1页*/
        TabHost.TabSpec spec = tabs.newTabSpec("Tag1");
        spec.setContent(R.id.c92_tab1);
        spec.setIndicator("Clock");
        tabs.addTab(spec);
        /*(2)增加第2页*/
        spec = tabs.newTabSpec("Tag2");
        spec.setContent(R.id.c92_tab2);
        spec.setIndicator("Button");
        tabs.addTab(spec);
        //步骤3:可通过setCurrentTab(index)指定显示的页,从0开始计算。
        tabs.setCurrentTab(1);
    }
例子二:设置标签
标签设置除了上面给出文本外,还可以给出widget,例如:
 Button b = new Button(this);
        b.setText("标签");
        spec.setIndicator(b);
这也是work的,当然设置button是很无聊的,通常我们希望是图片,如下面三图:
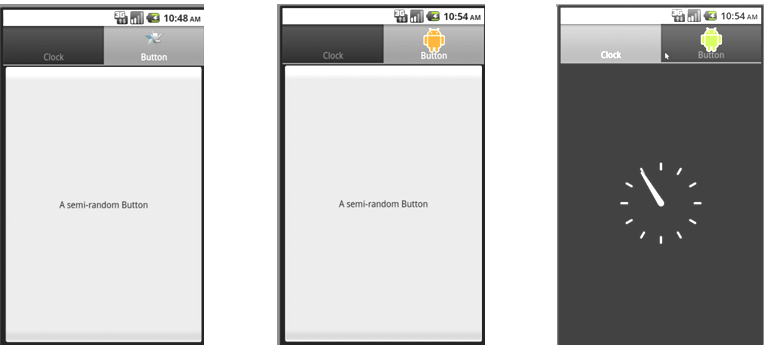
1)我们在标签上加一个图标,如左图。这个图片存在于drawable/目录下:
Resources res  = getResources();
spec.setIndicator("Button",res.getDrawable(R.drawable.star_logo));
2)我们在标签上家一个图片,当用户选择该页是为某一图标,不选择时为另一图标。如上中图和右图所示。我们在drawable目录项目有相关的两个图片文件。会议在Android学习笔记(六):xml和widget中的View,我们建立一个XML文件,描述:
<?xml version="1.0" encoding="utf-8"?>
<selector xmlns:android="http://schemas.android.com/apk/res/android">
  <!-- 这是顺序执行的,如果状态是selected,则为android_focused图标,如果不是下一步,采用android_normal图标-->
  <item android:drawable="@drawable/android_focused"
        android:state_selected="true" />
  <item android:drawable="@drawable/android_normal" />
</selector>
这个文件我们取名为chapter_9_tutorial3_ic.xml,为了方便管理,这次我们没有将之放置在layout目录下,而是方式在drawable目录下。源代码如下:
Resources res  = getResources();
spec.setIndicator("Button",res.getDrawable(R.drawable.chapter_9_tutorial3_ic));
例子三:动态添加Tab页
在某些情况下,我们需要动态添加Tab页,可通过TabContentFactory来实现。下面的例子,我们点击Tab也中的button,将新增一个tab页。
 Button button = (Button)findViewById(R.id.c92_tabhost);
        button.setOnClickListener(new View.OnClickListener() {
            public void onClick(View arg0) {
                TabHost.TabSpec spec = tabs.newTabSpec("tag1");
                spec.setContent(new TabHost.TabContentFactory() {
                    /*createTabContent将返回View,这里我们简单用一个模拟时钟*/
                    public View createTabContent(String tag) {
                        return new AnalogClock(Chapter9Test3.this);
                    }
                });
                spec.setIndicator("Clock");
                tabs.addTab(spec);
            }
        });
例子四:将一个Activity加入到Tab页
在Android SDK的Tutorial中给出了一个例子,采用setContent(Intent intent)的方式在content中传递一个Activity。这个例子费了我比长的时间,因为一开始运行时都报错。因此在写的时候,注意下面两个问题:
- 采用setContent(Intent intent)之前,必须对TabHost进行setup (LocalActivityManager activityGroup),因为在调起acivity时需要activityGroup,如果我们继承TabActivity,则由TabAcitivty自动完成,鉴于我们目前对LocalActivityManager尚不了解,简单地可以直接继承TabActivity
- Activity不能是内部类,Activity必须在AndroidManifest中进行注册
对于对第1点,我们的XML文件如下:
<?xml version="1.0" encoding="utf-8"?>
<TabHost xmlns:android="http://schemas.android.com/apk/res/android"
  android:id="@android:id/tabhost"
  android:layout_width="fill_parent"
  android:layout_height="fill_parent">
  <LinearLayout android:orientation="vertical"
                android:layout_width="fill_parent"
                android:layout_height="fill_parent"
                android:padding="5dp">
                <TabWidget android:id="@android:id/tabs"
                    android:layout_width="fill_parent"
                    android:layout_height="wrap_content" />
                <FrameLayout android:id="@android:id/tabcontent"
                    android:layout_width="fill_parent"
                    android:layout_height="fill_parent"
                    android:padding="5dp">
                </FrameLayout>
  </LinearLayout>
</TabHost>
对于第2点要求,我们可以直接使用之前我们创建过的Activity,代码如下
public class Chapter9Tutorial3 extends TabActivity{
    protected void onCreate(Bundle savedInstanceState) {
        super.onCreate(savedInstanceState);
        setContentView(R.layout.chapter_9_tutorial3);

        TabHost tabs = getTabHost();
        TabHost.TabSpec spec = null;
        //通过Intent,将activity导入,对于intent,这个类不能是内部类,这个类必须在AndroidManifest中注册的类
        Intent intent = new Intent();
        intent.setClass(this, Chapter9Tutorial2.class);
        spec = tabs.newTabSpec("Tag1");
        spec.setIndicator("Intent");
        spec.setContent(intent);
        tabs.addTab(spec);
       . .. ...
    }
}
转载自:http://blog.csdn.net/flowingflying/article/details/6304289,更多内容请看我的Andriod开发相关文章