一、OAuth2.0
1、OAuth2.0概念
OAuth2.0(Open Authorization)是一个开放授权协议;第三方应用不需要接触到用户的账户信息(如用户名密码),通过用户的授权访问用户资源
OAuth的步骤一般如下:
1、客户端要求用户给予授权
2、用户同意给予授权
3、根据上一步获得的授权,向认证服务器请求令牌(token)
4、认证服务器对授权进行认证,确认无误后发放令牌
5、客户端使用令牌向资源服务器请求资源
6、资源服务器使用令牌向认证服务器确认令牌的正确性,确认无误后提供资源
该协议的参与者至少包含:
RO (resource owner): 资源所有者:用户。
RS (resource server): 资源服务器:数据中心;它存储资源,并处理对资源的访问请求。如:API资源,相册服务器、博客服务器。
AS (authorization server): 授权服务器
Client: 第三方应用
2、授权模式
四种模式:
1、授权码模式(authorization code)
2、简化模式(implicit)
3、密码模式(resource owner password credentials)
4、客户端模式(client credentials)
二、IdentityServer + API+Client演示客户端模式
客户端模式(ClientCredentials):经常运用于服务器对服务器中间通讯使用;步骤如下:
1、客户端直接用自身的信息向授权服务器请求token:
HTTP请求:
granttype:授权类型
scope:授权范围
     POST /token HTTP/1.1
     Host: server.example.com
     Authorization: Basic czZCaGRSa3F0MzpnWDFmQmF0M2JW
     Content-Type: application/x-www-form-urlencoded

     grant_type=client_credentials&scope=api001
2、授权服务器验证信息后返回token
     HTTP/1.1 200 OK
     Content-Type: application/json;charset=UTF-8
     Cache-Control: no-store
     Pragma: no-cache

     {
       "access_token":"2YotnFZFEjr1zCsicMWpAA",
       "token_type":"example",
       "expires_in":3600,
       "example_parameter":"example_value"
     }

下面通过一个快速示例理解;快速示例将通过服务器与服务器直接通过api访问数据;
1、授权服务端;
这里将通过IdnetityServer4实现一个标准的Oauth2.0协议的服务端;
引用IdentityServer4包
新建ASP.NET Core Web Application ——Empty项目;这里通过程序包控制台添加IdentityServer4引用包
Install-Package IdentityServer4
定义API资源、定义客户端
新建类Config.cs;定义资源Scopes、Client;
using IdentityServer4.Models;
using System;
using System.Collections.Generic;
using System.Linq;
using System.Threading.Tasks;

namespace Practice.IdentityServer
{
    public class Config
    {
        //scopes定义
        public static IEnumerable<ApiResource> GetApiResource()
        {
            return new List<ApiResource>
            {
                //给api资源定义一个scopes
                new ApiResource("api1","my api")
            };

        }

        //客户端注册,客户端能够访问的资源(通过:AllowedScopes)
        public static IEnumerable<Client> GetClient()
        {
            return new List<Client>
            {
                new Client
                {
                    ClientId="client",
                    AllowedGrantTypes=GrantTypes.ClientCredentials,
                    ClientSecrets={new Secret("secrect".Sha256())},
                    AllowedScopes={"api"}
                }
            };
        }
    }
}
把资源和客户端、存储方式、添加到service container(DI system)
using System;
using System.Collections.Generic;
using System.Linq;
using System.Threading.Tasks;
using Microsoft.AspNetCore.Builder;
using Microsoft.AspNetCore.Hosting;
using Microsoft.AspNetCore.Http;
using Microsoft.Extensions.DependencyInjection;
using Microsoft.Extensions.Logging;

namespace Practice.IdentityServer
{
    public class Startup
    {
        // 添加服务到容器(add services to the container)DI系统.

        public void ConfigureServices(IServiceCollection services)
        {
            services.AddIdentityServer()
                .AddTemporarySigningCredential()
                .AddInMemoryApiResources(Config.GetApiResource())
                .AddInMemoryClients(Config.GetClient());
        }

        //配置HTTP request 管道(pipeline).
        public void Configure(IApplicationBuilder app, IHostingEnvironment env, ILoggerFactory loggerFactory)
        {
            loggerFactory.AddConsole(LogLevel.Debug);

            if (env.IsDevelopment())
            {
                app.UseDeveloperExceptionPage();
            }

            app.UseIdentityServer();

            //app.Run(async (context) =>
            //{
            //    await context.Response.WriteAsync("Hello World!");
            //});
        }
    }
}
配置
注意:使用自宿的方式调试;会把日志输出到控制台;自宿的配置方式:
方法1:

方法2:

配置地址:
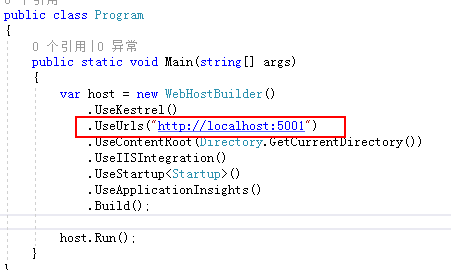
在program.cs添加一句:.UseUrls("http://localhost:5000") 设置调试url;
运行
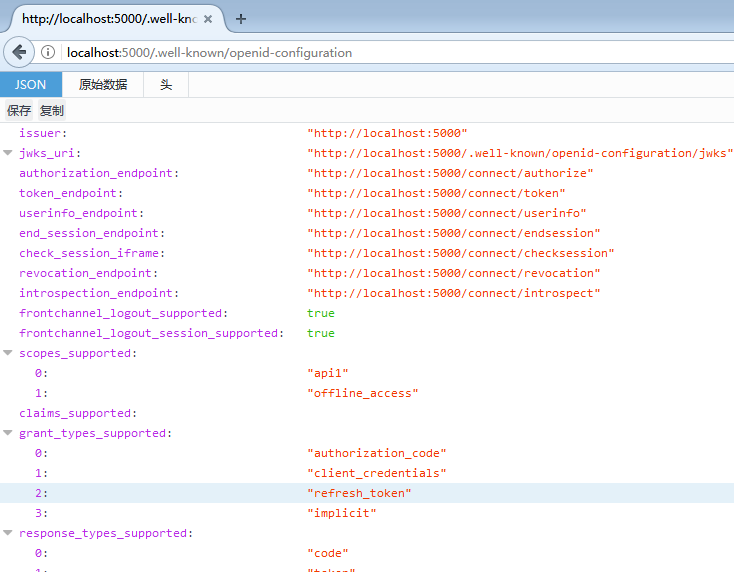
运行、通过http://localhost:5000/.well-known/openid-configuration访问 ;可以看到是一个restful的api;
2、API资源
新建ASP.NET Core Web API 项目;添加中间件IdentityServer4.AccessTokenValidation 包引用

配置api的地址
添加控制器
[Route("identity")]
    [Authorize]
    public class IdentityController : Controller
    {
        [HttpGet]
        public IActionResult Get()
        {
            return new JsonResult(from a in User.Claims select new { a.Type,a.Value});
        }
    }
配置
把授权中间件配置到api host里;IdentityServer4.AccessTokenValidation这里的主要作用
1、验证token令牌,确保token令牌的Issuer发行者是经过注册认证可信任的发行者;
2、验证token令牌,确保这个令牌的授权范围(scope)包括授权使用这个api
    public class Startup
    {
        public Startup(IHostingEnvironment env)
        {
            var builder = new ConfigurationBuilder()
                .SetBasePath(env.ContentRootPath)
                .AddJsonFile("appsettings.json", optional: false, reloadOnChange: true)
                .AddJsonFile($"appsettings.{env.EnvironmentName}.json", optional: true)
                .AddEnvironmentVariables();
            Configuration = builder.Build();
        }

        public IConfigurationRoot Configuration { get; }

        // This method gets called by the runtime. Use this method to add services to the container.
        public void ConfigureServices(IServiceCollection services)
        {
            // Add framework services.
            services.AddMvcCore()
                .AddAuthorization()
                .AddJsonFormatters();
        }

        // This method gets called by the runtime. Use this method to configure the HTTP request pipeline.
        public void Configure(IApplicationBuilder app, IHostingEnvironment env, ILoggerFactory loggerFactory)
        {
            loggerFactory.AddConsole(Configuration.GetSection("Logging"));
            loggerFactory.AddDebug();
            app.UseIdentityServerAuthentication(new IdentityServerAuthenticationOptions {
                Authority = "http://localhost:5000",
                RequireHttpsMetadata=false,
                ApiName="api1"
            });
            app.UseMvc();
        }
    }
运行后,直接浏览器访问http://localhost:5001/identity会被拒绝说明成功;访问这个api需要在http请求的header加入token才可以访问;
3、Client客户端
新建.Net Core——控制台应用;添加中间件

IdentityModel是官方提供给我们的一个Client类库;当然用户也可以自行构建原始的http协议访问API;
public class Program
    {
        public static void Main(string[] args) => MainAsync().GetAwaiter().GetResult();


        private static async Task MainAsync()
        {
            //
            var dico = await DiscoveryClient.GetAsync("http://localhost:5000");

            //token
            var tokenClient = new TokenClient(dico.TokenEndpoint, "client", "secret");
            var tokenresp = await tokenClient.RequestClientCredentialsAsync("api1");
            if (tokenresp.IsError)
            {
                Console.WriteLine(tokenresp.Error);
                return;

            }

            Console.WriteLine(tokenresp.Json);
            Console.WriteLine("

");


            var client = new HttpClient();
            client.SetBearerToken(tokenresp.AccessToken);

            var resp = await client.GetAsync("http://localhost:5000/identity");
            if (!resp.IsSuccessStatusCode)
            {
                Console.WriteLine(resp.StatusCode);
            }
            else
            {
                var content = await resp.Content.ReadAsStringAsync();
                Console.WriteLine(JArray.Parse(content));
            }


        }
    }
DiscoveryClient类:IdentityModel提供给我们通过基础地址(如:http://localhost:5000)就可以访问令牌服务端;当然可以根据上面的restful api里面的url自行构建;上面就是通过基础地址,获取一个TokenClient;(对应restful的url:token_endpoint "http://localhost:5000/connect/token")
RequestClientCredentialsAsync方法:请求令牌;
获取令牌后,就可以通过构建http请求访问API接口;这里使用HttpClient构建请求,获取内容;
运行效果:

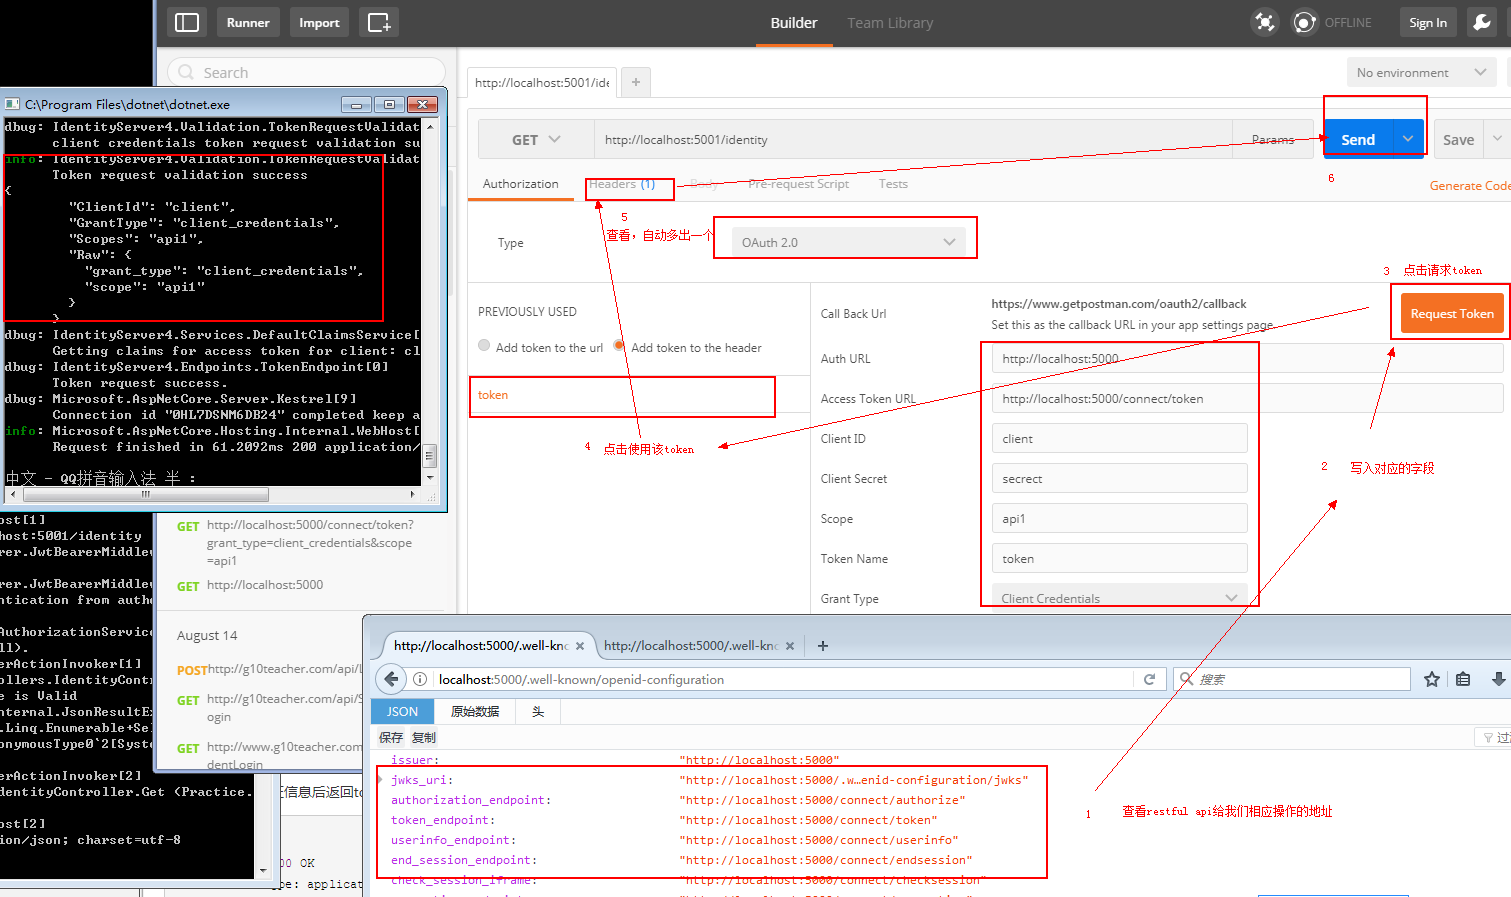
我们换一种原始的方式模拟这个流程
打开Postman:按照restful api页面的说明,依次进行下面的步骤操作,一个很原始的http流程就熟悉了;自行查看原图
资料:
http://wiki.connect.qq.com/%E4%BD%BF%E7%94%A8implicit_grant%E6%96%B9%E5%BC%8F%E8%8E%B7%E5%8F%96access_token