1、创建SecurityUser类,需要实现UserDetails接口
import lombok.Data;
import lombok.EqualsAndHashCode;
import org.springframework.security.core.GrantedAuthority;
import org.springframework.security.core.userdetails.UserDetails;

import java.io.Serializable;
import java.util.Collection;
import java.util.Date;

/**
 *
 * 封装登陆用户的信息
 */
@Data
public class SecurityUser implements UserDetails {

    private String uid;

    private String username;

    private String password;

    private Integer sex;

    private String description;

    private Integer age;

    private String birthday;

    private Integer isDeleted;
    private Integer status;//1未禁用0禁用

    @Override
    public Collection<? extends GrantedAuthority> getAuthorities() {
        return null;
    }

    @Override
    public boolean isAccountNonExpired() {
        return true;
    }

    @Override
    public boolean isAccountNonLocked() {
        return true;
    }

    @Override
    public boolean isCredentialsNonExpired() {
        return true;
    }

    @Override
    public boolean isEnabled() {
        return true;
    }
}
2、编写UserAuthenticationFilter过滤器,这里需要继承UsernamePasswordAuthenticationFilter
原因: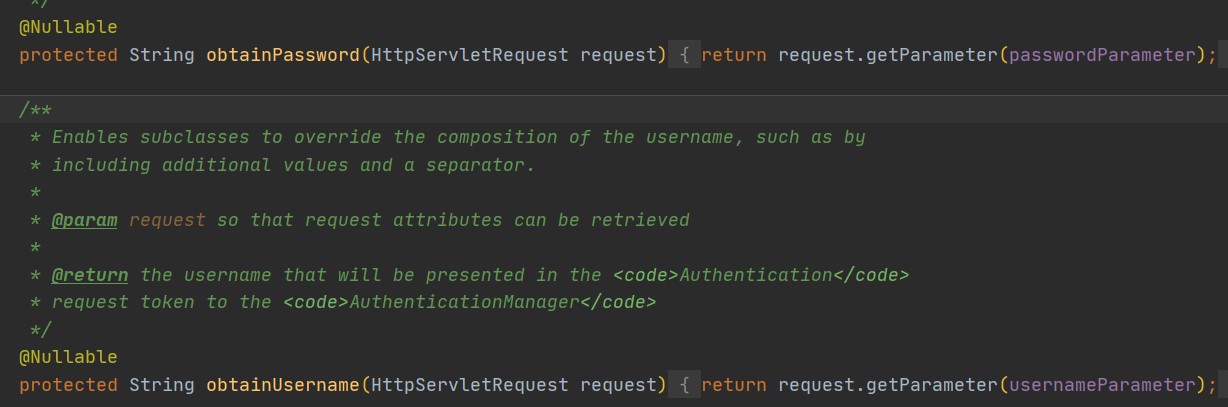
通过查看UsernamePasswordAuthenticationFilter获取用户名和密码的实现方法可以看到,默认只能获取form表单提供的数据,无法获得请求体中的数据。所以,要想获得请求体中的数据,需要自定义过滤器。
这里有两种方式获得用户名和密码
- 直接重写
obtainPassword和obtainUsername - 查看
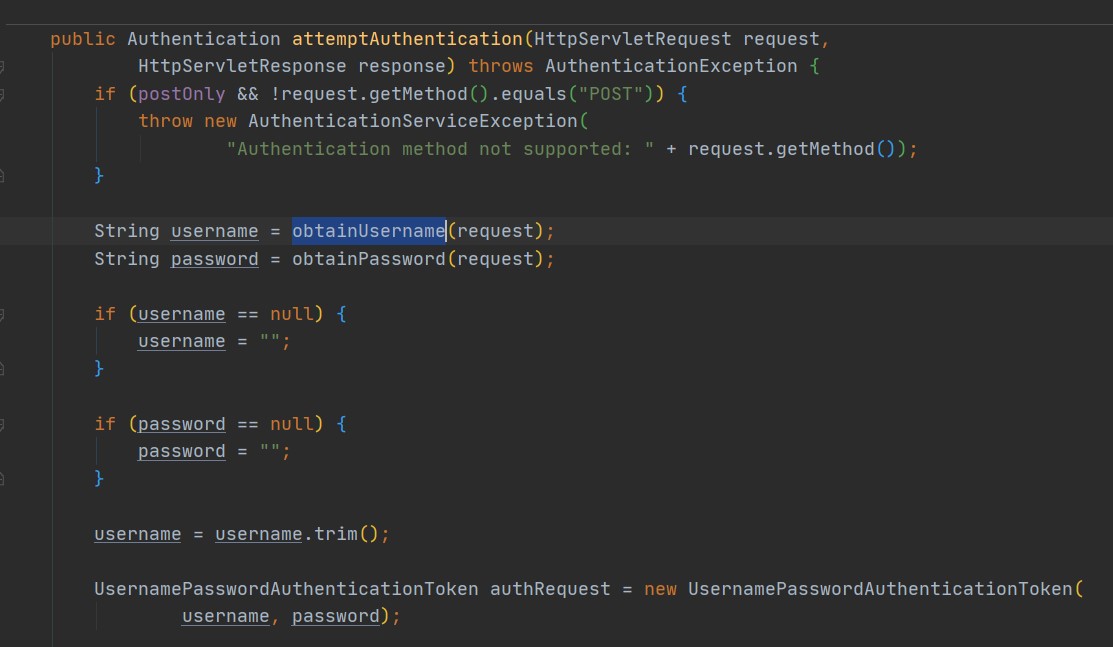
attemptAuthentication这个方法我们可以发现,用户名和密码是在这个方法里面获得并且使用的,因此我们可以直接重写这个方法。(这里使用的第二种方式)
import com.background.modules.security.bean.SecurityUser;
import com.fasterxml.jackson.databind.ObjectMapper;
import lombok.extern.slf4j.Slf4j;
import org.springframework.beans.factory.annotation.Autowired;
import org.springframework.security.authentication.AuthenticationManager;
import org.springframework.security.authentication.UsernamePasswordAuthenticationToken;
import org.springframework.security.core.Authentication;
import org.springframework.security.core.AuthenticationException;
import org.springframework.security.web.authentication.UsernamePasswordAuthenticationFilter;

import javax.servlet.http.HttpServletRequest;
import javax.servlet.http.HttpServletResponse;
import java.io.IOException;

@Slf4j
public class UserAuthenticationFilter extends UsernamePasswordAuthenticationFilter {

    @Autowired
    private AuthenticationManager authenticationManager;

    @Override
    public Authentication attemptAuthentication(HttpServletRequest req, HttpServletResponse res)
            throws AuthenticationException {
        try {
            SecurityUser user = new ObjectMapper().readValue(req.getInputStream(), SecurityUser.class);
            return authenticationManager.authenticate(new UsernamePasswordAuthenticationToken(user.getUsername(), user.getPassword()));
        } catch (IOException e) {
            throw new RuntimeException(e.getMessage());
        }

    }

}
3、编写UserDetailsServiceImpl,并且实现UserDetailsService
这里只需要实现loadUserByUsername方法,验证用户是否存在、是否被禁用
import com.baomidou.mybatisplus.core.conditions.query.QueryWrapper;
import com.background.modules.security.bean.SecurityUser;
import com.background.modules.user.bean.User;
import com.background.modules.user.service.UserService;
import lombok.extern.slf4j.Slf4j;
import org.springframework.beans.BeanUtils;
import org.springframework.beans.factory.annotation.Autowired;
import org.springframework.security.authentication.BadCredentialsException;
import org.springframework.security.core.userdetails.UserDetails;
import org.springframework.security.core.userdetails.UserDetailsService;
import org.springframework.security.core.userdetails.UsernameNotFoundException;
import org.springframework.stereotype.Component;

@Component
@Slf4j
public class UserDetailsServiceImpl implements UserDetailsService {
    @Autowired
    private UserService userService;


    @Override
    public UserDetails loadUserByUsername(String username) throws UsernameNotFoundException {
        User user = userService.getOne(new QueryWrapper<User>().eq("username", username));
        if(user==null){
            throw new BadCredentialsException("用户不存在");
        }
        if(user.getStatus()==0){
            throw new BadCredentialsException("用户被禁用");
        }
        SecurityUser userInfo = new SecurityUser();
        BeanUtils.copyProperties(user,userInfo);
        return userInfo;
    }
}
4、编写UserLoginAuthenticationProvider,继承DaoAuthenticationProvider
通过继承DaoAuthenticationProvider,可以自定义用户密码验证并查看异常信息。
具体效果

若不实现该类,抛出的异常信息会都变成Bad credentials
具体效果

import com.background.modules.security.service.UserDetailsServiceImpl;
import org.springframework.beans.factory.annotation.Autowired;
import org.springframework.security.authentication.BadCredentialsException;
import org.springframework.security.authentication.UsernamePasswordAuthenticationToken;
import org.springframework.security.authentication.dao.DaoAuthenticationProvider;
import org.springframework.security.core.AuthenticationException;
import org.springframework.security.core.userdetails.UserDetails;
import org.springframework.security.crypto.password.PasswordEncoder;
import org.springframework.stereotype.Component;


@Component
public class UserLoginAuthenticationProvider extends DaoAuthenticationProvider {

    @Autowired
    private UserDetailsServiceImpl detailsService;
    @Autowired
    private PasswordEncoder encoder;

    /**
     * 找到容器中的detailsService,并执行setUserDetailsService方法,完成赋值
     *
     * 必须要给UserDetailsService赋值,否则会出现UnsatisfiedDependencyException
     */
    @Autowired
    private void setDetailsService() {
        setUserDetailsService(detailsService);
    }

    @Override
    protected void additionalAuthenticationChecks(UserDetails userDetails, UsernamePasswordAuthenticationToken authentication) throws AuthenticationException {
        String presentedPassword = authentication.getCredentials().toString();
        if (!encoder.matches(presentedPassword, userDetails.getPassword())) {
            throw new BadCredentialsException(messages.getMessage("badCredentials", "用户密码错误"));
        }
    }
}
5、编写主配置类SecurityConfig,继承自WebSecurityConfigurerAdapter
import com.alibaba.fastjson.JSON;
import com.background.modules.security.filter.UserAuthenticationFilter;
import com.background.modules.security.provider.UserLoginAuthenticationProvider;
import com.common.util.R;
import lombok.extern.slf4j.Slf4j;
import org.apache.http.HttpStatus;
import org.springframework.beans.factory.annotation.Autowired;
import org.springframework.boot.SpringBootConfiguration;
import org.springframework.context.annotation.Bean;
import org.springframework.http.MediaType;
import org.springframework.security.authentication.AuthenticationManager;
import org.springframework.security.config.annotation.authentication.builders.AuthenticationManagerBuilder;
import org.springframework.security.config.annotation.web.builders.HttpSecurity;
import org.springframework.security.config.annotation.web.configuration.WebSecurityConfigurerAdapter;
import org.springframework.security.crypto.bcrypt.BCryptPasswordEncoder;
import org.springframework.security.crypto.password.PasswordEncoder;
import org.springframework.security.web.authentication.UsernamePasswordAuthenticationFilter;

/**
 * Created by X on 2020/7/22 16:30
 */
@Slf4j
@SpringBootConfiguration
public class SecurityConfig extends WebSecurityConfigurerAdapter {

    @Autowired
    private UserLoginAuthenticationProvider loginAuthenticationProvider;
    /**
     * 密码加密
     * @return
     */
    @Bean
    public PasswordEncoder passwordEncoder(){
        return new BCryptPasswordEncoder();
    }

    /**
     * 请求拦截、映射
     * @param http
     * @throws Exception
     */
    @Override
    public void configure(HttpSecurity http) throws Exception {
        http.authorizeRequests(auth->{
            //开放swagger、登陆页面的访问权限
           auth.antMatchers("/swagger-ui.html").permitAll()
                   .antMatchers("/swagger-resources/**").permitAll()
                   .antMatchers("/webjars/**").permitAll()
                   .antMatchers("/v2/**").permitAll()
                   .antMatchers("/api/**").permitAll()
                   .antMatchers("/background/login").permitAll()
                   .anyRequest().authenticated();
        });
        //启用自定义的过滤器
        http.addFilterAt(userAuthenticationFilter(), UsernamePasswordAuthenticationFilter.class);
        http.cors();//启用跨域
        http.csrf().disable();//关闭跨站攻击
    }

    /**
     * 用户认证
     * @param auth
     * @throws Exception
     */
    @Override
    protected void configure(AuthenticationManagerBuilder auth) throws Exception {
        //使用自定义的Provider,进行数据校验
        auth.authenticationProvider(loginAuthenticationProvider);
    }

    /**
     * 解决无法直接注入 AuthenticationManager
     * @return
     * @throws Exception
     */
    @Bean
    @Override
    public AuthenticationManager authenticationManager() throws Exception
    {
        return super.authenticationManager();
    }
    /**
     * 自定义成功回调、失败回调、登陆url地址等
     *
     * 可以在自定义UserAuthenticationFilter里面直接重写对应方法,
     * 例 成功回调:
     *      @Override
     *     public void setAuthenticationSuccessHandler(AuthenticationSuccessHandler successHandler) {
     *         super.setAuthenticationSuccessHandler(successHandler);
     *     }
     * @return
     * @throws Exception
     */
    @Bean
    public UserAuthenticationFilter userAuthenticationFilter() throws Exception {
        UserAuthenticationFilter filter = new UserAuthenticationFilter();
        //设置验证成功后的回调
        filter.setAuthenticationSuccessHandler((request,response,authentication)->{
            log.info("用户认证成功");
            //响应成功状态码必须为200
            response.setStatus(HttpStatus.SC_OK);
            response.setContentType(MediaType.APPLICATION_JSON_VALUE);
            response.setCharacterEncoding("utf-8");
            //将数据以json的形式返回给前台
            response.getWriter().print(JSON.toJSONString(R.ok()));
        });
        //设置验证失败后的回调
        filter.setAuthenticationFailureHandler((request,  response,  exception) ->{
            log.info("用户认证失败----{}",exception.getMessage());
            response.setContentType(MediaType.APPLICATION_JSON_VALUE);
            response.setCharacterEncoding("utf-8");
            //将数据以json的形式返回给前台
            response.getWriter().print(JSON.toJSONString(R.error(exception.getMessage())));
        });
        //设置用户发起登陆请求时的url
        filter.setFilterProcessesUrl("/background/login");
        filter.setAuthenticationManager(authenticationManager());
        return filter;
    }
}
若没有实现UserLoginAuthenticationProvider,这需要通过下面的方法实现数据校验
@Autowired
    private UserDetailsServiceImpl userDetailsService;
@Override
    protected void configure(AuthenticationManagerBuilder auth) throws Exception {    auth.userDetailsService(userDetailsService).passwordEncoder(passwordEncoder());
    }
6、vue开启请求携带cookies
axios.defaults.withCredentials=true//开启携带cookies