代码编辑&解释工具:Jupyter Notebook 快速入门
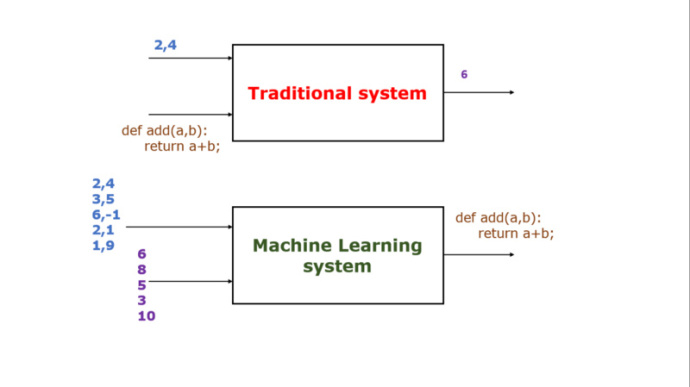
形象说明BP神经网络的用法(图片来自推特):
Bpnn类最主要的三个方法:
- initialize方法,用于设定神经网络的层数、各层节点数
- predict方法,方便用户应用模型做预测
- train方法,用来训练模型
所有代码如下(需要导入numpy模块):
import numpy as np
import math

def linear_transformation(matrix, vector):
    return vector.dot(matrix)

# vector = np.array([1, 2])
# matrix = [[1, 2], [3, 4]]
# vector = linear_transformation(matrix, vector)
# print("linear_transformation:", vector)
# print("linear_transformation:", type(vector))

def active(vector, f):
    return np.array(list(map(lambda x: f(x), vector)))

def sigmoid(x): # 激活函数
    return 1.0 / (1.0 + math.exp(-x))

# result = active(vector, sigmoid)
# print("active:", result)
# print("active:", type(result))

class Bpnn:
    # model是一个list,例如[2, 2, 3, 1]表示输入结点2个,第一个隐含层有2个节点,第二个隐含层有3个节点,输出结点1个
    def initialize(self, model):
        # 随机生成模型对应的矩阵(网络权重)和偏置
        self.matrixs = []
        self.biases = []
        for i in range(len(model) - 1): # 矩阵个数为总层数减1,例如4层的网络只需要3个矩阵就可以了
            self.matrixs.append(np.random.randn(model[i], model[i + 1])) # 矩阵的列数是对应输入节点的个数,矩阵的行数对应输出节点的个数

        for i in range(len(model) - 1):
            # 列表中的每个np数组代表一整层节点的偏置
            self.biases.append(np.random.randn(model[i + 1]))

    def predict(self, vector):
        result = np.array(vector)
        for i in range(len(self.matrixs)): # 其实就是对一个向量做多次线性变换
            result = linear_transformation(self.matrixs[i], result) + self.biases[i]
            result = active(result, sigmoid)
        return result

    def neural_net_output(self, feature): # 记录各层的输出
        result = []
        output = active(linear_transformation(self.matrixs[0], np.array(feature)) + self.biases[0], sigmoid)
        result.append(output)
        for i in range(len(self.matrixs) - 1):
            output = active(linear_transformation(self.matrixs[i + 1], output) + self.biases[i + 1], sigmoid)
            result.append(output)
        return result # 格式为[[代表第1层输出的向量], [代表第2层输出的向量], ...,[代表最终输出的向量]],所有向量都是一维的np.array,向量长度为该层节点数

    def compute_error(self, prediction, actual): # 计算各层的误差,actual是样本标记值(期望获得的值)
        result = []
        prediction = prediction[:] # 后面的处理都不影响原始数组
        prediction.reverse() # 转置便于处理
        error = prediction[0] * (1 - prediction[0]) * (actual - prediction[0]) # 计算最终输出的误差
        result.append(error)
        for i in range(len(self.matrixs) - 1): # 计算每层的误差,可以通过转置矩阵计算上一层误差的一个因子
            error = prediction[i + 1] * (1- prediction[i + 1]) * linear_transformation(self.matrixs[-1 - i].T, error)
            result.append(error)
        result.reverse()
        return result # 格式为[[代表第1层输出误差的向量], [代表第2层输出误差的向量], ...,[代表最终输出误差的向量]],所有向量都是一维的np.array,向量长度为该层节点数数

    def update_network(self, feature, prediction, error, LEARING_RATE):
        # 更新权重(手算凑出来的计算方法↓)
        temp = np.ones_like(self.matrixs[0])
        temp = temp * LEARING_RATE * error[0]
        temp = temp.T * np.array(feature)
        temp = temp.T
        self.matrixs[0] += temp;
        for i in range(len(self.matrixs) - 1):
            temp = np.ones_like(self.matrixs[i + 1])
            temp = temp * LEARING_RATE * error[i + 1]
            temp = temp.T * prediction[i]
            temp = temp.T
            self.matrixs[i + 1] += temp;

        # 更新偏置
        for i in range(len(self.biases)):
            self.biases[i] += LEARING_RATE * error[i]

    def train(self, get_batch, MAX_ITERATION, LEARING_RATE, MAX_LOSS):
        loss = MAX_LOSS = abs(MAX_LOSS)
        count = MAX_ITERATION
        while abs(loss) >= MAX_LOSS and count > 0:
            batch = get_batch()
            for example in batch:
                prediction = self.neural_net_output(example.feature)
                error = self.compute_error(prediction, example.label)
                self.update_network(example.feature, prediction, error, LEARING_RATE)
            loss = abs(np.mean(error[-1])) # 取最后一次迭代最终输出的平均值作为本批次的误差
            count = count - 1
        print("迭代次数:", MAX_ITERATION - count)
        print("误差:", loss)

class LabeledExample:
    def __init__(self, feature, label):
        self.feature = feature
        self.label = label

# 训练一个类似于异或(xor)运算的函数,相同为假,相异为真
labeled_examples = [LabeledExample([0, 0], [0]), LabeledExample([0, 1], [1]), LabeledExample([1, 0], [1]), LabeledExample([1, 1], [0])]

def full_batch():
    return labeled_examples


bpnn = Bpnn()
bpnn.initialize([2, 2, 1]) # 构造一个三层的神经网络,输入节点2个,隐含层节点2个,输出节点1个
bpnn.train(full_batch, 10000, 0.6, 0.01) # 学习因子为0.6, 最大允许误差0.01
print("输入层与隐含层权值", bpnn.matrixs[0])
print("隐含层权值与输出层权值", bpnn.matrixs[1])
print("隐含层阈值", bpnn.biases[0])
print("输出层阈值", bpnn.biases[1])
sample1 = [0.05, 0.1]
sample2 = [0.2, 0.9]
sample3 = [0.86, 0.95]
print("预测样本", sample1, "的结果是:", bpnn.predict(sample1))
print("预测样本", sample2, "的结果是:", bpnn.predict(sample2))
print("预测样本", sample3, "的结果是:", bpnn.predict(sample3))