饮水思源:https://www.bilibili.com/video/BV1Zy4y1K7SH?p=70
①划分组件,使用组件实现静态页面的效果。
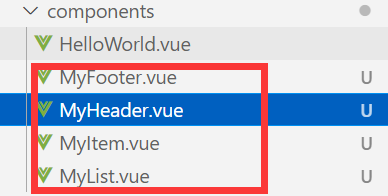
MyHeader.vue:
<template>

</template>

<script>
export default {
  name: 'MyHeader',
}
</script>

<!-- Add "scoped" attribute to limit CSS to this component only -->
<style scoped>

</style>
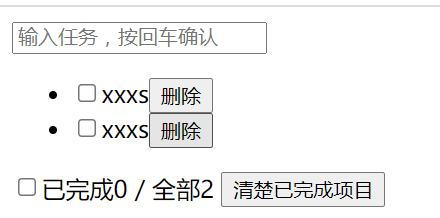
②把组件导入App。假设已经有非组件的静态页面。
App.vue:
<template>
  <div>
    <input type="text" placeholder="输入任务,按回车确认" />
    <ul>
      <li>
        <label>
          <input type="checkbox" />
          <span>xxxs</span>
        </label>
        <button>删除</button>
      </li>
      <li>
        <label>
          <input type="checkbox" />
          <span>xxxs</span>
        </label>
        <button>删除</button>
      </li>
    </ul>
    <div>
      <label>
        <input type="checkbox" />
      </label>
      <span>
        <span>已完成0</span> / 全部2
      </span>
      <button>清楚已完成项目</button>
    </div>
  </div>
</template>

<script>
// import MyHeader from './components/MyHeader.vue'
// import MyFooter from './components/MyFooter.vue'
// import MyList from './components/MyList.vue'
// import MyItem from './components/MyItem.vue'

export default {
  name: 'App',
  components: {

  }
}
</script>

<style>

</style>
③在维持静态页面正常显示的情况下,把html和css分发到各个.vue文件中去。
App.vue:
<template>
  <div>
    <MyHeader />
    <MyList />
    <MyFooter />
  </div>
</template>

<script>
import MyHeader from './components/MyHeader.vue'
import MyList from './components/MyList.vue'
import MyFooter from './components/MyFooter.vue'
// import MyItem from './components/MyItem.vue'

export default {
  name: 'App',
  components: {
    MyHeader,
    MyList,
    MyFooter,
  }
}
</script>

<style>

</style>
④安装nanoid(一个用于生成id的库)
cnpm i nanoid
⑤动态展示数据,暂时把数据放在MyList(初始化列表,内存List转化为页面List)
MyList.vue:
<template>
  <ul>
    <MyItem v-for="todoObj in todos" :key="todoObj.id" :todo="todoObj" />
  </ul>
</template>

<script>
import MyItem from './MyItem.vue'

export default {
  name: 'MyList',
  components: {
    MyItem,
  },
  data() {
    return {
      todos: [
        {id: '001', title: '吃饭', done: true},
        {id: '002', title: '喝水', done: false},
        {id: '003', title: '睡觉', done: true},
      ],
    }
  },
}
</script>

<!-- Add "scoped" attribute to limit CSS to this component only -->
<style scoped>

</style>
MyItem.vue:
<template>
  <li>
    <label>
      <input type="checkbox" :checked="todo.done"/>
      <span>{{todo.title}}</span>
    </label>
    <button>删除</button>
  </li>
</template>

<script>
export default {
  name: 'MyItem',
  props: ['todo']
}
</script>

<!-- Add "scoped" attribute to limit CSS to this component only -->
<style scoped>

</style>
⑥动态添加列表元素。
通过MyHeader.vue添加元素,但是有个问题,组件之间是兄弟关系,而不是父子关系,已知的知识没法传递数据。
MyHeader.vue:
<template>
  <input type="text" placeholder="输入任务,按回车确认" @keyup.enter="addItem"/>
</template>

<script>
import {nanoid} from 'nanoid'

export default {
  name: 'MyHeader',
  methods: {
    addItem(e) {
      const todoObj = {
        id: nanoid(),
        title: e.target.value,
        done: false,
      }
      console.log(todoObj)
    },
  },
}
</script>

<!-- Add "scoped" attribute to limit CSS to this component only -->
<style scoped>

</style>
解决办法:子组件向父组件传递——把List放在App(父)上,App(父)给MyHeader(子)传递一个向List添加元素的方法,MyHeader调用给方法实现传递。App(父)再通过MyList的props向其传递列表。
修改MyList.vue(感觉props有点类似于java中的构造器参数):
<template>
  <ul>
    <MyItem v-for="todoObj in todos" :key="todoObj.id" :todo="todoObj" />
  </ul>
</template>

<script>
import MyItem from './MyItem.vue'

export default {
  name: 'MyList',
  components: {
    MyItem,
  },
  props: ['todos'],
}
</script>

<!-- Add "scoped" attribute to limit CSS to this component only -->
<style scoped>

</style>
修改MyHeader.vue:
<template>
  <input type="text" placeholder="输入任务,按回车确认" @keyup.enter="addItem"/>
</template>

<script>
import {nanoid} from 'nanoid'

export default {
  name: 'MyHeader',
  props: ['appAddItem'],
  methods: {
    addItem(e) {
      const todoObj = {
        id: nanoid(),
        title: e.target.value,
        done: false,
      }
      this.appAddItem(todoObj)
    },
  },
}
</script>

<!-- Add "scoped" attribute to limit CSS to this component only -->
<style scoped>

</style>
修改App.vue:
<template>
  <div>
    <MyHeader :appAddItem="appAddItem" />
    <MyList :todos="todos" />
    <MyFooter />
  </div>
</template>

<script>
import MyHeader from './components/MyHeader.vue'
import MyList from './components/MyList.vue'
import MyFooter from './components/MyFooter.vue'

export default {
  name: 'App',
  data() {
    return {
      todos: [
        {id: '001', title: '吃饭', done: true},
        {id: '002', title: '喝水', done: false},
        {id: '003', title: '睡觉', done: true},
      ],
    }
  },
  methods: {
    appAddItem(x) {
      this.todos.unshift(x);
    }
  },
  components: {
    MyHeader,
    MyList,
    MyFooter,
  }
}
</script>

<style>

</style>
⑦勾选后改变数据
MyItem.vue办法一:
<template>
  <li>
    <label>
      <input type="checkbox" :checked="todo.done" @click="handleClick(todo)" />
      <span>{{todo.title}}</span>
    </label>
    <button>删除</button>
  </li>
</template>

<script>
export default {
  name: 'MyItem',
  props: ['todo'],
  methods: {
    handleClick(todo) {
      todo.done = !todo.done
    },
  },
}
</script>

<!-- Add "scoped" attribute to limit CSS to this component only -->
<style scoped>

</style>
办法二:
<template>
  <li>
    <label>
      <input type="checkbox" v-model="todo.done" />
      <span>{{todo.title}}</span>
    </label>
    <button>删除</button>
  </li>
</template>

<script>
export default {
  name: 'MyItem',
  props: ['todo'],
}
</script>

<!-- Add "scoped" attribute to limit CSS to this component only -->
<style scoped>

</style>
教程貌似不太建议上面的两种方法(修改了props,违反原则?)。而采用,父向子传递方法的办法。
⑧实现删除
从MyItem.vue开始实现(用css实现视觉效果):
<template>
  <li>
    <label>
      <input type="checkbox" v-model="todo.done" />
      <span>{{todo.title}}</span>
    </label>
    <button @click="handleRemove(todo.id)">删除</button>
  </li>
</template>

<script>
export default {
  name: 'MyItem',
  props: ['todo', 'appRemoveTodo'],
  methods: {
    handleRemove(id) {
      // console.log(id);
      this.appRemoveTodo(id)
    }
  },
}
</script>

<!-- Add "scoped" attribute to limit CSS to this component only -->
<style scoped>
  li:hover {
    background-color: aquamarine;
  }

  li button {
    display: none;
  }

  li:hover button {
    display: block;
  }
</style>
途经MyList.vue传递方法:
<template>
  <ul>
    <MyItem v-for="todoObj in todos" :key="todoObj.id" :todo="todoObj" :appRemoveTodo="appRemoveTodo"/>
  </ul>
</template>

<script>
import MyItem from './MyItem.vue'

export default {
  name: 'MyList',
  components: {
    MyItem,
  },
  props: ['todos', 'appRemoveTodo'],
}
</script>

<!-- Add "scoped" attribute to limit CSS to this component only -->
<style scoped>

</style>
通过App实现这个方法,修改todos:
<template>
  <div>
    <MyHeader :appAddItem="appAddItem" />
    <MyList :todos="todos" :appRemoveTodo="appRemoveTodo" />
    <MyFooter />
  </div>
</template>

<script>
import MyHeader from './components/MyHeader.vue'
import MyList from './components/MyList.vue'
import MyFooter from './components/MyFooter.vue'

export default {
  name: 'App',
  data() {
    return {
      todos: [
        {id: '001', title: '吃饭', done: true},
        {id: '002', title: '喝水', done: false},
        {id: '003', title: '睡觉', done: true},
      ],
    }
  },
  methods: {
    appAddItem(x) {
      this.todos.unshift(x);
    },
    appRemoveTodo(todoId) {
      this.todos = this.todos.filter(todo => todo.id !== todoId);
    },
  },
  components: {
    MyHeader,
    MyList,
    MyFooter,
  }
}
</script>

<style>

</style>