一、BOM概念
BOM(Browser Object Model)即浏览器对象模型。可以对浏览器窗口进行访问和操作。使用 BOM,开发者可以移动窗口、改变状态栏中的文本以及执行其他与页面内容不直接相关的动作。
BOM缺乏标准,JavaScript语法的标准化组织是ECMA,DOM的标准化组织是W3C,BOM最初是Netscape浏览器标准的一部分。
BOM提供了独立于内容而与浏览器窗口进行交互的对象。由于BOM主要用于管理窗口与窗口之间的通讯,因此其核心对象时window。
BOM由一系列相关的对象(WindowNavigatorScreenHistoryLocation)构成,并且每个对象都提供了很多方法与属性。
二、BOM内容
与浏览器窗口交互的一些对象,例如可以移动、调整浏览器大小的window对象,可以用于导航的location对象与history对象,可以获取浏览器、操作系统与用户屏幕信息的navigator与screen对象,可以使用document作为访问HTML文档的入口,管理框架的frames对象等。
通常浏览器特定的JavaScript扩展都被看做BOM的一部分,这些扩展包括:
- 弹出新的浏览器窗口
- 移动、关键浏览器窗口以及调整窗口大小
- 提供Web浏览器详细信息的定位对象
- 提供用户屏幕分辨率详细信息的屏幕对象
- 对cookie的支持
- IE扩展了BOM,加入ActiveXObject类,可以通过JavaScript实例化ActiveX对象

上图为BOM结构图,window对象是BOM的顶层(核心)对象,所有对象都是通过它延伸出来的,也可以称为window的子对象;BOM也是BOM的一部分。
三、window对象
window对象是js中的顶级对象;所有定义在全局作用域中的变量、函数都会变成window对象的属性和方法;window对象下的属性和方法在调用时,可以省略window。
1、系统对话框及BOM输出
(1)alert(message):显示带有一段消息和一个确定按钮的警告框
alert(11)是window.alert(11)的简写,它是window的子方法。常用于浏览器调试
(2)prompt('message', defaultValue): 显示可提示用户输入的对话框
// prompt('message',defaultValue)
var pro = prompt('路飞学城',443);
console.log(pro);  // 显示输入在对话框的内容
(3)confirm(message):显示带有一段消息以及确认按钮和取消按钮的对话框
// confirm() :如果点击确定返回true,如果点击取消,就返回false
var m = confirm("学习BOM");
console.log(m);
(4)print():打印当前窗口的内容
function printLuffy() {
    // window.print();
    print();   // 直接调用打印机
}
(5)find():
function findLuffy() {
    var m2 = confirm("学习");
    find(m2);
}
总结:

<!DOCTYPE html>
<html lang="en">
<head>
    <meta charset="UTF-8">
    <title>Title</title>
</head>
<body>
    <button onclick="printLuffy()">打印</button>
    <button onclick="findLuffy()">查找</button>
</body>
<script type="text/javascript">
    // 1.js的核心 ECMAScript  DOM  BOM
    // BOM:Browser Object Model 浏览器对象模型
    // 核心 浏览器

    // 输出  屏幕宽高  滚动宽高  setInterval等方法  window.open() close() location

    // 1.alert()

    // 2.用于浏览器的调试
    console.log('路飞学城');

    // 3.prompt('message',defaultValue)
    var pro = prompt('路飞学城',443);
    console.log(pro);  // 显示输入在对话框的内容

    // 4.confirm() :如果点击确定返回true,如果点击取消,就返回false
    var m = confirm("学习BOM");
    console.log(m);

    function printLuffy() {
        // window.print();
        print();   // 直接调用打印机
    }
    function findLuffy() {
        var m2 = confirm("学习");
        find(m2);
    }
</script>
</html>
系统对话框有三种:alert()、prompt()、confirm()。
    alert();    //不同浏览器中的外观是不一样的
    confirm();  //兼容不好
    prompt();   //不推荐使用
2、打开和关闭窗口
open语法:
 window.open(url,target,param);
/*
参数解释:
    url:要打开的地址。
    target:新窗口的位置。可以是:_blank 、_self、 _parent 父框架。
    param:新窗口的一些设置。
    返回值:新窗口的句柄。
*/
open和close使用总结:
open('https://www.baidu.com');//打开百度网页,winodow对象可以省略
//行间的js中的window不能省略
<button onclick="window.open('https://www.luffycity.com/')">路飞学城</button>

//打开空白页面
open('about:blank',"_self")

//关闭当前页面
close();
//行间js中的window还是不能省略
<button onclick="window.close()">关闭</button>
使用案例:

<!DOCTYPE html>
<html lang="en">
<head>
    <meta charset="UTF-8">
    <title>BOM中open和close方法</title>
</head>
<body>
    <!--行间js中的open() window不能省略-->
    <button onclick="window.open('http://www.sina.com.cn/')">新浪网站</button>

    <button>打开百度</button>

    <button>打开空白页面</button>

    <!--<button onclick="window.close()">关闭</button>-->
    <!--脚本不得关闭非脚本打开的窗口。-->

    <button>关闭</button>
</body>
<script type="text/javascript">

    var oBtn = document.getElementsByTagName('button')[1];  // button标签第二个
    // 此次windos对象可以省略
    oBtn.onclick = function () {
        open("https://www.baidu.com");
    }

    var oBtnBlank = document.getElementsByTagName('button')[2];
    oBtnBlank.onclick = function () {
        // 原页面,打开一个空白页面
        open('about:blank', "_self");
    }

    var CloseBtn = document.getElementsByTagName('button')[3];
    CloseBtn.onclick = function () {
        if (confirm("是否关闭")) {
            close();
        }
    }
</script>
</html>
四、location对象
location对象包含有关当前URL的信息。location对象是Window对象的一个部分,可以通过window.location属性来访问。
location对象的属性:
| 属性 | 描述 |
|---|---|
| hash | 设置或返回从井号 (#) 开始的 URL(锚)。 |
| host | 设置或返回主机名和当前 URL 的端口号。 |
| hostname | 设置或返回当前 URL 的主机名。 |
| href | 设置或返回完整的 URL。 |
| pathname | 设置或返回当前 URL 的路径部分。 |
| port | 设置或返回当前 URL 的端口号。 |
| protocol | 设置或返回当前 URL 的协议。 |
| search | 设置或返回从问号 (?) 开始的 URL(查询部分)。 |
location对象的方法:
| 属性 | 描述 |
|---|---|
| assign() | 加载新的文档。 |
| reload() | 重新加载当前文档。 |
| replace() | 用新的文档替换当前文档。 |
location.assign('http://www.baidu.com'); 等同于 window.location = 'http://www.baidu.com' 这种方式会讲新地址放到浏览器历史栈中,意味着转到新页面后“后退按钮”仍可以回到该页面。
location.replace( url )与assign方法一样,但会从浏览器历史栈中删除本页面,也就是说跳转到新页面后“后退按钮”不能回到该页面。目前IE、Chrome只是简单的跳转,只有Firefox会删除本页面的历史记录。
location.reload( force )重新载入当前页面。force为true时从服务器端重载;false则从浏览器缓存中重载,默认值false。
// 返回浏览器的用户设备信息
console.log(window.navigator.userAgent);

// 获取用户本地信息
console.log(window.location);
// 经常使用的一个方法————href,直接打开网址
window.location.href = 'https://www.luffycity.com';

// 全局刷新 ====> 尽量少用这种方法  对应局部刷新
setTimeout(function () {
    window.location.reload();
},3000)
// window.location.reload();
五、navigator对象
Navigator对象包含有关浏览器的信息。(没有公开的标准,但是所有浏览器都支持该对象)
// 返回浏览器的用户设备信息
console.log(window.navigator.userAgent);
六、Screen对象和History对象
Screen 对象包含有关客户端显示屏幕的信息。
History 对象包含用户(在浏览器窗口中)访问过的 URL。
History 对象是 window 对象的一部分,可通过 window.history 属性对其进行访问。
七、client系列
1、clientWidth/clientHeight:获取网页可视区域宽高
调用者不同,意义不同:
(1)盒子调用:用来检测盒子的宽高+padding;
clientWidth = width+padding;不包含border和margin,而且不会被内容左右
(2)body/htm调用:可视区域大小;
2、clientTop/clientLeft:内容区域到边框顶(左)部距离
clientTop:检测盒子的上border
clientLeft:检测盒子的左border
3、clientX/clientY:调用者为event,检测鼠标距离可视区域的宽高
<!DOCTYPE html>
<html lang="en">
<head>
    <meta charset="UTF-8">
    <title>client系列</title>
    <style type="text/css">
        .box {
             200px;
            height: 200px;
            position: absolute;
            border: 20px solid red;
            margin: 10px 0px 0px 0px;
            padding: 10px;
        }
    </style>
</head>
<body>
    <div class="box">

    </div>
</body>
    <script type="text/javascript">
        /*style
            top
            left
            right
            bottom
        client
            clientTop   内容区域到边框顶部距离
            clientLeft    内容区域到边框左部的距离
            clientWidth     内容区域+左右padding  可视宽度
            clientHeight    内容区域+上下padding  可视高度
         */
        var oBox = document.getElementsByClassName('box')[0];

        console.log(oBox.clientTop);
        console.log(oBox.clientLeft);
        console.log(oBox.clientWidth);
        console.log(oBox.clientHeight);
    </script>
</html>
运用案例:获取屏幕的可视区域
<!DOCTYPE html>
<html lang="en">
<head>
    <meta charset="UTF-8">
    <title>屏幕可视区域</title>
</head>
<body>

</body>
<script type="text/javascript">
    /*

     */
    // onload事件会在所有dom元素全部加载完成后才调用里面的方法
    window.onload = function () {
        console.log(document.documentElement.clientWidth);
        console.log(document.documentElement.clientHeight);

        // 监听可视区域宽高
        window.onresize = function () {
            console.log(document.documentElement.clientWidth);
            console.log(document.documentElement.clientHeight);
        }

    }
</script>
</html>
八、offset系列
offset() 方法返回或设置匹配元素相对于文档的偏移(位置)
|
offsetWidth和offsetHeight
|
offsetHeight的构成
|
offsetHeight = height + padding + border
offsetWidth相同
|
|
offsetHeight和style.height的区别
|
1. demo.style.height只能获取行内样式,否则无法获取到
2. .style.height是字符串(有单位px), offsetHeight是数值(无单位)
3. .style.height可以设置行内样式,但offsetHeight是只读属性,不可设置
所以:demo.style.height获取 某元素的真实高度/宽度,用.style.height来设置高度/宽度
|
|
|
offsetLeft和offsetTop
|
offsetLeft的构成
|
1,到距离自身最近的(带有定位的)父元素的 左侧/顶部
2,如果所有父级元素都没有定位,则以body为准
3,offsetLeft是自身border左侧到父级padding左侧的距离
|
|
offsetLeft和style.left的区别
|
1,style.left只能获取行内样式
2,offsetLeft只读,style.left可读可写
3,offsetLeft是数值,style.left是字符串并且有单位px
4,如果没有定位,style.left获取的数值可能是无效的
5,最大的区别:offsetLeft以border左上角为基准, style.left以margin左上角为基准
|
|
|
offsetParent
|
构成
|
1. 返回该对象距离最近的带有定位的父级元素
2. 如果当前元素的所有父级元素都没有定位(position为absolute或relative),那么offsetParent为body
3. offsetLeft获取的就是相对于offsetParent的距离
|
|
|
与parentNode的区别
|
parentNode始终指向的是当前元素的最近的父元素,无论定位与否 |
offset示意图:

offset示例:

<!DOCTYPE html>
<html lang="en">
<head>
    <meta charset="UTF-8">
    <title>offset系列</title>
    <style type="text/css">
        #box {
            width: 200px;
            height: 200px;
            border: 1px solid red;
            padding: 10px;
            margin: 10px;
            position: absolute;
            top: 20px;
            left: 30px;
        }
    </style>
</head>
<body>
    <!--行内样式-->
    <!--<div id="box" style=" 200px;height: 200px;border: 1px solid red;padding: 10px;margin: 10px;">-->
    <div id="box"></div>
    </div>
</body>
<script type="text/javascript">
    window.onload = function () {
        var box = document.getElementById('box');
        // 占位宽 高 top left
        /*
        offsetTop:如果盒子没有设置定位  到浏览器的顶部距离,
                   如果盒子设置定位,以父盒子为基准的top值
        offsetLeft: 如果盒子没有设置定位  到浏览器左部的距离
                    如果盒子设置定位,以父盒子为基准的left值
        offsetWidth:内容+padding+border
        offsetHeight: 内容+padding+border
         */
        console.log(box.offsetTop);  //10
        console.log(box.offsetLeft);  //18
        console.log(box.offsetWidth); //222  200+1+1+10+10
        console.log(box.offsetHeight);  //222


    }
</script>
</html>
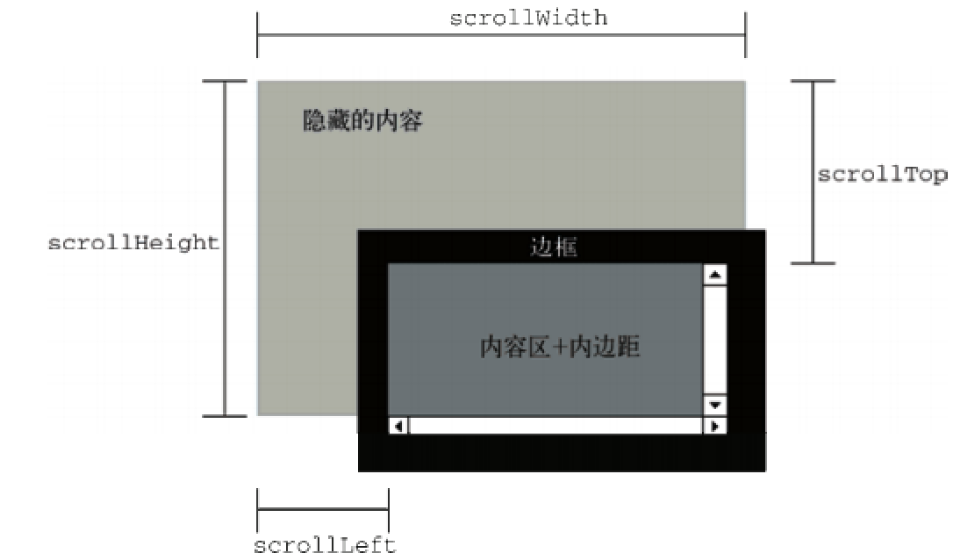
九、scroll系列方法
方法:
| scrollHeight和scrollWidth | 对象内部的实际内容的高度/宽度(不包括border) |
| scrollTop和scrollLeft | 被卷去部分的顶部/左侧 到 可视区域 顶部/左侧 的距离 |
| onscroll事件 | 滚动条滚动触发的事件 |
| 页面滚动坐标 | var scrollTop = window.pageYoffset || document.documentElement.scrollTop || document.body.scrollTop || 0; |
scroll示意图:

<!DOCTYPE html>
<html lang="en">
<head>
    <meta charset="UTF-8">
    <title>scroll系列</title>
</head>
<body style=" 2000px;height: 2000px;">
    <div style="height: 200px;background-color: red;"></div>
    <div style="height: 200px;background-color: green;"></div>
    <div style="height: 200px;background-color: yellow;"></div>
    <div style="height: 200px;background-color: blue;"></div>
    <div style="height: 200px;background-color: gray;"></div>

    <div id='scroll' style=" 200px;height: 200px;border: 1px solid red;
    overflow: auto;padding: 10px;margin: 5px 0px 0px 0px;">
        <p>
            路飞学城路飞学城路飞学城路飞学城路飞学城路飞学城路飞学城路飞学城路飞学城
            路飞学城路飞学城路飞学城路飞学城路飞学城路飞学城路飞学城路飞学城路飞学城
            路飞学城路飞学城路飞学城路飞学城路飞学城路飞学城路飞学城路飞学城路飞学城
            路飞学城路飞学城路飞学城路飞学城路飞学城路飞学城路飞学城路飞学城路飞学城
            路飞学城路飞学城路飞学城路飞学城路飞学城路飞学城路飞学城路飞学城路飞学城
        </p>
    </div>

</body>
<script type="text/javascript">
    window.onload = function () {
        // 实时监听滚动事件
        window.onscroll = function () {
            // console.log(111);
            // console.log('上边'+ document.documentElement.scrollTop);
            // console.log('左边'+ document.documentElement.scrollLeft);
            // console.log('宽'+ document.documentElement.scrollWidth);
            // console.log('高'+ document.documentElement.scrollHeight);
        }

        var s = document.getElementById('scroll');

        s.onscroll = function () {
            console.log('上边'+ s.scrollTop);
            console.log('左边'+ s.scrollLeft);
            console.log('宽'+ s.scrollWidth);
            // scrollHeight:内容的高度+padding  不包含边框和margin
            console.log('高'+ s.scrollHeight);
        }
    }

</script>
</html>
