在项目中创建新应用:Login,来实现注册、登录、认证功能。
一、注册接口
1、创建注册路由
首先在工程路由中添加login应用路由:
from django.contrib import admin
from django.urls import path, include, re_path
from django.views.static import serve
from LuffyCity import settings


urlpatterns = [
    path('admin/', admin.site.urls),
    path('api/course/', include("Course.urls")),
    path('api/', include("Login.urls")),

    # media路径配置
    # path('media/(?P<path>.*)', serve, {'document_root': settings.MEDIA_ROOT}),
    re_path('media/(?P<path>.*)', serve, {'document_root': settings.MEDIA_ROOT})
]
随后在login应用中添加路由文件./Login/urls.py:
from django.urls import path
from .views import RegisterView

urlpatterns = [
    path('register', RegisterView.as_view())
]
2、创建注册序列化器
添加新文件:./Login/serializers.py,内容如下所示:
from rest_framework import serializers
from Course.models import Account      # 账户表
import hashlib      #


class RegisterSerializer(serializers.ModelSerializer):
    # 注册序列化器
    class Meta:
        model = Account
        fields = "__all__"

    def create(self, validated_data):
        # 重写pwd,用md5加盐
        pwd = validated_data["pwd"]
        pwd_salt = "mao_password" + pwd
        md5_str = hashlib.md5(pwd_salt.encode()).hexdigest()    # hexdigest方法拿到md5的str
        user_obj = Account.objects.create(username=validated_data["username"], pwd=md5_str)
        return user_obj
3、配置消息响应
在工程根目录创建utils目录,添加base_response.py文件:
class BaseResponse(object):

    def __init__(self):
        self.code = 1000    # 默认码1000
        self.data = None
        self.error = None   # 错误信息

    @property   # 方法变属性
    def dict(self):
        print('222', self.__dict__)
        return self.__dict__
发送请求,可以看到这里dict函数中会打印如下信息:222 {'code': 1000, 'data': {'id': 33, 'username': 'alex', 'pwd': '7ab71bb07cb065c4f5261ea81159c100'}, 'error': None}
4、编写注册视图
在./Login/views.py中编写注册视图:
from rest_framework.views import APIView
from rest_framework.response import Response
from django.http import JsonResponse, HttpResponse
from .serializers import RegisterSerializer    # 引入序列化器
from utils.base_response import BaseResponse
# Create your views here.


class RegisterView(APIView):

    def post(self, request):
        res = BaseResponse()   # 实例化response
        # 用序列化器做校验
        ser_obj = RegisterSerializer(data = request.data)
        if ser_obj.is_valid():
            # 检验通过
            ser_obj.save()
            res.data = ser_obj.data
        else:
            # 检验失败
            res.code = 1020
            res.error = ser_obj.errors
        print('1111', res.data, res.dict)
        return Response(res.dict)
发送请求会打印如下信息:1111 {'id': 33, 'username': 'alex', 'pwd': '7ab71bb07cb065c4f5261ea81159c100'} {'code': 1000, 'data': {'id': 33, 'username': 'alex', 'pwd': '7ab71bb07cb065c4f5261ea81159c100'}, 'error': None}
5、测试注册请求

二、登录接口
因为HTTP请求是无状态的,要区分用户,需要给用户发一个会话标识。前后端不分离的项目,是用cookie和session来解决这个问题。对于前后端分离的项目,则通常是给用户生成一个唯一标识——token令牌。
1、配置路由和redis连接池
在Login/urls.py中添加登录路由:
from django.urls import path
from .views import RegisterView, LoginView, TestView


urlpatterns = [
    path('register', RegisterView.as_view()),
    path('login', LoginView.as_view()),
]
创建utils/redis_pool.py,配置redis连接池:
import redis

POOL = redis.ConnectionPool(host='127.0.0.1', port=6379, decode_responses=True,
                            max_connections=10)    # 最大连接数
2、登录视图
from rest_framework.views import APIView
from rest_framework.response import Response
from .serializers import RegisterSerializer    # 引入序列化器
from utils.base_response import BaseResponse
from Course.models import Account
from utils.redis_pool import POOL
import redis
import uuid

class LoginView(APIView):
    def post(self, request):
        res = BaseResponse()
        username = request.data.get("username", "")
        pwd = request.data.get("pwd", "")
        user_obj = Account.objects.filter(username=username, pwd=pwd).first()  # 查询用户表拿到用户对象
        if not user_obj:
            res.code = 1030
            res.error = "用户名或密码错误"
            return Response(res.dict)
        # 用户登录成功生成一个token写入redis
        # 写入redis   token(唯一): user_id
        conn = redis.Redis(connection_pool=POOL)
        try:
            token = uuid.uuid4()   # 生成随机字符串,类型是:<class 'uuid.UUID'>
            conn.set(str(token), user_obj.id, ex=120)   # ex:过期时间120秒
            res.data = token
        except Exception as e:
            print(e)
            res.code = 1031
            res.error = "创建令牌失败"
        return Response(res.dict)
注意uuid不能作为redis的key,需要转化为字符串、数字等数据类型。
另外需要注意到conn.set()方法的参数:
class Redis(object):
    def set(self, name, value, ex=None, px=None, nx=False, xx=False):
        """
        Set the value at key ``name`` to ``value``

        ``ex`` sets an expire flag on key ``name`` for ``ex`` seconds.

        ``px`` sets an expire flag on key ``name`` for ``px`` milliseconds.

        ``nx`` if set to True, set the value at key ``name`` to ``value`` only
            if it does not exist.

        ``xx`` if set to True, set the value at key ``name`` to ``value`` only
            if it already exists.
        """
在Redis中设置值,默认,不存在则创建,存在则修改。各个参数的含义:
- ex:过期时间(秒)
- px:过期时间(毫秒)
- nx:如设置为True,则只有name不存在时,当前set操作才执行,值存在,就修改不了,执行没有效果。
- xx:如设置为True,则只有name存在时,当前set操作才执行,值存在才能修改,值不存在,不会设置新值。
3、登录测试
图中data就是生成的token。

三、认证接口
校验请求头中携带的token信息。
1、添加认证测试路由
在/Login/urls.py中添加认证测试路由:
from django.urls import path
from .views import RegisterView, LoginView, TestView


urlpatterns = [
    path('register', RegisterView.as_view()),
    path('login', LoginView.as_view()),
    path('test_auth', TestView.as_view()),
]
2、添加自定义登录验证
在utils中添加my_auth.py文件:
from rest_framework.authentication import BaseAuthentication
from rest_framework.exceptions import AuthenticationFailed
from Course.models import Account
from .redis_pool import POOL
import redis

CONN = redis.Redis(connection_pool=POOL)

class LoginAuth(BaseAuthentication):
    def authenticate(self, request):
        # 从请求头中获取前端带过来的token
        token = request.META.get("HTTP_AUTHENTICATION", "")   # request.META是一个Python字典,包含本次HTTP请求的Header信息
        if not token:
            raise AuthenticationFailed("没有携带token")
        # 有token,去redis中比对
        user_id = CONN.get(str(token))    # 取不到值会报:None
        if user_id == None:
            # token不合法
            raise AuthenticationFailed("token已经过期")
        user_obj = Account.objects.filter(id=user_id).first()
        return user_obj, token
3、添加测试认证视图
from utils.my_auth import LoginAuth

class TestView(APIView):
    authentication_classes = [LoginAuth, ]   # 局部认证,该接口必须登录认证

    def get(self, request):
        return Response("认证测试")
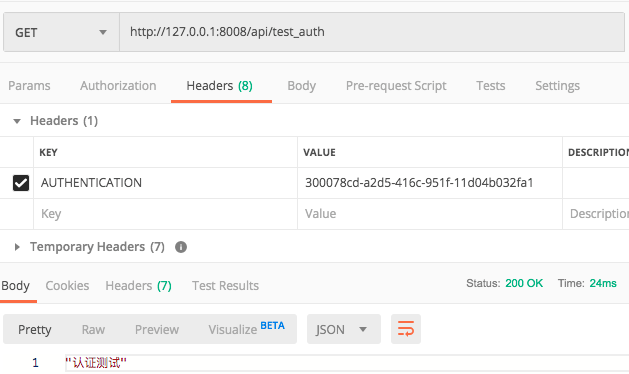
4、测试认证
通过POST http://127.0.0.1:8008/api/login,获取到token信息后,执行测试认证如下所示:
在登录视图中曾设置超时时间120秒,120秒后再次测试认证如下所示:
