本文参考以下内容:
[1] Starting out with Jersey & Apache Tomcat using IntelliJ
[2] 【Jersey】IntelliJ IDEA + Maven + Jetty + Jersey搭建RESTful服务
感谢两位作者。
网上很多文章都是用Jersey 1 搭建的,不能用Jersey 2的新特性,在此我分享一种Jersey 2的搭建方法。
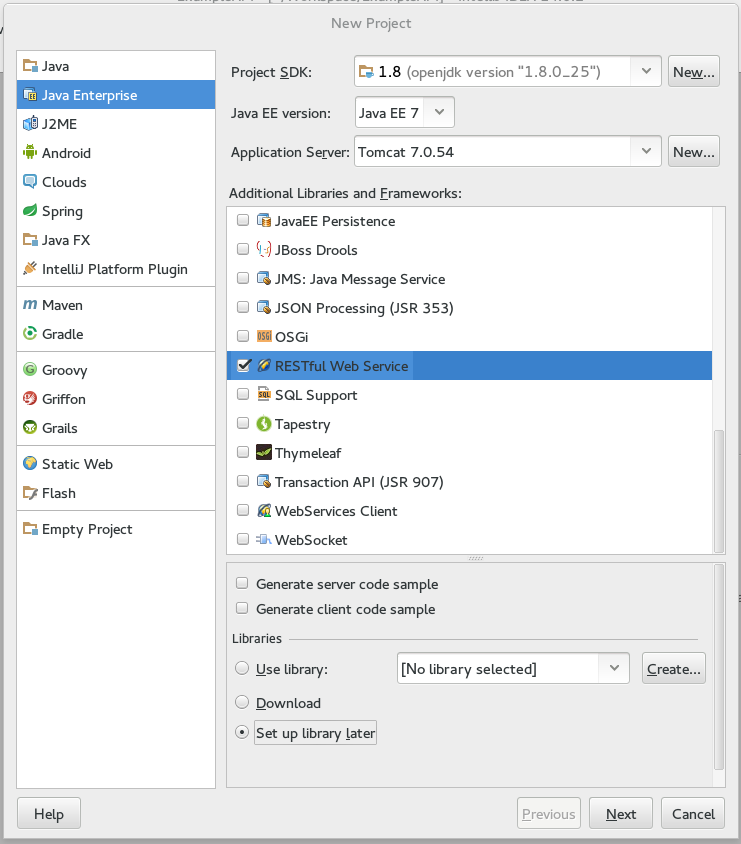
0. 创建新项目
在IntelliJ中创建新项目,选择Java Enterprise -> RESTful Web Service -> Setup libery later.
1. 加入web框架和maven框架
右键单击项目名-> Add Frameworks Support,分别勾选Web Application和Maven。

3. 在maven中加入jersey依赖
在pom.xml中加入:
 1 <dependency>
 2     <groupId>org.glassfish.jersey.containers</groupId>
 3     <artifactId>jersey-container-servlet</artifactId>
 4     <version>2.9</version>
 5 </dependency>
 6 <dependency>
 7     <groupId>org.glassfish.jersey.core</groupId>
 8     <artifactId>jersey-client</artifactId>
 9     <version>2.9</version>
10 </dependency>
11 <dependency>
12     <groupId>org.glassfish.jersey.media</groupId>
13     <artifactId>jersey-media-json-jackson</artifactId>
14     <version>2.9</version>
15 </dependency>
此时,整个pom.xml文档如下。另外使用maven默认的库下载源文件很慢,可以使用国内镜像,方法可见maven国内镜像(maven下载慢的解决方法)。
顺便一提,maven默认的java源值、目标值版本是1.5,可以自行修改成1.8,方法见下面代码。


 1 <?xml version="1.0" encoding="UTF-8"?>
 2 <project xmlns="http://maven.apache.org/POM/4.0.0"
 3          xmlns:xsi="http://www.w3.org/2001/XMLSchema-instance"
 4          xsi:schemaLocation="http://maven.apache.org/POM/4.0.0 http://maven.apache.org/xsd/maven-4.0.0.xsd">
 5     <modelVersion>4.0.0</modelVersion>
 6
 7     <groupId>cn.test</groupId>
 8     <artifactId>test</artifactId>
 9     <version>1.0-SNAPSHOT</version>
10     <name>test</name>
11
12     <properties>
13         <maven.compiler.source>1.8</maven.compiler.source>
14         <maven.compiler.target>1.8</maven.compiler.target>
15     </properties>
16
17     <dependencies>
18         <dependency>
19             <groupId>org.glassfish.jersey.containers</groupId>
20             <artifactId>jersey-container-servlet</artifactId>
21             <version>2.9</version>
22         </dependency>
23         <dependency>
24             <groupId>org.glassfish.jersey.core</groupId>
25             <artifactId>jersey-client</artifactId>
26             <version>2.9</version>
27         </dependency>
28         <dependency>
29             <groupId>org.glassfish.jersey.media</groupId>
30             <artifactId>jersey-media-json-jackson</artifactId>
31             <version>2.9</version>
32         </dependency>
33     </dependencies>
34 </project>
4. 创建源文件
在src/java目录下新建包,如com.test.jersey,在包下新建类HelloWorld.java,写上代码:
package com.test.jersey;

import javax.ws.rs.GET;
import javax.ws.rs.Path;
import javax.ws.rs.Produces;

@Path("/hello")
public class HelloWorld {
    //GET注解设置接受请求类型为GET
    @GET
    //Produces表明发送出去的数据类型为text/plain
    // 与Produces对应的是@Consumes,表示接受的数据类型为text/plain
    @Produces("text/plain")
    public String getMessage() {
        return "Hello world!";
    }
}
5. 配置servlet
编辑web/WEB-INF/web.xml,加入代码:
<servlet>
    <servlet-name>test</servlet-name>
    <servlet-class>org.glassfish.jersey.servlet.ServletContainer</servlet-class>

    <init-param>
        <param-name>jersey.config.server.provider.packages</param-name>
        <param-value>com.test.jersey</param-value>
    </init-param>
    <load-on-startup>1</load-on-startup>
</servlet>

<servlet-mapping>
    <servlet-name>test</servlet-name>
    <url-pattern>/*</url-pattern>
</servlet-mapping>
6. 配置Tomcat
点击Run >Edit Configurations… > “+” > Tomcat Server > Local,加入Tomcat,选择Deployment tab, 点击 “+”, 选择唯一的Artifact,点击"OK"即可。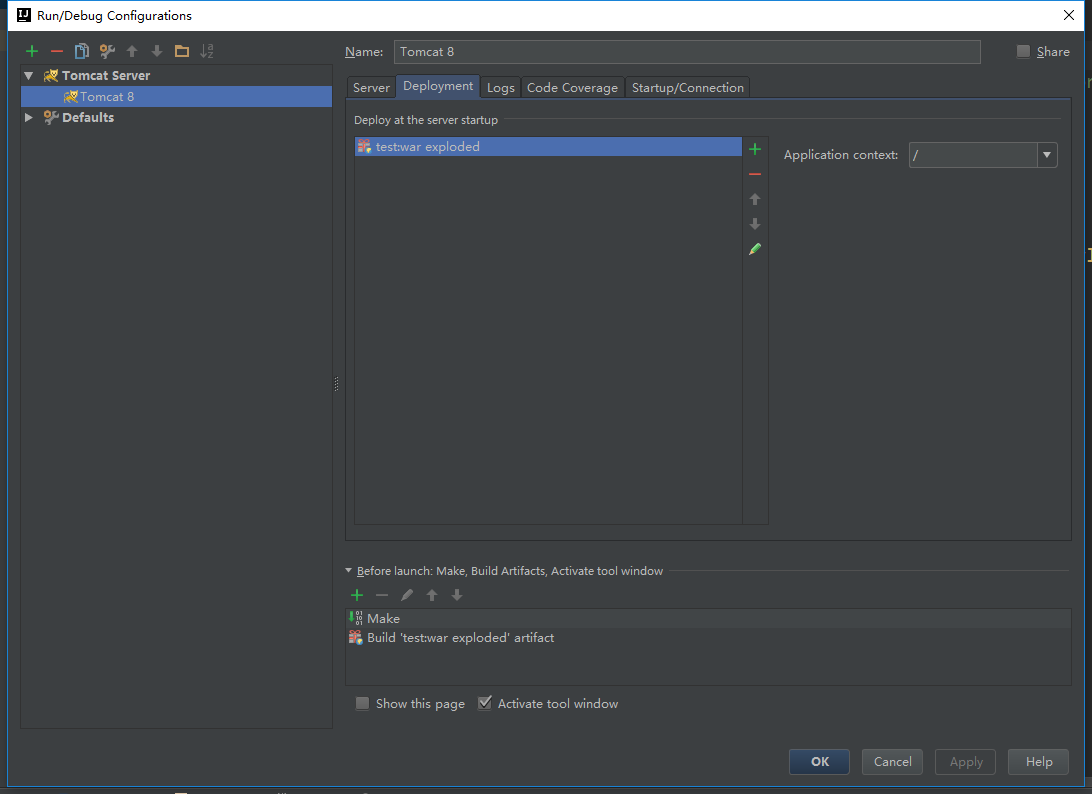
7. 在输出中加入库文件
选择Project Structure,点击Artifacts,可以右侧Available Elements下面有很多库文件没有包含在输出中。依次双击各个文件即可。


8. 运行Tomcat
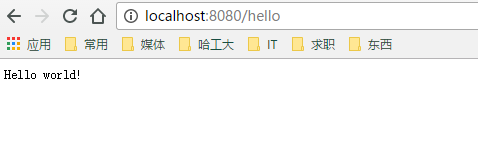
运行Tomcat,在浏览器中输入http://localhost:8080/hello,即可看到以下输出: