源码:编辑表单组件
组件源码(待优化)editForm.vue:


<!-- 搜索表单 -->
<template>
    <el-form ref='editForm' :size="size" inline :label-width="labelWidth" :model="editData" :rules="editRules">
        <el-form-item v-for='item in editCfg' :label="item.label" :prop='item.prop' :key="item.label"  >
            <!-- 输入框 -->
            <el-input v-if="item.type==='input'" v-model="editData[item.prop]"
                @change="item.change && item.change(editData[item.prop])"
                :disabled="item.disabled && item.disabled(editData)"
                :style="{item.width}"></el-input>
            <!-- 文本域 -->
            <el-input v-if="item.type==='textarea'" type="textarea"
                :disabled="item.disabled && item.disabled(editData)"
                @change="item.change && item.change(editData[item.prop])"
                 v-model="editData[item.prop]"  :style="{item.width}"></el-input>
            <!-- 下拉框 -->
            <el-select v-if="item.type==='select'" v-model="editData[item.prop]"
                @change="item.change && item.change(editData[item.prop])"
                :disabled="item.disabled && item.disabled(editData)">
                <el-option v-for="op in item.options" :label="op.label" :value="op.value" :key="op.value"></el-option>
            </el-select>
            <!-- 单选 -->
            <el-radio-group v-if="item.type==='radio'" v-model="editData[item.prop]"
                @change="item.change && item.change(editData[item.prop])"
                :disabled="item.disabled && item.disabled(editData)">
                <el-radio v-for="ra in item.radios" :label="ra.value" :key="ra.value">{{ra.label}}</el-radio>
            </el-radio-group>
            <!-- 单选按钮 -->
            <el-radio-group v-if="item.type==='radioButton'" v-model="editData[item.prop]"
                    @change="item.change && item.change(editData[item.prop])"
                    :disabled="item.disabled && item.disabled(editData)">
                <el-radio-button v-for="ra in item.radios" :label="ra.value" :key="ra.value">{{ra.label}}</el-radio-button>
            </el-radio-group>
            <!-- 复选框 -->
            <el-checkbox-group v-if="item.type==='checkbox'" v-model="editData[item.prop]"
                @change="item.change && item.change(editData[item.prop])"
                :disabled="item.disabled && item.disabled(editData)">
                <el-checkbox v-for="ch in item.checkboxs" :label="ch.value" :key='ch.value'>{{ch.label}}</el-checkbox>
            </el-checkbox-group>
            <!-- 日期 -->
            <el-date-picker v-if="item.type==='date'" v-model="editData[item.prop]"
                @change="item.change && item.change(editData[item.prop])"
                :disabled="item.disabled && item.disabled(editData)"></el-date-picker>
            <!-- 时间 -->
            <el-time-select v-if="item.type==='time'" v-model="editData[item.prop]" type=''
                @change="item.change && item.change(editData[item.prop])"
                :disabled="item.disabled && item.disabled(editData)"></el-time-select>
            <!-- 日期时间 -->
            <el-date-picker v-if="item.type==='dateTime'" type='datetime' v-model="editData[item.prop]"
                @change="item.change && item.change(editData[item.prop])"
                :disabled="item.disable && item.disable(editData[item.prop])"></el-date-picker>
            <!-- 滑块 -->
            <!-- <el-slider v-if="item.type==='Slider'" v-model="editData[item.prop]"></el-slider> -->
            <!-- 开关 -->
            <el-switch v-if="item.type==='switch'" v-model="editData[item.prop]"
                @change="item.change && item.change(editData[item.prop])"
                :disabled="item.disabled && item.disabled(editData)"></el-switch>
        </el-form-item>
    </el-form>
</template>

<script>
export default {
    props:{

        labelWidth:{
            type:String,
            default:'100px'
        },
        size:{
            type:String,
            default:'mini'
        },
        editCfg:{
            type:Array,
            default:()=>[]
        },
        editData:{
            type:Object,
            default:()=>{}
        },
        editRules:{
            type:Object,
            default:null
        }
    },
    data () {
        return {
            that:this
        };
    },
    methods:{
        // getThat(){
        //     this.$emit('that',this)
        // }
    }

}

</script>
<style>

</style>
页面调用:该组件嵌在弹窗组件之中,所以和之前的弹窗组件一样
<template>
  <div class="ces-main">
    <!-- 搜索 -->
    <ces-search
      :that='that'
      size='mini'
      labelWidth = '50px'
      :searchData = "searchData"
      :searchForm = "searchForm"
      :searchHandle="searchHandle"></ces-search>

    <!-- 操作表格 -->
    <ces-table
      :that='that'
      size='mini'
      :isSelection='true'
      :isIndex='true'
      :isPagination='true'
      :isHandle='true'
      :tableData='tableData'
      :tableCols='tableCols'
      :tableHandles='tableHandles'
      :tablePage='tablePage'></ces-table>

    <!-- 弹窗 -->
    <ces-modal width='450px'
      :that='that' :modalCfg='modalCfg'>
        <ces-edit ref='cesEdit' :that='that'
          :editCfg='editForm'
          :editData='editData'
          :editRules='editRules' ></ces-edit>
      </ces-modal>
  </div>
</template>

<script>
import cesSearch from '@/components/common/Form/searchForm'
import cesTable from '@/components/common/Table/Table'
import cesModal from '@/components/common/Modal/Modal'
import cesEdit from '@/components/common/Form/editForm'
import { createNamespacedHelpers } from 'vuex'
const { mapGetters, mapActions } = createNamespacedHelpers('Base')

export default {
  data () {
    return {
      that:this
    }
  },
  components:{
    cesTable,
    cesSearch,
    cesModal,
    cesEdit
  },
  computed:{
    ...mapGetters([
      'searchData','searchForm','searchHandle',
      'loading','tableData','tableCols','tableHandles','tablePage',
      'modalCfg',
      'editForm','editData','editRules'])
  },
  methods:{
    ...mapActions(['init','showEditModal','hideEditModal','getData','resetData','validateAdd','confirmDel','validateEdit'])
  }
}
</script>

<style>

</style>
最终运行效果:
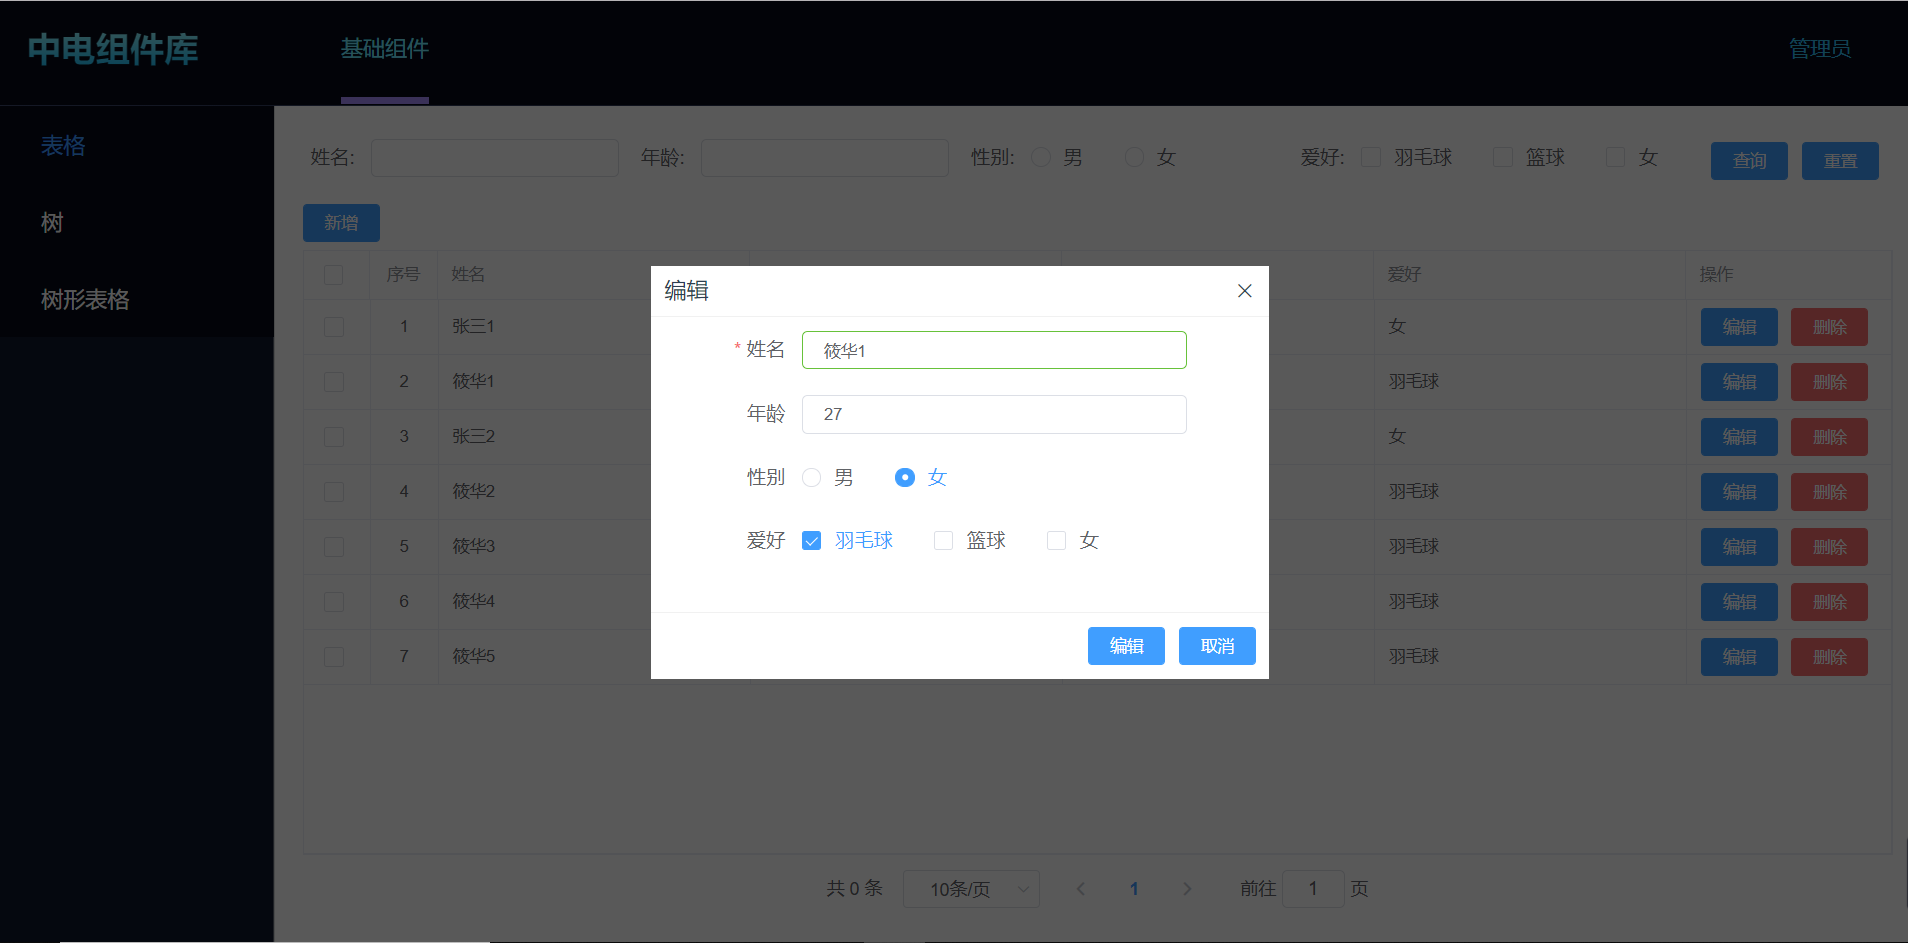
补充说明:
本篇文章是我基于element-ui制作脚手架项目的其中一部分,使用了vuex做数据管理,直接复制是跑不起来的。
我写了一个小例子,可直接复制:
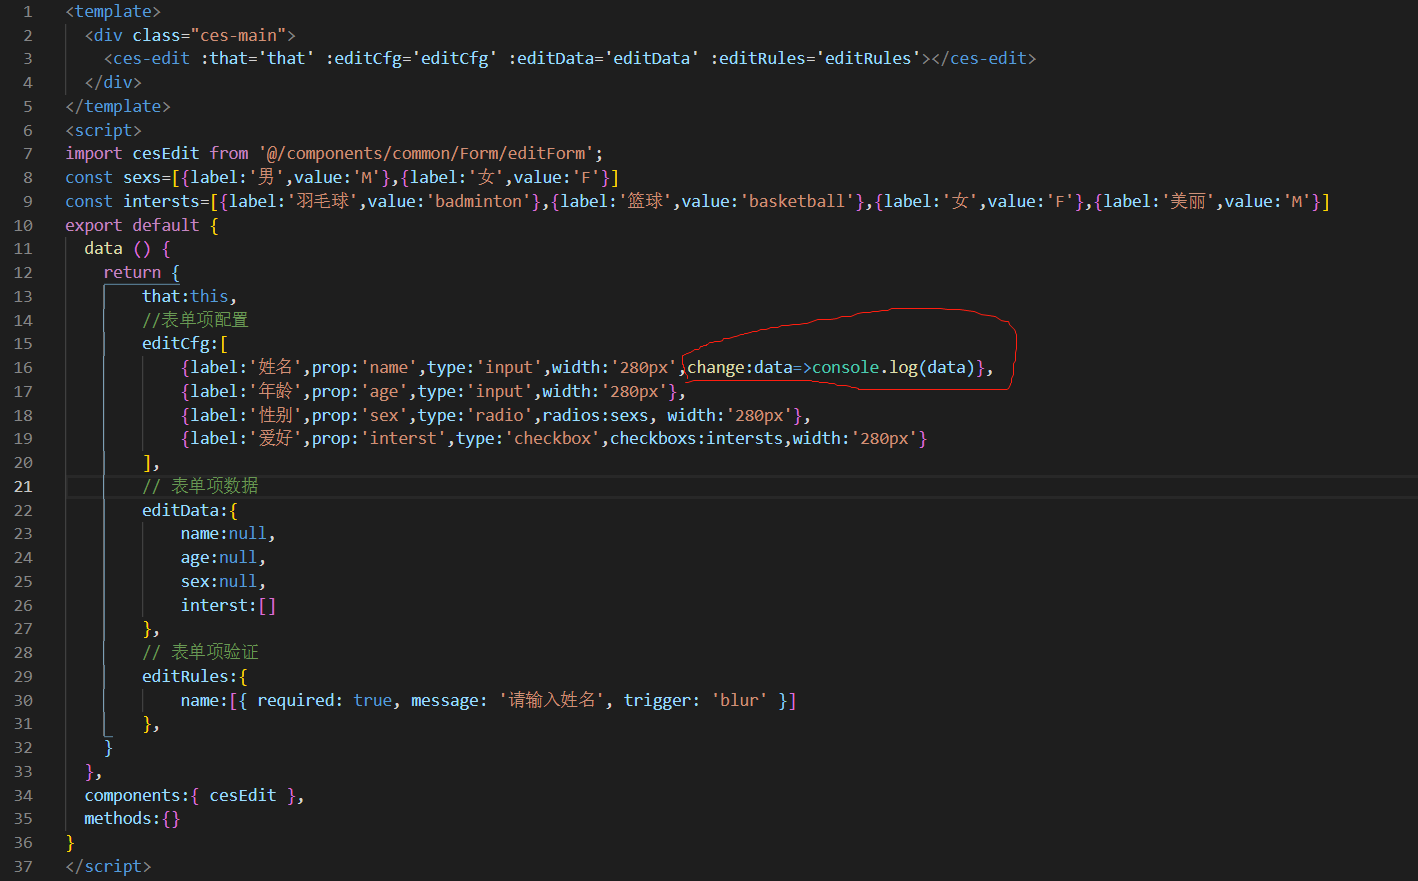
运行结果:
