1. 学习计划
第二天:商品列表功能实现
1、服务中间件dubbo
2、工程改造为基于soa架构
3、商品列表查询功能实现。
2. 将工程改造为SOA架构
2.1. 分析
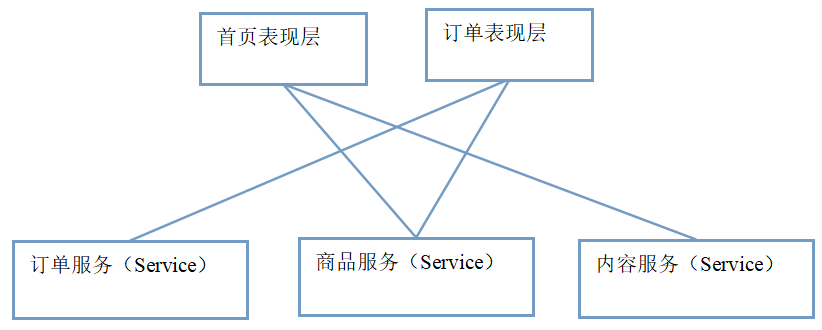
由于宜立方商城是基于soa的架构,表现层和服务层是不同的工程。所以要实现商品列表查询需要两个系统之间进行通信。
如何实现远程通信?
1、Webservice:效率不高基于soap协议。项目中不推荐使用。
2、使用restful形式的服务:http+json。很多项目中应用。如果服务太多,服务之间调用关系混乱,需要治疗服务。
3、使用dubbo。使用rpc协议进行远程调用,直接使用socket通信。传输效率高,并且可以统计出系统之间的调用关系、调用次数。
2.2. dubbo
2.2.1. 什么是dubbo
随着互联网的发展,网站应用的规模不断扩大,常规的垂直应用架构已无法应对,分布式服务架构以及流动计算架构势在必行,亟需一个治理系统确保架构有条不紊的演进。
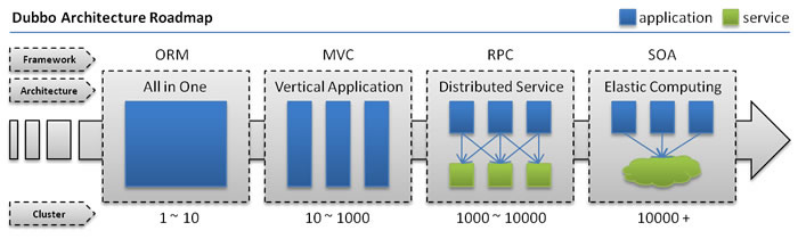
单一应用架构
当网站流量很小时,只需一个应用,将所有功能都部署在一起,以减少部署节点和成本。
此时,用于简化增删改查工作量的 数据访问框架(ORM) 是关键。
垂直应用架构
当访问量逐渐增大,单一应用增加机器带来的加速度越来越小,将应用拆成互不相干的几个应用,以提升效率。
此时,用于加速前端页面开发的 Web框架(MVC) 是关键。
- 分布式服务架构
当垂直应用越来越多,应用之间交互不可避免,将核心业务抽取出来,作为独立的服务,逐渐形成稳定的服务中心,使前端应用能更快速的响应多变的市场需求。
此时,用于提高业务复用及整合的 分布式服务框架(RPC) 是关键。
- 流动计算架构
当服务越来越多,容量的评估,小服务资源的浪费等问题逐渐显现,此时需增加一个调度中心基于访问压力实时管理集群容量,提高集群利用率。
此时,用于提高机器利用率的 资源调度和治理中心(SOA) 是关键。
Dubbo就是资源调度和治理中心的管理工具。
2.2.2. Dubbo的架构
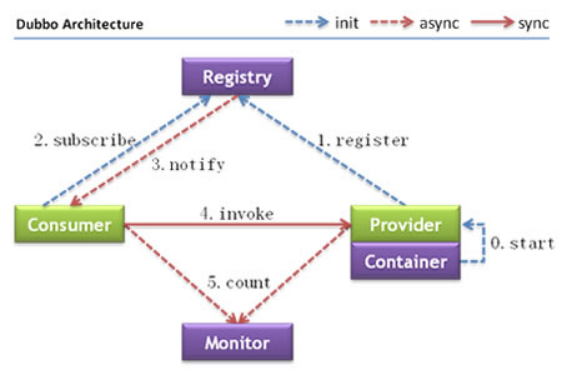
节点角色说明:
Provider: 暴露服务的服务提供方。
Consumer: 调用远程服务的服务消费方。
Registry: 服务注册与发现的注册中心。
Monitor: 统计服务的调用次调和调用时间的监控中心。
Container: 服务运行容器。
调用关系说明:
0. 服务容器负责启动,加载,运行服务提供者。
1. 服务提供者在启动时,向注册中心注册自己提供的服务。
2. 服务消费者在启动时,向注册中心订阅自己所需的服务。
3. 注册中心返回服务提供者地址列表给消费者,如果有变更,注册中心将基于长连接推送变更数据给消费者。
4. 服务消费者,从提供者地址列表中,基于软负载均衡算法,选一台提供者进行调用,如果调用失败,再选另一台调用。
5. 服务消费者和提供者,在内存中累计调用次数和调用时间,定时每分钟发送一次统计数据到监控中心。
2.2.3. 使用方法
Dubbo采用全Spring配置方式,透明化接入应用,对应用没有任何API侵入,只需用Spring加载Dubbo的配置即可,Dubbo基于Spring的Schema扩展进行加载。
单一工程中spring的配置
<bean id="xxxService" class="com.xxx.XxxServiceImpl" />
<bean id="xxxAction" class="com.xxx.XxxAction">
    <property name="xxxService" ref="xxxService" />
</bean>
远程服务:
在本地服务的基础上,只需做简单配置,即可完成远程化:
将上面的local.xml配置拆分成两份,将服务定义部分放在服务提供方remote-provider.xml,将服务引用部分放在服务消费方remote-consumer.xml。
并在提供方增加暴露服务配置<dubbo:service>,在消费方增加引用服务配置<dubbo:reference>。
发布服务:
<!-- 和本地服务一样实现远程服务 -->
<bean id="xxxService" class="com.xxx.XxxServiceImpl" />
<!-- 增加暴露远程服务配置 -->
<dubbo:service interface="com.xxx.XxxService" ref="xxxService" />
调用服务:
<!-- 增加引用远程服务配置 -->
<dubbo:reference id="xxxService" interface="com.xxx.XxxService" />
<!-- 和本地服务一样使用远程服务 -->
<bean id="xxxAction" class="com.xxx.XxxAction">
    <property name="xxxService" ref="xxxService" />
</bean>
2.3. 注册中心
2.3.1. Zookeeper介绍
官方推荐使用zookeeper注册中心。
注册中心负责服务地址的注册与查找,相当于目录服务,服务提供者和消费者只在启动时与注册中心交互,注册中心不转发请求,压力较小。使用dubbo-2.3.3以上版本,建议使用zookeeper注册中心。
Zookeeper是Apacahe Hadoop的子项目,是一个树型的目录服务,支持变更推送,适合作为Dubbo服务的注册中心,工业强度较高,可用于生产环境,并推荐使用
Zookeeper:
1、可以作为集群的管理工具使用。
2、可以集中管理配置文件。
2.3.2. Zookeeper的安装
安装环境:
Linux:centos6.4
Jdk:1.7以上版本
Zookeeper是java开发的可以运行在windows、linux环境。需要先安装jdk。
安装步骤:
第一步:安装jdk
第二步:把zookeeper的压缩包上传到linux系统。
第三步:解压缩压缩包
tar -zxvf zookeeper-3.4.6.tar.gz
--分别是四个参数
x : 从 tar 包中把文件提取出来
z : 表示 tar 包是被 gzip 压缩过的,所以解压时需要用 gunzip 解压
v : 显示详细信息
f xxx.tar.gz : 指定被处理的文件是 xxx.tar.gz
第四步:进入zookeeper-3.4.6目录,创建data文件夹。
mkdir data
第五步:把conf下的zoo_sample.cfg改名为zoo.cfg(因为 Zookeeper 在启动时会找这个文件作为默认配置文件。)
[root@localhost conf]# mv zoo_sample.cfg zoo.cfg
第六步:修改data属性:dataDir=/root/zookeeper-3.4.6/data
第七步:启动zookeeper
[root@localhost bin]# ./zkServer.sh start
关闭:[root@localhost bin]# ./zkServer.sh stop
查看状态:[root@localhost bin]# ./zkServer.sh status
注意:需要关闭防火墙。
service iptables stop
永久关闭修改配置开机不启动防火墙:
chkconfig iptables off
如果不能成功启动zookeeper,需要删除data目录下的zookeeper_server.pid文件。
2.4. 工程改造
2.4.1. 拆分工程
1)将表现层工程独立出来:
e3-manager-web
2)将原来的e3-manager改为如下结构
e3-manager
|--e3-manager-dao
|--e3-manager-interface
|--e3-manager-pojo
|--e3-manager-service(打包方式改为war)
2.4.2. 服务层工程
第一步:把e3-manager的pom文件中删除e3-manager-web模块。
第二步:把e3-manager-web文件夹移动到e3-manager同一级目录。
第三步:e3-manager-service的pom文件修改打包方式
<packaging>war</packaging>
第四步:在e3-manager-service工程中添加web.xml文件
第五步:把e3-manager-web的配置文件复制到e3-manager-service中。
删除springmvc.xml
第六步:web.xml 中只配置spring容器。删除前端控制器
第七步:发布服务
1、在e3-manager-Service工程中添加dubbo依赖的jar包。
<!-- dubbo相关 -->
        <dependency>
            <groupId>com.alibaba</groupId>
            <artifactId>dubbo</artifactId>
            <exclusions>
                <exclusion>
                    <groupId>org.springframework</groupId>
                    <artifactId>spring</artifactId>
                </exclusion>
                <exclusion>
                    <groupId>org.jboss.netty</groupId>
                    <artifactId>netty</artifactId>
                </exclusion>
            </exclusions>
        </dependency>
        <dependency>
            <groupId>org.apache.zookeeper</groupId>
            <artifactId>zookeeper</artifactId>
        </dependency>
        <dependency>
            <groupId>com.github.sgroschupf</groupId>
            <artifactId>zkclient</artifactId>
        </dependency>
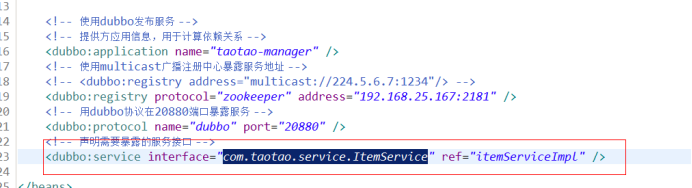
2、在spring的配置文件中添加dubbo的约束,然后使用dubbo:service发布服务。
<?xml version="1.0" encoding="UTF-8"?>
<beans xmlns="http://www.springframework.org/schema/beans"
    xmlns:context="http://www.springframework.org/schema/context" xmlns:p="http://www.springframework.org/schema/p"
    xmlns:aop="http://www.springframework.org/schema/aop" xmlns:tx="http://www.springframework.org/schema/tx"
    xmlns:dubbo="http://code.alibabatech.com/schema/dubbo" xmlns:xsi="http://www.w3.org/2001/XMLSchema-instance"
    xsi:schemaLocation="http://www.springframework.org/schema/beans http://www.springframework.org/schema/beans/spring-beans-4.2.xsd
    http://www.springframework.org/schema/context http://www.springframework.org/schema/context/spring-context-4.2.xsd
    http://www.springframework.org/schema/aop http://www.springframework.org/schema/aop/spring-aop-4.2.xsd http://www.springframework.org/schema/tx http://www.springframework.org/schema/tx/spring-tx-4.2.xsd
    http://code.alibabatech.com/schema/dubbo http://code.alibabatech.com/schema/dubbo/dubbo.xsd
    http://www.springframework.org/schema/util http://www.springframework.org/schema/util/spring-util-4.2.xsd">

    <context:component-scan base-package="cn.e3mall.service"></context:component-scan>

    <!-- 使用dubbo发布服务 -->
    <!-- 提供方应用信息,用于计算依赖关系 -->
    <dubbo:application name="e3-manager" />
    <dubbo:registry protocol="zookeeper"
        address="192.168.25.154:2181,192.168.25.154:2182,192.168.25.154:2183" />
    <!-- 用dubbo协议在20880端口暴露服务 -->
    <dubbo:protocol name="dubbo" port="20880" />
    <!-- 声明需要暴露的服务接口 -->
    <dubbo:service interface="cn.e3mall.service.ItemService" ref="itemServiceImpl" />

</beans>
改造e3-manager-web工程。2.4.3. 表现层工程
第一步:删除mybatis、和spring的配置文件。只保留springmvc.xml
第二步:修改e3-manager-web的pom文件,
1、修改parent为e3-parent
2、添加spring和springmvc的jar包的依赖
3、删除e3-mangager-service的依赖
4、添加dubbo的依赖
<!-- dubbo相关 -->
        <dependency>
            <groupId>com.alibaba</groupId>
            <artifactId>dubbo</artifactId>
            <exclusions>
                <exclusion>
                    <groupId>org.springframework</groupId>
                    <artifactId>spring</artifactId>
                </exclusion>
                <exclusion>
                    <groupId>org.jboss.netty</groupId>
                    <artifactId>netty</artifactId>
                </exclusion>
            </exclusions>
        </dependency>
        <dependency>
            <groupId>org.apache.zookeeper</groupId>
            <artifactId>zookeeper</artifactId>
        </dependency>
        <dependency>
            <groupId>com.github.sgroschupf</groupId>
            <artifactId>zkclient</artifactId>
        </dependency>
第三步:修改springmvc.xml,在springmvc的配置文件中添加服务的引用。5、e3-mangager-web添加对e3-manager-Interface的依赖。
<?xml version="1.0" encoding="UTF-8"?>
<beans xmlns="http://www.springframework.org/schema/beans"
    xmlns:xsi="http://www.w3.org/2001/XMLSchema-instance" xmlns:p="http://www.springframework.org/schema/p"
    xmlns:context="http://www.springframework.org/schema/context"
    xmlns:dubbo="http://code.alibabatech.com/schema/dubbo"
    xmlns:mvc="http://www.springframework.org/schema/mvc"
    xsi:schemaLocation="http://www.springframework.org/schema/beans http://www.springframework.org/schema/beans/spring-beans-4.2.xsd
        http://www.springframework.org/schema/mvc http://www.springframework.org/schema/mvc/spring-mvc-4.2.xsd
        http://code.alibabatech.com/schema/dubbo http://code.alibabatech.com/schema/dubbo/dubbo.xsd
        http://www.springframework.org/schema/context http://www.springframework.org/schema/context/spring-context-4.2.xsd">

    <context:component-scan base-package="cn.e3mall.controller" />
    <mvc:annotation-driven />
    <bean
        class="org.springframework.web.servlet.view.InternalResourceViewResolver">
        <property name="prefix" value="/WEB-INF/jsp/" />
        <property name="suffix" value=".jsp" />
    </bean>

    <!-- 引用dubbo服务 -->
    <dubbo:application name="e3-manager-web"/>
    <dubbo:registry protocol="zookeeper" address="192.168.25.154:2181,192.168.25.154:2182,192.168.25.154:2183"/>
    <dubbo:reference interface="cn.e3mall.service.ItemService" id="itemService" />

</beans>
第四步:在e3-manager-web工程中添加tomcat插件配置。
<build>
        <plugins>
            <!-- 配置Tomcat插件 -->
            <plugin>
                <groupId>org.apache.tomcat.maven</groupId>
                <artifactId>tomcat7-maven-plugin</artifactId>
                <configuration>
                    <path>/</path>
                    <port>8081</port>
                </configuration>
            </plugin>
        </plugins>
    </build>
2.5. Dubbo监控中心
需要安装tomcat,然后部署监控中心即可。
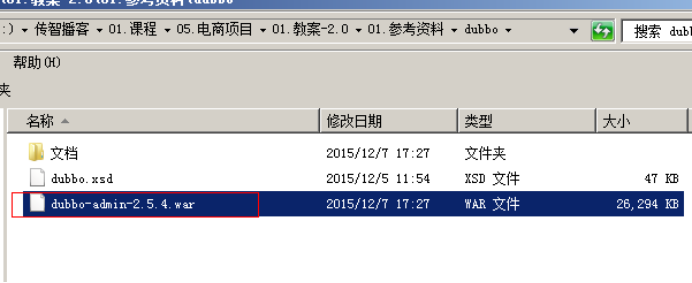
1、部署监控中心:
[root@localhost ~]# cp dubbo-admin-2.5.4.war apache-tomcat-7.0.47/webapps/dubbo-admin.war
2、启动tomcat
bin/startup.sh
查看启动信息
tail -f logs/catalina.out
3、访问http://192.168.25.167:8080/dubbo-admin/
用户名:root
密码:root
如果监控中心和注册中心在同一台服务器上,可以不需要任何配置。
如果不在同一台服务器,需要修改配置文件:
/root/apache-tomcat-7.0.47/webapps/dubbo-admin/WEB-INF/dubbo.properties

3. 商品列表查询
3.1. 展示后台首页
3.1.1. 功能分析
请求的url:/
参数:无
返回值:逻辑视图String
3.1.2. Controller
@Controller
public class PageController {

    @RequestMapping("/")
    public String showIndex() {
        return "index";
    }

    @RequestMapping("/{page}")
    public String showPage(@PathVariable String page) {
        return page;
    }
}
3.2. 功能分析
3.2.1. 整合静态页面
静态页面位置:02.第二天(三大框架整合,后台系统搭建)�1.参考资料后台管理系统静态页面
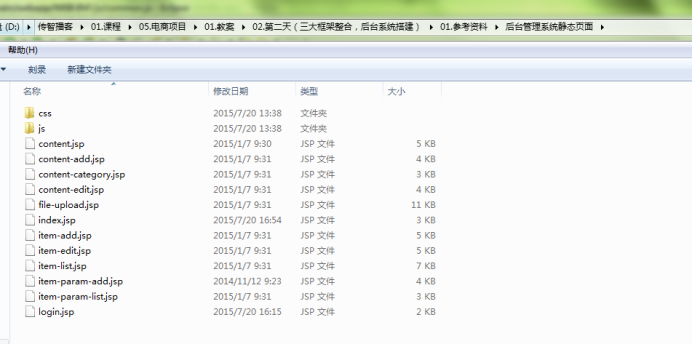
使用方法:
把静态页面添加到e3-manager-web工程中的WEB-INF下:

由于在web.xml中定义的url拦截形式为“/”表示拦截所有的url请求,包括静态资源例如css、js等。所以需要在springmvc.xml中添加资源映射标签:
|
<mvc:resources location="/WEB-INF/js/" mapping="/js/**"/> <mvc:resources location="/WEB-INF/css/" mapping="/css/**"/> |
3.2.2. 商品列表页面

对应的jsp为:
item-list.jsp
请求的url:
/item/list
请求的参数:
page=1&rows=30
响应的json数据格式:
Easyui中datagrid控件要求的数据格式为:
{total:”2”,rows:[{“id”:”1”,”name”:”张三”},{“id”:”2”,”name”:”李四”}]}

3.2.3. 响应的json数据格式EasyUIResult
public class EasyUIDataGridResult {

    private Integer total;

    private List<?> rows;

    public EasyUIResult(Integer total, List<?> rows) {
        this.total = total;
        this.rows = rows;
    }

    public EasyUIResult(Long total, List<?> rows) {
        this.total = total.intValue();
        this.rows = rows;
    }

    public Integer getTotal() {
        return total;
    }

    public void setTotal(Integer total) {
        this.total = total;
    }

    public List<?> getRows() {
        return rows;
    }

    public void setRows(List<?> rows) {
        this.rows = rows;
    }

}
3.2.4. 分页处理
逆向工程生成的代码是不支持分页处理的,如果想进行分页需要自己编写mapper,这样就失去逆向工程的意义了。为了提高开发效率可以使用mybatis的分页插件PageHelper。
3.3. 分页插件PageHelper
3.3.1. Mybatis分页插件 - PageHelper说明
如果你也在用Mybatis,建议尝试该分页插件,这个一定是最方便使用的分页插件。
该插件目前支持Oracle,Mysql,MariaDB,SQLite,Hsqldb,PostgreSQL六种数据库分页。
3.3.2. 使用方法
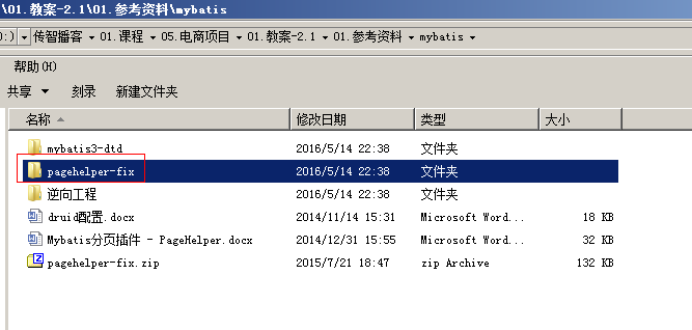
第一步:把PageHelper依赖的jar包添加到工程中。官方提供的代码对逆向工程支持的不好,使用参考资料中的pagehelper-fix。
第二步:在Mybatis配置xml中配置拦截器插件:
<plugins>
    <!-- com.github.pagehelper为PageHelper类所在包名 -->
    <plugin interceptor="com.github.pagehelper.PageHelper">
        <!-- 设置数据库类型 Oracle,Mysql,MariaDB,SQLite,Hsqldb,PostgreSQL六种数据库-->
        <property name="dialect" value="mysql"/>
    </plugin>
</plugins>
第二步:在代码中使用
1、设置分页信息:
    //获取第1页,10条内容,默认查询总数count
    PageHelper.startPage(1, 10);

    //紧跟着的第一个select方法会被分页
List<Country> list = countryMapper.selectIf(1);
2、取分页信息
//分页后,实际返回的结果list类型是Page<E>,如果想取出分页信息,需要强制转换为Page<E>,
Page<Country> listCountry = (Page<Country>)list;
listCountry.getTotal();
3、取分页信息的第二种方法
//获取第1页,10条内容,默认查询总数count
PageHelper.startPage(1, 10);
List<Country> list = countryMapper.selectAll();
//用PageInfo对结果进行包装
PageInfo page = new PageInfo(list);
//测试PageInfo全部属性
//PageInfo包含了非常全面的分页属性
assertEquals(1, page.getPageNum());
assertEquals(10, page.getPageSize());
assertEquals(1, page.getStartRow());
assertEquals(10, page.getEndRow());
assertEquals(183, page.getTotal());
assertEquals(19, page.getPages());
assertEquals(1, page.getFirstPage());
assertEquals(8, page.getLastPage());
assertEquals(true, page.isFirstPage());
assertEquals(false, page.isLastPage());
assertEquals(false, page.isHasPreviousPage());
assertEquals(true, page.isHasNextPage());
3.3.3. 分页测试
@Test
    public void testPageHelper() throws Exception {
        //初始化spring容器
        ApplicationContext applicationContext = new ClassPathXmlApplicationContext("classpath:spring/applicationContext-*.xml");
        //获得Mapper的代理对象
        TbItemMapper itemMapper = applicationContext.getBean(TbItemMapper.class);
        //设置分页信息
        PageHelper.startPage(1, 30);
        //执行查询
        TbItemExample example = new TbItemExample();
        List<TbItem> list = itemMapper.selectByExample(example);
        //取分页信息
        PageInfo<TbItem> pageInfo = new PageInfo<>(list);
        System.out.println(pageInfo.getTotal());
        System.out.println(pageInfo.getPages());
        System.out.println(pageInfo.getPageNum());
        System.out.println(pageInfo.getPageSize());
    }
3.4. Service层
参数:int page ,int rows
业务逻辑:查询所有商品列表,要进行分页处理。
返回值:EasyUIDataGridResult
@Override
    public EasyUIDataGridResult getItemList(int page, int rows) {

        //设置分页信息
        PageHelper.startPage(page, rows);
        //执行查询
        TbItemExample example = new TbItemExample();
        List<TbItem> list = itemMapper.selectByExample(example);
        //取分页信息
        PageInfo<TbItem> pageInfo = new PageInfo<>(list);

        //创建返回结果对象
        EasyUIDataGridResult result = new EasyUIDataGridResult();
        result.setTotal(pageInfo.getTotal());
        result.setRows(list);

        return result;
    }
3.4.1. 发布服务
3.5. 表现层
引用服务:

1、初始化表格请求的url:/item/list
2、Datagrid默认请求参数:
1、page:当前的页码,从1开始。
2、rows:每页显示的记录数。
3、响应的数据:json数据。EasyUIDataGridResult
@RequestMapping("/item/list")
    @ResponseBody
    public EasyUIDataGridResult getItemList(Integer page, Integer rows) {
        EasyUIDataGridResult result = itemService.getItemList(page, rows);
        return result;
    }
可以设置服务超时时间:
服务调用超时时间默认1秒,
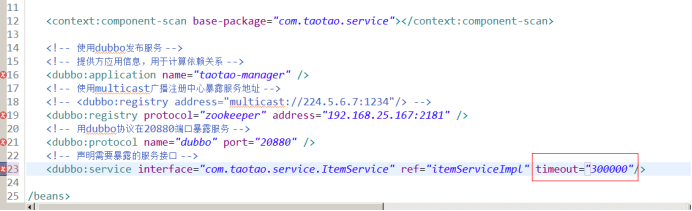
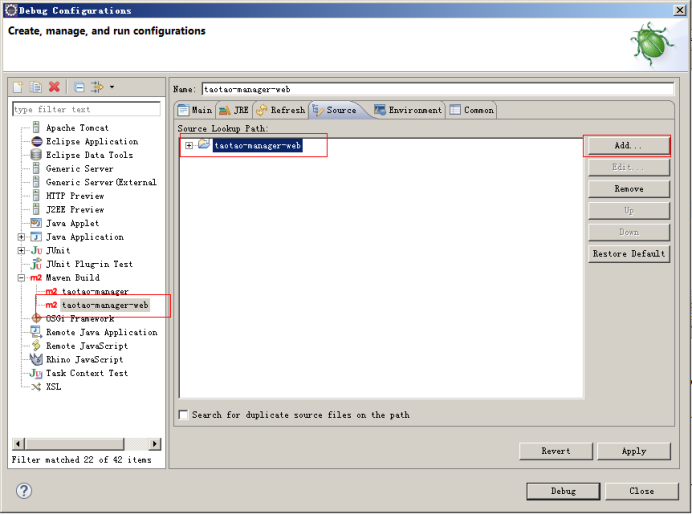
Debug设置源代码:
3.6. 安装maven工程跳过测试
clean install -DskipTests