1 回顾
1.1 Maven的好处
节省空间 对jar包做了统一管理 依赖管理
一键构建
可跨平台
应用在大型项目可提高开发效率
1.2 Maven安装部署配置
1.3 Maven的仓库
本地仓库
远程仓库(私服)
中央仓库
1.4 添加依赖
从网络上搜索:
http://mvnrepository.com/(推荐)
在本地重建索引,以索引的方式搜索
1.5 项目构建
1.6 依赖范围
Compile struts2 框架jar
Provided jsp-api.jar 重点(因为他会和tomcat的包相冲突)
Runtime 数据库驱动包
Test junit.jar
1.7 总结
<modelVersion>
坐标 GAV
<groupId>cn.itcast</groupId>
<artifactId>ssh</artifactId>
<version>0.0.1-SNAPSHOT</version>
Packaging 打包方式
Jar war pom
<dependencies>
<dependency>
<build> 里面放的是插件
<plugins>
<plugin>
2 整合ssh框架
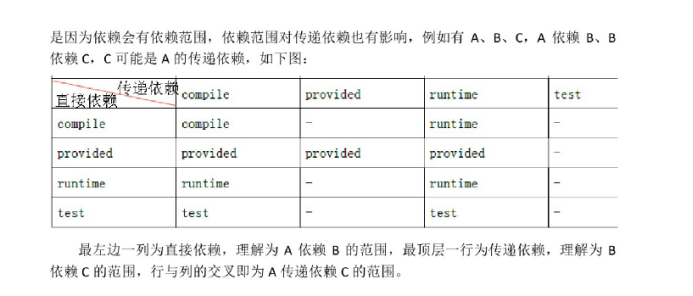
2.1 依赖传递
只添加了一个struts2-core依赖,发现项目中出现了很多jar,
这种情况 叫 依赖传递


2.2 依赖版本冲突的解决
1、 第一声明优先原则
<dependencies>

  <!--   spring-beans-4.2.4 -->

   <dependency>

   <groupId>org.springframework</groupId>

   <artifactId>spring-context</artifactId>

   <version>4.2.4.RELEASE</version>

   </dependency>


<!--   spring-beans-3.0.5 -->

   <dependency>

   <groupId>org.apache.struts</groupId>

   <artifactId>struts2-spring-plugin</artifactId>

   <version>2.3.24</version>

   </dependency>
2、 路径近者优先原则
自己添加jar包
<dependency>

   <groupId>org.springframework</groupId>

   <artifactId>spring-beans</artifactId>

   <version>4.2.4.RELEASE</version>

</dependency>
3、 排除原则
   <dependency>

   <groupId>org.apache.struts</groupId>

   <artifactId>struts2-spring-plugin</artifactId>

   <version>2.3.24</version>

   <exclusions>

     <exclusion>

       <groupId>org.springframework</groupId>

       <artifactId>spring-beans</artifactId>

     </exclusion>

   </exclusions>

   </dependency>
4、 版本锁定原则
<properties>

<spring.version>4.2.4.RELEASE</spring.version>

<hibernate.version>5.0.7.Final</hibernate.version>

<struts.version>2.3.24</struts.version>

</properties>


<!-- 锁定版本,struts2-2.3.24、spring4.2.4、hibernate5.0.7 -->

<dependencyManagement>

<dependencies>

<dependency>

<groupId>org.springframework</groupId>

<artifactId>spring-context</artifactId>

<version>${spring.version}</version>

</dependency>

</dependencies>

</dependencyManagement>
需求:
传客户ID 页面上显示客户信息
准备数据库
2.3 构建项目
1、 创建数据库,
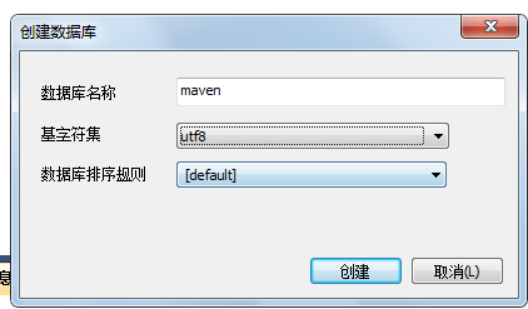
2、 执行准备好的sql脚本
Sql脚本的位置:

3、 完善pom.xml文件,把ssh相关的依赖都添加上去
 <!-- 属性 -->

<properties>

<spring.version>4.2.4.RELEASE</spring.version>

<hibernate.version>5.0.7.Final</hibernate.version>

<struts.version>2.3.24</struts.version>

</properties>


<!-- 锁定版本,struts2-2.3.24、spring4.2.4、hibernate5.0.7 -->

<dependencyManagement>

<dependencies>

<dependency>

<groupId>org.springframework</groupId>

<artifactId>spring-context</artifactId>

<version>${spring.version}</version>

</dependency>

<dependency>

<groupId>org.springframework</groupId>

<artifactId>spring-aspects</artifactId>

<version>${spring.version}</version>

</dependency>

<dependency>

<groupId>org.springframework</groupId>

<artifactId>spring-orm</artifactId>

<version>${spring.version}</version>

</dependency>

<dependency>

<groupId>org.springframework</groupId>

<artifactId>spring-test</artifactId>

<version>${spring.version}</version>

</dependency>

<dependency>

<groupId>org.springframework</groupId>

<artifactId>spring-web</artifactId>

<version>${spring.version}</version>

</dependency>

<dependency>

<groupId>org.hibernate</groupId>

<artifactId>hibernate-core</artifactId>

<version>${hibernate.version}</version>

</dependency>

<dependency>

<groupId>org.apache.struts</groupId>

<artifactId>struts2-core</artifactId>

<version>${struts.version}</version>

</dependency>

<dependency>

<groupId>org.apache.struts</groupId>

<artifactId>struts2-spring-plugin</artifactId>

<version>${struts.version}</version>

</dependency>

</dependencies>

</dependencyManagement>

<!-- 依赖管理 -->

<dependencies>

<!-- spring -->

<dependency>

<groupId>org.springframework</groupId>

<artifactId>spring-context</artifactId>

</dependency>

<dependency>

<groupId>org.springframework</groupId>

<artifactId>spring-aspects</artifactId>

</dependency>

<dependency>

<groupId>org.springframework</groupId>

<artifactId>spring-orm</artifactId>

</dependency>

<dependency>

<groupId>org.springframework</groupId>

<artifactId>spring-test</artifactId>

</dependency>

<dependency>

<groupId>org.springframework</groupId>

<artifactId>spring-web</artifactId>

</dependency>

<!-- hibernate -->

<dependency>

<groupId>org.hibernate</groupId>

<artifactId>hibernate-core</artifactId>

</dependency>


<!-- 数据库驱动 -->

<dependency>

<groupId>mysql</groupId>

<artifactId>mysql-connector-java</artifactId>

<version>5.1.6</version>

<scope>runtime</scope>

</dependency>

<!-- c3p0 -->


<dependency>

<groupId>c3p0</groupId>

<artifactId>c3p0</artifactId>

<version>0.9.1.2</version>

</dependency>


<!-- 导入 struts2 -->

<dependency>

<groupId>org.apache.struts</groupId>

<artifactId>struts2-core</artifactId>

</dependency>

<dependency>

<groupId>org.apache.struts</groupId>

<artifactId>struts2-spring-plugin</artifactId>

</dependency>


<!-- servlet jsp -->

<dependency>

<groupId>javax.servlet</groupId>

<artifactId>servlet-api</artifactId>

<version>2.5</version>

<scope>provided</scope>

</dependency>

<dependency>

<groupId>javax.servlet</groupId>

<artifactId>jsp-api</artifactId>

<version>2.0</version>

<scope>provided</scope>

</dependency>

<!-- 日志 -->

<dependency>

<groupId>org.slf4j</groupId>

<artifactId>slf4j-log4j12</artifactId>

<version>1.7.2</version>

</dependency>

<!-- junit -->

<dependency>

<groupId>junit</groupId>

<artifactId>junit</artifactId>

<version>4.9</version>

<scope>test</scope>

</dependency>

<!-- jstl -->

<dependency>

<groupId>javax.servlet</groupId>

<artifactId>jstl</artifactId>

<version>1.2</version>

</dependency>

</dependencies>


<build>

<plugins>

<!-- 设置编译版本为1.7 -->

<plugin>

<groupId>org.apache.maven.plugins</groupId>

<artifactId>maven-compiler-plugin</artifactId>

<configuration>

<source>1.7</source>

<target>1.7</target>

<encoding>UTF-8</encoding>

</configuration>

</plugin>


<!-- maven内置 的tomcat6插件 -->

<plugin>

<groupId>org.codehaus.mojo</groupId>

<artifactId>tomcat-maven-plugin</artifactId>

<version>1.1</version>

<configuration>

<!-- 可以灵活配置工程路径 -->

<path>/ssh</path>

<!-- 可以灵活配置端口号 -->

<port>8080</port>

</configuration>

</plugin>

</plugins>

</build>
4、 完成实体类代码
public class Customer {

private Long custId;

private String custName;

private Long custUserId;

private Long custCreateId;

private String custIndustry;

private String custLevel;

private String custLinkman;

private String custPhone;

private String custMobile;

public Long getCustId() {

return custId;

}

..省略get set方法
5、 完成dao代码
接口

package cn.itcast.dao;


import cn.itcast.entity.Customer;


public interface CustomerDao {


public Customer getById(Long id);


}

实现类

package com.itcast.dao.impl;

import org.springframework.orm.hibernate5.support.HibernateDaoSupport;

import cn.itcast.dao.CustomerDao;

import cn.itcast.entity.Customer;

public class CustomerDaoImpl extends HibernateDaoSupport implements CustomerDao {

@Override

public Customer getById(Long id) {

return this.getHibernateTemplate().get(Customer.class, id);

}

}
配置好spring,添加customer的bean注入sessionFactory,然后右键java文件进行junit测试
6、 完成service代码
接口

package com.itcast.service;

import cn.itcast.entity.Customer;

public interface CustomerService {

public Customer getById(Long id);

}


实现类

package com.itcast.service.impl;


import com.itcast.service.CustomerService;


import cn.itcast.dao.CustomerDao;

import cn.itcast.entity.Customer;


public class CustomerServiceImpl implements CustomerService {

private CustomerDao  customerDao;

public void setCustomerDao(CustomerDao customerDao) {

this.customerDao = customerDao;

}

@Override

public Customer getById(Long id) {

return customerDao.getById(id);

}

}
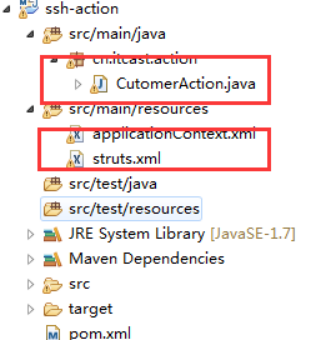
7、 完成action代码
package cn.itcast.action;

import com.itcast.service.CustomerService;

import com.opensymphony.xwork2.ActionSupport;

import cn.itcast.entity.Customer;

public class CutomerAction extends ActionSupport {

//两个成员变量

private Customer  customer;


private Long custId;

public Customer getCustomer() {

return customer;

}

public void setCustomer(Customer customer) {

this.customer = customer;

}

private CustomerService customerService;

public void setCustomerService(CustomerService customerService) {

this.customerService = customerService;

}

public Long getCustId() {

return custId;

}

public void setCustId(Long custId) {

this.custId = custId;

}

public String findById(){

customer = customerService.getById(custId);

return SUCCESS;

}

}
8、 拷贝配置文件并修改
从如下图位置拿到配置文件

放入到 src/main/resources目录中

修改内容 略
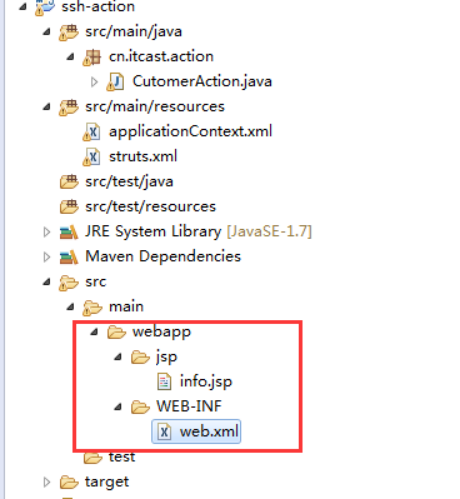
9、 修改web.xml 添加spring的监听
<listener>

 <listener-class>org.springframework.web.context.ContextLoaderListener</listener-class>

</listener>

<context-param>

<param-name>contextConfigLocation</param-name>

<param-value>classpath:applicationContext.xml</param-value>

</context-param>
10、 运行项目
3 分模块开发
依赖范围对依赖传递造成的影响(了解)
Service直接依赖dao(默认是compile) 而从dao传递过来的junit依赖范围是test的 所以service里面不会收到junit
父工程来管理 聚合
3.1 创建父工程:
1、
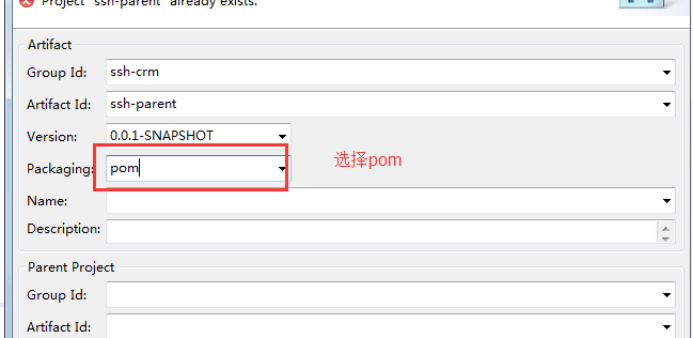
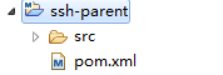
2、创建出的父工程如下
3、在pom.Xml中添加以下信息:
 <!-- 属性 -->

<properties>

<spring.version>4.2.4.RELEASE</spring.version>

<hibernate.version>5.0.7.Final</hibernate.version>

<struts.version>2.3.24</struts.version>

</properties>


<!-- 锁定版本,struts2-2.3.24、spring4.2.4、hibernate5.0.7 -->

<dependencyManagement>

<dependencies>

<dependency>

<groupId>org.springframework</groupId>

<artifactId>spring-context</artifactId>

<version>${spring.version}</version>

</dependency>

<dependency>

<groupId>org.springframework</groupId>

<artifactId>spring-aspects</artifactId>

<version>${spring.version}</version>

</dependency>

<dependency>

<groupId>org.springframework</groupId>

<artifactId>spring-orm</artifactId>

<version>${spring.version}</version>

</dependency>

<dependency>

<groupId>org.springframework</groupId>

<artifactId>spring-test</artifactId>

<version>${spring.version}</version>

</dependency>

<dependency>

<groupId>org.springframework</groupId>

<artifactId>spring-web</artifactId>

<version>${spring.version}</version>

</dependency>

<dependency>

<groupId>org.hibernate</groupId>

<artifactId>hibernate-core</artifactId>

<version>${hibernate.version}</version>

</dependency>

<dependency>

<groupId>org.apache.struts</groupId>

<artifactId>struts2-core</artifactId>

<version>${struts.version}</version>

</dependency>

<dependency>

<groupId>org.apache.struts</groupId>

<artifactId>struts2-spring-plugin</artifactId>

<version>${struts.version}</version>

</dependency>

</dependencies>

</dependencyManagement>

<!-- 依赖管理 -->

<dependencies>

<!-- spring -->

<dependency>

<groupId>org.springframework</groupId>

<artifactId>spring-context</artifactId>

</dependency>

<dependency>

<groupId>org.springframework</groupId>

<artifactId>spring-aspects</artifactId>

</dependency>

<dependency>

<groupId>org.springframework</groupId>

<artifactId>spring-orm</artifactId>

</dependency>

<dependency>

<groupId>org.springframework</groupId>

<artifactId>spring-test</artifactId>

</dependency>

<dependency>

<groupId>org.springframework</groupId>

<artifactId>spring-web</artifactId>

</dependency>

<!-- hibernate -->

<dependency>

<groupId>org.hibernate</groupId>

<artifactId>hibernate-core</artifactId>

</dependency>


<!-- 数据库驱动 -->

<dependency>

<groupId>mysql</groupId>

<artifactId>mysql-connector-java</artifactId>

<version>5.1.6</version>

<scope>runtime</scope>

</dependency>

<!-- c3p0 -->


<dependency>

<groupId>c3p0</groupId>

<artifactId>c3p0</artifactId>

<version>0.9.1.2</version>

</dependency>


<!-- 导入 struts2 -->

<dependency>

<groupId>org.apache.struts</groupId>

<artifactId>struts2-core</artifactId>

</dependency>

<dependency>

<groupId>org.apache.struts</groupId>

<artifactId>struts2-spring-plugin</artifactId>

</dependency>


<!-- servlet jsp -->

<dependency>

<groupId>javax.servlet</groupId>

<artifactId>servlet-api</artifactId>

<version>2.5</version>

<scope>provided</scope>

</dependency>

<dependency>

<groupId>javax.servlet</groupId>

<artifactId>jsp-api</artifactId>

<version>2.0</version>

<scope>provided</scope>

</dependency>

<!-- 日志 -->

<dependency>

<groupId>org.slf4j</groupId>

<artifactId>slf4j-log4j12</artifactId>

<version>1.7.2</version>

</dependency>

<!-- junit -->

<dependency>

<groupId>junit</groupId>

<artifactId>junit</artifactId>

<version>4.9</version>

<scope>test</scope>

</dependency>

<!-- jstl -->

<dependency>

<groupId>javax.servlet</groupId>

<artifactId>jstl</artifactId>

<version>1.2</version>

</dependency>

</dependencies>


<build>

<plugins>

<!-- 设置编译版本为1.7 -->

<plugin>

<groupId>org.apache.maven.plugins</groupId>

<artifactId>maven-compiler-plugin</artifactId>

<configuration>

<source>1.7</source>

<target>1.7</target>

<encoding>UTF-8</encoding>

</configuration>

</plugin>


<!-- maven内置 的tomcat6插件 -->

<plugin>

<groupId>org.codehaus.mojo</groupId>

<artifactId>tomcat-maven-plugin</artifactId>

<version>1.1</version>

<configuration>

<!-- 可以灵活配置工程路径 -->

<path>/ssh</path>

<!-- 可以灵活配置端口号 -->

<port>8080</port>

</configuration>

</plugin>


</plugins>

</build>
4、发布到本地仓库
dao service web
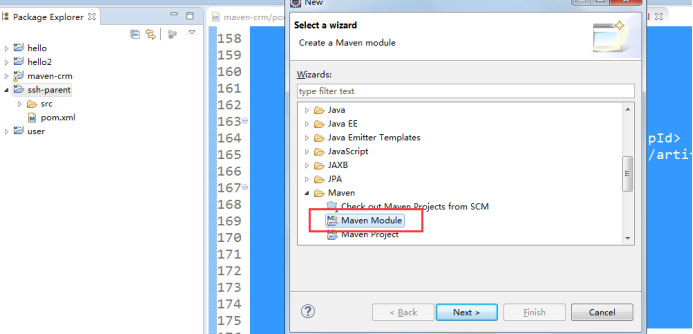
3.2 创建dao子模块
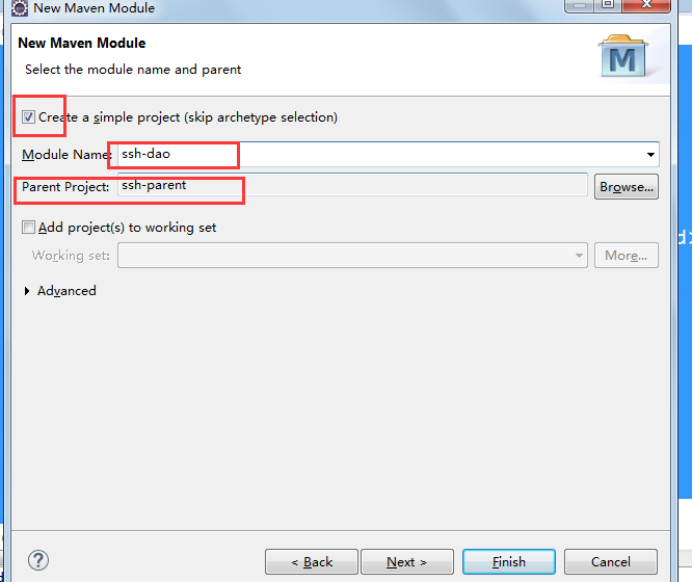
1、在ssh-parent项目上右击 ,创建时选择 Maven Module
2、填写子模块名称ssh-dao
3、把属于dao的代码拷贝到 该模块中:

4、完成后发布到本地仓库中
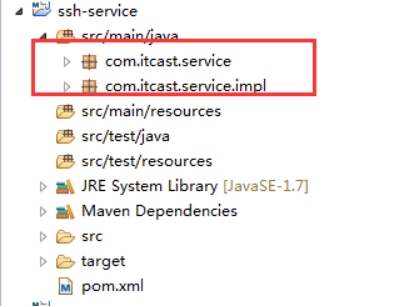
3.3 创建service子模块
1、创建方式如上:
2、把属于service的代码拷贝到该工程中
3、发布到本地仓库中
Service的Junit测试

//@ContextConfiguration(locations={"classpath*:applicationContext-*.xml"}) 第一个*是为了在jar包里面查找

@ContextConfiguration(locations={"classpath:applicationContext-dao.xml","classpath:applicationContext-service.xml"})

@RunWith(SpringJUnit4ClassRunner.class)

public class CustomerServiceImplTest {


// @Test

// public void test() {

// ApplicationContext app = new ClassPathXmlApplicationContext("classpath:applicationContext-dao.xml");

// CustomerDao customerDao = (CustomerDao) app.getBean("customerDao");

// Customer customer = customerDao.findById(23L);

// System.out.println("********************"+customer.getCustName());

// }

@Autowired

private CustomerService customerService;


@Test

public void test() {

// Customer customer = customerService.findById(1L);

// System.out.println("********************"+customer.getCustName());

}


}
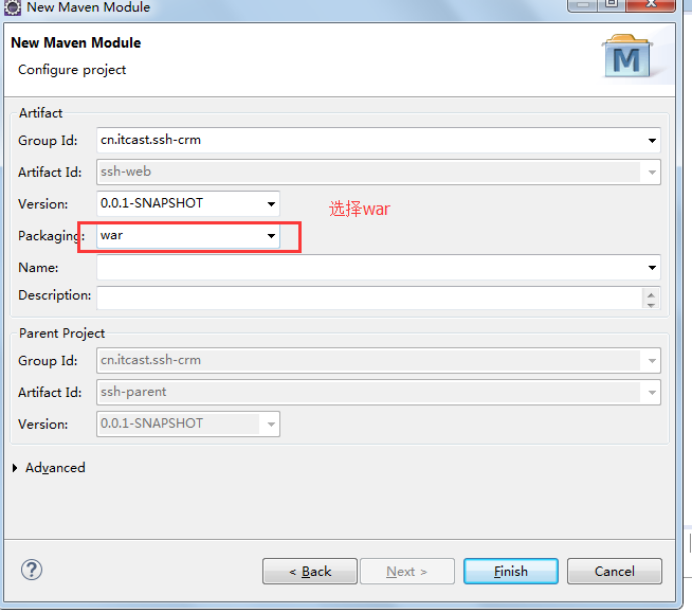
3.4 创建Action子模块
1、选择war的打包方式
2、 拷贝属于action的代码和配置文件
3、 修改web.xml 添加spring监听
<listener>

 <listener-class>org.springframework.web.context.ContextLoaderListener</listener-class>

</listener>


<context-param>

 <param-name>contextConfigLocation</param-name>

 <param-value>classpath*:applicationContext-*.xml</param-value>

</context-param>
4、添加页面:
4 私服 nexus
安装nexus

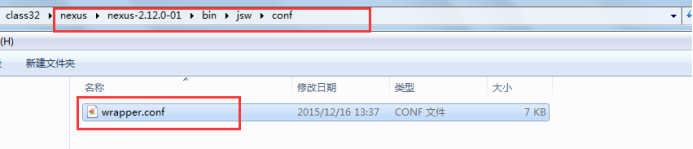
启动服务


启动失败的解决方法:
登录nexus
用户名/密码 admin/admin123
仓库类型

Virtual 虚拟仓库
Proxy 代理仓库
Hosted 宿主仓库 本地仓库
Group 组
需求:
把dao放到私服上,然后service从私服上下载
需求 :将ssh_dao的这个工程打成jar包,并放入到私服上去.
4.1 上传dao
第一步: 需要在客户端即部署dao工程的电脑上配置 maven环境,并修改 settings.xml 文件,配置连接私服的用户和密码 。
此用户名和密码用于私服校验,因为私服需要知道上传都 的账号和密码 是否和私服中的账号和密码 一致。
    <server>

      <id>releases</id>

      <username>admin</username>

      <password>admin123</password>

    </server>

<server>

      <id>snapshots</id>

      <username>admin</username>

      <password>admin123</password>

    </server>
第二步: 配置项目pom.xml
配置私服仓库的地址,本公司的自己的jar包会上传到私服的宿主仓库,根据工程的版本号决定上传到哪个宿主仓库,如果版本为release则上传到私服的release仓库,如果版本为snapshot则上传到私服的snapshot仓库
  <distributionManagement>

   <repository>

   <id>releases</id>

<url>http://localhost:8081/nexus/content/repositories/releases/</url>

   </repository>

   <snapshotRepository>

   <id>snapshots</id>

<url>http://localhost:8081/nexus/content/repositories/snapshots/</url>

   </snapshotRepository>

  </distributionManagement>
注意:pom.xml这里<id> 和 settings.xml 配置 <id> 对应!
第三步:执行deploy命令发布到私服
4.2 下载dao
第一步 修改settings.xml
<profile>

<!--profile的id-->

    <id>dev</id>

    <repositories>

      <repository>

<!--仓库id,repositories可以配置多个仓库,保证id不重复-->

        <id>nexus</id>

<!--仓库地址,即nexus仓库组的地址-->

        <url>http://localhost:8081/nexus/content/groups/public/</url>

<!--是否下载releases构件-->

        <releases>

          <enabled>true</enabled>

        </releases>

<!--是否下载snapshots构件-->

        <snapshots>

          <enabled>true</enabled>

        </snapshots>

      </repository>

    </repositories>

 <pluginRepositories>

     <!-- 插件仓库,maven的运行依赖插件,也需要从私服下载插件 -->

        <pluginRepository>

         <!-- 插件仓库的id不允许重复,如果重复后边配置会覆盖前边 -->

            <id>public</id>

            <name>Public Repositories</name>

            <url>http://localhost:8081/nexus/content/groups/public/</url>

        </pluginRepository>

    </pluginRepositories>

  </profile>


  <activeProfiles>

    <activeProfile>dev</activeProfile>

  </activeProfiles>
第二步 删除本地仓库中的dao
第三步 update service工程,出现以下信息说明已经成功

如果项目开发途中dao修改了内容,那么重新上传的时候记得要改版本号,不然service这边是下载不了的,因为maven不会对比用一个版本的不同文件的大小。