简单购物放大镜分享
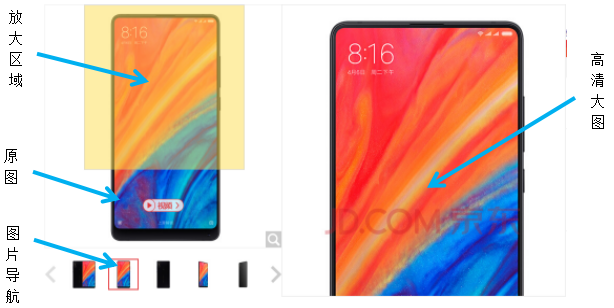
日常生活中电商购物极大方便了我们的生活,与实体店中我们可以现场查看物品,试用商品,对商品有着直观的感受不同电商购物的实体商品远在我们千里之外,我们无法通过现场获得直观感受,这样极大降低了人们的购物体验,对此电商们为了增加客户的购物体验,我们可以看到在购物的详情页面中看到这样一张商品高清图,当我们鼠标划上图片时,在右侧会跳出一张更大并将原图放大的图片如同放大镜一般,清晰的展示了我们所选商品直观图片,例图如下:

作为一位前端学习者,这里和大家分享一下一个简单的购物放大镜,同时也对自己所学的知识做一个记录。
首先我们的拆解购物放大镜逻辑动作:
1、鼠标划上上图片导航,原图跳转相对应图片。
2、鼠标划上原图,放大区域及高清大图出现。
3、放大区域移动过程中,鼠标一直显示与放大区域中央,同时高清大图响应移动,且移动反向为反向。
拆解完全以后,用代码实现逻辑动作,具体代码如下:
<!DOCTYPE html>
<html>
<head>
<meta charset="utf-8">
<title></title>
<style type="text/css">
.small {
margin: 0 10px;
border: 1px solid #fff;
}
.small:hover {
border-color: #000;
}
#filter{
200px;
height: 200px;
position: absolute;
background: #000;
opacity: 0.5;
left: 0;
top: 0;
display: none;
}
#box{position: relative; 400px}
#max{position: absolute;left:430px;top:0;overflow: hidden;400px;height: 400px;}
#maxImg{800px;height: 800px;position: absolute;}
</style>
</head>
<body>
<div id="box">
<!-- 1:2:4 -->
<img src="imgs/1-large.jpg" class="middle" width="400" height="400">
<div id="filter"></div>
</div>
<div id="max">
<img src="imgs/1-large.jpg" id="maxImg">
</div>
<div>
<img src="imgs/1-small.jpg" class="small" data-url="imgs/1-large.jpg">
<img src="imgs/2-small.jpg" class="small" data-url="imgs/2-large.jpg">
<img src="imgs/3-small.jpg" class="small" data-url="imgs/3-large.jpg">
<img src="imgs/4-small.jpg" class="small" data-url="imgs/4-large.jpg">
<img src="imgs/5-small.jpg" class="small" data-url="imgs/5-large.jpg">
</div>
</body>
</html>
<script>
var small=document.querySelectorAll('.small');
//所有小图
var middle=document.querySelector('.middle');
//中图
var abox = document.getElementById('box')
//盒子
var maximg =document.getElementById('maxImg')
//大图
var filter = document.getElementById('filter')
for (var i=0;i<small.length;i++) {
small[i].onmouseover=function(){
var asrc = this.getAttribute('data-url')
//获取自定义属性
middle.src = asrc;
//将自定义属性中存放的图片链接赋值给原图图片链接地址
maximg.src = asrc;
//将自定义属性中存放的图片链接赋值给大图图片链接地址
}
}
abox.onmouseover = function(){
//鼠标移入box盒子,将filter转为块元素
filter.style.display="block"
this.onmousemove=function(e){
var e = e||event
//鼠标移动时提取e
var l= e.clientX-(abox.offsetLeft+filter.offsetWidth/2);
var h= e.clientY-(abox.offsetTop+filter.offsetHeight/2);
//此时鼠标坐标减去box相对于可视区的距离和filter自身的大小的一半的和得到filter在box中可移动的相对距离
l>abox.offsetWidth-filter.offsetWidth?l=abox.offsetWidth-filter.offsetWidth:l<0? l=0:l
h>abox.offsetHeight-filter.offsetHeight?h=abox.offsetHeight-filter.offsetHeight:h<0? h=0:h
//判断当filter在box中可移动的相对距离超出边界时的情况做出应对
filter.style.left=l+'px';
filter.style.top=h+'px';
//filter在box中可移动的相对距离
maximg.style.left=-2*l+'px'
maximg.style.top=-2*h+'px'
}
}
filter.onmouseout=function(){
filter.style.display="none"
}