Python-docx
安装库:pip install python-docx
帮助文档:https://python-docx.readthedocs.io/en/latest/index.html
例子:


from docx import Document
from docx.shared import Inches

document = Document()

document.add_heading('Document Title', 0)

p = document.add_paragraph('A plain paragraph having some ')
p.add_run('bold').bold = True
p.add_run(' and some ')
p.add_run('italic.').italic = True

document.add_heading('Heading, level 1', level=1)
document.add_paragraph('Intense quote', style='Intense Quote')

document.add_paragraph(
    'first item in unordered list', style='List Bullet'
)
document.add_paragraph(
    'first item in ordered list', style='List Number'
)

document.add_picture('monty-truth.png', width=Inches(1.25))

records = (
    (3, '101', 'Spam'),
    (7, '422', 'Eggs'),
    (4, '631', 'Spam, spam, eggs, and spam')
)

table = document.add_table(rows=1, cols=3)
hdr_cells = table.rows[0].cells
hdr_cells[0].text = 'Qty'
hdr_cells[1].text = 'Id'
hdr_cells[2].text = 'Desc'
for qty, id, desc in records:
    row_cells = table.add_row().cells
    row_cells[0].text = str(qty)
    row_cells[1].text = id
    row_cells[2].text = desc

document.add_page_break()

document.save('demo.docx')
东湖日报脚本源码
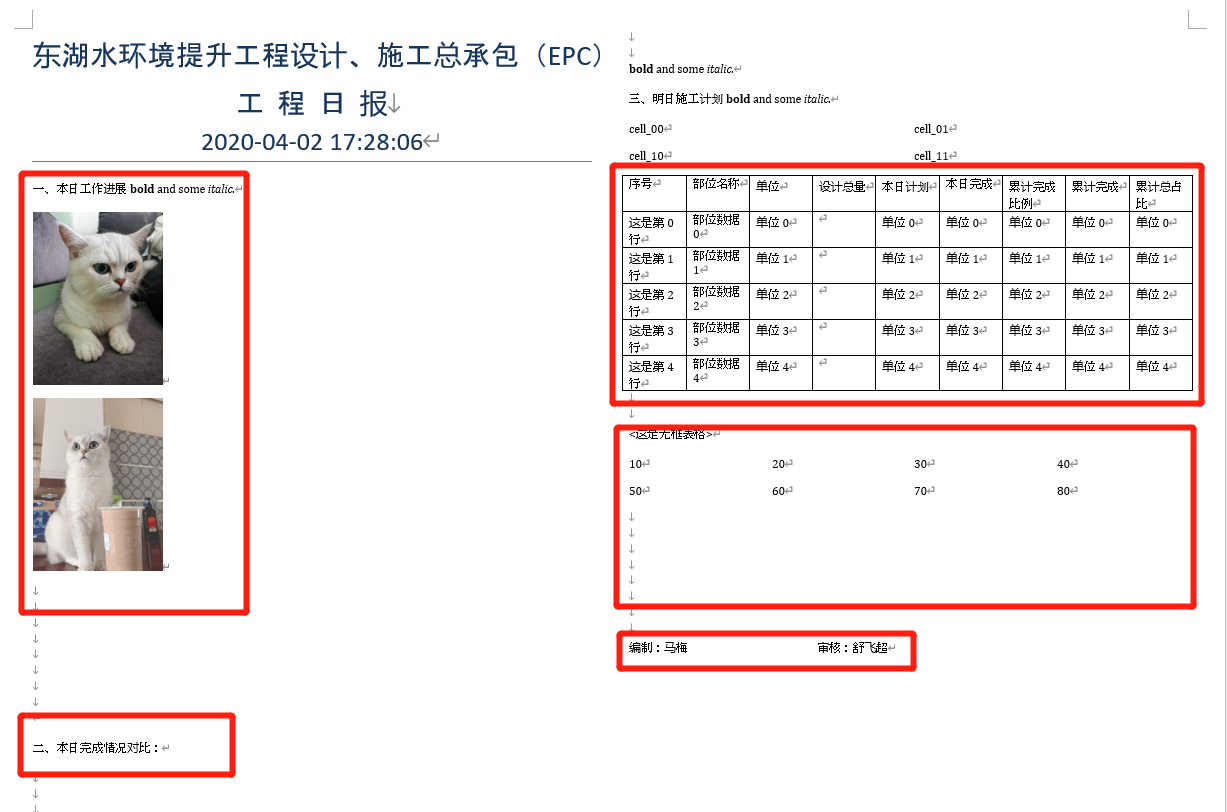
# -*- coding:utf-8 -*-
# ====#====#====#====#====#====#====#====#====
# @Time    : 2020/4/2 10:58
# @Author  : Alex_Dong
# @Email   : 1220274707@qq.com
# @HomePage:https://www.cnblogs.com/xied/
# @File    : 东湖日报脚本.py
# @Software: PyCharm
# ====#====#====#====#====#====#====#====#====

from docx import Document
from docx.enum.text import WD_ALIGN_PARAGRAPH,WD_LINE_SPACING
from docx.shared import Pt,Inches
from docx import section
from docx.enum.section import WD_SECTION,WD_ORIENT
from docx.shared import RGBColor
import time
import docx

from docx.oxml.ns import qn

# 实例化一个document对象
donghu_document = Document()

# 调取sections对象
sections = donghu_document.sections
for section in sections:
    pass
# 方法二  对下一也新增
# section = donghu_document.add_section()


# 对属性的修改
#方法允许在文档末尾启动一个新节。调用此方法后添加的段落和表将出现在新的部分:(增加一页)
# current_section = donghu_document.sections[-1]  # last section in document
# new_section = donghu_document.add_section(WD_SECTION.ODD_PAGE)

# 长宽高
section.orientation = WD_ORIENT.LANDSCAPE
# 尺寸像素点
# section.page_width = 15544800
# section.page_hwidth = 15544800

section.page_width = Inches(16)
section.page_height = Inches(12)

# 设置分栏为2

section._sectPr.xpath('./w:cols')[0].set(qn('w:num'),'2')


#设置页边距
section.left_margin = Inches(0.5)
section.right_margin = Inches(0.5)
section.top_margin= Inches(0.5)
section.bottom_margin= Inches(0.5)


# 时间模块
Data_now1 = time.strftime('%Y-%m-%d %H:%M:%S', time.localtime(time.time()))
Data_now = time.strftime('%Y-%m-%d', time.localtime(time.time()))
print('现在时间:',Data_now1)


# 大标题一
head = donghu_document.add_heading(level=0)#添加一级标题
head_run = head.add_run('东湖水环境提升工程设计、施工总承包(EPC)
')
head_run = head.add_run('工  程  日  报
')
head_run = head.add_run(Data_now1)
head_run.font.size = Pt(24)
head.alignment = WD_ALIGN_PARAGRAPH.CENTER#居中

# 段落一
p = donghu_document.add_paragraph('一、本日工作进展')
p.add_run('bold').bold = True
p.add_run(' and some ')
p.add_run('italic.').italic = True

#插入图片
# 添加图片,设置图片大小
donghu_document.add_picture(r".picmabu1.jpg", height=Inches(2.25))
donghu_document.add_picture(r'.picmabu2.jpg',height=Inches(2.25))   #  width=Inches(2.25)--2.25英寸

# 换页和换行--如果是换行的话就不需要使用docx.enum.text.WD_BREAK.PAGE参数
# donghu_document.paragraphs[0].runs[0].add_break(docx.enum.text.WD_BREAK.PAGE)


# 段落二
p = donghu_document.add_paragraph('


')
p = donghu_document.add_paragraph('二、本日完成情况对比:')
p = donghu_document.add_paragraph('


')

p.add_run('bold').bold = True
p.add_run(' and some ')
p.add_run('italic.').italic = True


# 段落三
p = donghu_document.add_paragraph('三、明日施工计划')
p.add_run('bold').bold = True
p.add_run(' and some ')
p.add_run('italic.').italic = True


# A添加表格,填入表格内容
table = donghu_document.add_table(rows=2, cols=2)
table.cell(0, 0).text = "cell_00"
table.cell(0, 1).text = "cell_01"
table.cell(1, 0).text = "cell_10"
table.cell(1, 1).text = "cell_11"

# B##############################创建表格##########
table = donghu_document.add_table(rows=1, cols=9, style='Table Grid')  # 创建带边框的表格
hdr_cells = table.rows[0].cells  # 获取第0行所有所有单元格
hdr_cells[0].text = '序号'
hdr_cells[1].text = '部位名称'
hdr_cells[2].text = '单位'
hdr_cells[3].text = '设计总量'
hdr_cells[4].text = '本日计划'
hdr_cells[5].text = '本日完成'
hdr_cells[6].text = '累计完成比例'
hdr_cells[7].text = '累计完成'
hdr_cells[8].text = '累计总占比'


# 添加三行数据
data_lines = 5
for i in range(data_lines):
    cells = table.add_row().cells
    cells[0].text = '这是第%s行' % i           #序号
    cells[1].text = '部位数据%s' % i           #部位
    cells[2].text = '单位%s' % i           #单位
    cells[4].text = '单位%s' % i           #'本日计划'
    cells[5].text = '单位%s' % i           #'本日完成'
    cells[6].text = '单位%s' % i           #'累计完成比例'
    cells[7].text = '单位%s' % i           #'累计完成'
    cells[8].text = '单位%s' % i           #'累计总占比'


#插入无框表格
p = donghu_document.add_paragraph('

<这是无框表格>')

rows = 2
cols = 4
table = donghu_document.add_table(rows=rows, cols=cols)
val = 1
for i in range(rows):
    cells = table.rows[i].cells
    for j in range(cols):
        cells[j].text = str(val * 10)
        val += 1


# 最后签名
p = donghu_document.add_paragraph('


编制:马梅                                                  审核:舒飞超')


donghu_fileName = '【%s】东湖水环境提升日报'%Data_now+'.docx'
donghu_fileName = str(donghu_fileName)
print(donghu_fileName,'已经成功生成!!!')

#存储文档
donghu_document.save('.word\%s' %donghu_fileName)
一.简单的打开保存
from docx import Document
document = Document('existing-document-file.docx') #可以docx=None
document.save('new-file-name.docx')
打开
f = open('foobar.docx', 'rb')
document = Document(f)
f.close()
二.API Documentation文档对象
python-docx的API旨在使简单的事情变得简单,同时允许通过适当的、增量的理解来实现更复杂的结果。只使用一个对象docx.api就可以创建一个基本文档。打开文件时返回的文档对象。docx.api上的方法。文档允许将块级对象添加到文档的末尾。块级对象包括段落、内联图片和表。标题、项目符号和编号列表只是应用了特定样式的段落。这样一个文件。
- Document objects文档对象
- Document
Settingsobjects 文档设置对象 - Style-related objects 风格相关的对象
- Text-related objects 文本相关的对象
- Table objects 表对象
- Section objects 部分对象
- Shape-related objects Shape-related对象
- DrawingML objects DrawingML对象
- Shared classes 共享类
- Enumeration 枚举
三.Working with Sections
Word支持section的概念,即文档的一个部分,具有相同的页面布局设置,如页边距和页面方向。例如,这就是文档在纵向布局中包含某些页面而在横向布局中包含其他页面的方式。大多数Word文档只有一个默认的部分,而且大多数文档没有理由改变默认的页边距或其他页面布局。但是,当您确实需要更改页面布局时,您需要了解各个部分才能完成。
1.获取sections对象
2.添加新的部分
add_section()方法允许在文档末尾启动一个新节。调用此方法后添加的段落和表将出现在新的部分:current_section = document.sections[-1] # last section in document
new_section = document.add_section(WD_SECTION.ODD_PAGE)
new_section.start_type
3.Section properties属性
Section对象有11个属性,允许发现和指定页面布局设置。
-
Section start type部分启动类型
-
section.start_type起始类型new_page(2),然后 section.start_type = WD_SECTION.ODD_PAGE -
ODD_PAGE (4)>>>>>>>start_type的值是WD_SECTION_START枚举的成员。
-
-
Page dimensions and orientation页面尺寸和方向
- Section中的三个属性描述了页面的大小和方向。这些可以一起使用,例如,改变一个截面的方向从纵向到横向:
- 用到了:section.orientation, section.page_width, section.page_height
-
View Code
>>> section.orientation, section.page_width, section.page_height
(PORTRAIT (0), 7772400, 10058400)  # (Inches(8.5), Inches(11))
>>> new_width, new_height = section.page_height, section.page_width
>>> section.orientation = WD_ORIENT.LANDSCAPE
>>> section.page_width = new_width
>>> section.page_height = new_height
>>> section.orientation, section.page_width, section.page_height
(LANDSCAPE (1), 10058400, 7772400)
-
Page margins页边距
Section上的七个属性一起指定了决定文本在页面上出现位置的各种边缘间距:
#section.left_margin, section.right_margin
#section.top_margin, section.bottom_margin
#section.gutter
#section.header_distance, section.footer_distance
1 from docx.shared import Inches
2 #section.left_margin, section.right_margin
3 #section.top_margin, section.bottom_margin
4 #section.gutter
5 #section.header_distance, section.footer_distance
6
7 section.left_margin = Inches(1.5)
8 section.right_margin = Inches(1)
9 section.left_margin, section.right_margin
-
Working with Headers and Footers 处理页眉和页脚
Word支持页眉和页脚。页眉是出现在每页顶部空白区域的文本,与正文分离,通常传递上下文信息,如文档标题、作者、创建日期或页码。文档中的页眉在页与页之间是相同的,只有内容上的细微差异,比如更改了节标题或页码。页眉也称为运行头。页脚在任何方面都类似于页眉,但它出现在页面的底部。它不应该被混淆
-
-
Accessing the header for a section访问节的标头
- 每个section对象都有一个.header属性,为该section提供对_Header对象的访问:
-
Adding a header (simple case)添加标题(简单的情况)
-
paragraph = header.paragraphs[0] -
paragraph.text = "Title of my document"
-
-
-
-
Adding “zoned” header content添加“分区”标题内容
-
带有多个“区域”的页眉通常是使用精心放置的制表符来完成的。中心对齐和右对齐的“区域”所需的制表符停止是Word中页眉和页脚样式的一部分。如果您使用的是自定义模板而不是python-docx默认模板,那么在模板中定义该样式可能是有意义的。插入的制表符(“ ”)用于分隔左、中、右对齐的标题内容:
-
-
- >>> paragraph = header.paragraphs[0]
- >>> paragraph.text = "Left Text Center Text Right Text"
- >>> paragraph.style = document.styles["Header"]
-
-
-
Removing a header
-
header.is_linked_to_previous = True
-
python给word添加换行换页符
- #换页只需要把docx.enum.text.WD_BREAK.PAGE作为唯一的参数传递给add_break
- #如果是换行的话就不需要使用docx.enum.text.WD_BREAK.PAGE参数
- doc2.paragraphs[0].runs[0].add_break(docx.enum.text.WD_BREAK.PAGE)
-
四.Styles
Questions:
-
-
What is a style in Word?
-
Why doesn’t the style I applied show up?
-
-
Access a style
The Styles object is also iterable. By using the identification properties on BaseStyle, various subsets of the defined styles can be generated. For example, this code will produce a list of the defined paragraph styles:Styles对象也是可迭代的。通过使用BaseStyle上的标识属性,可以生成定义的样式的各种子集。例如,这段代码将生成定义的段落样式列表:
>>> from docx.enum.style import WD_STYLE_TYPE
>>> styles = document.styles
>>> paragraph_styles = [
...     s for s in styles if s.type == WD_STYLE_TYPE.PARAGRAPH
... ]
>>> for style in paragraph_styles:
...     print(style.name)
...
Normal
Body Text
List Bullet
-
Apply a style应用一个样式
>>> document = Document()
>>> paragraph = document.add_paragraph()
>>> paragraph.style
<docx.styles.style._ParagraphStyle object at <0x11a7c4c50>
>>> paragraph.style.name
'Normal'
>>> paragraph.style = document.styles['Heading 1']
>>> paragraph.style.name
'Heading 1'
-
Add or delete a style
#通过指定一个唯一的名称和样式类型,可以将一个新样式添加到文档中:
>>> from docx.enum.style import WD_STYLE_TYPE
>>> styles = document.styles
>>> style = styles.add_style('Citation', WD_STYLE_TYPE.PARAGRAPH)
>>> style.name
'Citation'
>>> style.type
PARAGRAPH (1)

#使用base_style属性指定新样式应该继承的格式设置:
>>> style.base_style
None
>>> style.base_style = styles['Normal']
>>> style.base_style
<docx.styles.style._ParagraphStyle object at 0x10a7a9550>
>>> style.base_style.name
'Normal'

#一个样式可以从文档中删除,只需调用它的delete()方法:
>>> styles = document.styles
>>> len(styles)
10
>>> styles['Citation'].delete()
>>> len(styles)
9