表单
在Web程序中,表单时和用户交互最常见的方式之一。用户注册、登录、撰写文章、编辑设置,无一不用到表单。不过,表单的处理不简单。要创建表单,验证用户输入的内容,向用户显示错误提示,还要获取并保存数据。
WTForms可以做这些事情,WTForms是一个使用python编写的表单库,它使得表单的定义、验证(服务器端)和处理变得非常轻松。下面学习一下web程序中处理表单的方法和技巧。
HTML表单
在html中,表单通过<form>标签来创建,表单中的字段使用<input>标签定义。下面是一个表单:
<form method="post">
    <label for="username">Username</label><br>
    <input type="text" name="username" placeholder="Ross Gellar"><br>
    <label for="password">Password</label><br>
    <input type="password" name="password" placeholder="19870308"><br>
    <input id="remember" name="remember" type="checkbox" checked>
    <label for="remember"><small>Remember me</small></label><br>
    <input type="submit" name="submit" value="Log in">
</form>
在html表单中,我们创建<input>标签标示各种输入字段,<label>标签则用来定义字段的标签文字。可以在<from>和<input>标签中使用各种属性来对表单进行设置。
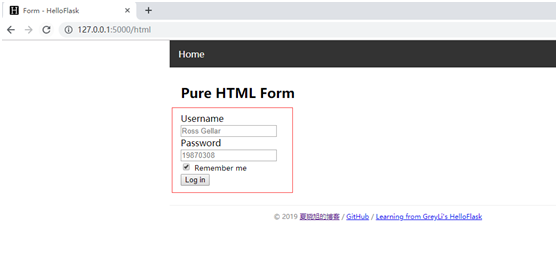
上面的表单被浏览器解析后会生成两个输入框,一个勾选框和一个提交按钮。
运行程序后,在浏览器中输入URL:127.0.0.1:5000/html,会触发视图函数,页面如下:

示例相关文件:
appFrom.py:
#encoding=utf-8
from flask import Flask,render_template,flash,redirect,url_for,session
import os#用不到

app = Flask(__name__)
app.secret_key = os.getenv('SECRET_KEY','secret string')#用不到

@app.route('/html',methods=['GET','POST'])
def html():
    return render_template('pure_html.html')

if __name__ == '__main__':
    app.run(debug=True)
基模板baseFrom.html:
<!DOCTYPE html> <html> <head> {% block head %} {% block metas %} <meta charset="UTF-8"> {% endblock metas %} <title>{% block title %}Form - HelloFlask{% endblock %}</title> <link rel="icon" type="image/x-icon" href="{{ url_for('static', filename='favicon.ico') }}"> {% block styles %} <link rel="stylesheet" type="text/css" href="{{ url_for('static', filename='style.css') }}"> {% endblock styles %} {% endblock head %} </head> <body> <nav> {% block nav %} <ul> <li><a href="{{ url_for('html') }}">Home</a></li> </ul> {% endblock %} </nav> <main> {% for message in get_flashed_messages() %} <div class="alert"> {{ message }} </div> {% endfor %} {% block content %}{% endblock %} </main> <footer> {% block footer %} <small> © 2019 <a href="https://www.cnblogs.com/xiaxiaoxu/" title="xiaxiaoxu's blog">夏晓旭的博客</a> / <a href="https://github.com/xiaxiaoxu/hybridDrivenTestFramework" title="Contact me on GitHub">GitHub</a> / <a href="http://helloflask.com" title="A HelloFlask project">Learning from GreyLi's HelloFlask</a> </small> {% endblock %} </footer> {% block scripts %}{% endblock %} </body> </html>
存放表单的子模板:pure_html.html
{% extends 'baseForm.html' %}

{% block content %}
<h2>Pure HTML Form</h2>

<form method="post">
    <label for="username">Username</label><br>
    <input type="text" name="username" placeholder="Ross Gellar"><br>
    <label for="password">Password</label><br>
    <input type="password" name="password" placeholder="19870308"><br>
    <input id="remember" name="remember" type="checkbox" checked>
    <label for="remember"><small>Remember me</small></label><br>
    <input type="submit" name="submit" value="Log in">
</form>
{% endblock %}
WTForms支持在python中使用类定义表单,然后通过类定义生成对应的HTML代码,这种方式更方便,易于重用。因此,除非是非常简单的程序,或者想让表单的定义更加灵活,否则不会再模板中直接使用HTML编写表单。