1 基本图形和属性
<rect><circle><ellipse><line><polyline><polygon>
矩形---圆形————椭圆———直线——折线—————多边形
PS:<path> 用来绘制任意的曲线<rect> x y width height rx ry
x y 表示左上角的位置

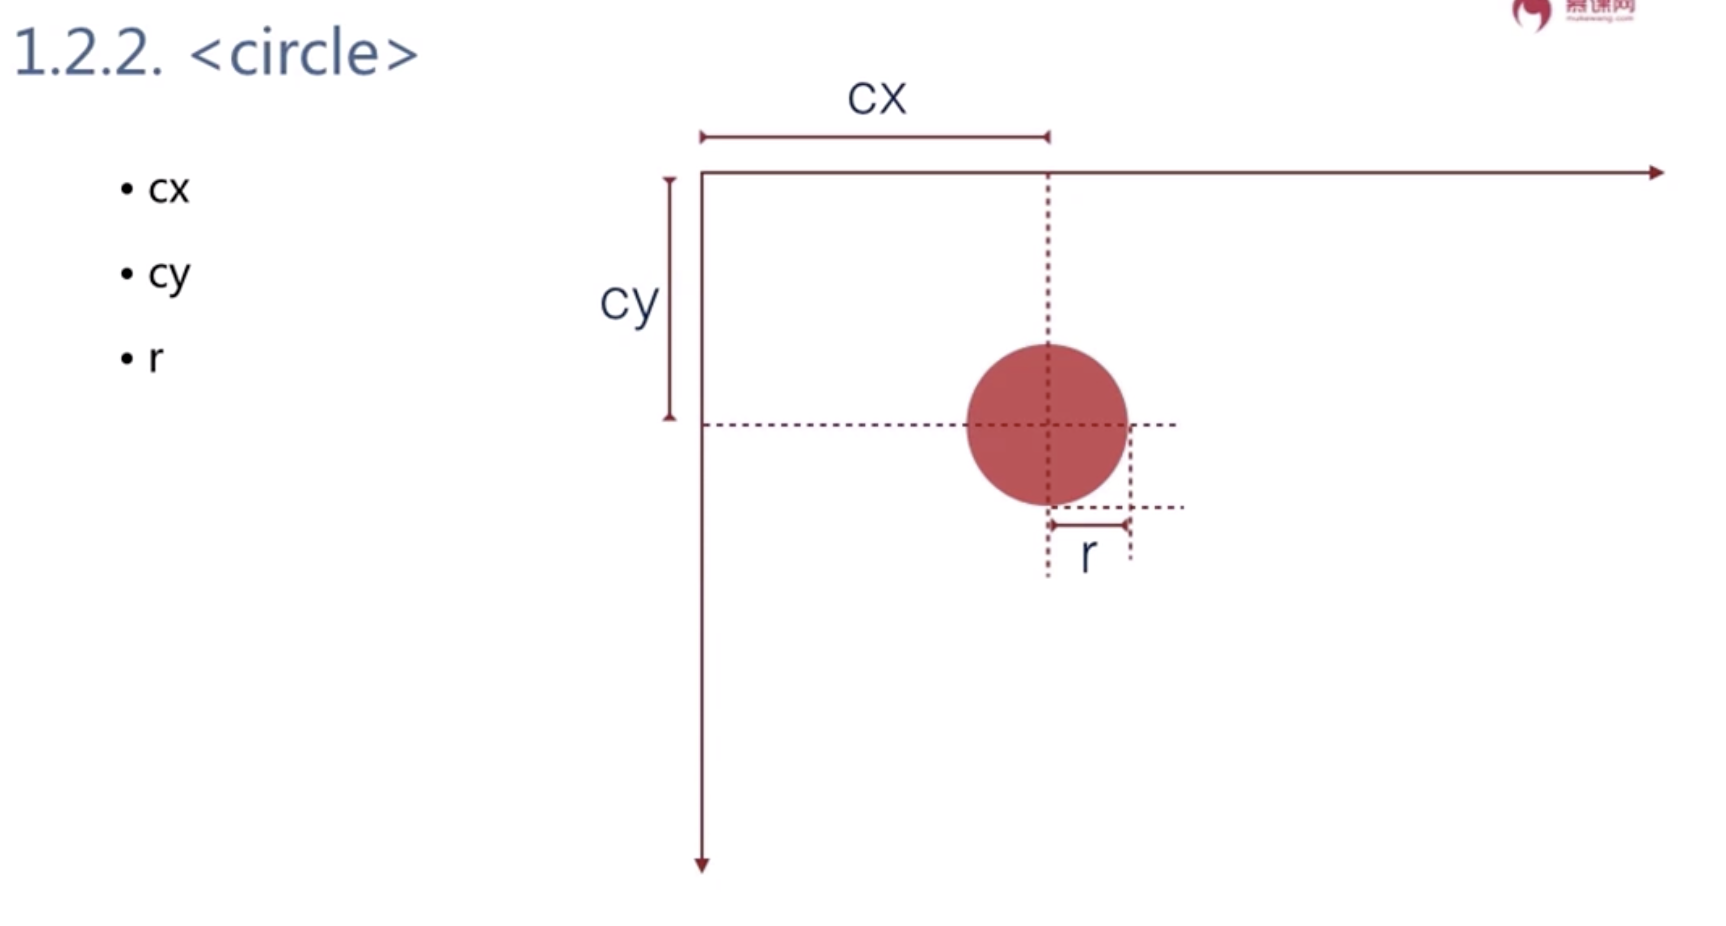
<circle> cx cy r
cx cy表示圆心的位置
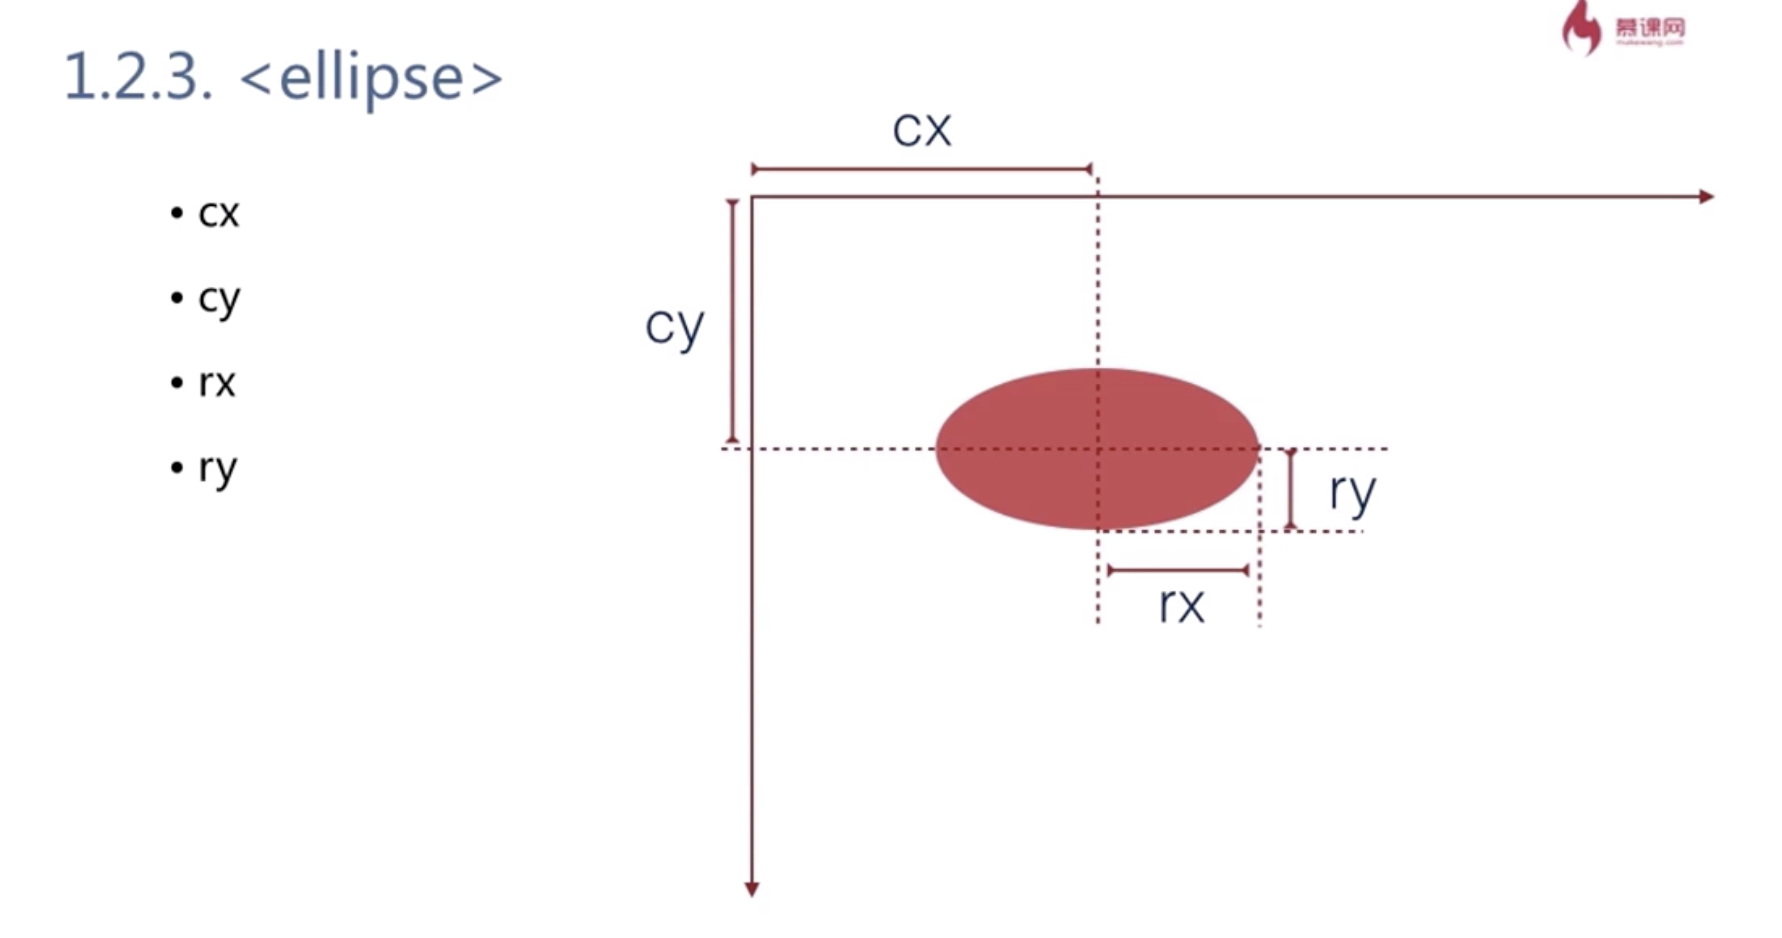
<ellipse> cx cy rx ry
![]()
<line> x1 y1 x2 y2
<polyline> points=”x1 y1 x2 y2 x3 y3 ….”![]()
<polygon> points=”x1 y1 x2 y2 x3 y3 ….” //多边形 最后会自动封闭图形

2 基本属性
fill:填充色
stroke:边框色
stroke-width:边框宽度
transform:偏移量
3 动态创建svg的基本API
创建图形: document.createElementNS(ns,tagName)
添加图形:element.appendChild(childElement)
设置获取属性:element.setAttribute(name,value)
<svg xmlns="http://www.w3.org/2000/svg">
    <rect
        x="10"
        y="10"
        rx="5"
        ry="5"
        width="150"
        height="150"
        stroke="red"
        fill="yellow"
    ></rect>
    <circle
    cx="250"
    cy="60"
    r="50"
    stroke="red"
    fill="green"
    ></circle>
    <line
        x1="20"
        y1="20"
        x2="200"
        y2="200"
        stroke="green"
    ></line>
    <polyline
        points="
        100 100
        200 400
        300 200
        "
        fill="green"
        stroke="red"
        stroke-width="5"
    ></polyline>
    <polygon
        points="
        250 120
        300 220
        200 220
        100 300
        "
        stroke="red"
        stroke-width="5"
    ></polygon>
</svg>
示例2 微笑脸
<svg xmlns="http://www.w3.org/2000/svg"
    width="200" height="200">
    <!--Face-->
    <circle cx="100" cy="100" r="90" fill="#39F" />
    <!--Eyes-->
    <circle cx="70" cy="80" r="20" fill="white" />
    <circle cx="130" cy="80" r="20" fill="white" />
    <circle cx="65" cy="75" r="10" fill="black" />
    <circle cx="125" cy="75" r="10" fill="black"/>
    <!--Smile-->
    <path d="M 50 140 A 60 60 0 0 0 150 140"
        stroke="white" stroke-width="3" fill="none" />
</svg>
<!DOCTYPE html>
<html lang="en">
<head>
    <meta charset="UTF-8">
    <meta name="viewport" content="width=device-width, initial-scale=1.0">
    <meta http-equiv="X-UA-Compatible" content="ie=edge">
    <title>Document</title>
    <style>
        .box{
            width: 200px;
            text-align: center;
            line-height: 60px;
            height: 60px;
            background-color: green;
            color: red;
        }
    </style>
</head>
<body>
    <!--点击按钮动态生成svg-->
    <div class="box">按钮</div>
    <div id="canvas"></div>
    <script>
        var SVG_NS = 'http://www.w3.org/2000/svg';
        var defaultAttrs = {
            rect: {
                x:'10',
                y:'10',
                '200',
                height:'100',
                rx:'10',
                ry:'10',
                fill:'red'
            },
            circle:{
                cx:"100",
                cy:'100',
                r:'50',
                fill:'yellow'
            }
        };
        function createSVG() {
            var svg = document.createElementNS(SVG_NS, 'svg');
            var canvas = document.querySelector('#canvas');
            svg.setAttribute('width', '100%');
            svg.setAttribute('height', '100%');
            for (name in defaultAttrs) {
                var shape = document.createElementNS(SVG_NS, name);
                for(key in defaultAttrs[name]){
                    shape.setAttribute(key, defaultAttrs[name][key]);
                    svg.appendChild(shape);
                }
            }
            canvas.appendChild(svg);
        }
        document.querySelector('.box').addEventListener('click',function(){
            createSVG();
        },false)
    </script>
</body>
</html>
视野与世界
世界是无穷大的
视野是观察世界的一个矩形区域(viewbox)
width,height—控制视窗,svg用来渲染图像的区域;
SVG代码—定义世界
viewBox preserveAspectORatio—控制视野,也就是决定用户能够观看到的范围;
<svg
 xmlns=""
 width="800"
 height="600"
 viewBox="0 0 400 300"
 preserveAspectORatio = "xMidYMid meet"
>
</svg>
一般来说设置 viewBox=”0 0 400 300”
这里的400 300 就是svg的宽度和高度即可
分组的概念
标签来创建分组
属性继承
transform 属性定义坐标变换
可以嵌套使用
示例:锤子分组
<svg xmlns="http://www.w3.org/2000/svg"
    >
    <line
        x1="0"
        y1="0"
        x2="200"
        y2="0"
        stroke="red">
    </line>
    <g stroke="green" fill="none" transform="translate(50,50)">
        <rect x="100" y="50" width="100" height="50"></rect>
        <rect x="140" y="100" width="20" height="120"></rect>
    </g>
</svg>
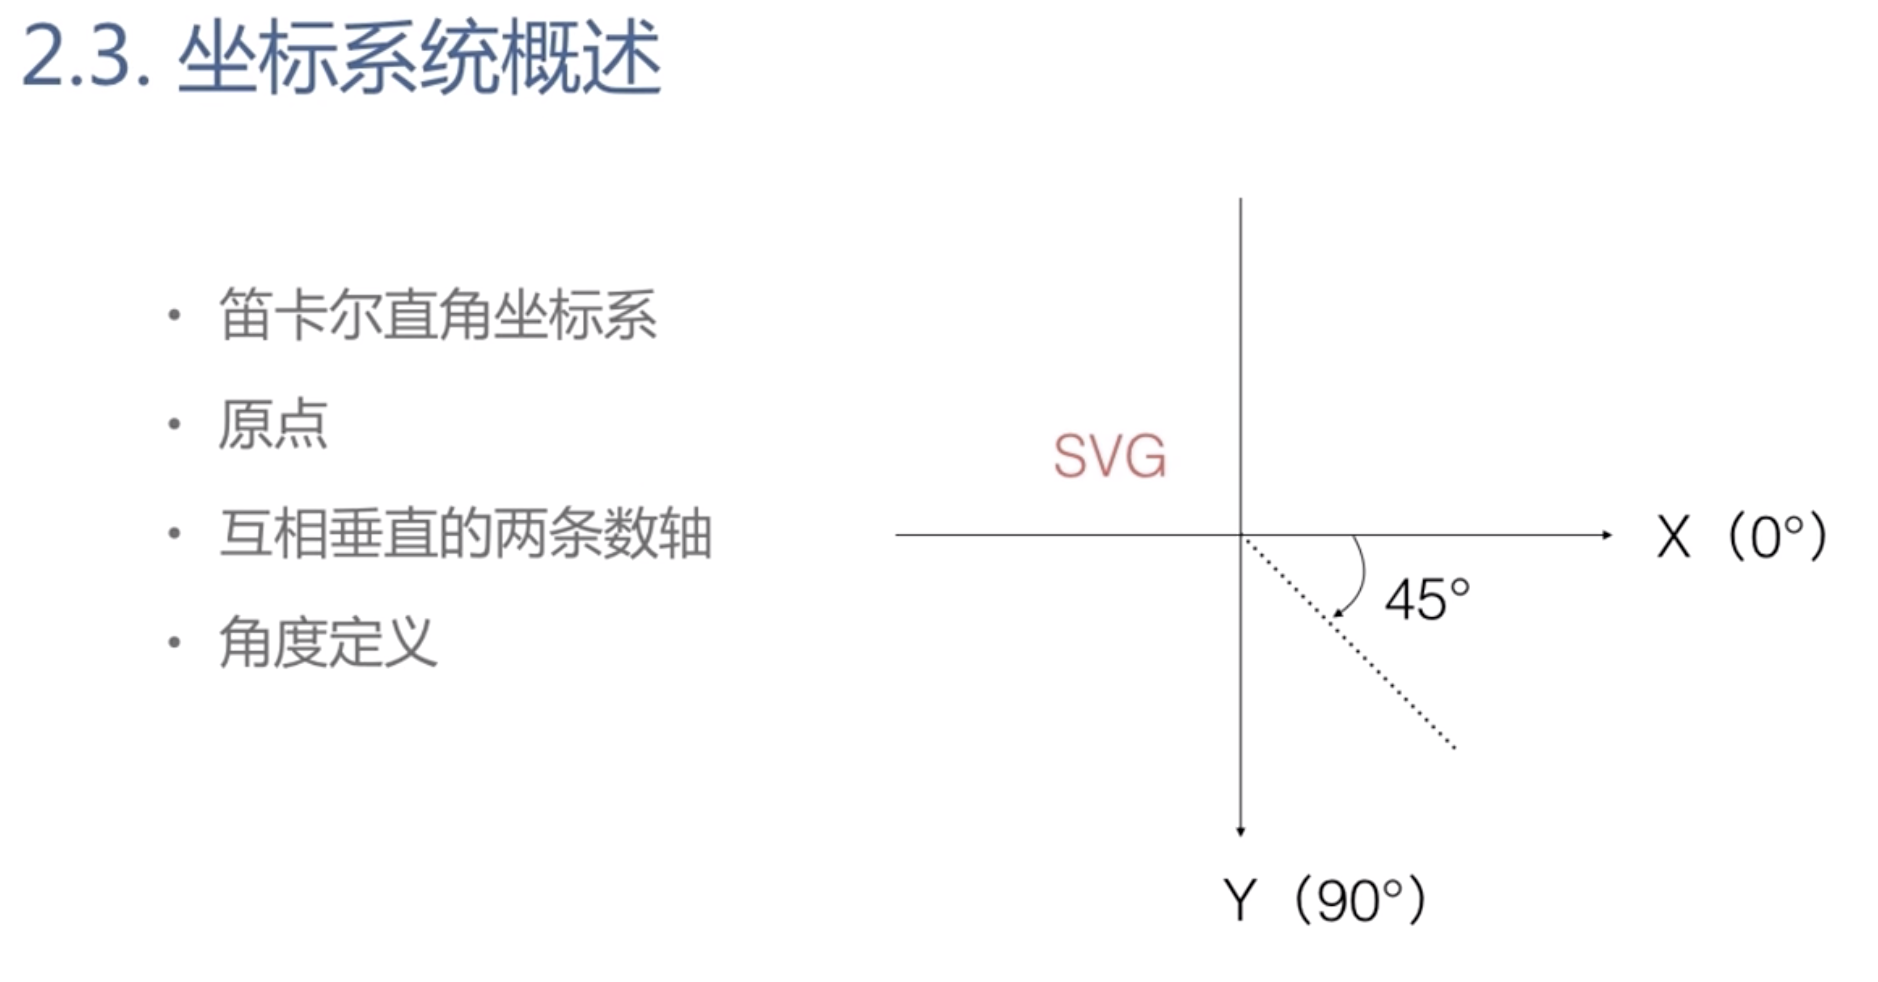
笛卡尔直角坐标系
和常规的坐标系是相反的,顺时针角度为正值
transform 属性
rotate(deg)
translate(x,y)
scale(sx,sy)
matrix(a,b,c,d,e,f)
<defs></defs> 标签不会被立即绘出来,但是会在后面被引用,相当于是个组件,提高复用性
<defs>
    <g id="coord">
        <rect></rect>
    </g>
</defs>
<use xlink:href="#coord" stroke="blank"/>
<use xlink:href="#coord" stroke="blank"/>
线性渐变(斜对角线方向)
<linearGradient> 和 <stop>
定义方向
关键点位置及颜色
gradientUnits
<svg xmlns="http://www.w3.org/2000/svg">
<path d="M100,100A200,100,0,1,0,200,200" stroke="red" fill="none"/>
</svg>
===
userSpaceOnUse是真实的宽高/objectBoundingBox是按照比例计算的
<svg xmlns="http://www.w3.org/2000/svg">
<defs>
    <linearGradient id="grad1" x1="0" y1="0" x2="1" y2="1">
        <stop offset="0" stop-color="red"/>
        <stop offset="0.5" stop-color="yellow"/>
        <stop offset="1" stop-color="green"/>
    </linearGradient>
</defs>
<rect  x="100" y="100" fill="url(#grad1)" width="200" height="150"></rect>
</svg>
径向渐变(斜对角线方向)
<radialGradient> 和 <stop>
cx1开始位置
定义方向
关键点位置及颜色
gradientUnits
焦点位置fxfy
<svg xmlns="http://www.w3.org/2000/svg">
<defs>
    <radialGradient id="grad2" cx1="0.5" cy1="0.5"  r="0.5" fx="0.6" fy="0.3">
        <stop offset="0" stop-color="red"/>
        <stop offset="0.5" stop-color="yellow"/>
        <stop offset="1" stop-color="green"/>
    </radialGradient>
</defs>
<rect  x="100" y="100" fill="url(#grad2)" width="200" height="150"></rect>
</svg>
笔刷
绘制纹理
标签
patternUnits
patternContentUnits //内容设置
userSpaceOnUse是真实的宽高/objectBoundingBox是按照比例计算的
<svg xmlns="http://www.w3.org/2000/svg">
<defs>
    <pattern id="p1" x="0" y="0" width="0.2" height="0.2">
        <circle cx="10" cy="10" r="5" fill="red"></circle>
        <polygon points="30 10 60 50 0 50" fill="green"></polygon>
    </pattern>
</defs>
<rect  x="100" y="100" fill="url(#p1)" width="200" height="150" stroke="blue"></rect>
</svg>
patternContentUnits = “userSpacePnUse” 表示按照实际宽高计算的而不是按照比例
<svg xmlns="http://www.w3.org/2000/svg">
<defs>
    <pattern id="p1" x="0" y="0" width="0.2" height="0.2">
        <circle cx="10" cy="10" r="5" fill="red"></circle>
        <polygon points="30 10 60 50 0 50" fill="green"></polygon>
    </pattern>
</defs>
<rect  x="100" y="100" fill="url(#p1)" width="200" height="150" stroke="blue"></rect>
</svg>
Path路径
<path d="M0,0L10,20C30-10,40,20,100,100" stroke="red">
其中L表示命令 数字表示参数
参数之间用空格或者逗号隔开,有一种情况例外,就是下一个数值是负数

列举了相关命令;
区分大小写:大写表示坐标参数为绝对位置,小写为相对位置 最后的参数表示最终要到达的位置
上一个命令结束的位置就是下一个命令开始的位置 命令可以重复参数表示重复执行同一个命令
弧线命令
A(rx,ry,xr,laf,sf,x,y)—绘制弧线
![]()
rx 表示弧线所在椭圆的x半轴长
ry 表示弧线所在椭圆的y半轴长
xr 表示弧线所在椭圆的长轴角度,旋转角度
laf 表示是否选择弧长较长的那一段弧线
sf 表示是否选择逆时针方向的那一段弧线
x,y表示弧线要画到那个位置
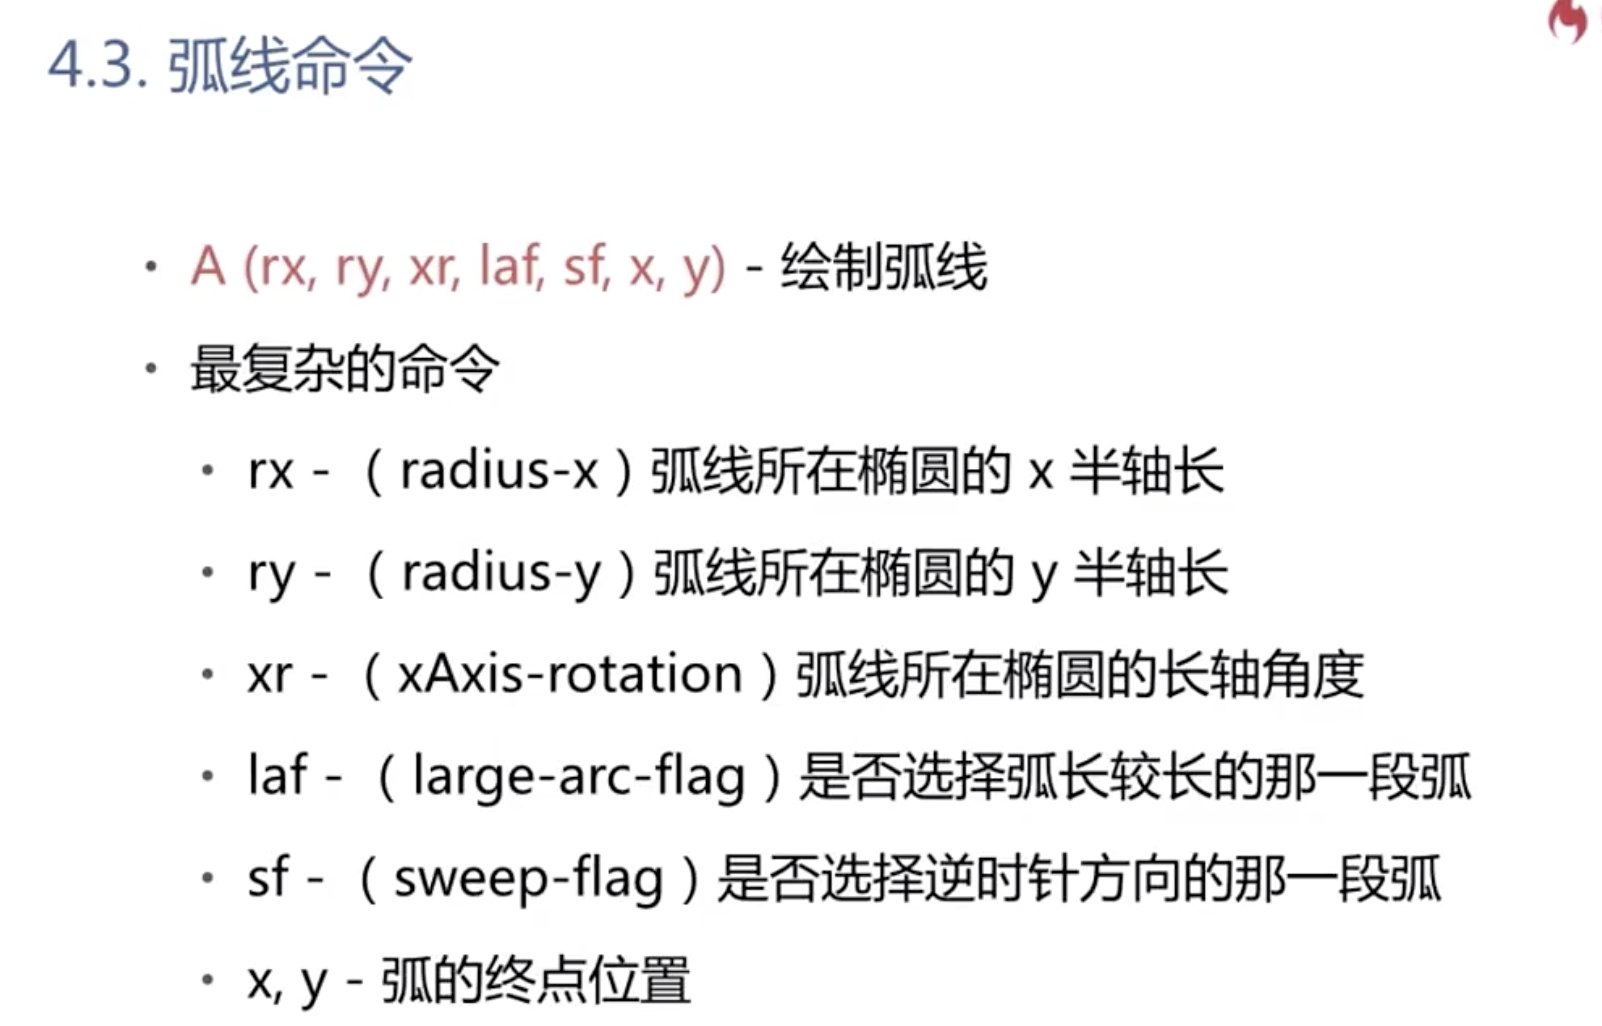

laf=1的时候选择的是大弧线;
sf=1的时候表示是顺时针


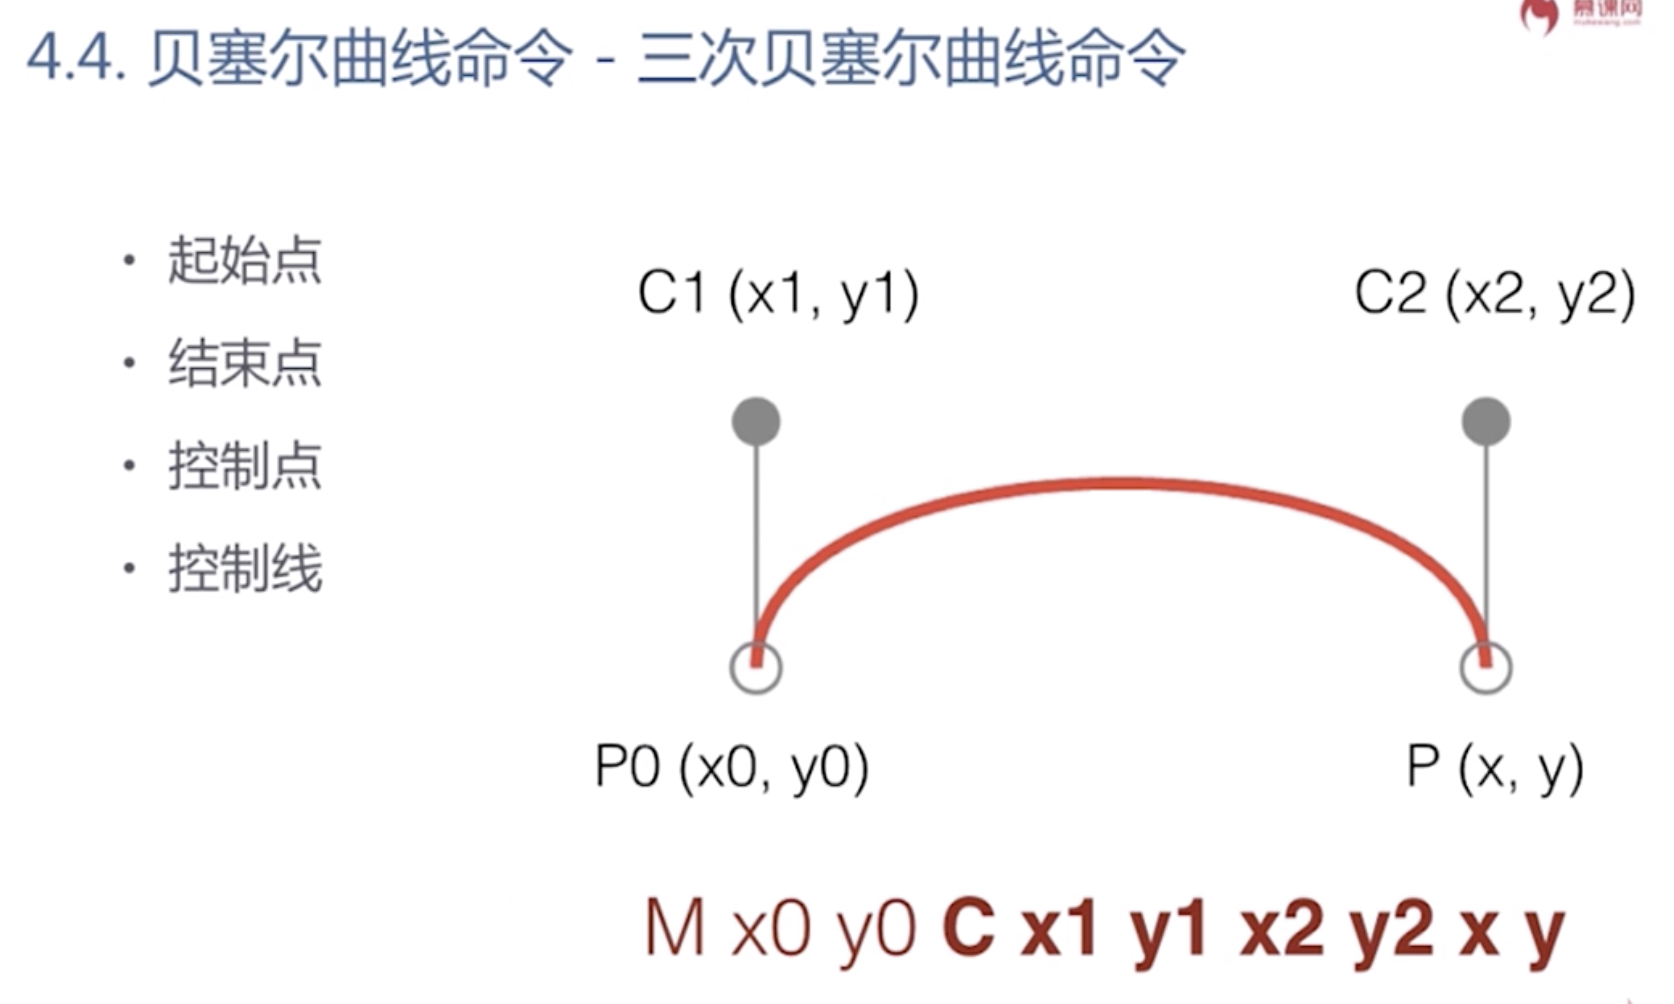
贝塞尔曲线
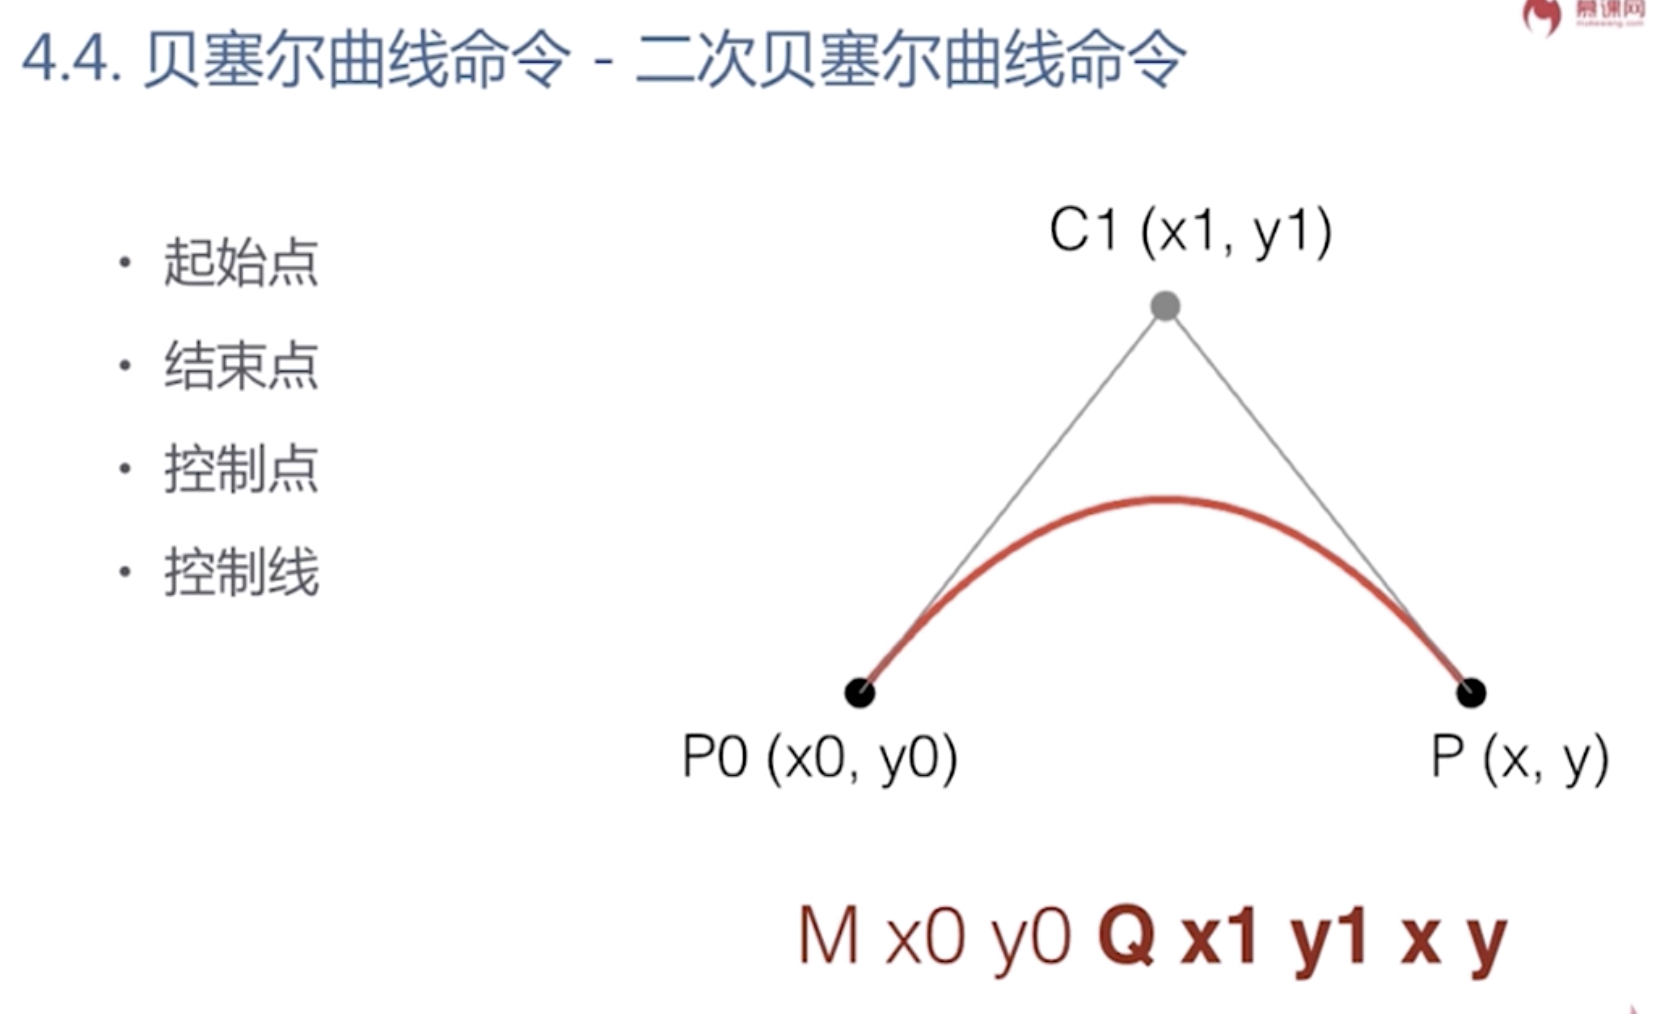

Q是大写的时候 是相对于坐标系的绝对路径
q是小写的时候 是相对于坐标系的相对路径
M x0 y0 Q x1 y1 x y
<svg xmlns="http://www.w3.org/2000/svg">
<path d="M100,100 Q200,250 300,100" stroke="red" fill="none"/>
</svg>
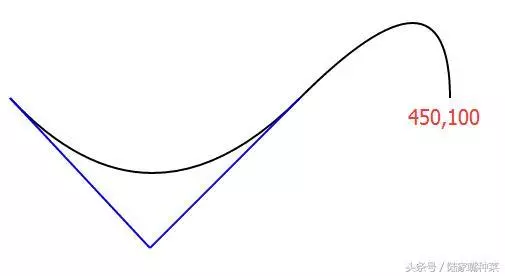
光滑曲线,无需指定第三个控制点的坐标
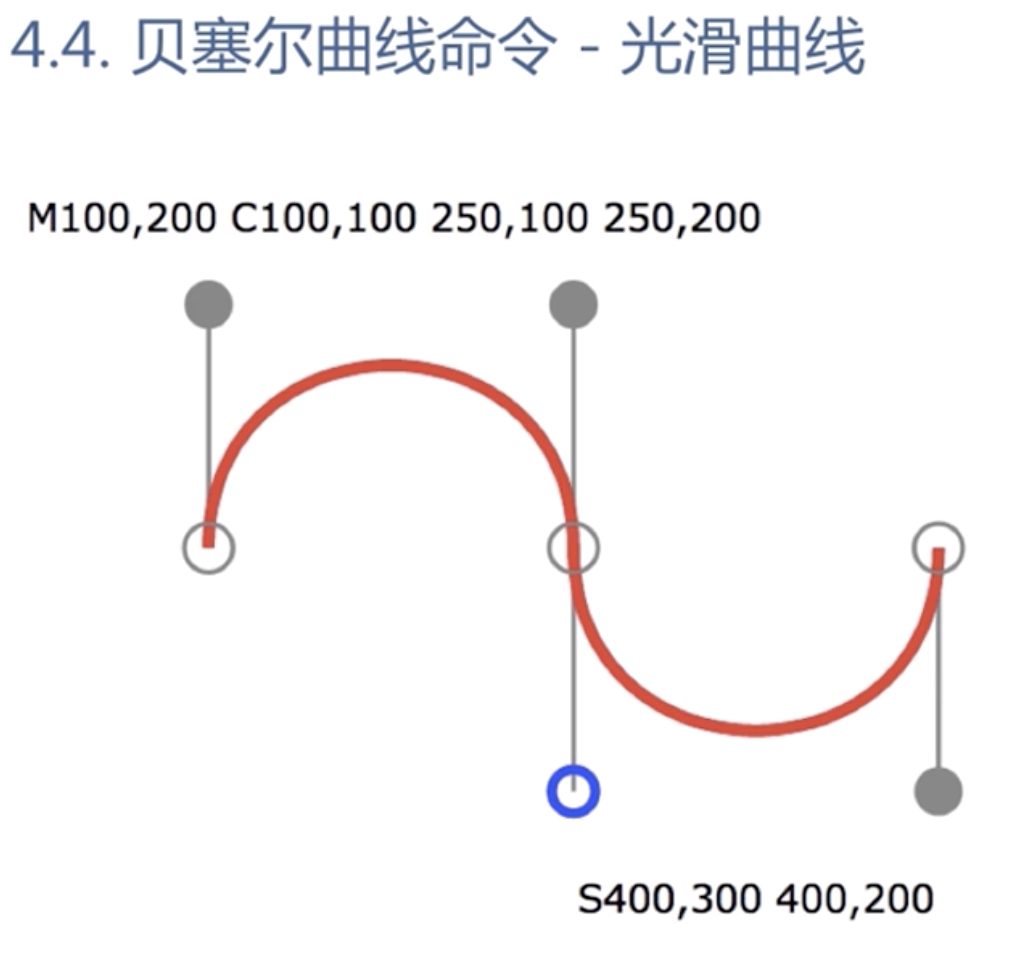
T指令自动补全对称的控制点(上图蓝色部分),让曲线平滑起来
<svg xmlns="http://www.w3.org/2000/svg">
<path d="M10,100 Q150,250 300,100 T450,100" stroke="red" fill="none"/>
</svg>
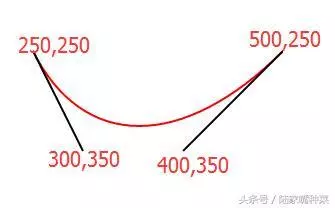
<svg xmlns="http://www.w3.org/2000/svg">
<path d="M250,250 C300,350,400,350,500,250" stroke="red" fill="none"/>
</svg>
<svg xmlns="http://www.w3.org/2000/svg">
<path d="M250,250 C300,350,400,350,500,250 S650,100 700,200" stroke="red" fill="none"/>
</svg>

在SVG中使用文本
<svg xmlns="http://www.w3.org/2000/svg">
<defs>
    <pattern id="grid" x="0" y="0" width="20" height="20" patternUnits="userSpaceOnUse">
        <path d="M0,0H20V20" stroke="red" fill="none"/>
    </pattern>
</defs>
<rect width="1200" height="1000" fill="url(#grid)"></rect>
<text x="100" y="100" style="font-size:50px">你好</text>
<path d="M100,0V200M0,100H200" stroke="green"></path>
</svg>
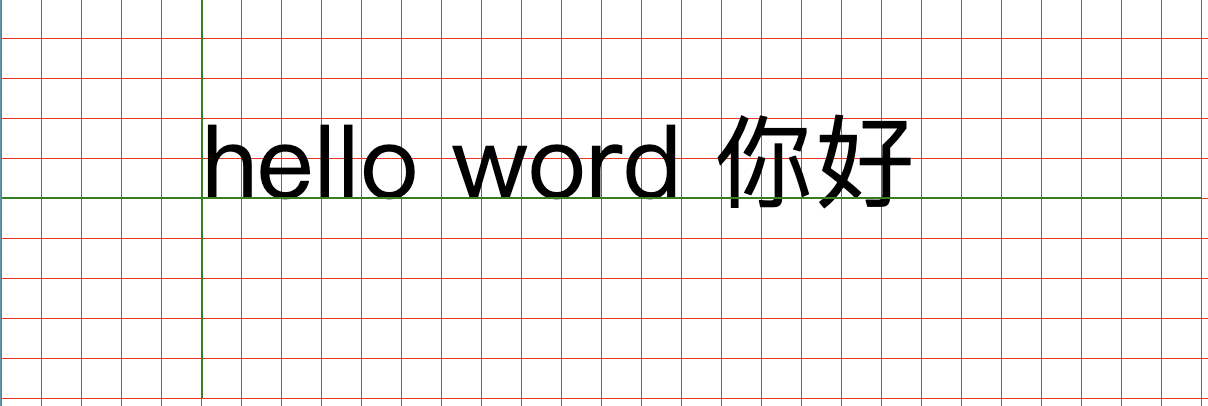
可以看出基线是和 英文字母下对齐的。
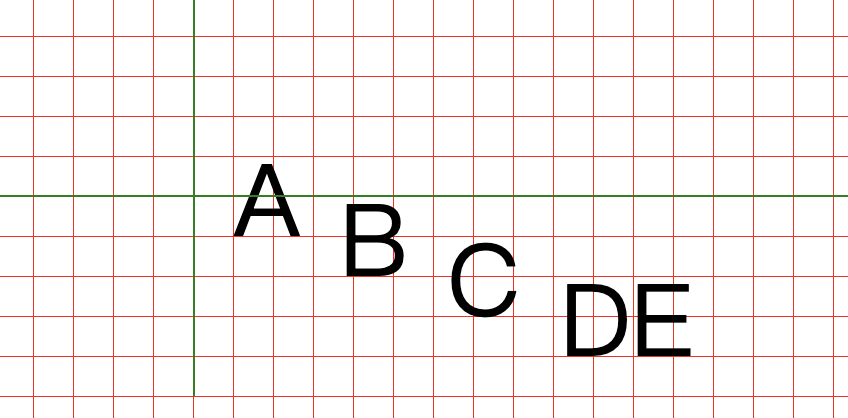
dx和dy表示在水平方向和垂直方向上的移动,支持数组形式,则表示对每一个数字移动
<svg xmlns="http://www.w3.org/2000/svg">
<defs>
    <pattern id="grid" x="0" y="0" width="20" height="20" patternUnits="userSpaceOnUse">
        <path d="M0,0H20V20" stroke="red" fill="none"/>
    </pattern>
</defs>
<rect width="1200" height="1000" fill="url(#grid)"></rect>
<text x="100" y="100" dx="20 20 20 20" dy="20 20 20 20" style="font-size:50px">ABCDE</text>
<path d="M100,0V200M0,100H600" stroke="green"></path>
</svg>
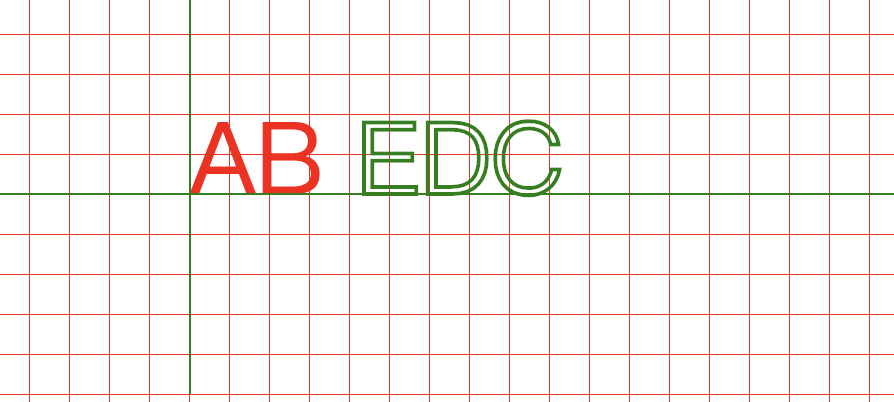
tspan可以用来对文字进行分组
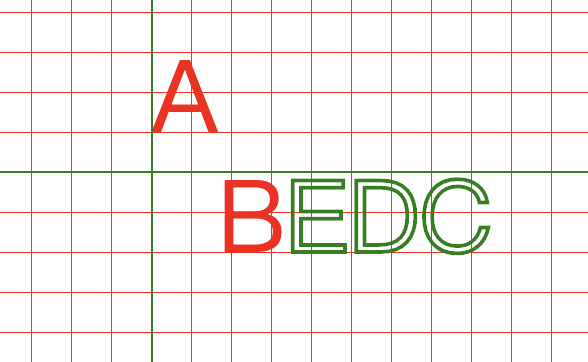
<svg xmlns="http://www.w3.org/2000/svg">
<defs>
    <pattern id="grid" x="0" y="0" width="20" height="20" patternUnits="userSpaceOnUse">
        <path d="M0,0H20V20" stroke="red" fill="none"/>
    </pattern>
</defs>
<rect width="1200" height="1000" fill="url(#grid)"></rect>
<text x="100" y="100" style="font-size:50px">
    <tspan fill="red">AB</tspan>
    <tspan fill="none"  stroke="green" stroke-width="2">EDC</tspan>
</text>
<path d="M100,0V200M0,100H600" stroke="green"></path>
</svg>
其中给第一个tspan设置的dy属性也会应用到剩下的tspan
<svg xmlns="http://www.w3.org/2000/svg">
<defs>
    <pattern id="grid" x="0" y="0" width="20" height="20" patternUnits="userSpaceOnUse">
        <path d="M0,0H20V20" stroke="red" fill="none"/>
    </pattern>
</defs>
<rect width="1200" height="1000" fill="url(#grid)"></rect>
<text x="100" y="100" style="font-size:50px">
    <tspan fill="red" dy="-20 60">AB</tspan><tspan fill="none"  stroke="green" stroke-width="2">EDC</tspan>
</text>
<path d="M100,0V200M0,100H600" stroke="green"></path>
</svg>
文字居中问题
1 text-anchor 水平居中属性
2 垂直居中 使用dy自己模拟

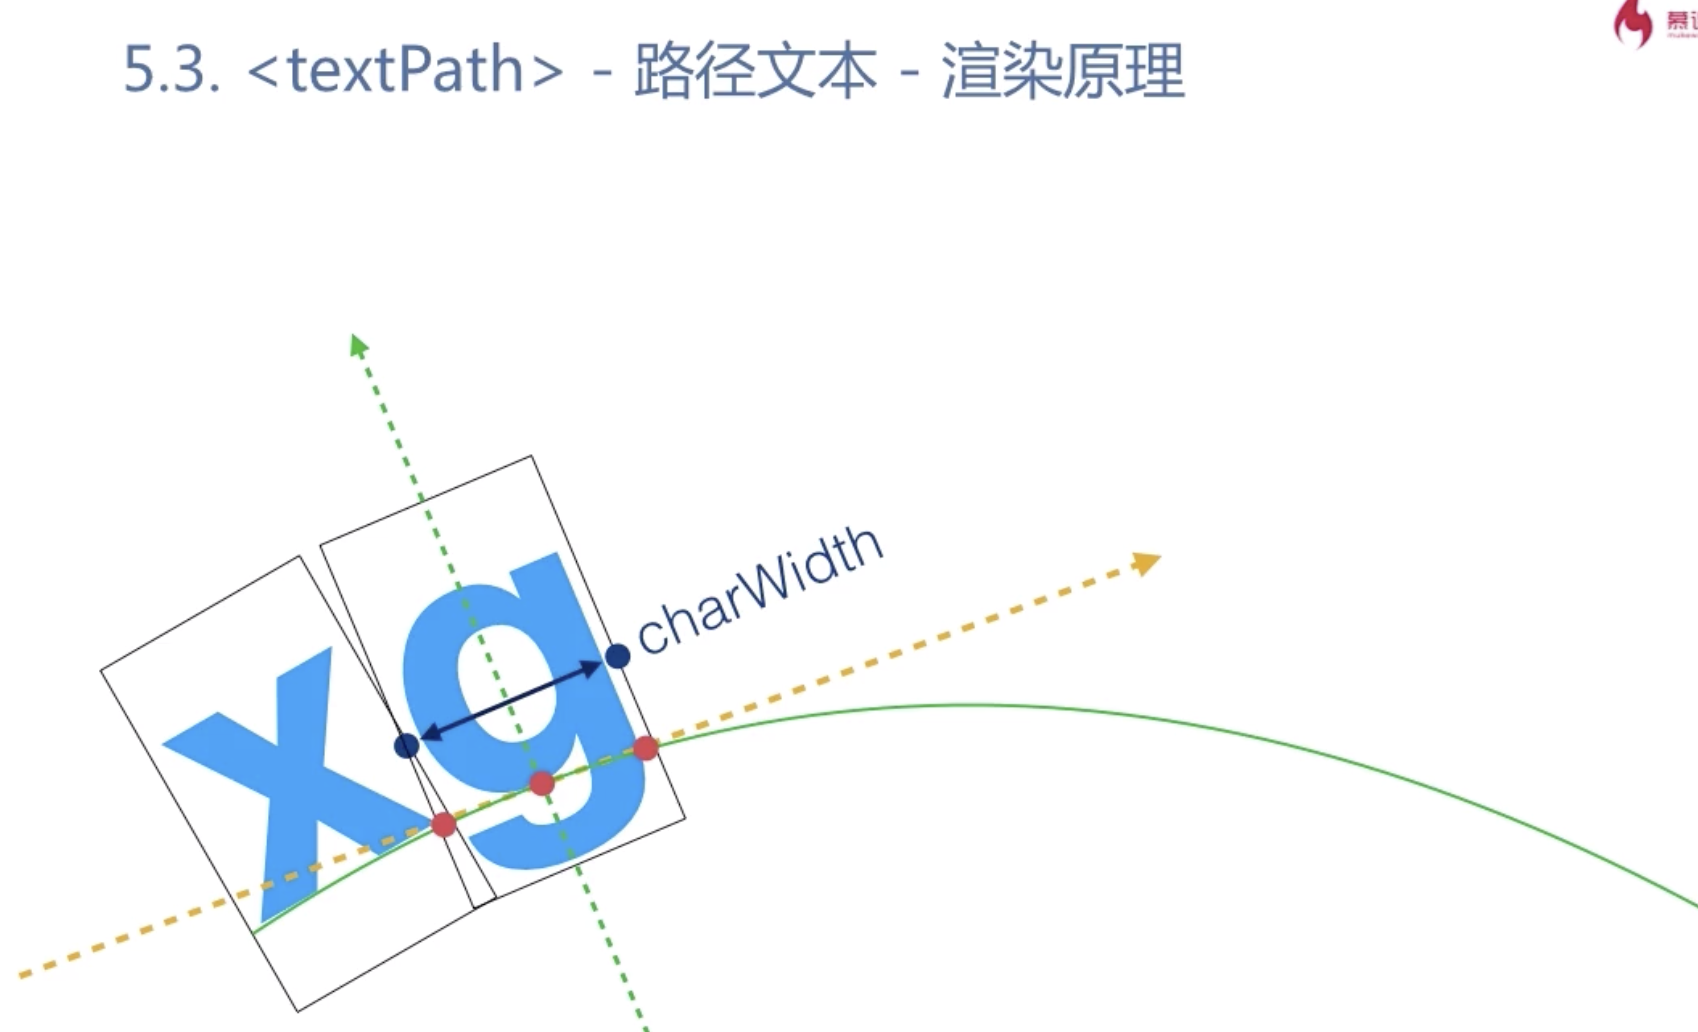
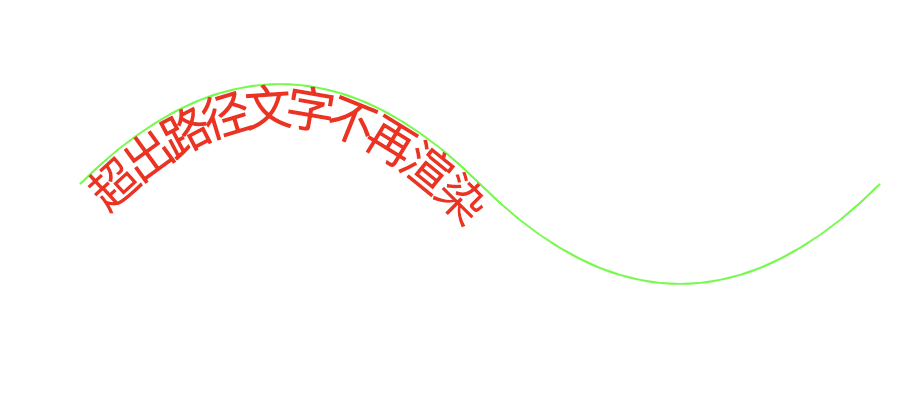
路径文本
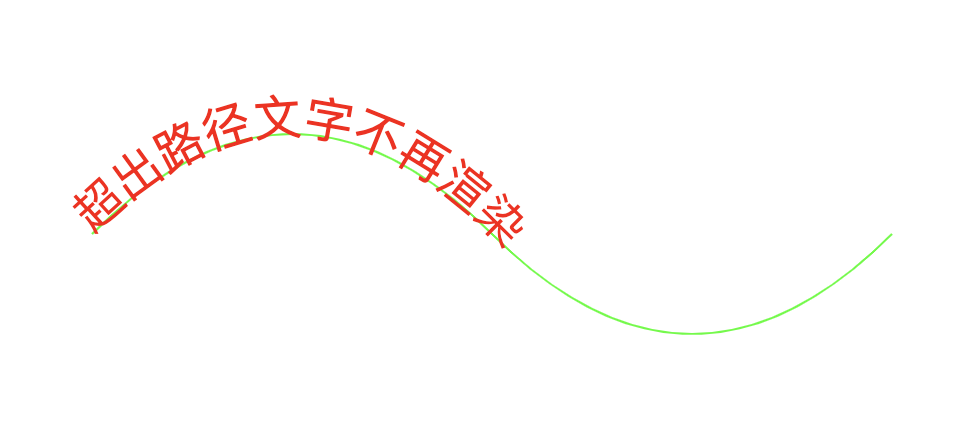
<textPath> 路径文本 注意一定要在html中使用,不能单独在svg中使用
<!DOCTYPE html>
<html>
<head>
<meta charset="UTF-8"/>
<title>textpath</title>
</head>
<body>
<svg xmlns="http://www.w3.org/2000/svg" width="600" height="300">
    <path id="path1" d="M 100 200 Q 200 100 300 200 T 500 200" stroke="rgb(0,255,0)" fill="none"></path>
    <text style="font-size:24px;">
        <textpath xlink:href="#path1" fill="red">超出路径文字不再渲染</textpath>
    </text>
</svg>
</html>
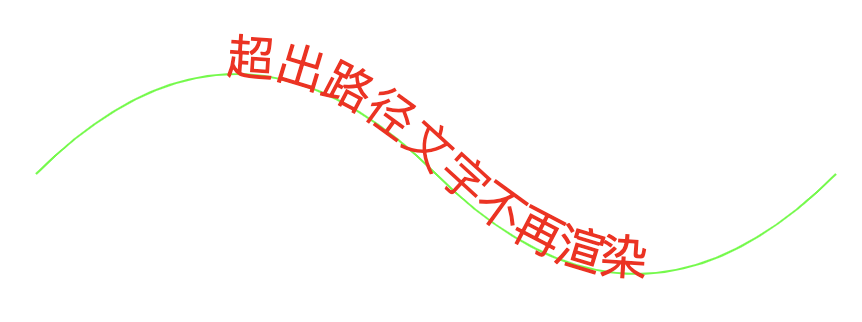
<textpath> x,text-anchor,startOffset 属性确定排列起始位置
dx,dy属性:切线和法线方向的偏移量
例如修改x属性,可以让文字右移动
<!DOCTYPE html>
<html>
<head>
<meta charset="UTF-8"/>
<title>textpath</title>
</head>
<body>
<svg xmlns="http://www.w3.org/2000/svg" width="600" height="300">
    <path id="path1" d="M 100 200 Q 200 100 300 200 T 500 200" stroke="rgb(0,255,0)" fill="none"></path>
    <text style="font-size:24px;" x="100">
        <textpath xlink:href="#path1" fill="red">超出路径文字不再渲染</textpath>
    </text>
</svg>
</html>
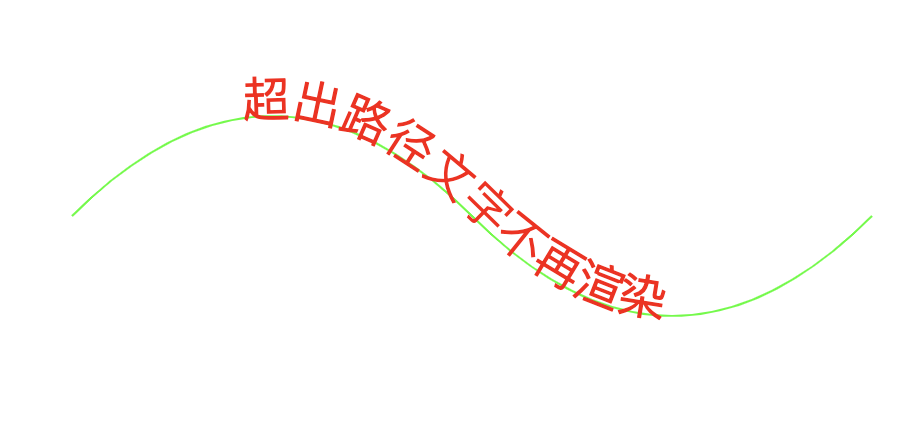
示例2 修改dy属性 可以往下移动
<!DOCTYPE html>
<html>
<head>
<meta charset="UTF-8"/>
<title>textpath</title>
</head>
<body>
<svg xmlns="http://www.w3.org/2000/svg" width="600" height="1000">
    <path id="path1" d="M 100 200 Q 200 100 300 200 T 500 200" stroke="rgb(0,255,0)" fill="none"></path>
    <text style="font-size:24px;" dy="20">
        <textpath xlink:href="#path1" fill="red">超出路径文字不再渲染</textpath>
    </text>
</svg>
</html>
其中 text-anchor="middle" 指的是 文本长度的中间位置处于底部path的头部位置;
但是使用 startOffset="50%" 偏移量,可以把这个位置再调整回来,如:
<!DOCTYPE html>
<html>
<head>
<meta charset="UTF-8"/>
<title>textpath</title>
</head>
<body>
<svg xmlns="http://www.w3.org/2000/svg" width="600" height="1000">
    <path id="path1" d="M 100 200 Q 200 100 300 200 T 500 200" stroke="rgb(0,255,0)" fill="none"></path>
    <text style="font-size:24px;" text-anchor="middle">
        <textpath xlink:href="#path1" fill="red" startOffset="50%">超出路径文字不再渲染</textpath>
    </text>
</svg>
</html>
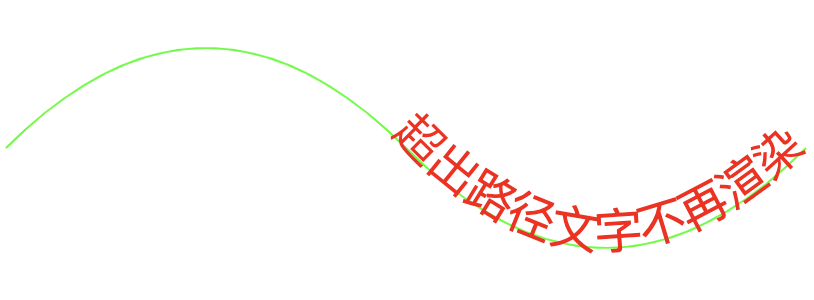
因此,同时设置了尾部对齐 text-anchor="end" 和 偏移量startOffset="100%" ,就会看到文字的末尾和路径的末尾对齐
<!DOCTYPE html>
<html>
<head>
<meta charset="UTF-8"/>
<title>textpath</title>
</head>
<body>
<svg xmlns="http://www.w3.org/2000/svg" width="600" height="1000">
    <path id="path1" d="M 100 200 Q 200 100 300 200 T 500 200" stroke="rgb(0,255,0)" fill="none"></path>
    <text style="font-size:24px;" text-anchor="end">
        <textpath xlink:href="#path1" fill="red" startOffset="100%">超出路径文字不再渲染</textpath>
    </text>
</svg>
</html>
===========
<text>文本文字水平垂直居中
<svg style=' border:1px solid blue;300px;height:300px;'>
    <path d='M0,150 300,150  M150,0 L150,300 ' fill='none' stroke='green'/>
    <text fill='red' x='150' y='150'
    style='dominant-baseline:middle;text-anchor:middle;'>
        中文内容,中文内容
    </text>
</svg>
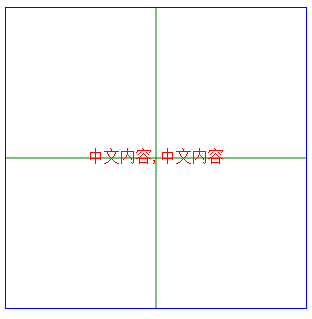
PS:text文本的x,y起始位置要和对齐的外部元素(这里是path的两条绿色线段)对齐,然后在设置style= 'dominant-baseline:middle;text-anchor:middle;'
类似的:
{
 value.showTips && value.info.detail.length <= 36 && (
                  <g transform="translate(0,10)">
                    <defs>
                      <filter id="f1" x="0" y="0">
                        <feGaussianBlur in="SourceGraphic" stdDeviation="2" />
                      </filter>
                    </defs>
                    <rect x={value.x - 175} y={value.y + 18} width="460" height="36" rx="20" ry="20" fill="rgba(0,0,0,0.5)" filter="url(#f1)"></rect>
                    <rect
                      x={value.x - 170}
                      y={value.y + 20}
                      width="450"
                      height="30"
                      rx="15"
                      ry="15"
                      stroke="none"
                      strokeWidth="1"
                      fill="#fff"
                      className="myrect"
                    ></rect>
                    {this.currPoly(value)}
                    <text x={value.x + 55} y={value.y + 37}
                    style={{'dominant-baseline':'middle','text-anchor':'middle'}}>
                      {value.info.detail}
                    </text>
                  </g>

}
text文本要放在白色区域内,水平居中对齐,rect的坐标是:x = {value.x - 170} y={value.y + 18}; 则text在这个基础上 再加上rect的宽度和高度x = {(value.x - 170)+(450/2)} ,类似的计算高度,然后再设置style水平垂直居中,即可。
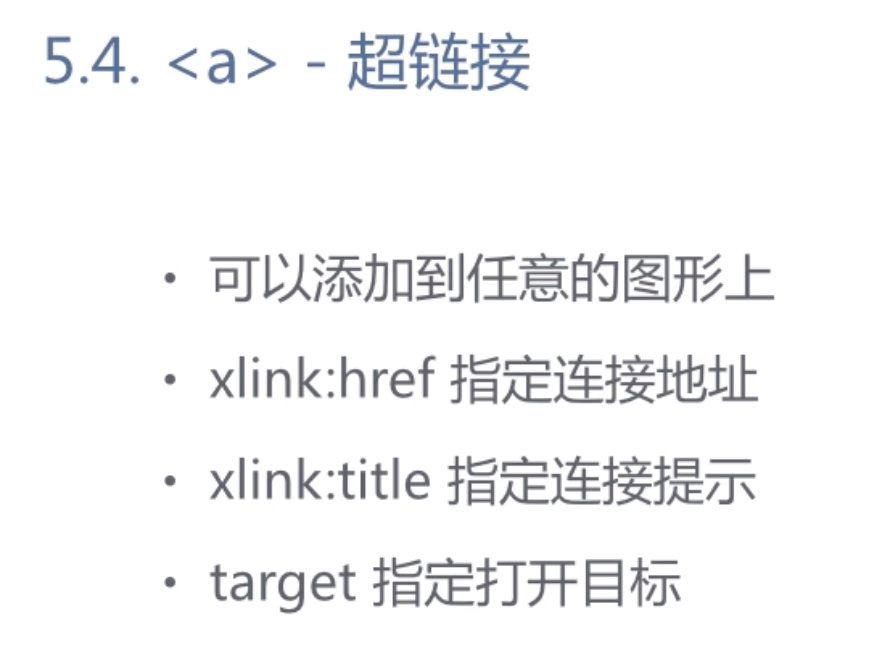
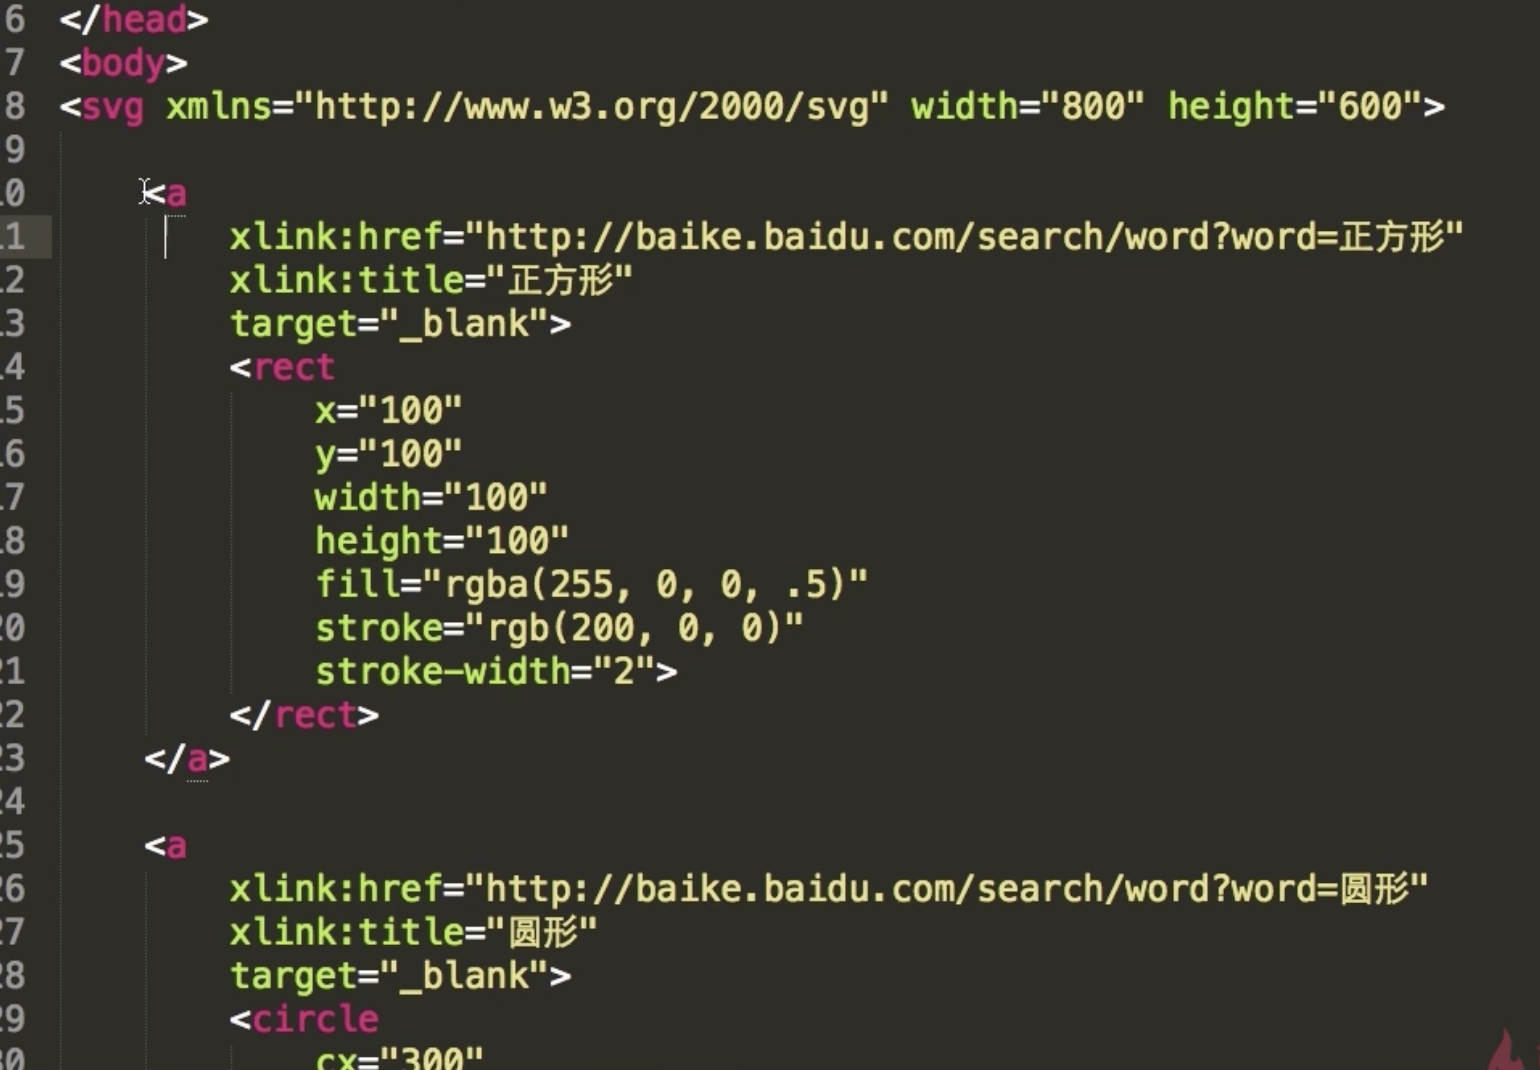
使用超链接