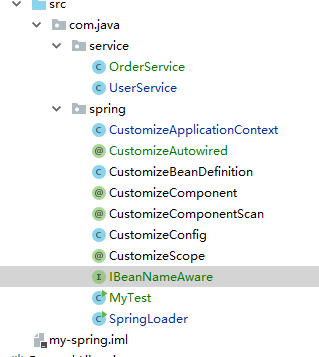
代码结构:

作用:将bean的名字传给实现此接口类
package com.java.spring;

/**
 * 自定义BeanNameAware接口
 * 作用:将bean的名字传给实现类
 */
public interface IBeanNameAware {
    void setBeanName(String name);
}
package com.java.service;

import com.java.spring.CustomizeComponent;
import com.java.spring.IBeanNameAware;

@CustomizeComponent("orderService")
public class OrderService implements IBeanNameAware {

    private String beanName;

    @Override
    public void setBeanName(String name) {
        this.beanName = name;
    }

    public void doPBeanName(){
        System.out.println(">>>>"+beanName);
    }
}
package com.java.service;

import com.java.spring.CustomizeAutowired;
import com.java.spring.CustomizeComponent;
import com.java.spring.CustomizeScope;

@CustomizeComponent("userService")
@CustomizeScope("prototype")
public class UserService {

    @CustomizeAutowired
    public OrderService orderService;

    public void doSomething(){
        orderService.doPBeanName();
    }
}
CustomizeApplicationContext
  /**
     * 创基bean
     * @param beanName
     * @return
     */
    public Object createBean(String beanName,CustomizeBeanDefinition beanDefinition){
        Class clazz = beanDefinition.getClazz();
        Object instance = null;

        try {
            instance = clazz.getDeclaredConstructor().newInstance();

            //依赖注入,给属性赋值
            //获取类中所有属性
            Field[] filelds = clazz.getDeclaredFields();
            for(Field f : filelds){
                //如果有定义的注入注解
                if(f.isAnnotationPresent(CustomizeAutowired.class)){
                    //根据属性名去找
                    String fBeanName = f.getName();

                    Object fBean = getBean(fBeanName);
                    CustomizeAutowired customizeAutowired = f.getDeclaredAnnotation(CustomizeAutowired.class);
                    if(customizeAutowired.required() && null == fBean){
                        //如果是必须
                        throw new NullPointerException();
                    }

                    //由于属性为私有属性,需要通过反射方式赋值,故设置true
                    f.setAccessible(true);
                    //将对象赋值给属性
                    f.set(instance,fBean);
                }
            }


            //beanName 回调
            if(instance instanceof IBeanNameAware){
                ((IBeanNameAware) instance).setBeanName(beanName);
            }


        } catch (InstantiationException e) {
            e.printStackTrace();
        } catch (IllegalAccessException e) {
            e.printStackTrace();
        } catch (InvocationTargetException e) {
            e.printStackTrace();
        } catch (NoSuchMethodException e) {
            e.printStackTrace();
        }
        return instance;
    }
 public static void main(String[] args) {
        SpringLoader loaderTest = new SpringLoader();
        loaderTest.test2();
    }

    /**
     * 依赖注入测试
     */
    private void test2(){
        CustomizeApplicationContext context = new CustomizeApplicationContext(CustomizeConfig.class);
        UserService userService1 = (UserService) context.getBean("userService");
        userService1.doSomething();
    }
结果:
