此文档用于简单记述!!!
详情请看官方文档
官方文档:https://automapper.netlify.app/docs/usages/init/create-map
Demo地址:https://codesandbox.io/s/automapper-demo-latest-ms1c3
安装依赖 :
npm install @nartc/automapper
npm install --save reflect-metadata
使用步骤:
1、在文件中引用插件
import { Mapper, AutoMapper, mapFrom, ProfileBase, mapWith, ignore } from '@nartc/automapper'
2、给需要映射的字段添加@AutoMap()
3、配置关系
1)先通过 createMap 创建两个实体之间的关联关系,createMap(数据源类型 , 目标类型)
2)通过 forMember 创建两个字段之间的关联关系,forMember(目标类型字段 ,mapFrom(数据来源字段))
export class CustomShowScopeProfile extends ProfileBase {
  constructor(mapper: AutoMapper) {
    super();

    mapper
      .createMap(CustomShowScopeResponse, BaseData)
      .forMember(
        u => u.id,
        mapFrom(t => t.targetId),
      )
      .forMember(
        u => u.name,
        mapFrom(t => t.targetName),
      );
  }
}
4、在全局添加关系配置
Mapper.addProfile(CustomShowScopeProfile);
5、获取转换对象
1)如果是实例化对象,那么可直接如下方式获取转换对象
const a = new CustomShowScopeResponse();
a.targetId = '11';
a.targetName = '22';
const ret = Mapper.map(data.customShowScope, BaseData);
2)如果非实例化对象,需要在map时声明源数据类型获取
const ret = Mapper.map(data.customShowScope[0], BaseData, CustomShowScopeResponse);
3)数组对象可用mapArray获取,但同样需要声明源数据类型
const ret = Mapper.mapArray(data.customShowScope, BaseData, CustomShowScopeResponse);
注:如果配置文件跟使用文件不是在同一个文件,那么需要在使用的那个文件中引用配置文件,否则关系配置不生效
补充:
1、@AutoMap()
1)在所需映射字段声明类型


2)若两个字段类型相同,则字段上加上@AutoMap()后,不需要在createMap后再对此字段使用forMember进行自定义
2.mapWith()
如果在你的数据模型中字段类型定义为实体类的数组,这个时候就不能用mapFrom,而是用mapWith了,
mapWith()接受两个必需的参数:(1)是目标模型,(2)是源上的值,其值将用于映射

还可考虑提供第三个可选参数valueModel,以帮助@nartc/automapper确定withValue的正确模型
Mapper.createMap(User, UserVm).forMember(
  dest => dest.someProfile,
  mapWith(
    ProfileVm,
    src => src.originalProfile,
    () => Profile
  )
);
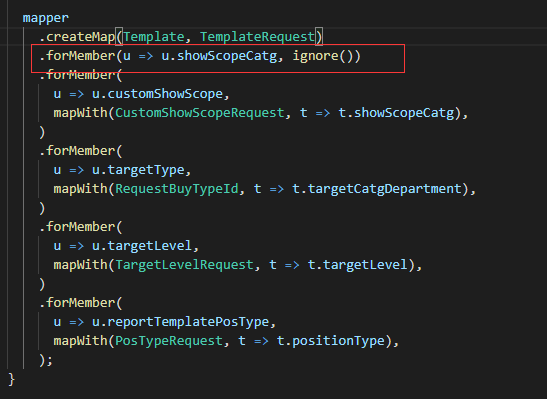
3.ignore()
表明忽略此字段来源,此时目标值将被设置为null
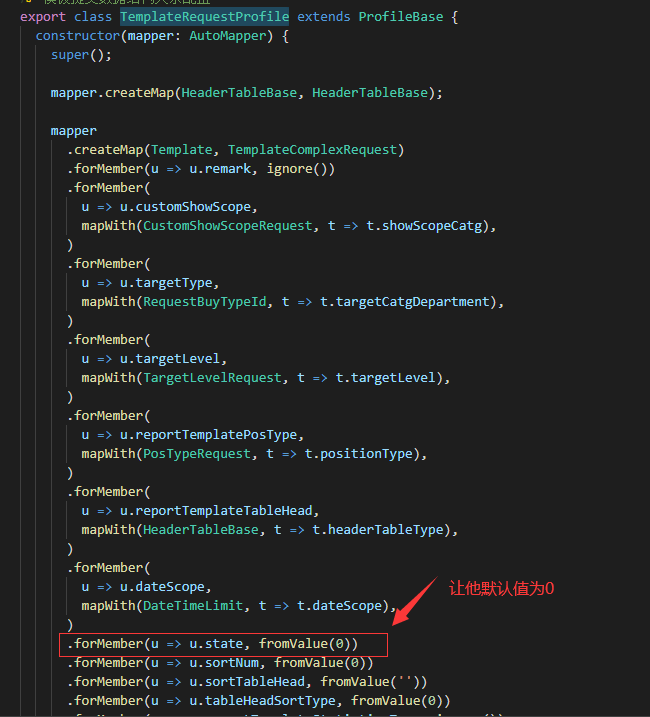
4.fromValue()
fromValue()接受原始值以映射到目标。请注意,如果将对象传入fromValue(),则该对象将被赋予默认值而不考虑其他任何映射
5.condition()
condition()接受一个接收源并返回布尔值.如果返回true,那么将映射source到目标,否则目标值将被设置为null
Mapper.createMap(User, UserVm).forMember(
  dest => dest.fullName,
  condition(src => src.age > 10)
);
condition()还接受一个可选的第二个参数,该参数是将用于当条件不满足时映射到目标的默认值
Mapper.createMap(User, UserVm)
  .forMember(dest => dest.fullname,condition(src => src.age > 10, 'default value')
);
其实除了使用condition()外,下面这种写法也能达到如上效果
Mapper.createMap(User, UserVm)
   .forMember((d) => d.fullName,mapFrom((t) =>  t.age>10?t.fullName:'default value')
);
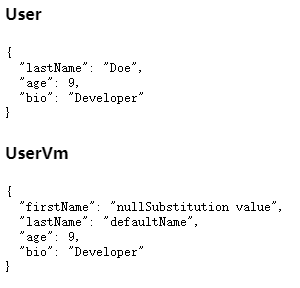
6.nullSubstitution()
nullSubstitution()接受当来源为null或者undefind时要映射到目标的原始值。当您将一个对象传递给nullSubstitution()时,适用于fromValue()的相同规则,这意味着对象将被映射而不考虑任何别的映射问题。所需的值是强类型化到目标的。
class User {
  @AutoMap() firstName!: string;
  @AutoMap() lastName!: string;
  @AutoMap() age!: number;
  @AutoMap() bio!: string;
}
class UserVm {
  @AutoMap() firstName!: string;
  @AutoMap() lastName!: string;
  @AutoMap() fullName!: string;
  @AutoMap() age!: number;
  @AutoMap() isAdult!: boolean;
  @AutoMap() bio!: string;
}
class UserProfile extends ProfileBase {
  constructor(mapper: AutoMapper) {
    super();
    mapper.createMap(User, UserVm)
    .forMember(u=>u.lastName,fromValue('defaultName'))
    .forMember(u=>u.firstName,nullSubstitution('nullSubstitution value'));
  }
}
Mapper.addProfile(UserProfile);
当firstName存在时,user.firstName将被映射到vm.firstName上,当firstName不存在时,vm.firstName将被赋予nullSubstitution所传对象:
7.convertUsing()
(1) 在某些情况下,您可能需要将一些逻辑从一种类型映射到另一种类型,以便在整个应用程序中重用。例如,您希望使用一些有意义的公共逻辑从字符串映射到日期,并且可能在应用程序中经常使用,您可以使用convertUsing来实现这一点。
convertUsing是一个实现转换器接口的类。convertUsing需要convert()函数,并且还接受两个类型参数:TConvertSource和TConvertDestination,这两个参数注释转换器的源值和目标值的类型。
class StringDateConverter implements Converter<string, string> {
  convert(source: string): string {
    // handle validation here if you like
    return source+' 17:48:00';
  }
}

class UserProfile extends ProfileBase {
  constructor(mapper: AutoMapper) {
    super();
    mapper.createMap(User, UserVm)
    .forMember(u=>u.date,convertUsing(new StringDateConverter(),t=>t.date));
  }
}
运行结果:

如果转换器希望convert()方法中包含整个源对象,则可以省略选择器参数。如果没有选择器参数,将调用转换器.convert()与源对象。
class FullNameConverter implements Converter<User, string> {
  convert(source: User): string {
    return source.firstName + ' ' + source.lastName;
  }
}
class UserProfile extends ProfileBase {
  constructor(mapper: AutoMapper) {
    super();
    mapper.createMap(User, UserVm)
    .forMember(u=>u.date,convertUsing(new FullNameConverter()));
 }
}
注:官方文档说是不用再传选择器参数,实际上用他自己的Demo地址是运行报错的,所以还是需要传,只不过是传这个源对象
class UserProfile extends ProfileBase {
  constructor(mapper: AutoMapper) {
    super();
    mapper
      .createMap(User, UserVm)
      .forMember(
        (d) => d.full,
        convertUsing(new FullNameConverter(), (s) => s)
      );
  }
}
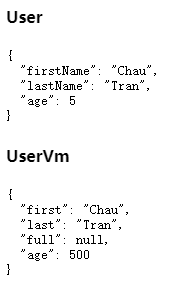
(2) 与值转换器的概念非常相似。但是,解析器可以访问整个源对象以及要映射的当前目标。您可以使用解析器为不想污染映射构造的特定目标处理更复杂的业务映射逻辑。
ValueResolver是实现解析器接口的类。解析程序接受3个类型参数:TSource、tdestinition和要应用此解析程序的目标类型。实现解析器需要resolve()函数。
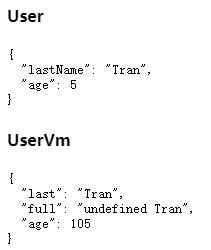
interface Resolver<TSource, TDestination, TDestinationMember> {
  resolve(source: TSource, destination: TDestination): TDestinationMember;
}

class TaxResolver implements Resolver<User, UserVm, number> {
  resolve(source: User, destination: UserVm): number {
    if (source.firstName) {
      return source.age + 10;
    }
    return source.age + 100;
  }
}

class User {
  @AutoMap()
  firstName!: string;
  @AutoMap()
  lastName!: string;
  @AutoMap()
  age!: number;
}

class UserVm {
  @AutoMap()
  first!: string;
  @AutoMap()
  last!: string;
  @AutoMap()
  full!: string;
  @AutoMap()
  age!: number;
}

class UserProfile extends ProfileBase {
  constructor(mapper: AutoMapper) {
    super();
    mapper
      .createMap(User, UserVm)
      .forMember(
        (d) => d.first,
        mapFrom((s) => s.firstName)
      )
      .forMember(
        (d) => d.last,
        mapFrom((s) => s.lastName)
      )
      .forMember(
        (d) => d.full,
        convertUsing(new FullNameConverter(), (s) => s)
      )
      .forMember(d=>d.age,mapFrom(new TaxResolver()));
  }
}

Mapper.addProfile(UserProfile);

const user = new User();
// user.firstName = "Chau";
user.lastName = "Tran";
user.age = 5;

const vm = Mapper.map(user, UserVm);
运行结果:
8.reverseMap()
通过在createMap()之后链接reverseMap()来支持反向映射。这将为createMap()中传递的两个模型创建一个反向映射
class UserProfile extends ProfileBase {
  constructor(mapper: AutoMapper) {
    super();
    mapper
      .createMap(User, UserVm)
      .reverseMap();
  }
}

const vm = new UserVm();
vm.first = "Chau";
vm.last = "Tran";
vm.age = 5;

const user = Mapper.map(vm, User);
运行结果:

操作中我发现,这个貌似只适用于那种字段名相同可直接转的,对那种forMember过的字段无效。
9. PreCondition()
与condition()的工作方式与条件类似。但是,前提条件只是对某个表达式的预检查,以确定下面的映射操作是否可以继续。通过调用PreCondition()可以打开前置条件
class UserProfile extends ProfileBase {
  constructor(mapper: AutoMapper) {
    super();
    mapper
      .createMap(User, UserVm)
      .forMember(
        (d) => d.first,
        mapFrom((s) => s.firstName)
      )
      .forMember(
        (d) => d.last,
        mapFrom((s) => s.lastName)
      )
      .forMember(
        (d) => d.full,
        mapWith(BaseDataVm, (t) => t.fullName)
      )
      .forMember(
        (d) => d.age,
        preCondition((t) => t.age > 10),
        ignore()
      )
      .forMember(
        (d) => d.age,
        preCondition((t) => t.age < 10),
        mapFrom(new TaxResolver())
      )
      .reverseMap();
  }
}
当我的age>10时:
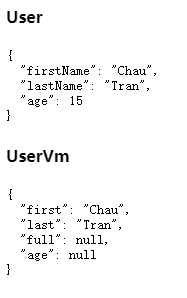
当我的age<10时: