1.html部分
<template>
  <div class="pic-zoom">
    <div
      class="preview-box"
      @mousemove="move($event)"
      @mouseleave="out"
      ref="previewBox"
      @mouseenter="enter"
    >
      <img :src="previewImg" style="350px">
      <div class="mask" ref="hoverBox" v-show="maskShow"></div>
    </div>
    <div class="zoom-box" v-show="zoomVisiable" ref="zoomBox">
      <img :src="zoomImg" ref="bigImg">
    </div>
  </div>
</template>
2.js部分
<script>
function offset (el) {
  let top = el.offsetTop;
  let left = el.offsetLeft;
  if (el.offsetParent) {
    el = el.offsetParent;
    top += el.offsetTop;
    left += el.offsetLeft;
  };
  return {
    left: left,
    top: top
  };
}
export default {
  name: 'picZoom',
  props: {
    previewImg: {
      type: String,
      default: ''
    },
    zoomImg: {
      type: String,
      default: ''
    }
  },
  data () {
    return {
      zoomVisiable: false,
      maskShow: false
    };
  },
  methods: {
    enter () {
      this.maskShow = true;
    },
    out () {
      this.zoomVisiable = false;
      this.maskShow = false;
    },
    move (ev) {
      this.init();
      // 鼠标距离屏幕距离
      let moveX = ev.clientX;
      let moveY = ev.clientY;
      // 大盒子距离顶部的距离
      let offsetLeft = offset(this.oPreviewBox).left;
      let offsetTop = offset(this.oPreviewBox).top;
      let left = moveX - offsetLeft - this.houverWidth / 2;
      let top;
      if (this.scroll > 0) {
        top = moveY - offsetTop + this.scroll - this.houverHeight / 2;
      } else {
        top = moveY - offsetTop - this.houverHeight / 2;
      }
      let maxWidth = this.pWidth - this.houverWidth;
      let maxHeight = this.pWidth - this.houverHeight;
      left = left < 0 ? 0 : left > maxWidth ? maxWidth : left;
      top = top < 0 ? 0 : top > maxHeight ? maxHeight : top;
      let percentX = left / (maxWidth);
      let percentY = top / (maxHeight);
      this.oHoverBox.style.left = left + 'px';
      this.oHoverBox.style.top = top + 'px';
      this.oBigImg.style.left = percentX * (this.bWidth - this.imgWidth) + 'px';
      this.oBigImg.style.top = percentY * (this.bHeight - this.imgHeight) + 'px';
      this.$emit('move', ev);
      this.zoomVisiable = true;
    },
    init () {
      this.oHoverBox = this.$refs.hoverBox;
      this.oPreviewBox = this.$refs.previewBox;
      this.oBigImg = this.$refs.bigImg;
      this.imgBox = this.$refs.zoomBox;
      this.houverWidth = this.oHoverBox.offsetWidth;
      this.houverHeight = this.oHoverBox.offsetHeight;
      this.pWidth = this.oPreviewBox.offsetWidth;
      this.pHeight = this.oPreviewBox.offsetHeight;
      this.imgWidth = this.oBigImg.offsetWidth;
      this.imgHeight = this.oBigImg.offsetHeight;
      this.bWidth = this.imgBox.offsetWidth;
      this.bHeight = this.imgBox.offsetHeight;
      this.scroll = document.documentElement.scrollTop || document.body.scrollTop;
    }
  }
};
</script>
3.样式部分
<style lang="scss" scoped>
  .pic-zoom {
    .preview-box {
       350px;
      height: 350px;
      border: 1px solid #dddddd;
      position: relative;
      cursor: crosshair;
      .mask{
        top: 75px;
        left: 75px;
         200px;
        height: 200px;
        position: absolute;
        background-color: #FFF;
        opacity: .6;
        border: 1px solid #CCC;
        cursor: crosshair;
        z-index: 101;
      }
    }
    .zoom-box {
      top: 0px;
      left: 365px;
       450px;
      height: 400px;
      border: 1px solid #999;
      position: absolute;
      overflow: hidden;
      z-index: 100;
      background: #FFF;
      img {
        //  500px;
        // height: 500px;
        position: absolute;
        border: 0px;
        display: block;
        left: -100.286px;
        top: -125.357px;
      }
    }
  }
</style>
4.使用
<template>
  <div>
    <pic-zoom :previewImg="smallImg" :zoomImg="bigImg"></pic-zoom>
  </div>
</template>
<script>
import PicZoom from "./components/PicZoom.vue";
export default {
  components: {
    PicZoom
  }
  data() {
    return {
      data: {
        smallImg: '../../static/image/small.jpg',
        bigImg: '../../static/image/big.jpg'
      }
    };
  }
}
</script>
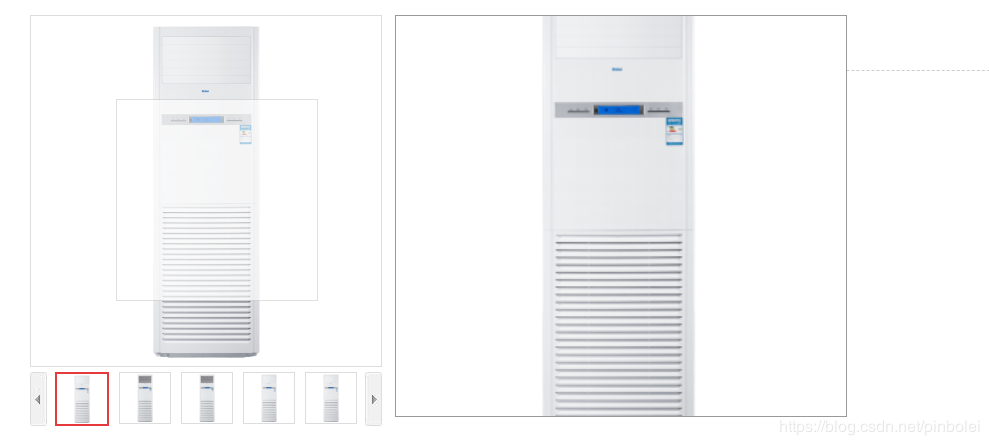
5效果