Vue通信、传值的多种方式,详解(都是干货):
一、通过路由带参数进行传值
①两个组件 A和B,A组件通过query把orderId传递给B组件(触发事件可以是点击事件、钩子函数等)
this.$router.push({ path: '/conponentsB', query: { orderId: 123 } }) // 跳转到B
②在B组件中获取A组件传递过来的参数
this.$route.query.orderId
二、通过设置 Session Storage缓存的形式进行传递
①两个组件A和B,在A组件中设置缓存orderData
const orderData = { 'orderId': 123, 'price': 88 }

sessionStorage.setItem('缓存名称', JSON.stringify(orderData))
②B组件就可以获取在A中设置的缓存了
const dataB = JSON.parse(sessionStorage.getItem('缓存名称'))
此时 dataB 就是数据 orderData
朋友们可以百度下 Session Storage(程序退出销毁) 和 Local Storage(长期保存) 的区别。
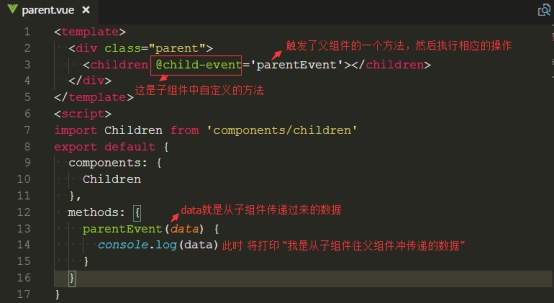
三、父子组件之间的传值
(一)父组件往子组件传值props
①定义父组件,父组件传递 number这个数值给子组件,如果传递的参数很多,推荐使用json数组{}的形式

②定义子组件,子组件通过 props方法获取父组件传递过来的值。props中可以定义能接收的数据类型,如果不符合会报错。
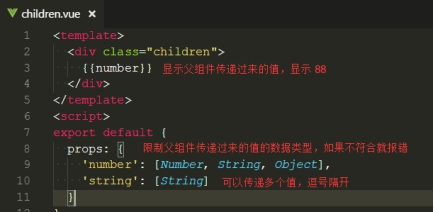
当然也可以简单一点,如果不考虑数据类型,直接 props:["number","string"]就可以了,中括号包裹,多个值使用,分隔。
注:props:{
}
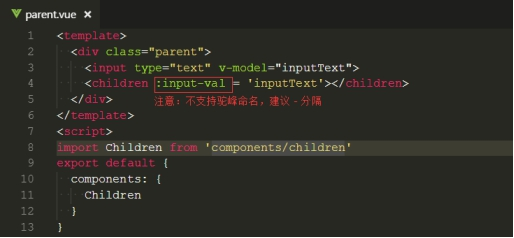
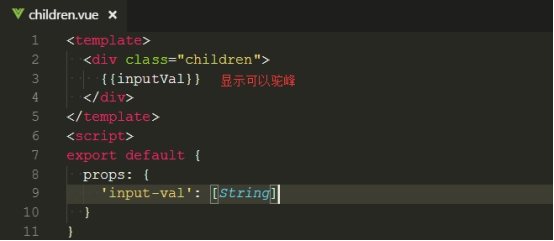
③假如接收的参数 是动态的,比如 input输入的内容 v-model的形式
注意:传递的参数名称 支持驼峰命名,下图 描述不正确(1.0是不支持的)
④父子组件传值,数据是异步请求,有可能数据渲染时报错
原因:异步请求时,数据还没有获取到但是此时已经渲染节点了
解决方案:可以在 父组件需要传递数据的节点加上 v-if = false,异步请求获取数据后,v-if = true
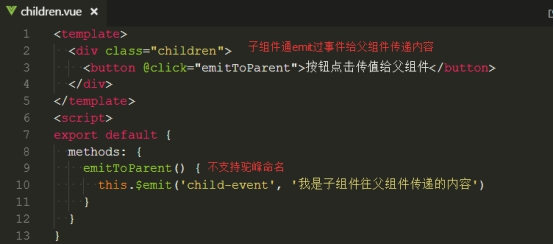
(二)、子组件往父组件传值,通过emit事件
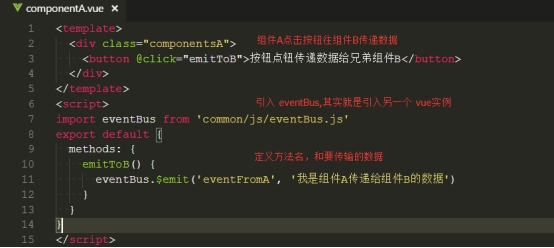
四、不同组件之间传值,通过eventBus(小项目少页面用eventBus,大项目多页面使用 vuex)
①定义一个新的vue实例专门用于传递数据,并导出

②定义传递的方法名和传输内容,点击事件或钩子函数触发eventBus.emit事件
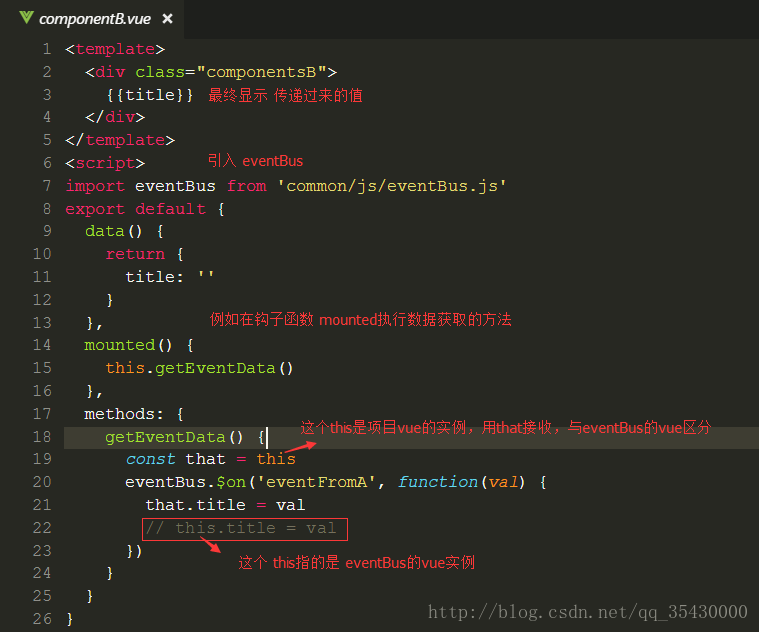
③接收传递过来的数据
注意:enentBus是一个另一个新的Vue实例,区分两个this所代表得vue实例
五、vuex进行传值
为什么使用vuex?
vuex主要是是做数据交互,父子组件传值可以很容易办到,但是兄弟组件间传值(兄弟组件下又有父子组件),或者大型spa单页面框架项目,页面多并且一层嵌套一层的传值,异常麻烦,用vuex来维护共有的状态或数据会显得得心应手。
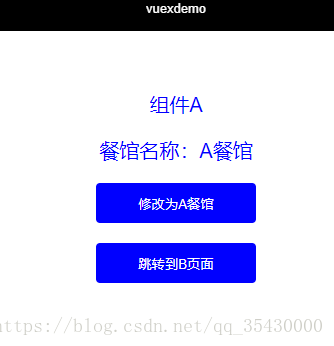
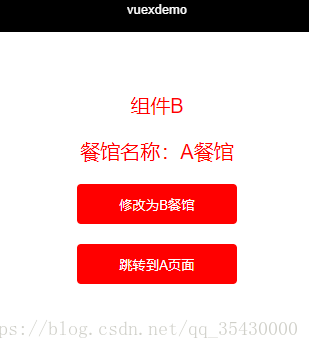
需求:两个组件A和B,vuex维护的公共数据是 餐馆的名称 resturantName,默认餐馆名称是 飞歌餐馆,那么现在A和B页面显示的就是飞歌餐馆。如果A修改餐馆名称 为 A餐馆,则B页面显示的将会是 A餐馆,反之B修改同理。这就是vuex维护公共状态或数据的魅力,在一个地方修改了数据,在这个项目的其他页面都会变成这个数据。
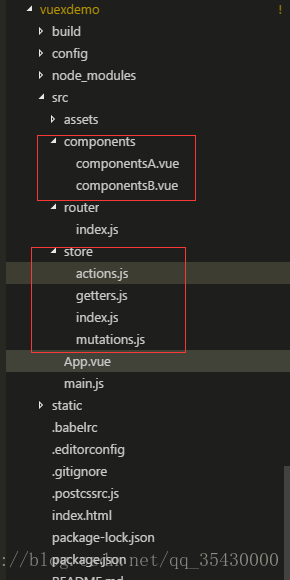
①使用 vue-cli脚手架工具创建一个工程项目,工程目录,创建组件A和组件B路由如下:
import Vue from 'vue'
import Router from 'vue-router'
import componentsA from '@/components/componentsA'
import componentsB from '@/components/componentsB'

Vue.use(Router)

export default new Router({
   mode: 'history',
    routes: [
        {
        path: '/',
        name: 'componentsA',
        component: componentsA
        },
        {
            path: '/componentsA',
            name: 'componentsA',
            component: componentsA
        },
        {
            path: '/componentsB',
            name: 'componentsB',
            component: componentsB
        }
    ]
})
app.vue
<template>
  <div id="app">
    <router-view/>
  </div>
</template>

<script>
export default {
  name: 'App'
}
</script>

<style>
#app {
  font-family: 'Avenir', Helvetica, Arial, sans-serif;
  -webkit-font-smoothing: antialiased;
  -moz-osx-font-smoothing: grayscale;
  text-align: center;
  color: #2c3e50;
  margin-top: 60px;
}
</style>
②开始使用vuex,新建一个 sotre文件夹,分开维护 actions mutations getters
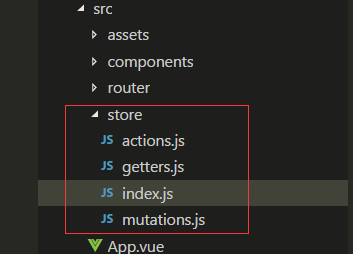
②在store/index.js文件中新建vuex 的store实例
*as的意思是 导入这个文件里面的所有内容,就不用一个个实例来导入了。
import Vue from 'vue'
import Vuex from 'vuex'
import * as getters from './getters' // 导入响应的模块,*相当于引入了这个组件下所有导出的事例
import * as actions from './actions'
import * as mutations from './mutations'

Vue.use(Vuex)
// 首先声明一个需要全局维护的状态 state,比如 我这里举例的resturantName
const state = {
    resturantName: '飞歌餐馆' // 默认值
    // id: xxx  如果还有全局状态也可以在这里添加
    // name:xxx
}

// 注册上面引入的各大模块
const store = new Vuex.Store({
    state,    // 共同维护的一个状态,state里面可以是很多个全局状态
    getters,  // 获取数据并渲染
    actions,  // 数据的异步操作
    mutations  // 处理数据的唯一途径,state的改变或赋值只能在这里
})

export default store  // 导出store并在 main.js中引用注册。
③actions
// 给action注册事件处理函数。当这个函数被触发时候,将状态提交到mutations中处理
export function modifyAName({commit}, name) { // commit 提交;name即为点击后传递过来的参数,此时是 'A餐馆'
    return commit ('modifyAName', name)
}
export function modifyBName({commit}, name) {
    return commit ('modifyBName', name)
}

// ES6精简写法
// export const modifyAName = ({commit},name) => commit('modifyAName', name)
④mutations
// 提交 mutations是更改Vuex状态的唯一合法方法
export const modifyAName = (state, name) => { // A组件点击更改餐馆名称为 A餐馆
    state.resturantName = name // 把方法传递过来的参数,赋值给state中的resturantName
}
export const modifyBName = (state, name) => { // B组件点击更改餐馆名称为 B餐馆
    state.resturantName = name
}
⑤getters
// 获取最终的状态信息
export const resturantName = state => state.resturantName
⑥在main.js中导入 store实例
// The Vue build version to load with the `import` command
// (runtime-only or standalone) has been set in webpack.base.conf with an alias.
import Vue from 'vue'
import App from './App'
import router from './router'
import store from './store'

Vue.config.productionTip = false

/* eslint-disable no-new */
new Vue({
  el: '#app',
  router,
  store,  // 这样就能全局使用vuex了
  components: { App },
  template: '<App/>'
})
④在组件A中,定义点击事件,点击 修改 餐馆的名称,并把餐馆的名称在事件中用参数进行传递。
...mapactions 和 ...mapgetters都是vuex提供的语法糖,在底层已经封装好了,拿来就能用,简化了很多操作。
其中...mapActions(['clickAFn']) 相当于this.$store.dispatch('clickAFn',{参数}),mapActions中只需要指定方法名即可,参数省略。
...mapGetters(['resturantName'])相当于this.$store.getters.resturantName
<template>
  <div class="componentsA">
      <P class="title">组件A</P>
      <P class="titleName">餐馆名称:{{resturantName}}</P>
      <div>
            <!-- 点击修改 为 A 餐馆 -->
          <button class="btn" @click="modifyAName('A餐馆')">修改为A餐馆</button>
      </div>
      <div class="marTop">
          <button class="btn" @click="trunToB">跳转到B页面</button>
      </div>
  </div>
</template>

<script>
import {mapActions, mapGetters} from 'vuex'
export default {
  name: 'A',
  data () {
    return {
    }
  },
  methods:{
      ...mapActions( // 语法糖
          ['modifyAName'] // 相当于this.$store.dispatch('modifyName'),提交这个方法
      ),
      trunToB () {
          this.$router.push({path: '/componentsB'}) // 路由跳转到B
      }
  },
  computed: {
      ...mapGetters(['resturantName']) // 动态计算属性,相当于this.$store.getters.resturantName
  }
}
</script>

<!-- Add "scoped" attribute to limit CSS to this component only -->
<style scoped>
    .title,.titleName{
        color: blue;
        font-size: 20px;
    }
    .btn{
         160px;
        height: 40px;
        background-color: blue;
        border: none;
        outline: none;
        color: #ffffff;
        border-radius: 4px;
    }
    .marTop{
        margin-top: 20px;
    }
</style>
B组件同理
<template>
  <div class="componentsB">
      <P class="title">组件B</P>
      <P class="titleName">餐馆名称:{{resturantName}}</P>
      <div>
          <!-- 点击修改 为 B 餐馆 -->
          <button class="btn" @click="modifyBName('B餐馆')">修改为B餐馆</button>
      </div>
      <div class="marTop">
          <button class="btn" @click="trunToA">跳转到A页面</button>
      </div>
  </div>
</template>

<script>
import {mapActions, mapGetters} from 'vuex'
export default {
  name: 'B',
  data () {
    return {
    }
  },
  methods:{
      ...mapActions( // 语法糖
          ['modifyBName'] // 相当于this.$store.dispatch('modifyName'),提交这个方法
      ),
      trunToA () {
          this.$router.push({path: '/componentsA'}) // 路由跳转到A
      }
  },
  computed: {
      ...mapGetters(['resturantName']) // 动态计算属性,相当于this.$store.getters.resturantName
  }
}
</script>

<!-- Add "scoped" attribute to limit CSS to this component only -->
<style scoped>
    .title,.titleName{
        color: red;
        font-size: 20px;
    }
    .btn{
         160px;
        height: 40px;
        background-color: red;
        border: none;
        outline: none;
        color: #ffffff;
        border-radius: 4px;
    }
    .marTop{
        margin-top: 20px;
    }
</style>
来源:https://blog.csdn.net/qq_35430000/article/details/79291287
增加:
父组件获取子组件数据
父组件通过$refs获取子组件的数据和方法
1.可获取类型
- 子组件属性
- 子组件方法
2.操作步骤
1.调用子组件的时候调用一个ref
<v-fgsheader ref="header"></v-fgsheader>
2.在父组件中通过
this.$refs.header.属性
this.$refs.header.方法
3.适用场景
子组件给父组件传值
4.示例代码
父组件
<template>
    <div class="FGSHome">
        <v-fgsheader ref="header"></v-fgsheader>
        <button @click="getChildProp()">获取子组件的属性的值</button>
        <button @click="getChildMethod()">获取子组件的方法</button>
    </div>
</template>

<script>
import FGSHeader from './FGSHeader.vue'
    export default{

        data(){
            return { }
        },
        components:{
            'v-fgsheader':FGSHeader,
        },
        methods: {
          getChildProp(){
              alert(this.$refs.header.msg);
          },
          getChildMethod(){
              this.$refs.header.run();
          }
        },
    }
</script>
子组件
<script>
    export default{
        data(){
            return {
                msg:"我是子组件header的值哟"
            }
        },
        methods:{
            run(){
                alert("这是子组件Header的方法+"+this.msg);
            }
        }
    }
</script>
子组件获取父组件数据
子组件通过$parent获取父组件的数据和方法,这种传值方式实际上类似于上边的属性传值中父组件给子组件的传递了子类对象this,只不过Vue官方给封装好了。
1.可获取类型
- 父组件属性
- 父组件方法
2.操作步骤
直接在子组件中使用this.$parent.XX,不需要做任何多余操作。
3.适用场景
父组件给子组件传值
4.示例代码
子组件
getFatherProp(){
    alert(this.$parent.fatherMsg);
},
getFatherMethod(){
    this.$parent.fatherRun();
}