Linux下安装Python3.6和第三方库
如果本机安装了python2,尽量不要管他,使用python3运行python脚本就好,因为可能有程序依赖目前的python2环境,
比如yum!!!!!
不要动现有的python2环境!
一、安装python3.6
1. 安装依赖环境
# yum -y install zlib-devel bzip2-devel openssl-devel ncurses-devel sqlite-devel readline-devel tk-devel gdbm-devel db4-devel libpcap-devel xz-devel
2.下载Python3
https://www.python.org/downloads/
各版本链接:
https://www.python.org/ftp/python/
wget https://www.python.org/ftp/python/3.6.1/Python-3.6.1.tgz
3.安装python3
我个人习惯安装在/usr/local/python3(具体安装位置看个人喜好)
创建目录:
mkdir -p /usr/local/python3
解压下载好的Python-3.x.x.tgz包(具体包名因你下载的Python具体版本不不同⽽而不不同,如:我下载的是Python3.6.1.那我这里就是Python-3.6.1.tgz)
tar -zxvf Python-3.6.1.tgz
4.进入解压后的目录,编译安装
# cd Python-3.6.1
# ./configure --prefix=/usr/local/python3
make
# make
make install
make install 或者 make && make install
5.建立python3的软链
# ln -s /usr/local/python3/bin/python3 /usr/bin/python3
6.并将/usr/local/python3/bin加入PATH
# vim ~/.bash_profile
# .bash_profile
# Get the aliases and functions
if [ -f ~/.bashrc ]; then
. ~/.bashrc
fi
# User specific environment and startup programs
PATH=$PATH:$HOME/bin:/usr/local/python3/bin
export PATH
按ESC,输入:wq回车退出。
修改完记得执行行下面的命令,让上一步的修改生效:
# source ~/.bash_profile
检查Python3及pip3是否正常可用:
# python3 -V
Python 3.6.1
# pip3 -V
pip 9.0.1 from /usr/local/python3/lib/python3.6/site-packages (python 3.6)
7.不行的话在创建一下pip3的软链接(我也不清楚这一步有什么用)
# ln -s /usr/local/python3/bin/pip3 /usr/bin/pip3
二、安装pip以及setuptools
毕竟丰富的第三方库是python的优势所在,为了更加方便的安装第三方库,使用pip命令,我们需要进行相应的安装。
1、安装pip前需要前置安装setuptools
命令如下:
wget --no-check-certificate https://pypi.python.org/packages/source/s/setuptools/setuptools-19.6.tar.gz#md5=c607dd118eae682c44ed146367a17e26
tar -zxvf setuptools-19.6.tar.gz
cd setuptools-19.6
python3 setup.py build
python3 setup.py install
如果前面没布置好环境的话,就要苦逼一下了:
报错: RuntimeError: Compression requires the (missing) zlib module
我们需要在linux中安装zlib-devel包,进行支持。
yum install zlib-devel
需要对python3.5进行重新编译安装。
cd python3.6.1
make && make install
又是漫长的编译安装过程。
重新安装setuptools
python3 setup.py build
python3 setup.py install
2、安装pip
命令如下:
wget --no-check-certificate https://pypi.python.org/packages/source/p/pip/pip-8.0.2.tar.gz#md5=3a73c4188f8dbad6a1e6f6d44d117eeb
tar -zxvf pip-8.0.2.tar.gz
cd pip-8.0.2
python3 setup.py build
python3 setup.py install
如果没有意外的话,pip安装完成。
如果没有搞好环境的话,会碰见亲切的报错:
pip3 install paramiko
报这个错
pip is configured with locations that require TLS/SSL, however the ssl module in Python is not available.
然后开始进行如下操作
yum install openssl
yum install openssl-devel
cd python3.6.1
make && make install
坑
1、pip is configured with locations that require TLS/SSL问题
python3.7安装, 解决pip is configured with locations that require TLS/SSL问题
1.安装相关依赖
yum install gcc libffi-devel zlib* openssl-devel
# libffi-devel zlib-devel bzip2-devel openssl-devel ncurses-devel sqlite-devel readline-devel tk-devel gcc make
2.下载并解压
wget https://www.python.org/ftp/python/3.7.1/Python-3.7.1.tar.xz
# 下载
wget https://www.python.org/ftp/python/3.7.1/Python-3.7.1.tar.xz
# 解压并编译:
tar -xvJf Python-3.7.1.tar.xz
cd Python-3.7.1
3.编译安装
./configure prefix=/usr/local/python3
make && make install
# 编译完成后,创建软链接文件到执行文件路径:
ln -s /usr/local/python3/bin/python3 /usr/bin/python3
ln -s /usr/local/python3/bin/pip3 /usr/bin/pip3
# 我们可以清除之前编译的可执行文件及配置文件 && 清除所有生成的文件:
make clean && make distclean
bug: 使用pip 命令失败
2.1 错误信息
pip is configured with locations that require TLS/SSL, however the ssl module in Python is not available.
Collecting virtualenv
Retrying (Retry(total=4, connect=None, read=None, redirect=None, status=None)) after connection broken by 'SSLError("Can't connect to HTTPS URL because the SSL module is not available.")': /simple/virtualenv/
Retrying (Retry(total=3, connect=None, read=None, redirect=None, status=None)) after connection broken by 'SSLError("Can't connect to HTTPS URL because the SSL module is not available.")': /simple/virtualenv/
Retrying (Retry(total=2, connect=None, read=None, redirect=None, status=None)) after connection broken by 'SSLError("Can't connect to HTTPS URL because the SSL module is not available.")': /simple/virtualenv/
Retrying (Retry(total=1, connect=None, read=None, redirect=None, status=None)) after connection broken by 'SSLError("Can't connect to HTTPS URL because the SSL module is not available.")': /simple/virtualenv/
Retrying (Retry(total=0, connect=None, read=None, redirect=None, status=None)) after connection broken by 'SSLError("Can't connect to HTTPS URL because the SSL module is not available.")': /simple/virtualenv/
Could not fetch URL https://pypi.org/simple/virtualenv/: There was a problem confirming the ssl certificate: HTTPSConnectionPool(host='pypi.org', port=443): Max retries exceeded with url: /simple/virtualenv/ (Caused by SSLError("Can't connect to HTTPS URL because the SSL module is not available.")) - skipping
Could not find a version that satisfies the requirement virtualenv (from versions: )
No matching distribution found for virtualenv
pip is configured with locations that require TLS/SSL, however the ssl module in Python is not available.
Could not fetch URL https://pypi.org/simple/pip/: There was a problem confirming the ssl certificate: HTTPSConnectionPool(host='pypi.org', port=443): Max retries exceeded with url: /simple/pip/ (Caused by SSLError("Can't connect to HTTPS URL because the SSL module is not available.")) - skipping
2.2 原因
系统版本centos6.5,其中openssl的版本为OpenSSL 1.0.1e-fips 11 Feb 2013,而python3.7需要的openssl的版本为1.0.2或者1.1.x,需要对openssl进行升级,并重新编译python3.7.0。yum 安装的openssl 版本都比较低。
2.3 升级openssl
# 1.下贼openssl
wget https://www.openssl.org/source/openssl-1.1.1a.tar.gz
tar -zxvf openssl-1.1.1a.tar.gz
cd openssl-1.1.1a
# 2.编译安装
./config --prefix=/usr/local/openssl no-zlib #不需要zlib
make
make install
# 3.备份原配置
mv /usr/bin/openssl /usr/bin/openssl.bak
mv /usr/include/openssl/ /usr/include/openssl.bak
# 4.新版配置
ln -s /usr/local/openssl/include/openssl /usr/include/openssl
ln -s /usr/local/openssl/lib/libssl.so.1.1 /usr/local/lib64/libssl.so
ln -s /usr/local/openssl/bin/openssl /usr/bin/openssl
# 5.修改系统配置
## 写入openssl库文件的搜索路径
echo "/usr/local/openssl/lib" >> /etc/ld.so.conf
## 使修改后的/etc/ld.so.conf生效
ldconfig -v
# 6.查看openssl版本
openssl version
openssl version 提示:
/usr/local/openssl/bin/openssl: error while loading shared libraries: libssl.so.1.1: cannot open shared object file: No such file or directory
假如你的libssl.so.1.1 文件在/usr/local/openssl/lib/下面,可以这样做
ln -s /usr/local/openssl/lib/libssl.so.1.1 /usr/lib64/libssl.so.1.1
ln -s /usr/local/openssl/lib/libcrypto.so.1.1 /usr/lib64/libcrypto.so.1.1
3.3 重新安装python
./configure --prefix=/usr/local/python3 --with-openssl=/usr/local/openssl
make
make install
2、pip 安装模块的过程慢,更换镜像源
在用户文件夹下新建.pip3 文件夹及 pip3.conf 文件,写入
[global]
index-url = https://pypi.tuna.tsinghua.edu.cn/simple
[install]
trusted-host=mirrors.aliyun.com
有多个 pip 的需要修改对应 pip 名称
写入文件后可输入以下指令查看是否写入成功
more ~/.pip3/pip3.conf
成功后下载包会提示
Looking in indexes: https://pypi.tuna.tsinghua.edu.cn/simple
国内镜像汇总:

http://pypi.douban.com/         豆瓣
http://pypi.hustunique.com/         华中理工大学
http://pypi.sdutlinux.org/         山东理工大学
http://pypi.mirrors.ustc.edu.cn/         中国科学技术大学
http://mirrors.aliyun.com/pypi/simple/         阿里云
https://pypi.tuna.tsinghua.edu.cn/simple/         清华大学
windows下同理
Pycharm 远程连接 Linux 进行开发
看到这里,你可能会问用 git 版本控制不香么,为啥还要这样?因为公司已有的 gitlab 已经有了,再配置一个 github 艰难了……所以找替代方案。
Project Interpreter配置远程连接
选择File->Settings配置Project Interpreter
这是一个配置好的远程连接效果

新增一个远程连接
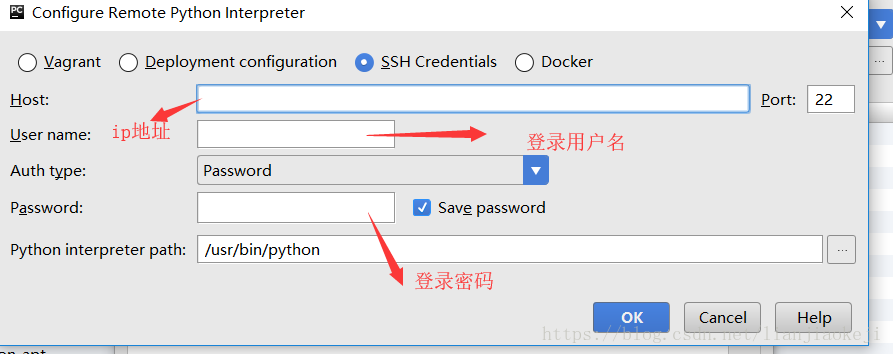
搜索Project Interpreter,必须选择Add Remote选项

IP地址是你Linux服务器分配的IP地址 如127.0.0.1,端口默认 是22,不做特殊处理
用户名必须是你登录的用户名,这块不要填错,登录密码
Linux自带Python,目录不用特殊修改
配置完成,会同步几分钟。
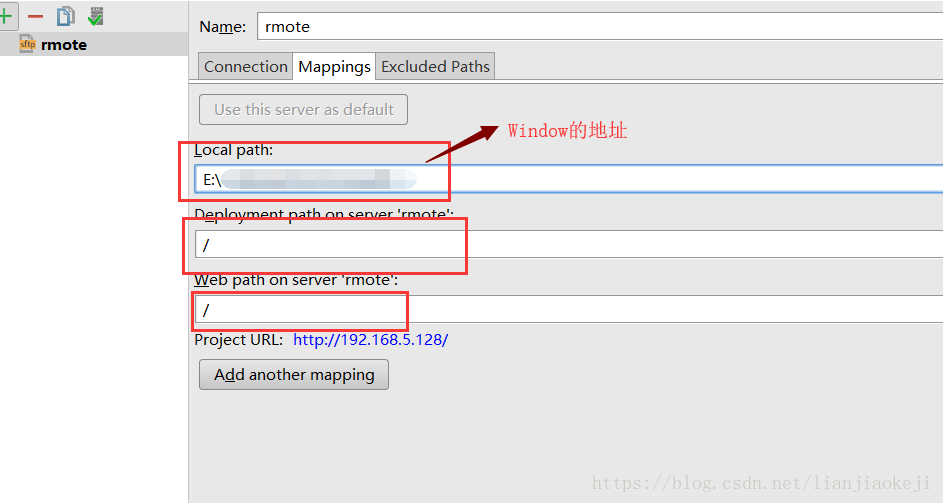
配置项目目录同步到Linux上
选择Tools->Deployment->Configuration配置同步目录

按照我框选的进行修改
SSH远程连接出现乱码问题
打开设置修改编码为UTF-8

远程连接linux设置Ctrl+S自动同步代码
选择Tools->Deployment->Options进行修改设置

打开SSH连接的会话
选择Tools-> Start SSH session->选择远程会话,连接到远程的服务器会话

pip版本低
You are using pip version 8.1.1, however version 18.1 is available.
You should consider upgrading via the 'pip install --upgrade pip' command.
必须使用这种方式进行更新
python3 -m pip install --upgrade pip