stress
下载地址:http://people.seas.harvard.edu/~apw/stress/
一、stress工具安装:
1、获取stress源码安装包(stress-1.0.4.tar.gz)
3、解压并安装
[root@localhost /]#cd /tmp/
[root@localhost tmp]#tar –zxvf stress-1.0.4.tar.gz
4、进入stress-1.0.4文件夹下,编译并安装stress
[root@localhost tmp]#cd /tmp/stress-1.0.4/
[root@localhost stress-1.0.4]#./configure
[root@localhost stress-1.0.4]# make
[root@localhost stress-1.0.4]#make install
默认安装在:/usr/local/bin/stress
二、stress工具使用:
命令:taskset –c 逻辑CPU索引号 stress --timeout 持续时间 --cpu 1
参数说明:
-c 服务器逻辑CPU的索引号
--timeout 对CPU施加压力的持续时间
--cpu stress进程数,若值为2,每个stress进程所有消耗的逻辑CPU资源平分
如:对索引为0的逻辑cpu施加压力, 持续30秒
taskset -c 0 stress --timeout 30 --cpu 1
systat
下载地址:http://sebastien.godard.pagesperso-orange.fr/
sysstat提供了Linux性能监控的工具集,包括sar、sadf、mpstat、iostat、pidstat等,这些工具可以监控系统性能和使用情况。各工具的作用如下:
iostat - 提供CPU统计,存储I/O统计(磁盘设备,分区及网络文件系统)
mpstat - 提供单个或组合CPU相关统计
pidstat - 提供Linux进程级别统计:I/O、CPU、内存等
sar - 收集、报告、保存系统活动信息:CPU、内存、磁盘、中断、网络接口、TTY、内核表等
sadc - 系统活动数据收集器,作为sar后端使用
sa1 - 收集系统活动日常数据,并二进制格式存储,它作为sadc的工具的前端,可以通过cron来调用
sa2 - 生成系统每日活动报告,同样可作为sadc的工具的前端,可以通过cron来调用
sadf - 可以以CSV、XML格式等显示sar收集的性能数据,这样非常方便的将系统数据导入到数据库中,或导入到Excel中来生成图表
nfsiostat-sysstat: 提供NFS I/O统计
cifsiostat: 提供CIFS统计
sysstat功能强大,功能也在不断的增强,每个版本提供了不同的功能,用户可以到sysstat官网了解工具最先发展情况和获得相应的帮助手册。官网地址:http://sebastien.godard.pagesperso-orange.fr/
安装
1. 网络安装
对于大多数Linux系统,都有sysstat安装包,可以通过网络来进行安装:
以CentOS系统为例,可以通过yum来进行安装:
[root@centos ~]# yum install sysstat
以Ubuntu系统为例, 可以通过apt-get来进行安装:
[root@localhost ~]# apt-get install sysstat
2. 源码安装
可以在官网:http://sebastien.godard.pagesperso-orange.fr/download.html或GITHUB:https://github.com/sysstat/sysstat下载sysstat的源码。
按照下面的步骤来进行源码安装(以Ubuntu系统为例):
root@ubuntu:~# apt-get install xz-utils
root@ubuntu:~# xz -d sysstat-11.0.5.tar.xz
root@ubuntu:~# tar -xvf sysstat-11.0.5.tar
root@ubuntu:~# cd sysstat-11.0.5
root@ubuntu:~/sysstat-11.0.5# ./configure --disable-nls
root@ubuntu:~/sysstat-11.0.5# make
root@ubuntu:~/sysstat-11.0.5# make install
注释1:从官网中下载的源码包为.tar.xz压缩文件,需要安装xz-utils工具包,先通过xz -d解压为tar文件,然后再通过tar命令解压
注释2:编译过程中如果遇到问题,可以查看源码根目录下的FAQ文件获取帮助信息
注释3:如果需要多语言支持,需要安装GNU gettext包,否则可能遇到”make: ***[locales] Error 127“错误,本例子中通过”--disable-nls"配置项禁用了该选项。可以参考FAQ中的信息来解决相应问题:
1.1. When I compile sysstat, it fails with the following message:
make: msgfmt: Command not found
make: ***[locales] Error 127
The msgfmt command belongs to the GNU gettext package.
If you don't have it on your system, just configure sysstat with
NLS disabled like this:
$ ./configure --disable-nls
or answer 'y' (for "yes") to the question
"Disable National Language Support (NLS)? (y/n) [--disable-nls]"
if you use the Interactive Configuration script (iconfig),
then compile sysstat as usual (make ; make install).
Please read the README-nls file included in sysstat source package to learn
some more about National Language Support.
sysbench
sysbench是一款压力测试工具,可以测试系统的硬件性能,也可以用来对数据库进行基准测试
wget https://github.com/akopytov/sysbench/archive/1.0.zip -O "sysbench-1.0.zip" 下载之后的名字是1.0.zip。解压之后为sysbench-1.0
百度云网盘:https://pan.baidu.com/s/1mjoa25y 密码:i4pm
cd sysbench-1.0
执行autogen.sh用它来生成configure这个文件
./autogen.sh

执行configure && make && make install 来完成sysbench的安装
./configure && make && make install 这个命令是用于mysql默认的安装路径
./configure --prefix=/usr/local/sysbench/ --with-mysql --with-mysql-includes=/usr/local/mysql/include --with-mysql-libs=/usr/local/mysql/lib 这个是用于指定mysql安装的路径(我的mysql是默认路径,所以我用第一种)
当然了,用上面的参数编译的话,就要确保你的 MySQL lib目录下有对应的 so 文件,如果没有,可以自己下载 devel 或者 share 包来安装。
另外,如果想要让 sysbench 支持 pgsql/oracle 的话,就需要在编译的时候加上参数
--with-pgsql
或者
--with-oracle
这2个参数默认是关闭的,只有 MySQL 是默认支持的


执行之后出现这个错误
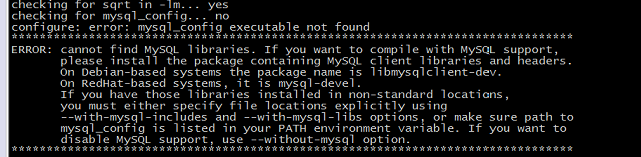
这是缺少MySQL头文件和库文件
centos6用:
yum install MySQL-shared
yum install MySQL-devel
centos7用:
yum install -y Percona-XtraDB-Cluster-shared-56.x86_64
yum install -y Percona-XtraDB-Cluster-devel-56
重新 ./configure && make && make install
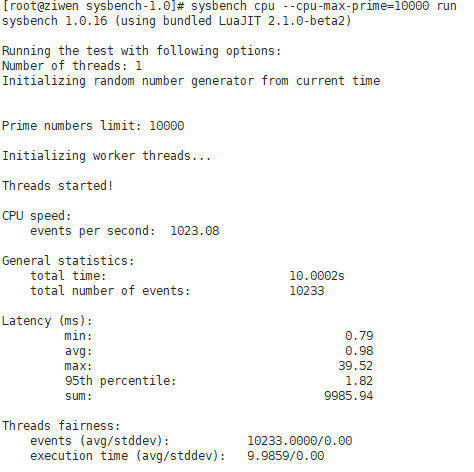
测试:sysbench cpu --cpu-max-prime=10000 run
出现这个就是成功
sysbench支持以下几种测试模式:
1、CPU运算性能
2、磁盘IO性能
3、调度程序性能
4、内存分配及传输速度
5、POSIX线程性能
6、数据库性能(OLTP基准测试)
目前sysbench主要支持 mysql,drizzle,pgsql,oracle 等几种数据库。