weblogic简介
BEA WebLogic是用于开发、集成、部署和管理大型分布式Web应用、网络应用和数据库应 用的Java应用服务器。将Java的动态功能和Java Enterprise标准的安全性引入大型网络应用的开发、集成、部署和管理之中。
BEA WebLogic Server拥有处理关键Web应用系统问题所需的性能、可扩展性和高可用性。 与BEA WebLogic Commerce ServerTM配合使用, BEA WebLogic Server可为部署适应性个性化电子商务应用系统提供完善的解决方案。
BEA WebLogic Server拥有处理关键Web应用系统问题所需的性能、可扩展性和高可用性。 与BEA WebLogic Commerce ServerTM配合使用, BEA WebLogic Server可为部署适应性个性化电子商务应用系统提供完善的解决方案。
配置weblogic域(版本为9.x,安装目录为E:\bea)
①运行开始 -> 程序 -> BEA Products -> Tools -> Configuration Wizard。
②选择 Create a new WebLogic domain,Next。
③在 Select Domain Source 界面保持默认,Next。
④在 User name 处输入用户名,默认为weblogic,两个 password 都输入 12345678(密码要求 8 位),Next。
⑤ 在 Configure Server Start Mode and JDK 界面中保持默认,即 JDK 选择的是“Sun SDK 1.5.0_03 @ E:\bea\jdk150_03”,注意这里若选择“Other JDK”配置比 SDK 1.5.0_03 更高的版本,服务器启动时将会出现异常,所以最好保持默认,然后 Next。
⑥在 Customize Environment and Services Settings 界面中默认为 No,Next。
⑦在 Domain name 处输入 mydomain,点击 Create。
⑧完成后点击 Done 关闭 Configuration Wizard 对话框。
⑨ 运行开始 -> 程序 -> BEA Products -> User Projects -> mydomain -> Start Admin Server for Weblogic Server Domain,检查服务器是否启动成功。[url]http://localhost:[/url]7001/console
在Eclipse3.3(MyEclipse6.0.1)中配置weblogic9.x服务器。
启 动 Eclipse,选择“Window -> Preferences”菜单,打开首选项对话框。展开 MyEclipse 下的Servers 节点,再展开 WebLogic节点,点击WebLogic 9.x ,选中右边的 Enable 单选按钮,启用 WebLogic 服务器。配置如下:
①BEA home directory:E:\bea(WebLogic 的安装目录)
②WebLogic installation directory:E:\bea\weblogic90
①BEA home directory:E:\bea(WebLogic 的安装目录)
②WebLogic installation directory:E:\bea\weblogic90
③Admin username:weblogic(来自 WebLogic 中的配置)
④Admin password:12345678(来自 WebLogic 中的配置)
⑤Execution domain root:E:\bea\user_projects\domains\mydomain
④Admin password:12345678(来自 WebLogic 中的配置)
⑤Execution domain root:E:\bea\user_projects\domains\mydomain
⑥Execution server name:AdminServer
⑦Security policy file:E:\bea\weblogic90\server\lib\weblogic.policy
⑦Security policy file:E:\bea\weblogic90\server\lib\weblogic.policy
⑧JAAS login configuration file:(Null)
在配置jdk点击WebLogic 9.x 目录下的JDK,这里的JDK最好用weblogic自带的JDK,要不然可能会出现下面的异常信息:
weblogic.management.ManagementException: Parsing Failure: javax.xml.namespace.QName; local class incompatible: stream classdesc serialVersionUID = 4418622981026545151, local class serialVersionUID
= -9120448754896609940
at weblogic.management.provider.internal.RuntimeAccessImpl.<init>(RuntimeAccessImpl.java:131)
at weblogic.management.provider.internal.RuntimeAccessImpl.<init>(RuntimeAccessImpl.java:131)
这一点一定要注意。
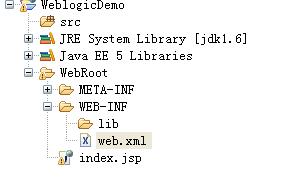
新建一个web项目(WeblogicDemo)目录如下:

index.jsp文件中就是默认的一句话:This is my JSP page.
在weblogic中部署web项目,并启动服务器,当在控制台看到如下信息时表示部署成功。
<2008-7-31 上午10时24分26秒 CST> <Info> <WebLogicServer> <BEA-000377> <Starting WebLogic Server with Java HotSpot(TM) Client VM Version 1.5.0_03-b07 from Sun Microsystems Inc.>
......
<2008-7-31 上午10时24分45秒 CST> <Notice> <WebLogicServer> <BEA-000360> <Server started in RUNNING mode>
......
<2008-7-31 上午10时24分45秒 CST> <Notice> <WebLogicServer> <BEA-000360> <Server started in RUNNING mode>
这时我们访问[url]http://127.0.0.1:7001/WeblogicDemo/[/url]可能会出现401无法访问的错误。
这时我们并没有部署完,运行开始 -> 程序 -> BEA Products -> User Projects -> mydomain -> Admin Server Console,也可以直接访问[url]http://localhost:7001/console[/url]。用你刚刚建立weblogic域时填写的用户名(weblogic)和密码(12345678)登录控制台。进入控制台以后在左边的导航栏有个Domain
Structure(域结构),我安装的是英文版本的。在该目录下点击部署(Deployments)。首先要激活“锁定并编辑”(Lock&Edit).然后点击安装(Install)按钮,按照提示找到刚刚我们建立项目所在的根目录(/WelogicDemo).最后会出现如下界面。这时并没有完全安装完,这时选中WeblogicDemo前面的复选框,然后点击(启动)Start按钮。这时后面的状态为激活状态时(active),表明启动成功。

最后在注意一点,一定要激活我们的更改,就是原来那个锁定并编辑按钮,这是我们的配置才会生效,如果你没有激活的话可能会出现503的无权访问的错误。
这时会在E:\bea\user_projects\domains\mydomain\config下面的config.xml中生成我们刚刚部署的项目描述:
<app-deployment>
<name>WeblogicDemo</name>
<target>AdminServer</target>
<module-type>war</module-type>
<source-path>E:\WeblogicDemo</source-path>
<security-dd-model>DDOnly</security-dd-model>
</app-deployment>
<name>WeblogicDemo</name>
<target>AdminServer</target>
<module-type>war</module-type>
<source-path>E:\WeblogicDemo</source-path>
<security-dd-model>DDOnly</security-dd-model>
</app-deployment>
表明配置成功。
重启一下服务器,再次访问可能还会有下面这样的错,
Expected elements 'servlet-class@[url]http://java.sun.com/xml/ns/j2ee[/url] jsp-file@[url]http://java.sun.com/xml/ns/j2ee[/url] '
就是web.xml中的javaee版本原因,现在9.x的版本支持到javaee2.4的版本,最简单的解决方法就是把这些文件类型定义,命名空间,版本信息都删除,只剩下如下:
<?xml version="1.0" encoding="UTF-8"?>
<web-app>
<welcome-file-list>
<welcome-file>index.jsp</welcome-file>
</welcome-file-list>
</web-app>
<web-app>
<welcome-file-list>
<welcome-file>index.jsp</welcome-file>
</welcome-file-list>
</web-app>
这样就不会报错了。但这不是最好的解决办法,或者用version="2.4" 的也行。这时在访问[url]http://127.0.0.1:7001/WeblogicDemo/[/url]就会看到如下成功页面的信息了:
This is my JSP page.
weblogic的默认端口是7001,如果想改端口的话在config.xml文件中的添加<listen-port>80</listen-port>。位置如下:
<server>
<name>AdminServer</name>
<listen-port>80</listen-port>
<listen-address></listen-address>
</server>
<server>
<name>AdminServer</name>
<listen-port>80</listen-port>
<listen-address></listen-address>
</server>