vscode
光标左击选中某个变量,然后CTRL+Shift+L 选中所有的目标变量 改名字
react开发依赖
 <script src="https://cdn.bootcdn.net/ajax/libs/react/16.13.1/umd/react.development.js"></script>
  <script src="https://cdn.bootcdn.net/ajax/libs/react-dom/16.13.1/umd/react-dom.development.js"></script>
  <script src="https://cdn.bootcdn.net/ajax/libs/babel-standalone/6.26.0/babel.js"></script>

 <script type="text/babel"></script>
初体验:切换文本
<!DOCTYPE html>
<html lang="en">

<head>
  <meta charset="UTF-8">
  <meta name="viewport" content="width=device-width, initial-scale=1.0">
  <title>Document</title>
  <script src="https://cdn.bootcdn.net/ajax/libs/react/16.13.1/umd/react.development.js"></script>
  <script src="https://cdn.bootcdn.net/ajax/libs/react-dom/16.13.1/umd/react-dom.development.js"></script>
  <script src="https://cdn.bootcdn.net/ajax/libs/babel-standalone/6.26.0/babel.js"></script>


</head>

<body>
  <div id="app"></div>


  <script type="text/babel">
    let flag = true
    function render() {
      const context = <div><h2>hello {flag ? 'world' : 'react'}</h2> <button onClick={changeText}>切换文字</button></div>
      ReactDOM.render(context, document.getElementById('app'))

    }
    render()

    function changeText() {
      flag = !flag //改变数据,需要手动重新 调用ReactDOM.render
      render()

    }

  </script>
</body>

</html>
class改进
- 响应数据要放在state里面。
- 更新state里面数据一定要调用this.setState()方法。这样react才会自动调用render函数。
- 所以永远不要手动调用render()函数。
<body>
  <div id="app"></div>


  <script type="text/babel">
    class App extends React.Component {
      constructor() {
        super()
        // this.state控制响应式数据
        this.state = {
          flag: true,


        }
      }
      // 永远不用手动调用render()函数,没有任何效果。
      render() {
        return (
          <div>
            <h2>hello {this.state.flag ? 'world' : 'react'}</h2>
            <button onClick={this.changeText}>切换文本</button>
          </div>
        )
      }
      changeText = () => {
        // this.state.flag = !this.state.flag //state里面的flag确实改变,但是页面不会自动渲染更新,render函数不会执行
        // 要想自动更新,需要调用setState方法。这样才会通知render函数去自动执行
        this.setState({
          flag: !this.state.flag //只会更新自己要改变的值。其他在state里的属性和值都不会丢失。保持原样
        })


      }

    }

    ReactDOM.render(<App></App>, document.getElementById('app'))


  </script>
</body>
jsx
jsx语法书写规范:
- jsx顶层只能有一个根元素
- render函数return 后面带一个小括号().小括号里面写任何的jsx语法。不带小括号就不能换行了。
- jsx里面HTML元素可以写单标签和双标签。如果是单标签,必须是带/闭合
- jsx注释{/注释注释注释/}
 render() {
        return (
          <div>
            <h3>{this.state.msg}</h3>
            {/*
              我是注释,可以一行
              我是注释可以多行
            */}
            <img src="" alt="" />
          </div>
        )
      }
jsx变量
在{}中可以在页面正常显示的数据类型有:string|number|Array.
在{}中不会在页面显示的数据类型有:null|undefined|boolean.但是不会报错。如果想显示,转为字符串类型。
在{}中绝对不能放Object .
{/* 放变量,放变量表达式,放三目运算符,放函数*/}
<h3>hello world</h3>
<h3>hello {this.state.msg}</h3>
<h3>{this.state.demo1?'a':'b'}</h3>
<h3>{this.showInfo(this.state.user)}</h3>
绑定属性
<script type='text/babel'>
class App extends React.Component {
constructor() {
super()
this.state = {
title: "I am title",
imgSrc: './imgs/logo192.png',
reactUrl: 'https://react.docschina.org/docs/introducing-jsx.html',
active: true,
marginRight: 30
}
}
render() {
let { title, imgSrc, reactUrl, active, marginRight } = this.state
return (
<div>
<h3 title={title}>绑定title</h3>
<img src={imgSrc} width="30"></img>
<a href={reactUrl}>react 官网</a>
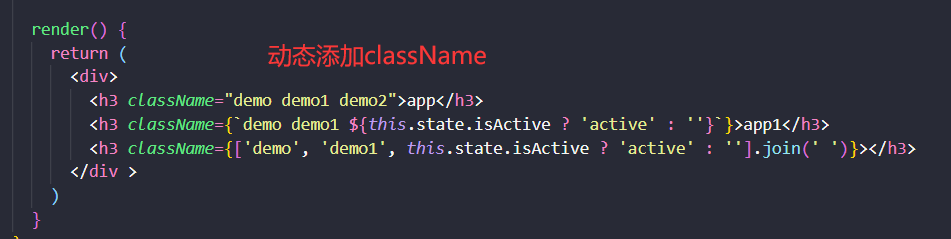
<h3 className="demo demo1 demo2">class样式是className 不是class避免es6 class关键字 </h3>
<h3 className={"demo0 demo1 " + (active ? 'active' : '')}>动态切换是否添加active class样式</h3>
<h3 className={['demo', 'demo', active ? 'active' : ''].join(' ')}>动态绑定class方式2</h3>
<h3 className={`demo0 demo1 ${active ? 'active' : ''}`}>动态绑定class方式3</h3>
<label htmlFor="aa">for在js中是关键字,所以label要避讳</label>
<h3 style={{ color: 'red', fontSize: '30px', marginRight:marginRight }}>绑定内联样式数字自动带px</h3>
</div>
)
}
}
ReactDOM.render(<App />, document.getElementById('app'))
</script>
虚拟DOM
jsx语法本质是React.createElement()的语法糖,生成一个ReactElement对象树(js对象),这个对象数就是虚拟DOM对象,保存在内存中。然后通过ReactDOM.render()函数渲染成真实的DOM对象。
<body>
  <div id="app"></div>
  <script type="text/babel">
    const message0 =
      <div className="wrap">
        <header className='header'>
          <h2>i am header</h2>
        </header>
        <main className="content">
          <h3>i am content</h3>

        </main>

      </div>
    const message =
      React.createElement("div", { className: "wrap" },
        React.createElement("header", { className: "header" }, React.createElement("h2", null, "i am header")),
        React.createElement("main", { className: "content" }, React.createElement("h3", null, "i am content")));
      console.log(message);
    ReactDOM.render(message, document.getElementById('app'))
  </script>

</body>
react事件处理其传参
- React 事件的命名采用小驼峰式(camelCase),而不是纯小写。
- 使用 JSX 语法时你需要传入一个函数作为事件处理函数,而不是一个字符串。
<script type='text/babel'>
    class App extends React.Component {
      constructor() {
        super()
        this.state = {
          message: 'hello react',
          num:300
        }
        // this.handleClick = this.handleClick.bind(this)
      }
      render() {
        return (
          <div>
            {/*优选使用事件传参1 */}
            <button onClick={(e) => { this.handleClick(e, 100) }}>事件传参方式1 this是render函数中的this</button>
            <button onClick={this.handleClick1.bind(this, 100)}>事件传参方式2</button>
            <button onClick={this.handleClick2(100)}>事件传参方式3</button>
          </div>
        )

      }
      handleClick(e, params) {
        console.log(e, params);

      }
      handleClick1(num, e) {
        console.log(num, e);
      }
      handleClick2 = (num) => {
        return e => {
          console.log(e);
          console.log(num);
        }
      }
    }
    ReactDOM.render(<App />, document.getElementById('app'))
  </script>
条件渲染
模拟实现v-if
v-if作用1:显示不同内容
render() {
        const { isLogin, flag, moiveList } = this.state
        const txt = isLogin ? '登录' : '退出'
        const isShowH3 = flag ? 'block' : 'none'
        const h3Style = { color: 'red', display: isShowH3 }
        return (
          <div>
            {/* v-if if控制显示内容方式1 判断逻辑放在外面*/}
            <h3>{txt}</h3>
            {/*v-if if控制显示内容方式2 三目表达式*/}
            <h3>{isLogin ? '登录' : '退出'}</h3>


          </div>
        )

      }
v-if作用2:控制是否渲染&&
render() {
        const { isLogin, flag, moiveList } = this.state
        const txt = isLogin ? '登录' : '退出'
        const isShowH3 = flag ? 'block' : 'none'
        const h3Style = { color: 'red', display: isShowH3 }
        return (
          <div>

            {/* 这个h3标签不管是true/false都会渲染出*/}
            <h3>{isLogin && '登录'}</h3>

            {/* 这个最好; 只有当isLogin是true的时候还会渲染h3标签*/}
            {isLogin && <h3>登录</h3>}

             {/* 只有当moiveList列表长度>0才遍历渲染数组 */}
            {moiveList.length > 0 &&
              <ul>
                {moiveList.map((item, index) => <li key={index}>{item}</li>)}
              </ul>
            }

          </div>
        )

      }
模拟实现v-show css的display
render() {
        const { isLogin, flag, moiveList } = this.state
        const isShowH3 = flag ? 'block' : 'none'
        const h3Style = { color: 'red', display: isShowH3 }
        return (
          <div>

            {/*模拟实现v-show  css的display属性*/}
            <h3 style={h3Style}>hello react</h3>


          </div>
        )

      }
列表和对象遍历&key
首先要明确对象不能在react遍历。需要变样遍历。
<script type='text/babel'>

    class App extends React.Component {
      constructor() {
        super()
        this.state = {
          message: 'hello world',
          movieList: ['少年派', '变形金刚', '三国演义', '大话西游'],
          user: { name: 'zs', age: 10 }
        }
      }
      render() {
        return (
          <div>
            <h3>{this.state.message}</h3>
            <h2>电影列表</h2>
            <ul>//遍历列表
              {
                this.state.movieList.map((item, index) => {
                  return <li key={index}>{item}</li>
                })

              }
            </ul>
            <h3>user信息</h3>
            <div>//遍历对象
              {
                Object.keys(this.state.user).map(key => {
                  return <p key={key}>{this.state.user[key]}</p>
                })
              }
            </div>
          </div>
        )
      }

    }
    ReactDOM.render(<App />, document.getElementById('app'))

  </script>
bookstore综合练习
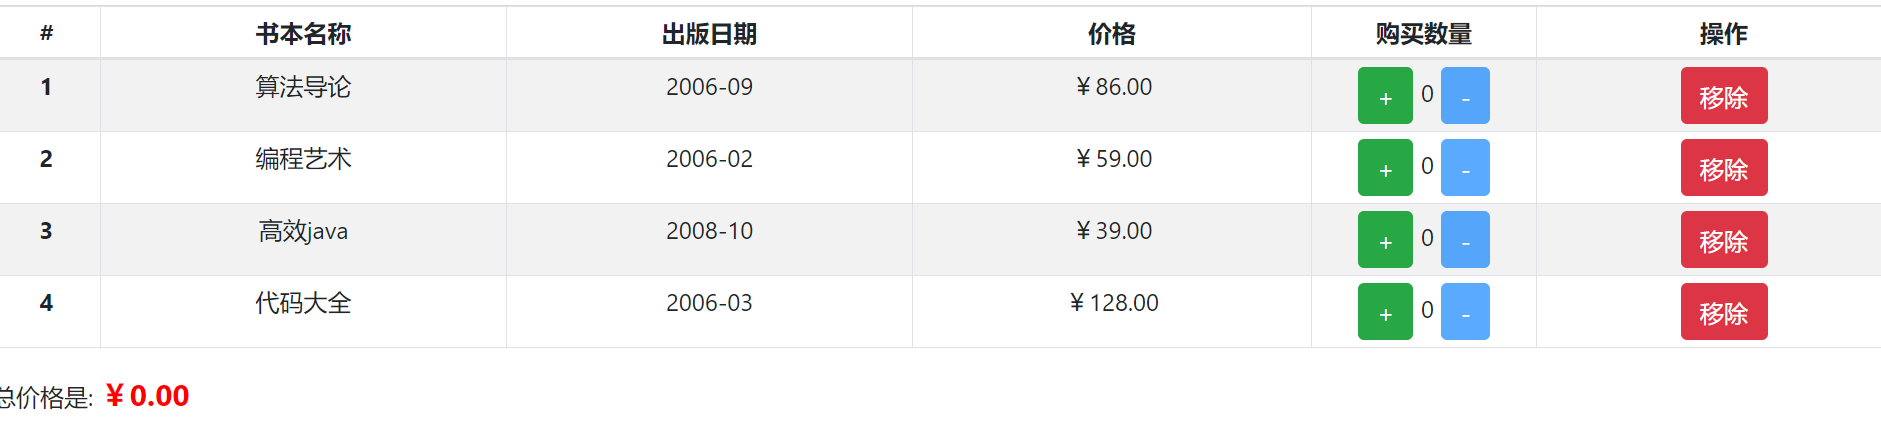
- 表格显示内容
- 底部显示总价格
- 点击+ -增加或者减少书数量。但是不能减少为负数
- 点击删除按钮移除一行数据,当移除所有书,显示购物车为空。
<body>
  <div id="app"></div>
  <script type="text/babel">
    class App extends React.Component {
      constructor() {
        super()
        this.state = {
          bookStoreList: [
            { title: '算法导论', publicTime: '2006-09', price: 86.00, count: 0, },
            { title: '编程艺术', publicTime: '2006-02', price: 59.00, count: 0, },
            { title: '高效java', publicTime: '2008-10', price: 39, count: 0, },
            { title: '代码大全', publicTime: '2006-03', price: 128.00, count: 0 },
          ],


        }
      }
      initTable() {
        const { bookStoreList } = this.state
        return (
          <div>
            <table className="table table-striped table-bordered table-sm">
              <thead>
                <tr>
                  <th scope="col">#</th>
                  <th scope="col">书本名称</th>
                  <th scope="col">出版日期</th>
                  <th scope="col">价格</th>
                  <th scope="col">购买数量</th>
                  <th scope="col">操作</th>
                </tr>
              </thead>
              <tbody>
                {bookStoreList.map((item, index) => {
                  return (
                    <tr key={item.title}>
                      <th scope="row">{index + 1}</th>
                      <td>{item.title}</td>
                      <td>{item.publicTime}</td>
                      <td>{this.formatPrice(item.price)}</td>
                      <td style={{  150 }}>
                        <button type="button" className="btn btn-success" onClick={() => this.handleAdd(item.title,)}>+</button>
                        <span className="count">{item.count}</span>
                        <button type="button"
                          className="btn btn-primary"
                          disabled={item.count <= 0}
                          onClick={() => this.decrease(item.title,)}>-</button>
                      </td>
                      <td><button
                        type="button"
                        className="btn btn-danger"
                        onClick={() => this.deleteItem(item.title)}
                      >移除</button> </td>
                    </tr>
                  )
                })}

              </tbody>
            </table>
            {/*计算总价格*/}
            {this.computeTotal()}

          </div>
        )
      }
      renderTips() {
        return <p>购物车为空</p>
      }
      render() {
        return this.state.bookStoreList.length > 0 ? this.initTable() : this.renderTips()
      }
      formatPrice(price) {
        return typeof price === 'number' ? `¥${price.toFixed(2)}` : price
      }
      //计算总价格 注意:其他函数(非render函数)里面也可以使用jsx语法。
      computeTotal() {
        const totalPrice = this.formatPrice(this.state.bookStoreList.reduce((prev, next) => prev + next.price * next.count, 0))
        return <p>总价格是: <span style={{ color: 'red', fontSize: 20, fontWeight: 700 }}>{totalPrice}</span></p>

      }
      //增加数量
      handleAdd(title) {
        {/*this.state.bookStoreList不要改动*/ }
        this.setState({ bookStoreList: this.state.bookStoreList.map(item => item.title === title ? { ...item, count: ++item.count } : item) })

      }
      //减少数量
      decrease(title) {


        const res = this.state.bookStoreList.map(item => item.title === title ? { ...item, count: --item.count } : item)
        this.setState({ bookStoreList: res })
      }
      // 移除
      deleteItem(bookTitle) {
        //react中设计原则:state数据不可变性。
        this.setState({ bookStoreList: this.state.bookStoreList.filter(item => item.title !== bookTitle) })//filter函数不会修改this.state.bookStoreList的值

      }
    }
    ReactDOM.render(<App></App>, document.getElementById('app'))

  </script>

</body>
全局安装yarn
node 包管理工具
npm install yarn -g
yarn --version
yarn add package === npm i package -S 运行依赖
yarn add package -D ===npm i pageage -D 开发依赖
yarn remove package === npm uninstall package -S/D
yarn cache clean ===npm chahe clean
yarn upgrade
全局安装react手脚架
npm install create-react-app -g
create-react-app --version
创建react项目
create-react-app projectName 创建项目
cd projectName
yarn start
projectName不能使用大写字母,多个单词以-连接。eg: mail-store-h5
react vscode插件和快捷键
user.json加入。写标签自动闭合
"emmet.includeLanguages": {
"javascript": "javascriptreact"
}

imrc  -> import React, { Component } from 'react'
ccc  ->快速生成类组件
rcc  ->imrc+ccc
rconst ->constructor函数
rpcp  -> proptypes
rfc  ->函数式组件
//rpcp
import React, { PureComponent } from 'react'
import PropTypes from 'prop-types'

export default class FileName extends PureComponent {
  static propTypes = {}

  render() {
    return <div>$2</div>
  }
}
react最开始的初始化
也就是删除一些文件而已
react组件化开发
组件思想:
数据逻辑和ui组件的分离
组件划分:
根据组件定义划分:函数组件(没有内部状态|没有生命周期)和类组件
根据组件内部是否有状态需要维护:无状态组件(stateless Component)和有状态组件(stateful Component)
根据组件的职责:展示性组件和容器类组件
异步组件、高阶组件等
类组件
- 定义组件时组件名大写字母开头,必须继承React.Component ;类组件必须实现render函数。
- eg: class News extends React.Component{}
- render函数的返回值:react元素(html元素|自定义react组件),数组(普通数组|jsx数组),基本数据类型(number|string|boolean(页面看不见))
- constructor()函数可选;this.state()里面放组件数据
- 作为组件使用:
而使用 是错的。
react 类组件生命周期
https://zh-hans.reactjs.org/docs/react-component.html

import React, { Component } from 'react';
export default class App extends Component {
  constructor() {
    super();
    console.log('父组件的constructor');
    this.state = {
      message: 'hello world',
      num: 10,
    }
  }
  render() {
    console.log('父组件的render');
    const { message } = this.state;
    return (
      <div>
        <h3>{message}</h3>
        <button onClick={() => this.changeMessage()}>验证生命周期</button>
      </div>

    )
  }
  changeMessage() {
    this.setState({
      message: 'hello react'
    })
  }

  componentDidMount() { //cdm
    console.log('只会初始化时候执行唯一一次componentDidMount()');
    console.log('constructor()函数执行->render()函数执行->componentDidMount()函数执行');
  }
  componentDidUpdate(prevProps, prevState) { //cdu
    console.log(prevProps); //{}
    console.log(prevState); //第一次点击{ message: 'hello world', num:10,}
    console.log('componentDidUpdate初始化时不会执行,只有在state中数据发生改变时执行');
    console.log('render()函数执行->componentDidUpdate()函数执行');
  }

  componentWillUnmount(){
    console.log('组件卸载时候触发');
  }


}
生命周期函数
componentDidMount
可以进行的数据操作有
1.真实dom操作,在ReactDOM.render()执行之后调用componentDidMount。这个时候虚拟dom已经渲染成真实的DOM
2. 网络请求,改变state里面数据
3. 添加一些订阅 (在componentWillUnmount手动取消订阅)
componentDidMount() {
    fetchPosts().then(response => {
      this.setState({
        posts: response.posts
     });//重新执行render函数,生成虚拟dom。
});
componetDidUpdate(prevProps,prevState)
组件初始化不会执行,只有当数据改变后才会执行。
可以进行的数据操作有
- 真实dom操作
- 通过前后props|state变化,判断是否发生网络请求。
componentDidUpdate(prevProps) {
  // 典型用法(不要忘记比较 props):
  if (this.props.userID !== prevProps.userID) {
    this.fetchData(this.props.userID);
  }
}
componentWillUnmount()
组件卸载和销毁之前调用。
可以进行的数据操作有
- 清除定时器
- 清除componentDidMount里面订阅的事件
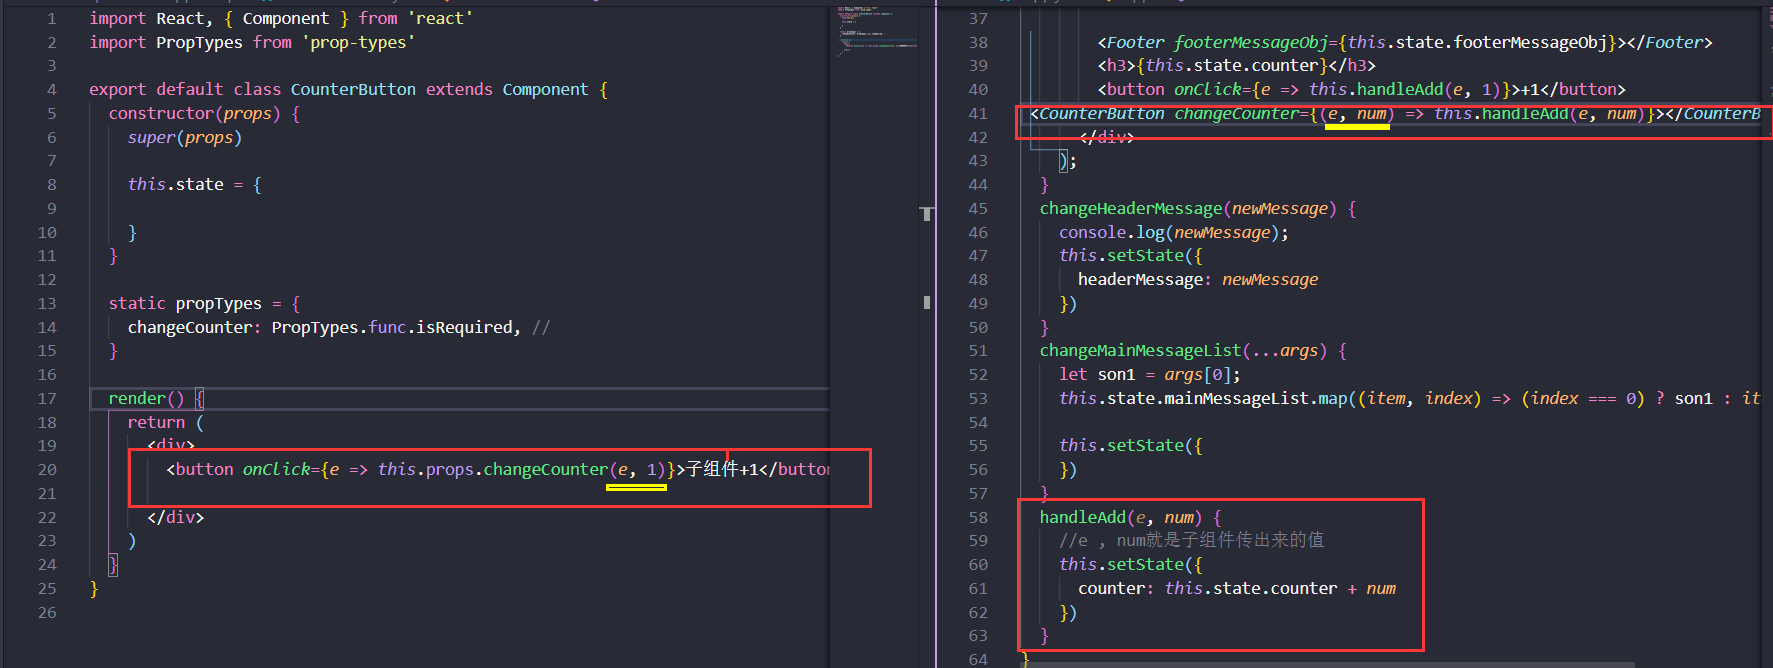
数组通信 &&propTypes
rpcp快捷键
https://react.docschina.org/docs/typechecking-with-proptypes.html
//app.jsx
import React, { Component } from 'react';
import Header from './component/appComp/Header'
class App extends Component {
  constructor(props) {
    super(props)
    this.state = {
      headerMessage: 'hello react',
      headerMessage1: 100,

    }
  }

  render() {
    return (
      <div>
        <h2>app</h2>
        <Header
          headerMessage={this.state.headerMessage}
          headerMessage1={this.state.headerMessage1}
          changeHeaderMessage={(newMessage) => { this.changeHeaderMessage(newMessage) }}>
        </Header>
      </div>
    );
  }
  changeHeaderMessage(newMessage) {
    this.setState({
      headerMessage: newMessage
    })
  }

}

export default App;
//Header.jsx子组件 rpcp
import React, { Component } from 'react'
import propTypes from 'prop-types'

export default class Header extends Component {
  //如果夫组件没有传属性,可以允许使用默认值。如果这个是属性是isRequired,但是父组件也没有传,如果设置了该值是默认值也不会有警告
  static defaultProps = {
    headerMessage: 'default value headerMessage ' //给headerMessage设置默认值
  }
  static propTypes = {
    headerMessage: propTypes.string.isRequired, //string类型必选
    headerMessage1: propTypes.oneOfType(
      [propTypes.string, propTypes.number.isRequired] //任意类型之一,并且number必传
    ),
    changeHeaderMessage: propTypes.func //函数类型
  }
  constructor(props) {
    super(props)
    this.state = {

    }
  }

  render() {
    return (
      <div>
        <div className="header">{this.props.headerMessage}</div>
        <div>{this.props.headerMessage1}</div>
		//子组件给父组件传值。通过函数
        <button onClick={() => { this.props.changeHeaderMessage('hello world') }}>改变父组件的header值</button>
      </div>
    )
  }
}
本质是父组件传函数给子组件。子组件调用父组件函数时候会传递过来一些值。
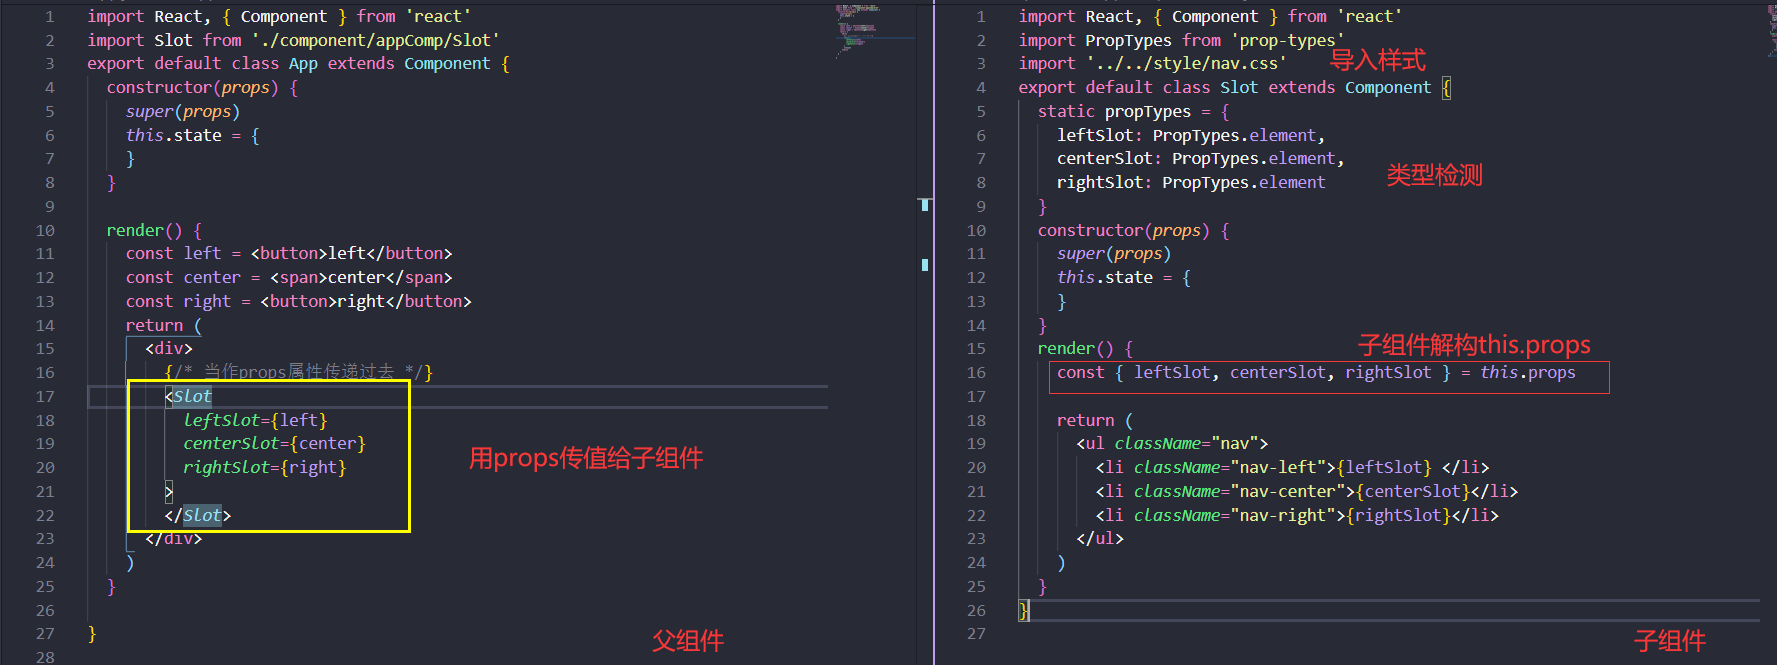
react实现Vue插槽效果
首先明确一点:react没有插槽,需要自己手动实现
插槽:父组件向子组件传递HTML结构。props是向子组件传递数据。
1.this.props.children实现插槽
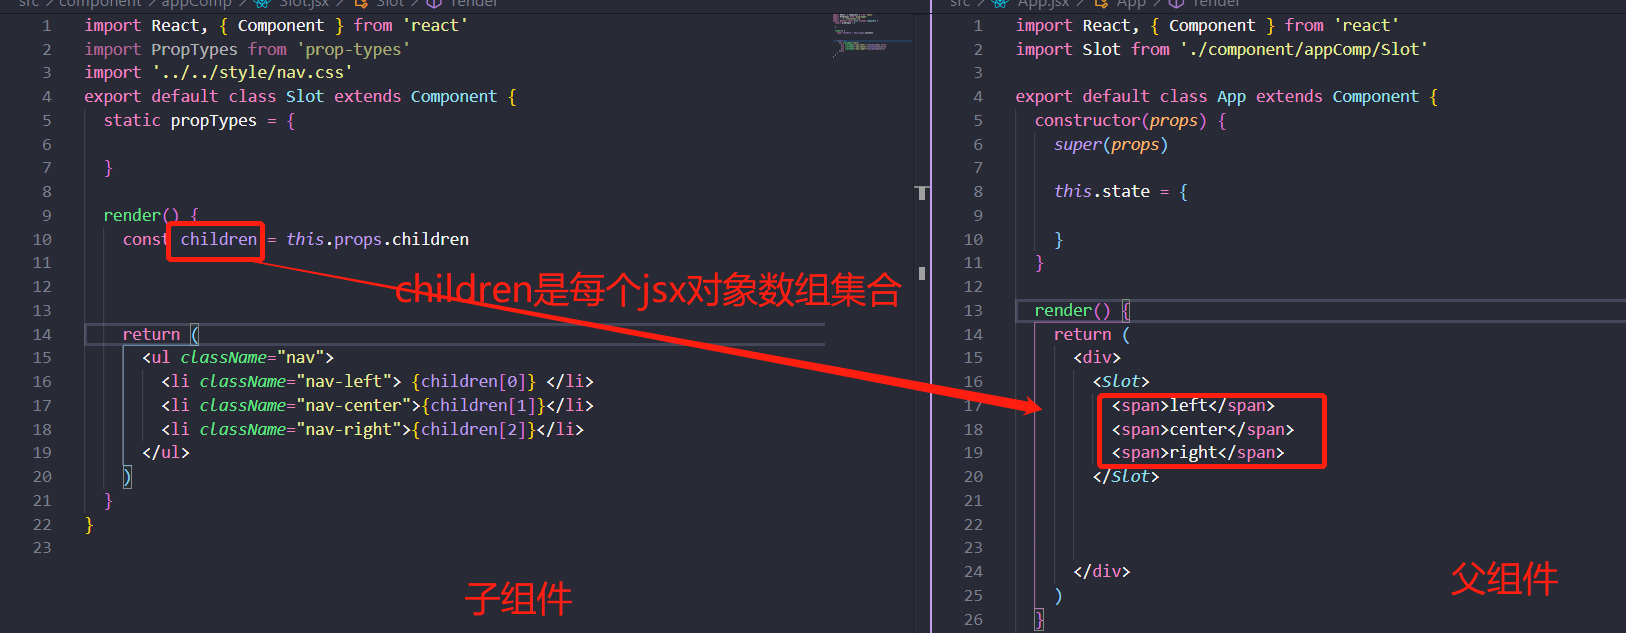
2.this.props直接实现插槽
综合建议:多多使用方式二 this.props实现插槽效果。
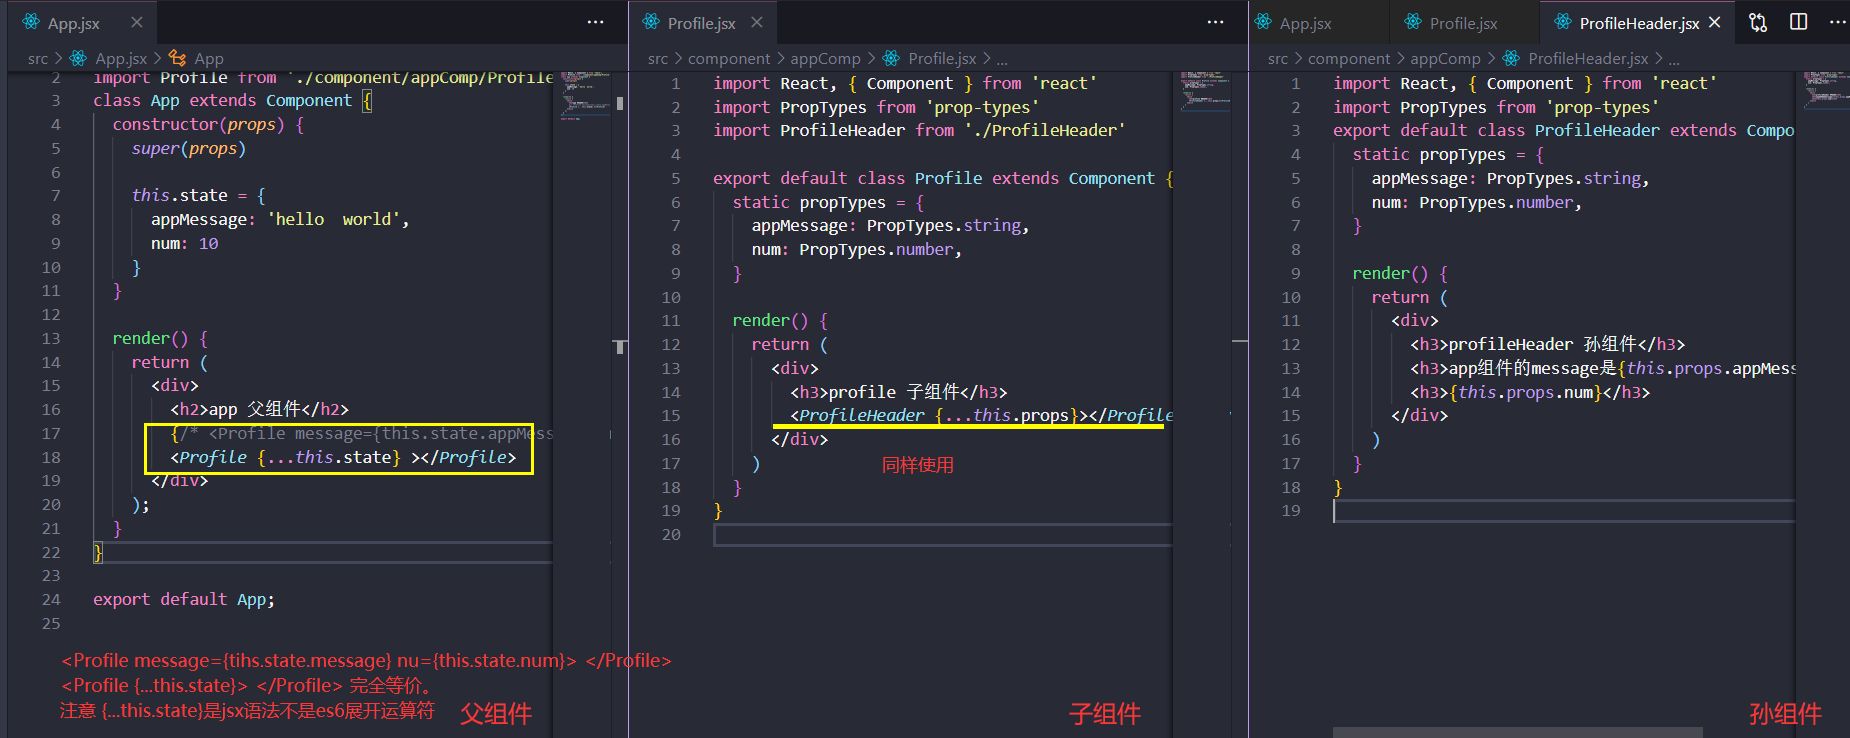
跨组件通信
app组件->子组件Profile->孙组件ProfileHeader.想要从app组件传值到孙组件ProfileHeader,就要通过props属性先传给子组件,然后子组件在做一次Props转发到子组件。这就是一层一层传递数据。
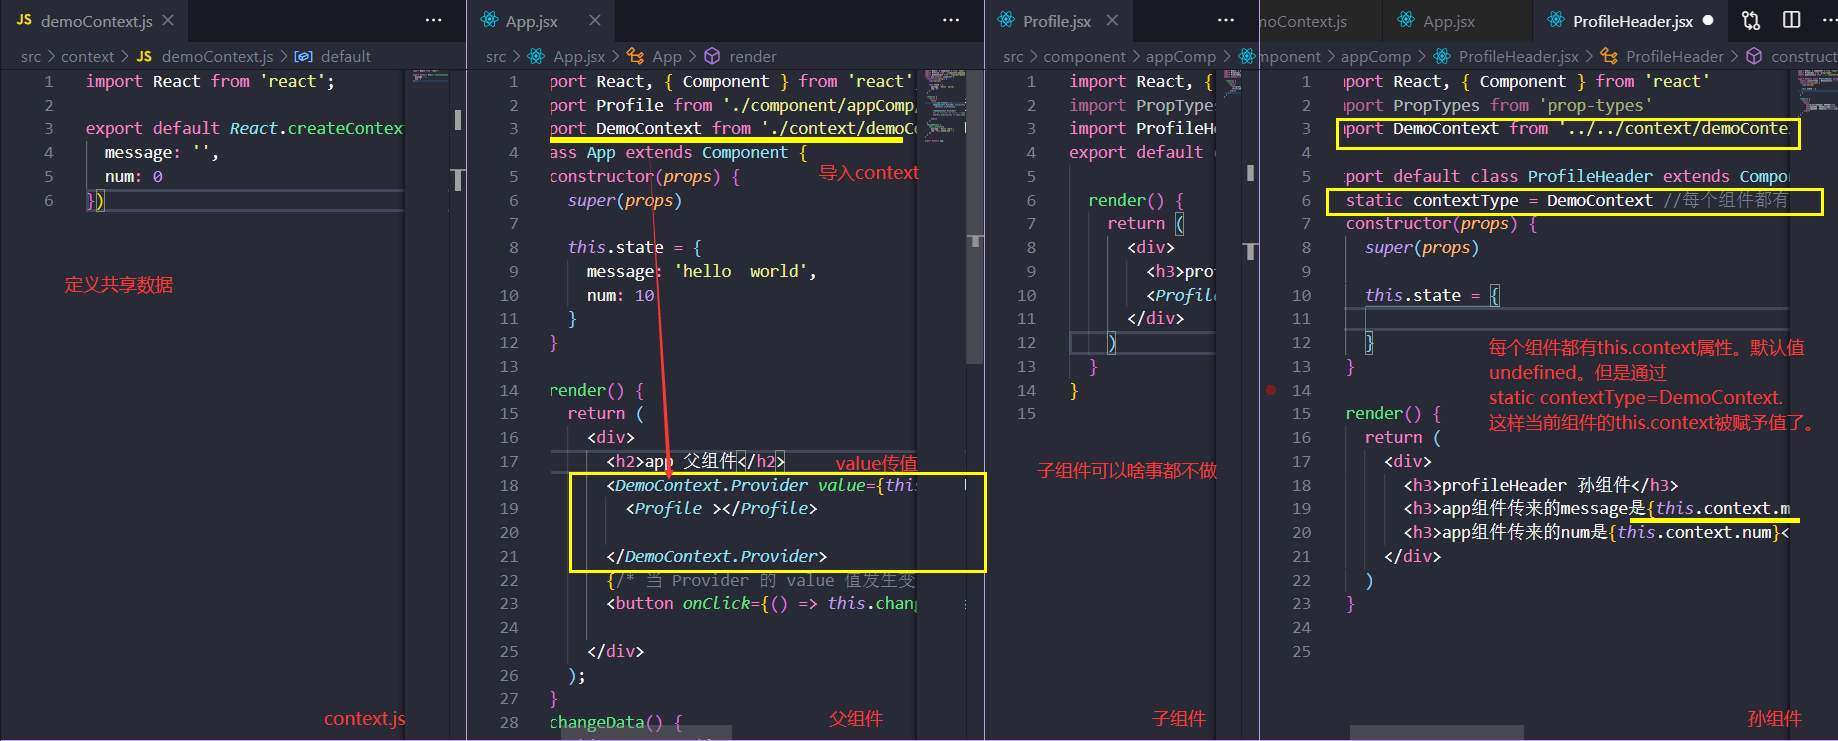
Context API
Context 提供了一个无需为每层组件手动添加 props,就能在组件树间进行数据传递的方法。
Context 设计目的是为了共享那些对于一个组件树而言是“全局”的数据,例如当前认证的用户、主题或首选语言。
React.createContext
const MyContext = React.createContext(defaultValue);
Context.Provider
<MyContext.Provider value={/* 某个值 */}>
每个 Context 对象都会返回一个 Provider React 组件,它允许消费组件订阅 context 的变化。
当 Provider 的 value 值发生变化时,它内部的所有消费组件都会重新渲染
多个 Provider 也可以嵌套使用,里层的会覆盖外层的数据。、
Class.contextType
和 static contextType = MyContext;等价.给this.context赋值操作。
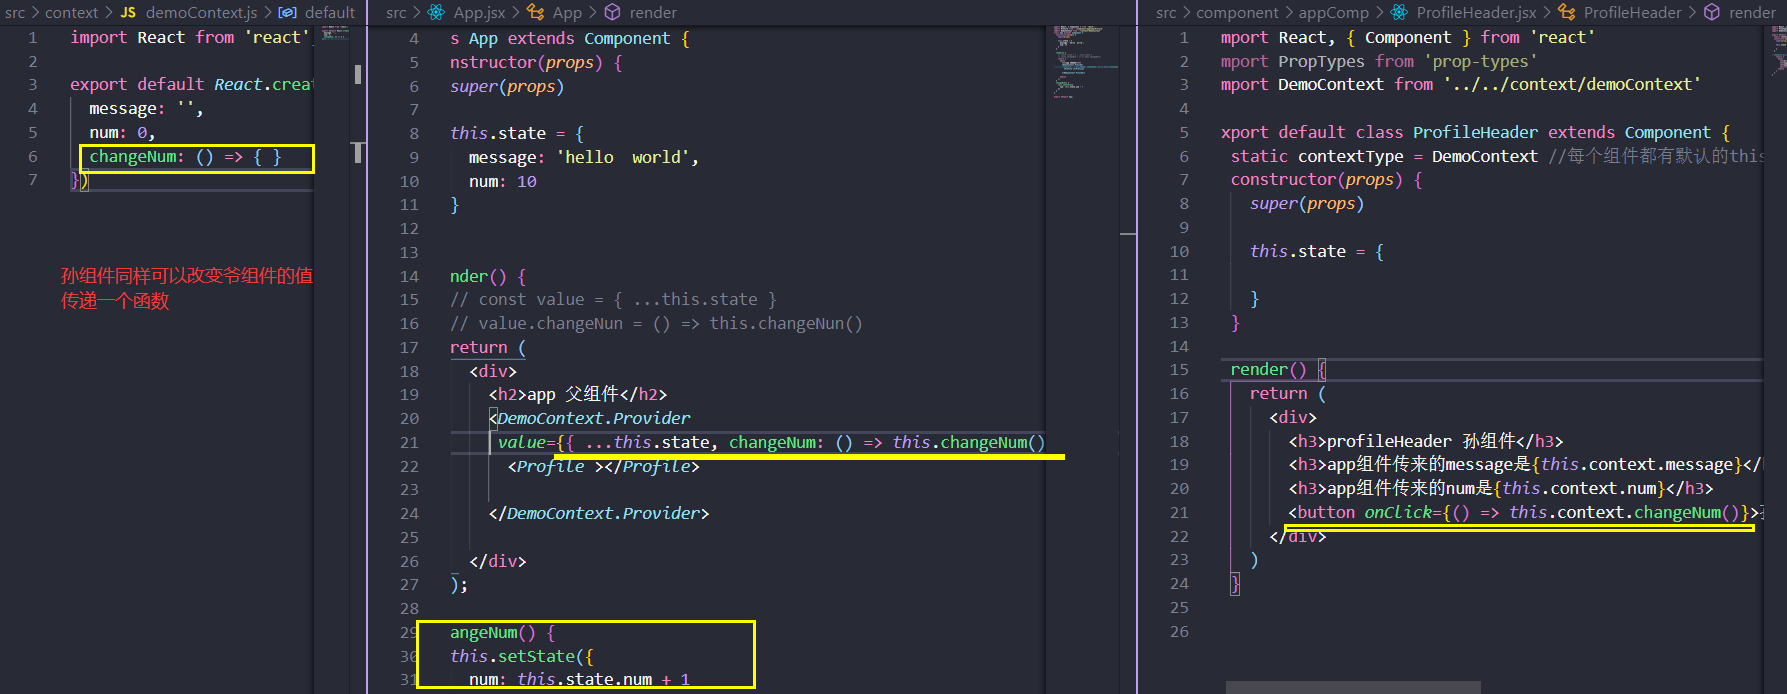
孙组件同样可以改变爷组件的值。传递函数
跨组件事件events
yarn add events

ref
ref等于字符串|对象|函数。但是ref=字符串会被react抛弃。不建议使用
import React, { PureComponent } from 'react'

export default class App extends PureComponent {
  render() {
    return (
      <div>
        //ref="字符串"
        <h3 ref="titleRef">hello world!</h3>
        <button onClick={e => this.changeText()}>ref改变文本</button>
      </div>
    )
  }
  changeText() {
      //获取
    this.refs.titleRef.innerHTML='hello react'
  }


}
import React, { PureComponent, createRef } from 'react'
export default class App extends PureComponent {
  constructor(props) {
    super(props)
    this.titleRef = createRef()

    this.state = {

    }
  }

  render() {
    return (
      <div>
        //ref=一个由createRef函数返回的对象。
        <h3 ref={this.titleRef}>hello world!</h3>
        <button onClick={e => this.changeText()}>ref改变文本</button>
      </div>
    )
  }
  changeText() {
    this.titleRef.current.innerHTML ='hello react'
  }


}
import React, { PureComponent } from 'react'
export default class App extends PureComponent {
  constructor(props) {
    super(props)
    this.titleEl = null

    this.state = {

    }
  }

  render() {
    return (
      <div>
        {/* args是h3dom元素,并且函数在初始化时候就执行 */}
        <h3 ref={args => this.titleEl = args}>hello world</h3>
        <button onClick={e => this.changeText()}>ref改变文本</button>
      </div>
    )
  }
  changeText() {
    this.titleEl.innerHTML = 'hello react'
  }


}
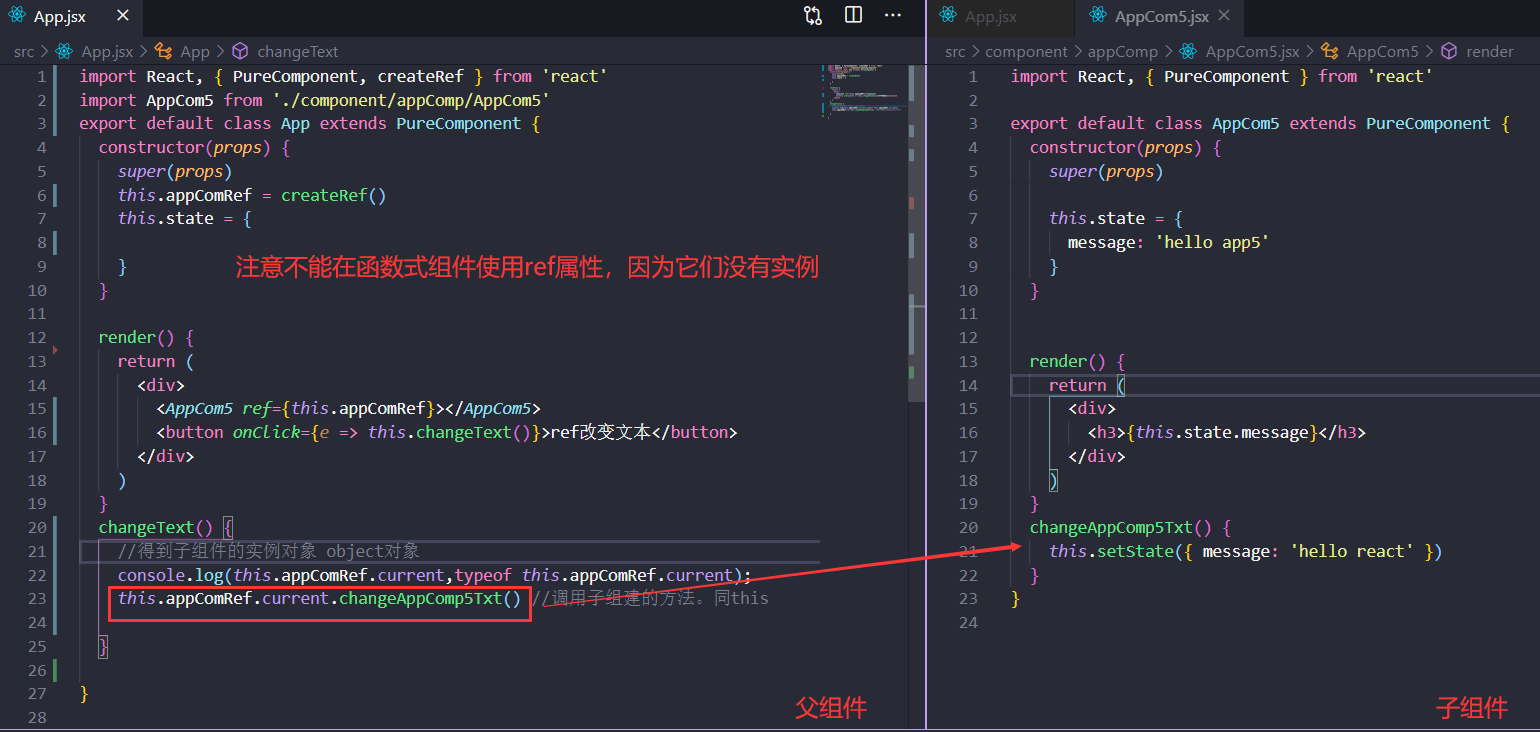
ref转发forwardRef
// 不能再函数式组件上面使用ref 。 要想获取函数式里面的元素 用forwardRef
const SS2=forwardRef(function  (props,ref) {
  return (
    <div>
      <h6 ref={ref}>ss2--{props.a}</h6>
    </div>
  )
})
export default class Son6 extends PureComponent {
  constructor(props) {
    super(props)
    this.h4Ref = createRef()
    this.ss1Ref=createRef()
    this.ss2Ref=createRef()

  }
  render() {
    return (
      <div>
        <h4 ref={this.h4Ref}>son6</h4>
        <SS1 ref={this.ss1Ref}></SS1>
        <SS2  ref={this.ss2Ref} a='10'></SS2>
        <button onClick={e=>this.showRef()}>打印ref</button>
      </div>
    )
  }
  showRef(){
    console.log(this.h4Ref.current);
    console.log(this.ss1Ref.current);
    console.log(this.ss2Ref.current);

  }
}
setState
react里面没有Vue2的Object.defineProperty或者Vue3 proxy监视数据变化。
必须手动调用setState来告知React数据已经发生了改变。
setState是继承过来的方法。
setState异步更新
为什么setState是异步更新?
- 设计为异步,可以显著提高性能。
- 如果设计为同步,每次调用setState都会触发调用render函数,界面将会重新渲染,最好的办法是获取到多个更新,批量更新
- 如果同步更新state,但是还没有执行render函数,render里面有子组件,子组件通过props传值。可能state和props不能保持同步(数据一致性)
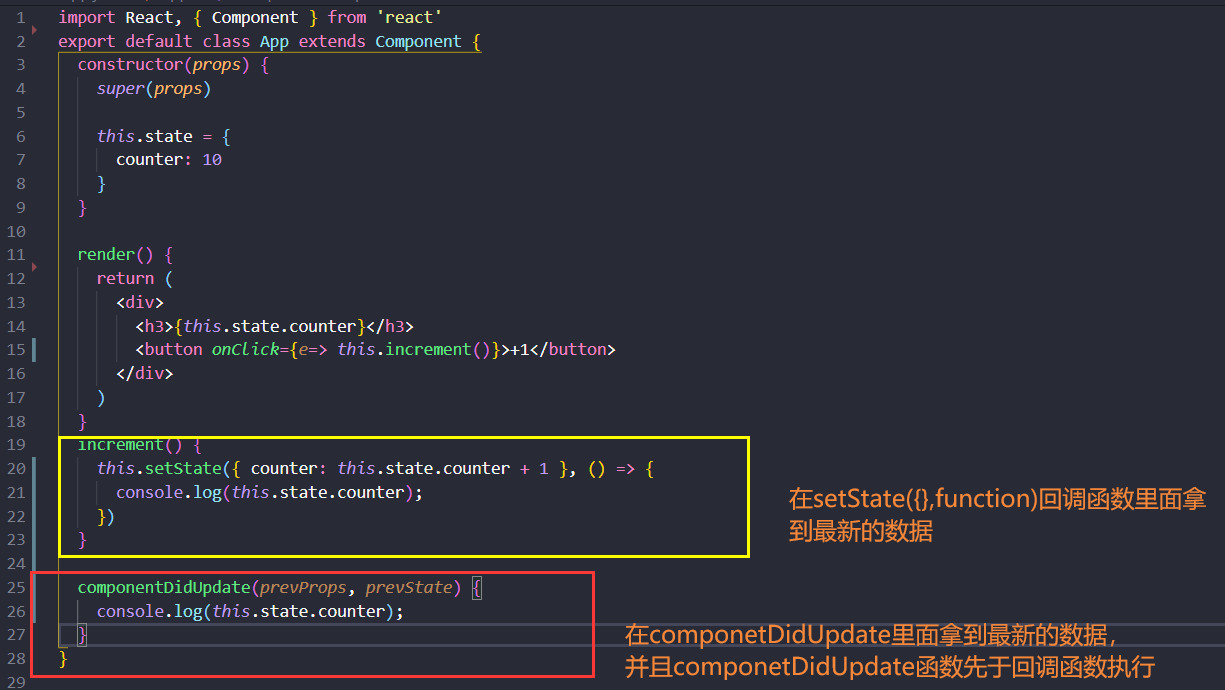
获取到异步更新的数据
两种方式拿到最新的数据:
- setState({},function)回调函数里面拿到最新数据
- componentDidUpdate生命周期函数里面拿到最新数据
设计setState为同步更新方案
setState放入定时器中或者原生DOM事件中,setState将会变为同步
1将setState放入到定时器中执行,setState将会变为同步
 render() {
    return (
      <div>
        <h3>{this.state.counter}</h3>
        <button onClick={e => this.increment()}>+1</button>
      </div>
    )
  }
  increment() {
    setTimeout(() => {
      this.setState({ counter: this.state.counter + 10 })
      console.log(this.state.counter);
    }, 0)
  }
2.在dom原生事件中,setState是同步。
render() {
    console.log('render');
    return (
      <div>
        <h3>{this.state.counter}</h3>
        {/* <button onClick={e => this.increment()}>+1</button> */}
        <button id='btn'>+1</button>
      </div>
    )
  }
  componentDidMount() {
    //原生事件方式1
    document.getElementById('btn').onclick = () => {
      this.setState({ counter: this.state.counter + 10 })
      console.log(this.state.counter);
    }
    // 原生事件方式2
    document.getElementById('btn').addEventListener('click', () => {
      this.setState({ counter: this.state.counter + 10 })
      console.log(this.state.counter);

    })
  }
setState数据的合并
state里面数据是合并的。源码是Object.assign({},this.state,新传入的对象)
setState本身的合并
setState本身合并导致的现象:
render函数只会执行一次。componentDidUpdate回调函数也只会执行一次。
import React, { Component } from 'react';
class App extends Component {
  constructor(props) {
    super(props)

    this.state = {
      num: 10,
      message: 'hello world'
    }
  }
  render() {
    console.log(111);
    return (
      <div>
        <h3>{this.state.num}</h3>
        <button onClick={e => this.changeNum()}>改变num</button>
      </div>
    );
  }
  // setState会被合并,render函数只会执行一次,但是state里面的num变为10+40=50 message变为hello react
  changeNum() {
    this.setState({ num: this.state.num + 10 })
    this.setState({ num: this.state.num + 20 })
    this.setState({ num: this.state.num + 30 })
    this.setState({ num: this.state.num + 40 })
    this.setState({ message: 'hello react' })

  }
}
export default App;
setState不让它本身合并
setState(function)传入函数。注意这个也是异步。
render函数也只会执行一次。componentDidUpdate回调函数也只会执行一次。
但是num是10+10+20+30=70
import React, { Component } from 'react';
class App extends Component {
  constructor(props) {
    super(props)

    this.state = {
      num: 10,
      message: 'hello world'
    }
  }
  render() {
    console.log(111);
    return (
      <div>
        <h3>{this.state.num}</h3>
        <button onClick={e => this.changeNum()}>改变num</button>
      </div>
    );
  }
  // setState会被合并,render函数只会执行一次,但是state里面的num变为10+40=50 message变为hello react
  changeNum() {
    this.setState((preState) => {
      console.log(preState);
      return {
        num: preState.num + 10
      }

    })
    this.setState((preState) => {
      console.log(preState);
      return {
        num: preState.num + 20
      }

    })
    this.setState((preState) => {
      console.log(preState);
      return {
        num: preState.num + 30
      }

    })


  }
}
export default App;
setState传递的是不可变数据
换言之:setState不要改变原始this.state里面的数据。
this.setState()函数执行就会触发shouldComponentUpdate函数执行,只有shouldComponentUpdate函数返回true才会去执行render函数。shouldComponentUpdate返回false,render函数就不会被执行。默认情况下shouldComponentUpdate返回true 所以可以省略直接执行render函数.
  shouldComponentUpdate(nextProps, nextState) {

    if (nextState.friends !== this.state.friends) {
      return true //只有返回true 才会去执行render函数
    }
    return false
  }
React更新机制
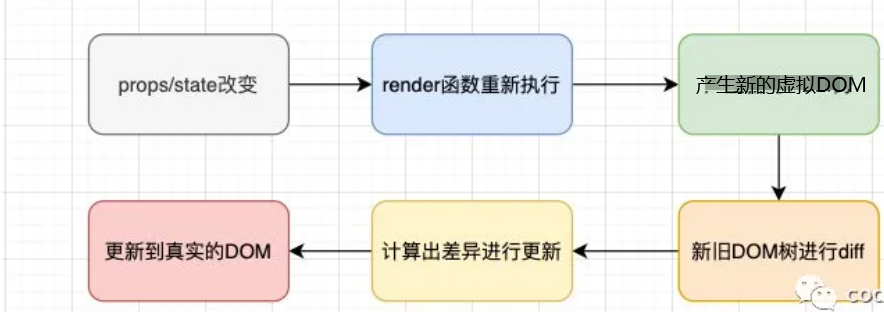

render函数
import { PureComponent } from 'react'
React.PureComponent 中以浅层对比 prop 和 state 的方式来实现了该函数。如果赋予 React 组件相同的 props 和 state,render() 函数会渲染相同的内容,那么在某些情况下使用 React.PureComponent 可提高性能。
PureComponent&&memo
PureComponent对新旧state props进行浅层比较。如果没发生变化,就不会调用render函数
function checkShouldComponentUpdate(workInProgress, ctor, oldProps, newProps, oldState, newState, nextContext) {

  // PureReactComponent 自带isPureReactComponent属性为true
  if (ctor.prototype && ctor.prototype.isPureReactComponent) {
    return !shallowEqual(oldProps, newProps) || !shallowEqual(oldState, newState); //结果返回false 表示不更新  即render函数不会执行
  }

  return true;
}


function shallowEqual(objA, objB) {
  if (Object.is(objA, objB)) { //setState会返回一个新的对象 所以基本上 这个判断进不去
    return true;
  }

  if (typeof objA !== 'object' || objA === null || typeof objB !== 'object' || objB === null) {
    return false;
  }

  var keysA = Object.keys(objA);
  var keysB = Object.keys(objB);
  // 说明setState如果加了新属性或者减少 PureComponent也是会更新的
  if (keysA.length !== keysB.length) {
    return false;
  } // Test for A's keys different from B.


  for (var i = 0; i < keysA.length; i++) {
    // 如果新的没有旧的key 或者新的旧的key对应的value不一样 也是会更新的 比较地址值
    //注意点2: 只是对第一层数据的key进行比较,
    if (!Object.prototype.hasOwnProperty.call(objB, keysA[i]) || !Object.is(objA[keysA[i]], objB[keysA[i]])) {
      return false;
    }
  }

  return true;
}
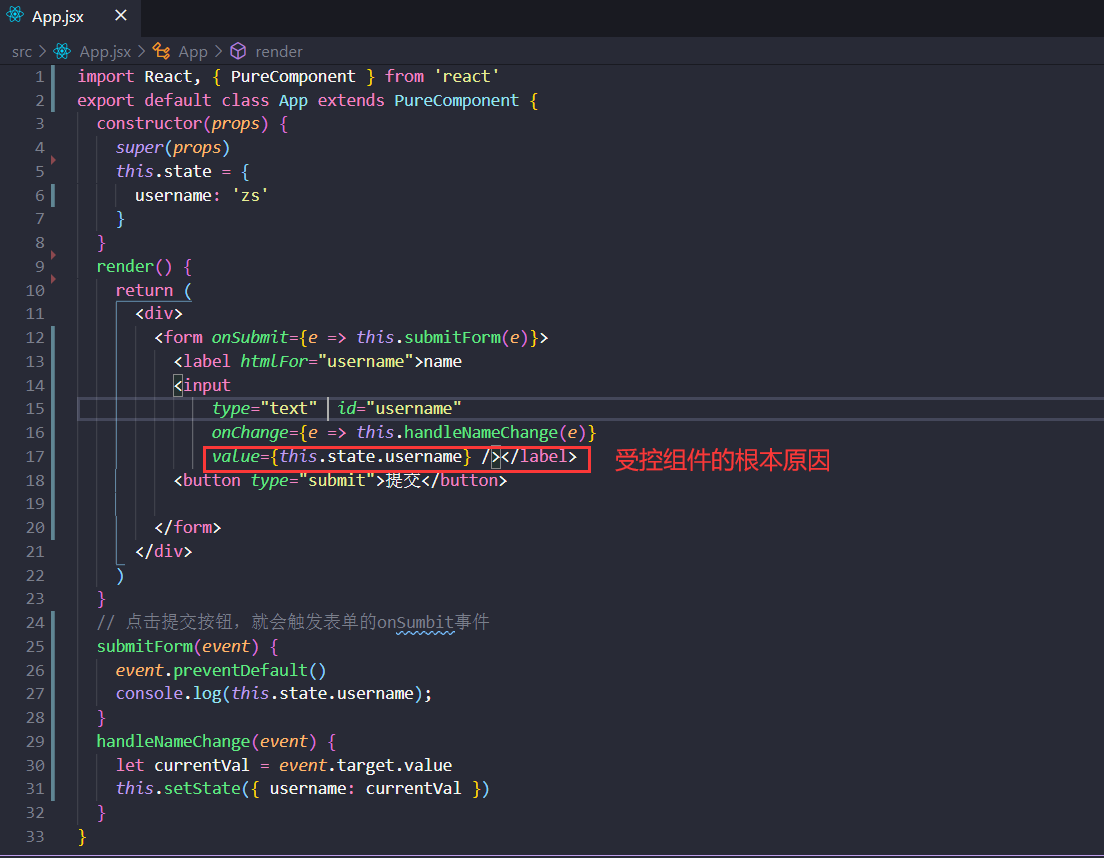
受控组件和非受控组件
受控组件
在 HTML 中,表单元素(如<input>、 <textarea> 和 <select>)之类的表单元素通常自己维护 state,并根据用户输入进行更新。而在 React 中,可变状态(mutable state)通常保存在组件的 state 属性中,并且只能通过使用 setState()来更新。
我们可以把两者结合起来,使 React 的 state 成为“唯一数据源”。渲染表单的 React 组件还控制着用户输入过程中表单发生的操作。被 React 以这种方式控制取值的表单输入元素就叫做“受控组件”
大白话:由于在表单元素上设置了 value 属性,因此显示的值将始终为 this.state.value,这使得 React 的 state 成为唯一数据源。
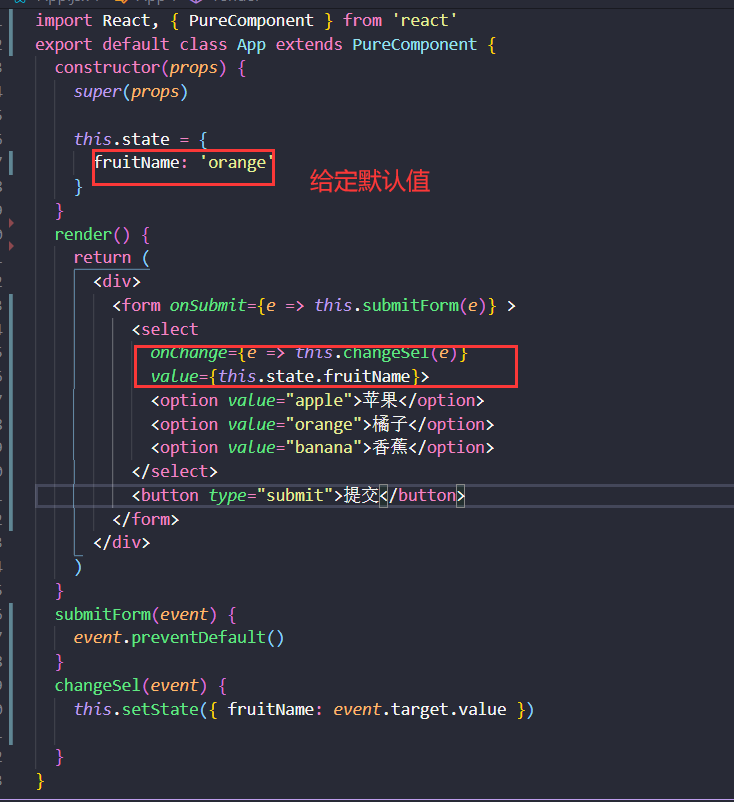
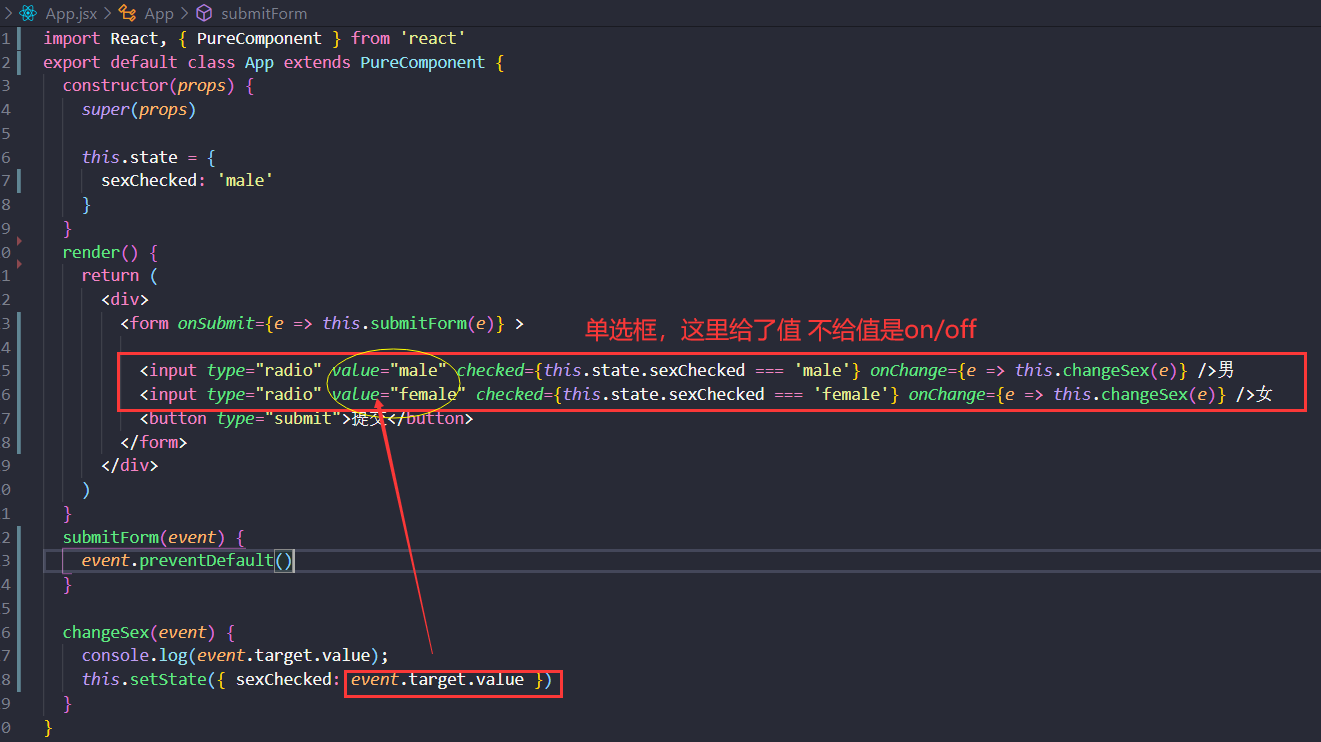
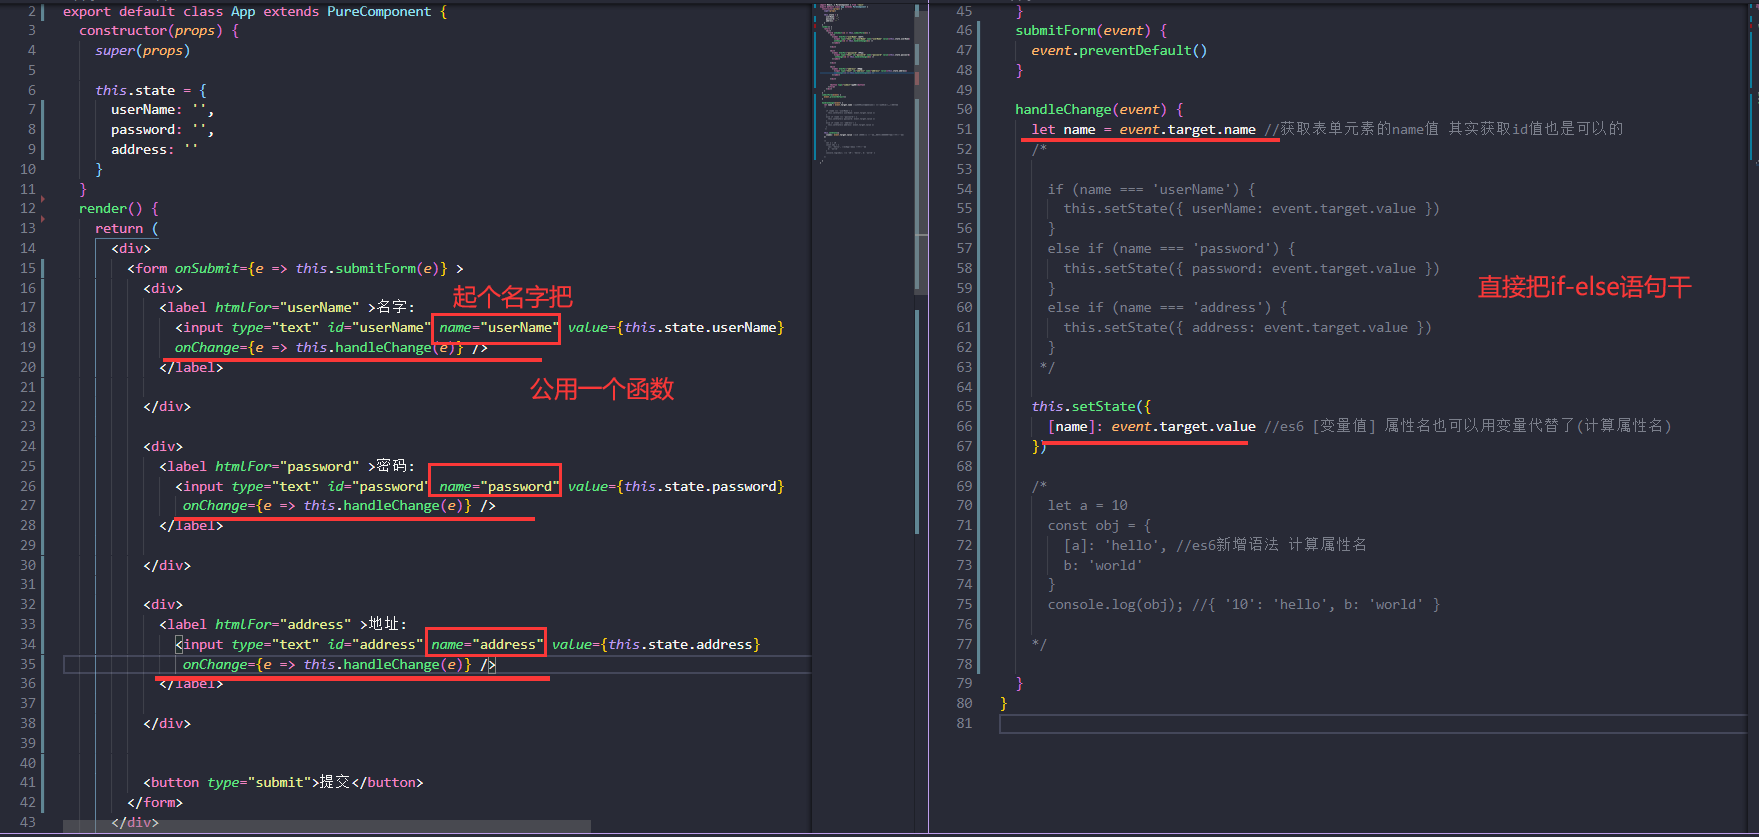
多输入
高阶函数
知识待补充。。。
高阶组件HOC
higher-order Component 高阶组件(HOC)是 React 中用于复用组件逻辑的一种高级技巧。HOC 自身不是 React API 的一部分,它是一种基于 React 的组合特性而形成的设计模式。
高阶组件:高阶组件的参数是组件,返回值是新组件的函数。
注意:高阶组件本身不是一个组件而是一个函数。但是这个函数的参数是一个组件A,返回值也是一个组件B。组件B是组件A的父组件。
const EnhancedComponent = higherOrderComponent(WrappedComponent);
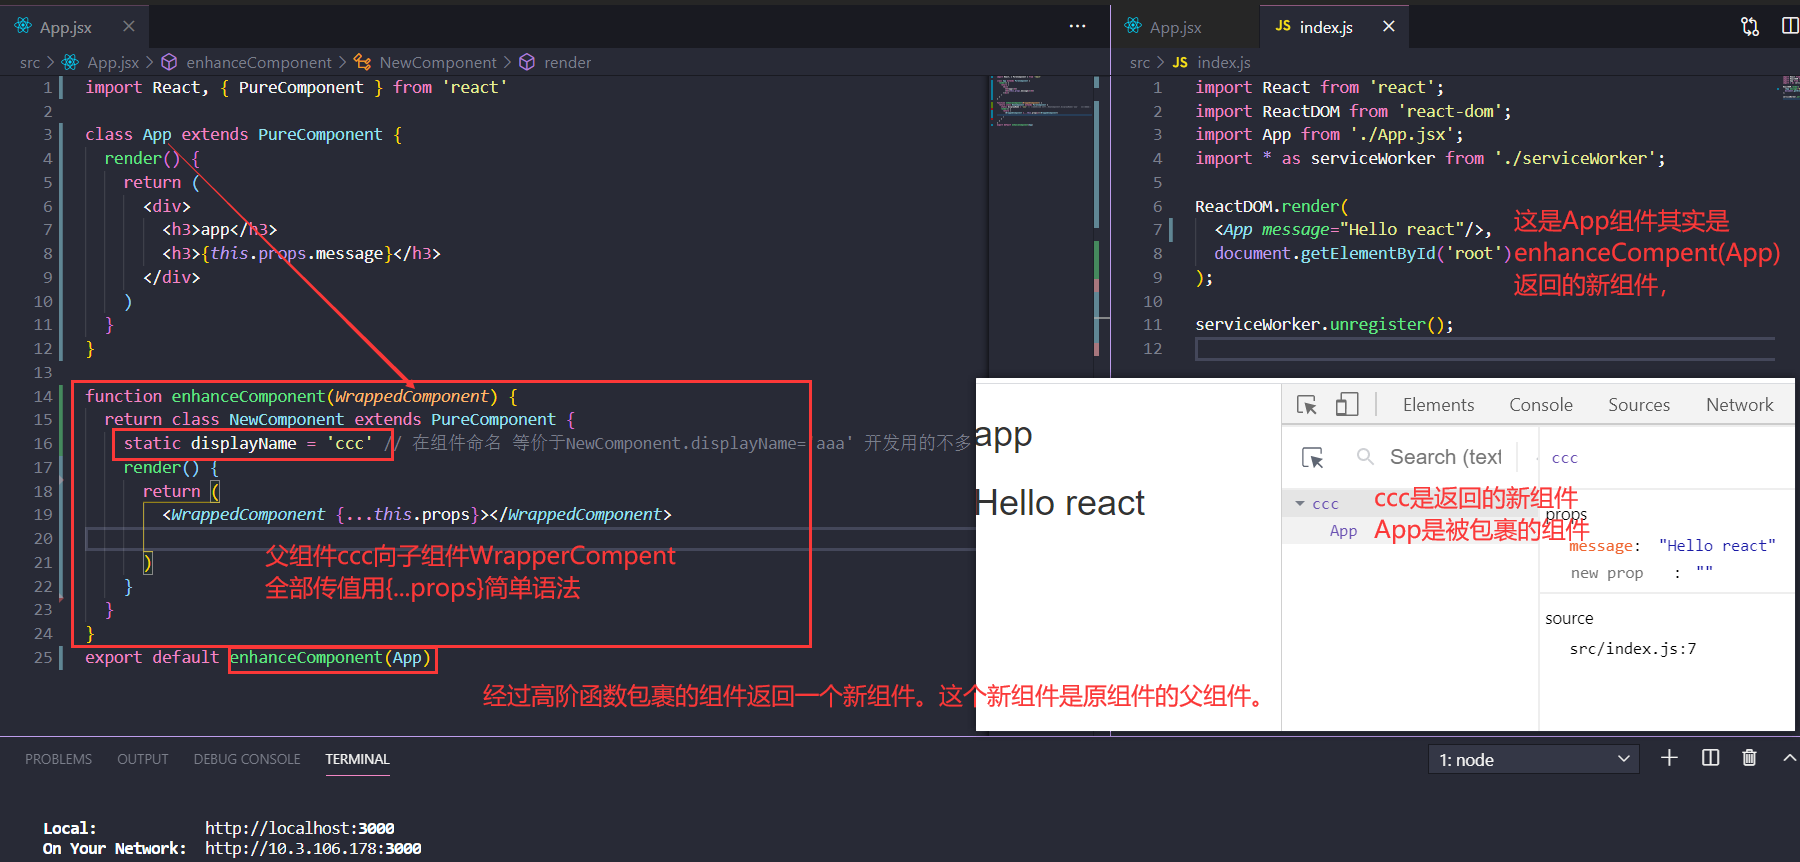
HOC高阶组件
本质就是一个函数highOrderComponent。入参是组件,返回值也是组件。起到了组件劫持的效果
const EnhanceComponent=highOrderComponent(WrapperComponent)
// hoc告诫组件定义形式1 类组件
function enhance(Wrapper) {
  return class EnhanceComponent extends PureComponent {
    render(){
      return (
        <div>
          <Wrapper {...this.props} region='中国'></Wrapper>
        </div>
      )
    }
  }
}

//函数式组件 更清爽不是
function enhance1(Wrapper) {
  return function EnhanceComponent(props) { //进化为箭头函数
    return <Wrapper {...props} region='中国'></Wrapper>  //实现props属性增强。
  }
}
//函数式组件 变形 箭头函数形式
function enhance2(Wrapper){
    return props=>{
        return <Wrapper {...props} regin='中国'></Wrapper>
    }
}
简化Context
原始写法。出现的问题是 Son3|Son4里面代码高度重复。
//Fa.jsx
<UserContext.Provider value={{nickName:'zs',level:90,region:'中国'}} >

          <Son3  ></Son3>
          <Son4 ></Son4>

 </UserContext.Provider>


class Son3 extends PureComponent {
  render() {
    // UserContext.Consumer 比 ContextType 适用性更强  因为UserContext.Consumer在函数式组件和类组件里面都可以使用
    return <UserContext.Consumer>
      {value => {
        return (
          <div>
            <h4>son3 --{value.nickName}---{value.level}---{value.region}</h4>

          </div>
        )
      }}
    </UserContext.Consumer>

  }
}

class Son4 extends PureComponent {
  render() {
    return (
      <UserContext.Consumer>
        {
          user => {
            return (<div>
              <h4>son4 --{user.nickName}---{user.level}---{user.region}</h4>
            </div>)
          }
        }
      </UserContext.Consumer>

    )
  }
}
Hoc增强做法
//fa.jsx 这个不变
<UserContext.Provider value={{nickName:'zs',level:90,region:'中国'}} >

          <Son3  a='1' b='2' ></Son3>
          <Son4 ></Son4>

  </UserContext.Provider>
//精华在这里。 定义一个高阶组件withUser函数************************************************
export function withUser(Wrapper) {
  return props => { //返回的是一个函数式组件
    return <UserContext.Consumer>
      {value => {
        //这里看清楚 是把value属性展开 然后当作props属性来传递的 ==可以的==
        return <Wrapper {...props} {...value}></Wrapper>
      }}
    </UserContext.Consumer>
  }
}

//use
class Son3 extends PureComponent {
  render() {
    return (
      <div>
            //和普通组件使用的毫无感知一摸一样 ,也是props属性增强 写出更加优化的代码。
         <h4>son3 --{this.props.nickName}---{this.props.level}---{this.props.region}</h4>
      </div>
    )

  }
}
export default withUser(Son3) // 高阶函数调用*****************************88
鉴权
判断是否有权限进来这个页面。目的就是为了使用更加优雅 <Son5 isLogin={this.state.isLogin}></Son5>
class LoginPage extends PureComponent {
  render() {
    return (
      <div>
        <h4>去登录页面</h4>
      </div>
    )
  }
}

 class Son5 extends PureComponent {
  render() {
    return (
      <div>
        <h4>son5</h4>
      </div>
    )
  }
}
// use  <Son5  isLogin={this.state.isLogin}></Son5>
function withAuth(Wrapper) {
  return props => { //props就是外面传的自定义属性
    const isLogin = props.isLogin;
    if (isLogin) return <Wrapper {...props}></Wrapper>
    else return <LoginPage></LoginPage>


  }
}
export default withAuth(Son5)
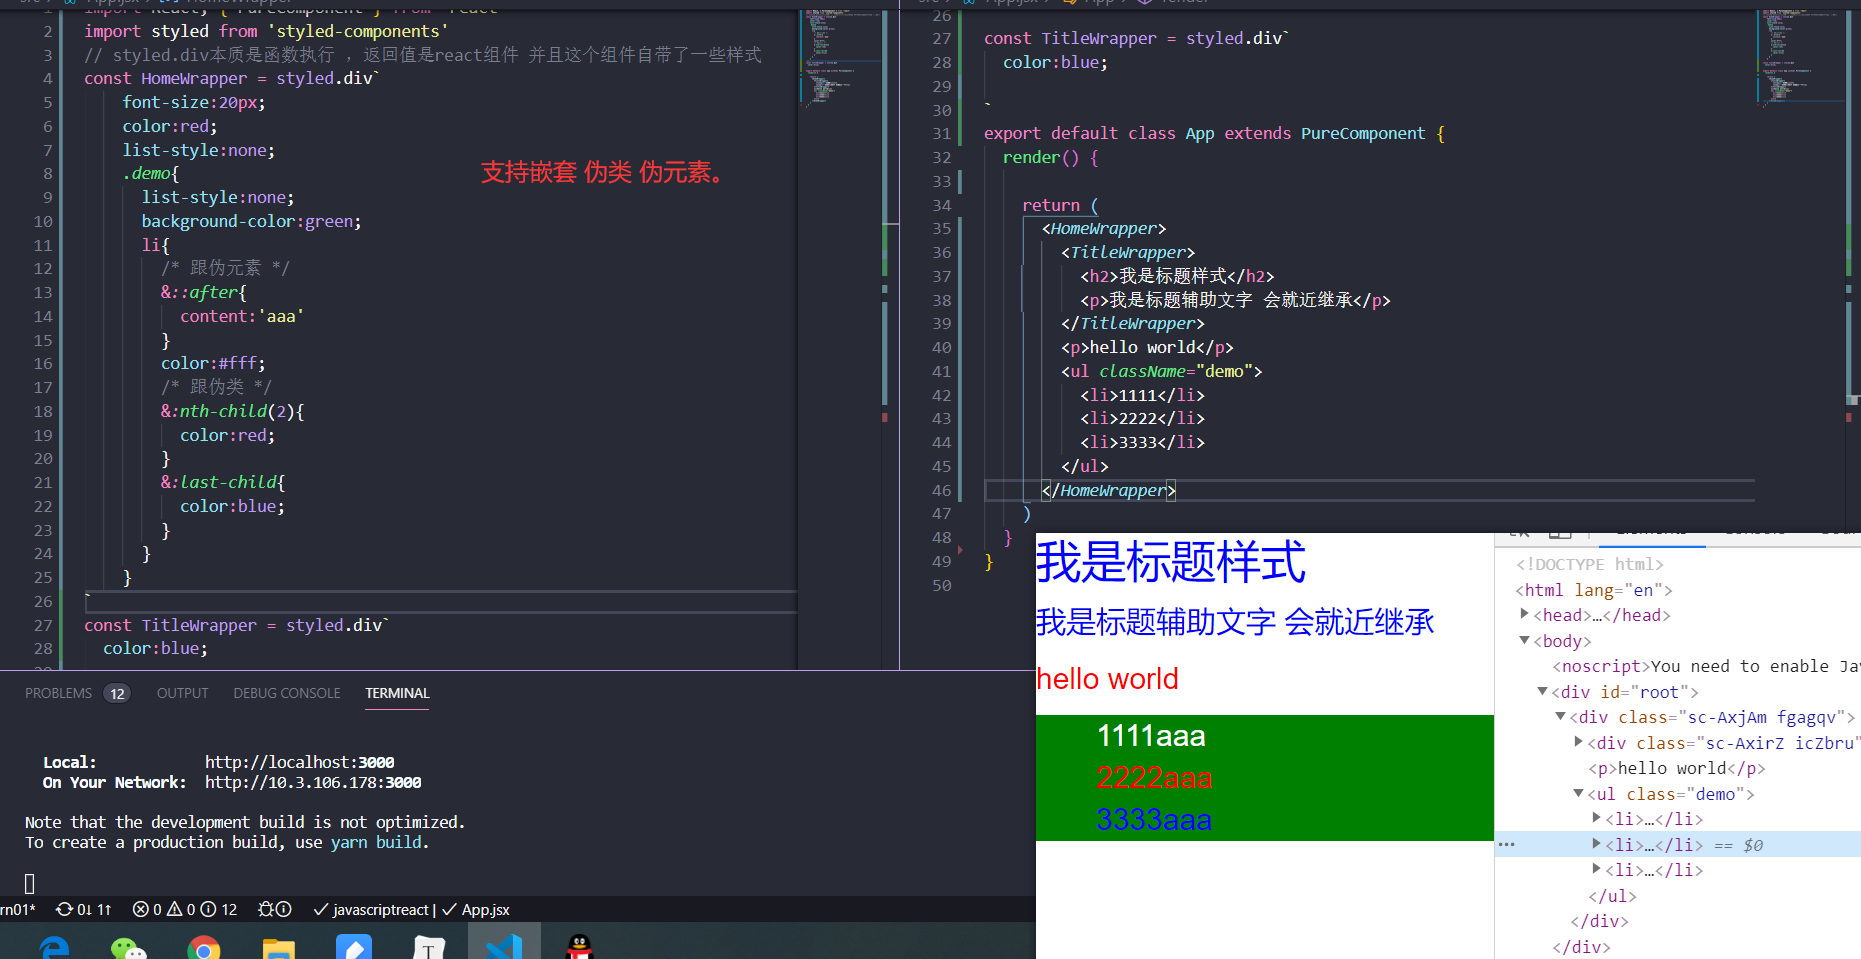
react-css
内联样式
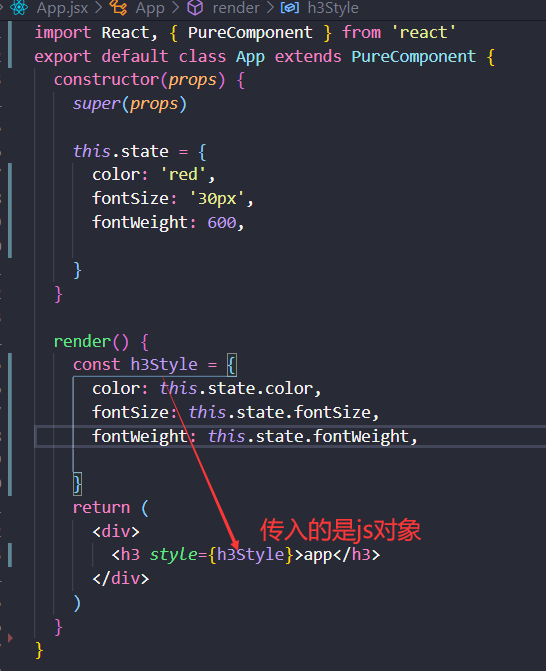
内联样式优点:不同组件之间,样式无论如何都不会发生冲突。可以动态获取到state中的状态。
缺点:写法上需要使用驼峰标识;大量内联样式出现代码混论;伪类和伪元素无法编写


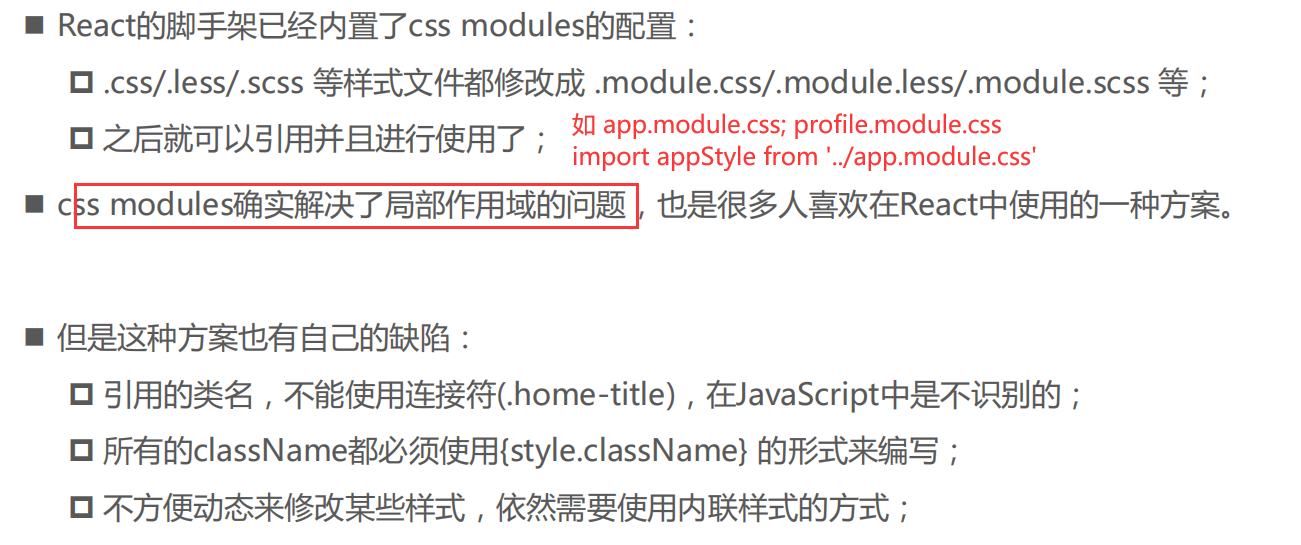
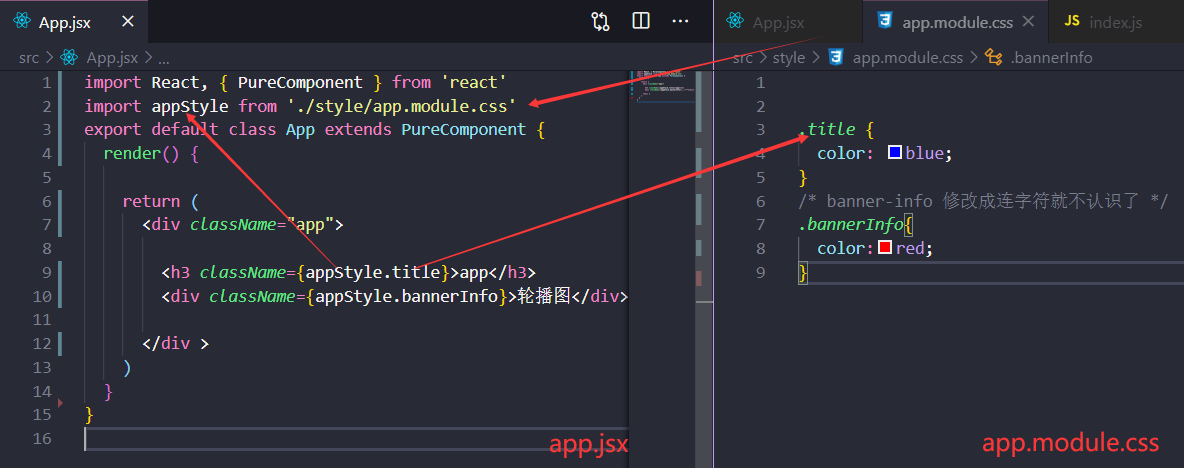
css module
解决各个模块之间,样式不冲突问题。
但是最大的局限是:不能动态使用state状态值。
注意事项:文件命名必须是xxx.module.css;
styled-components
函数调用标签模板字符串
const name = 'zs'
const age = 10
const message = `my name is ${name}, age is ${age}`
console.log(message);

// 标签模板字符串 函数调用标签模板字符串
function foo(...args) {
  console.log(args);

}
foo`${message}` //[ [ '', '' ], 'my name is zs, age is 10' ]
foo`my name is ${name}, age is ${age}` //[ [ 'my name is ', ', age is ', '' ], 'zs', 10 ]
foo`
 font-size:12px;
 color:${props=>props.color};
`
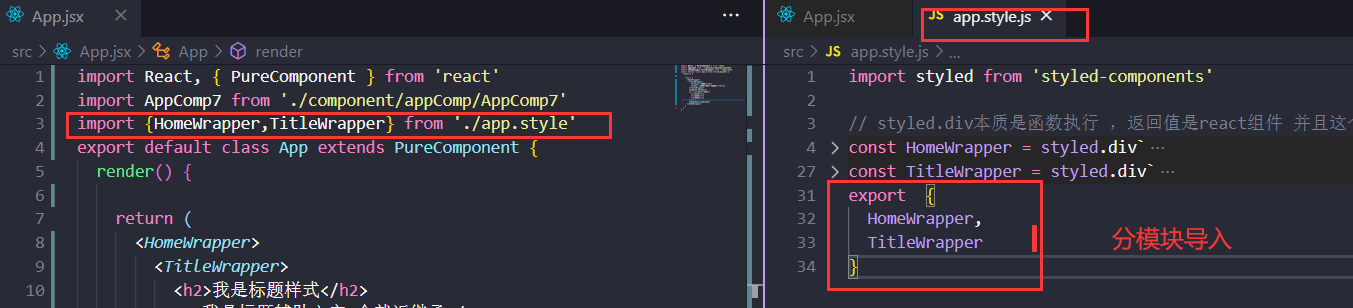
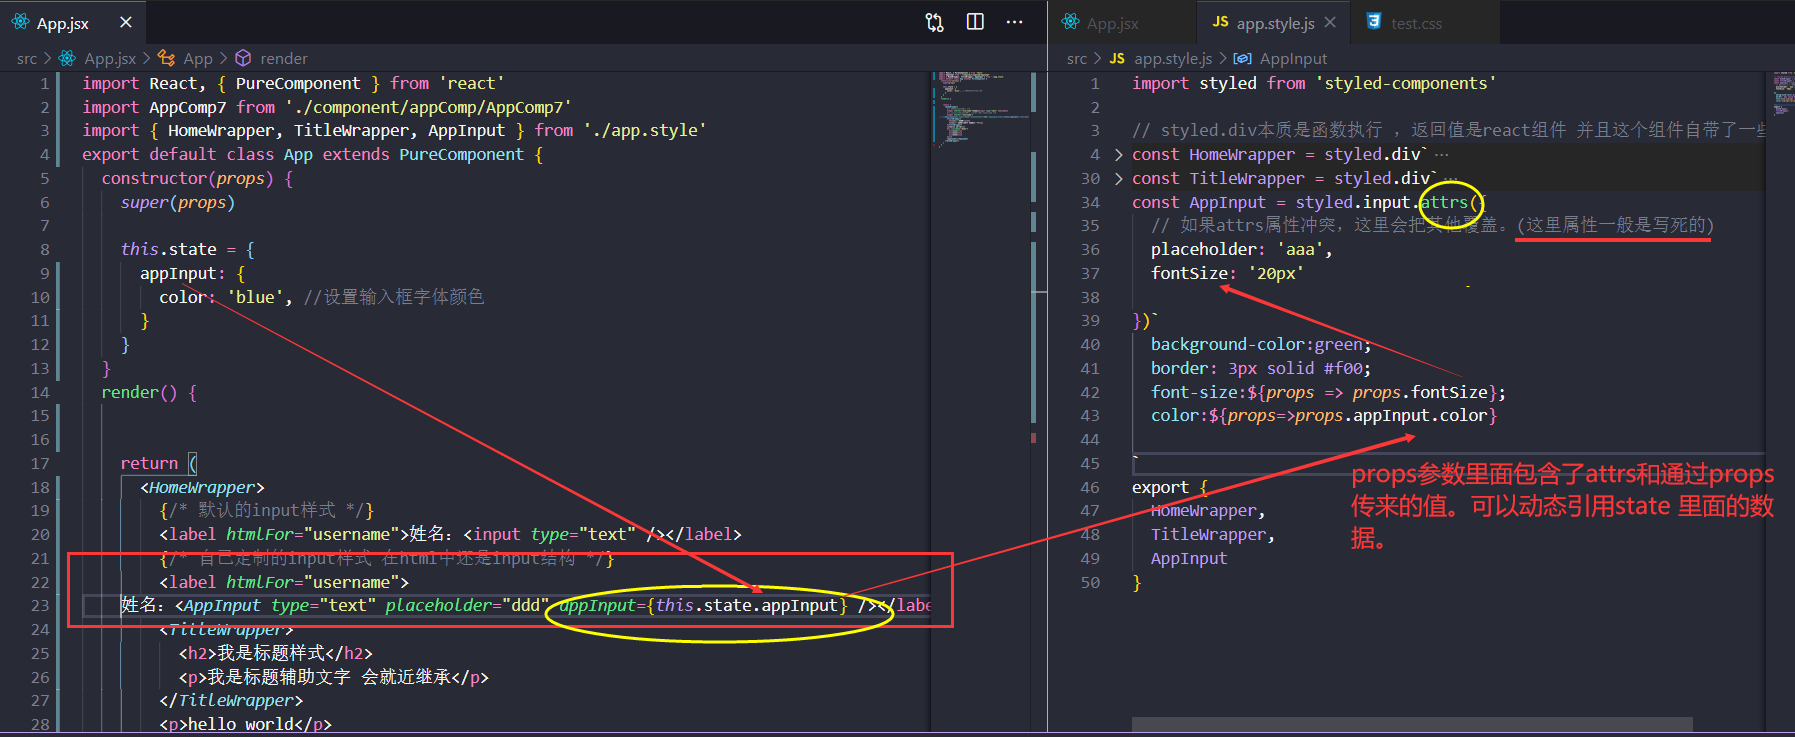
css-in-js一种流行库 yarn add styled-components
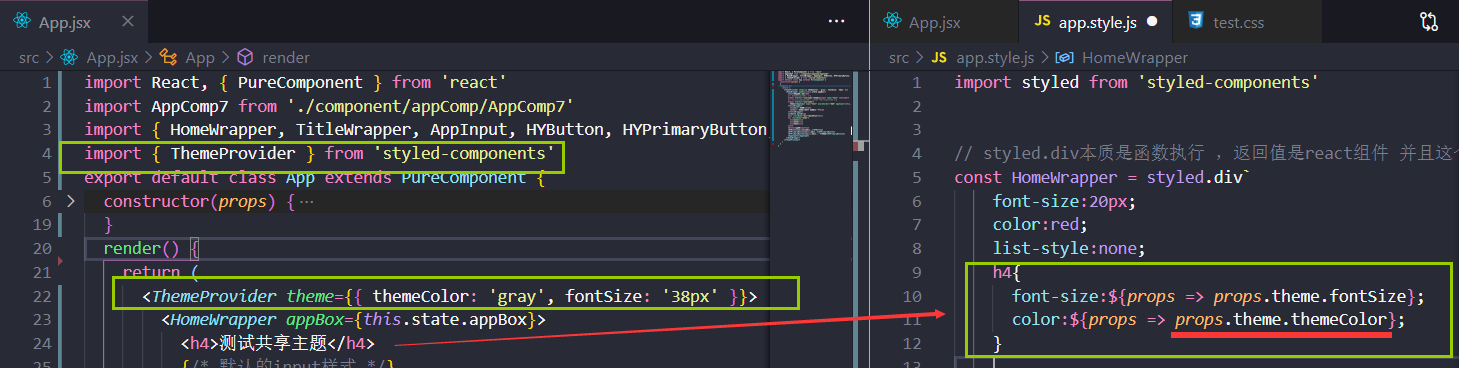
styled.标签 本质是函数执行 ,返回值是react组件 并且这个组件自带了一些样式 。
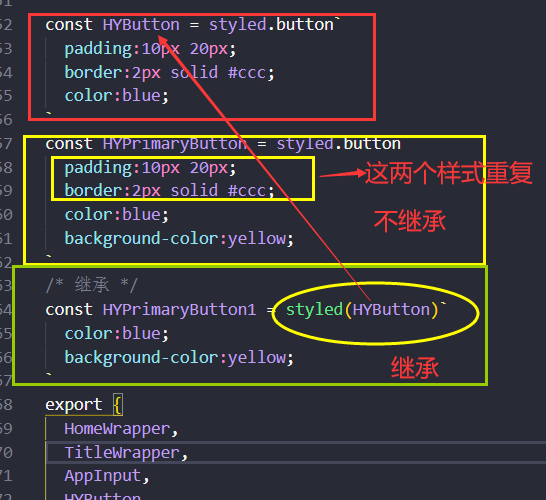
继承(不多)
设置共享样式主题
也就是一些公共样式放在一起
动态添加className
Ant Design of React(antd)
yarn add antd
按需加载
antd 的 JS 代码默认支持基于 ES modules 的 tree shaking。对于js部分,直接引入 import {Button,DataPicker} from "antd"就有按需加载的效果。
craco
https://ant.design/docs/react/use-with-create-react-app-cn
yarn run eject会暴露出来webpack配置进行修改。其实在开发中不建议直接修改webpack配置信息。
yarn add @craco/craco
修改package.json srcipt脚本文件
"scripts": {
    "start": "set PORT=3000 && craco start",
    "build": "set GENERATE_SOURCEMAP=false && craco build",
    "test": "craco test"
  },
修改antd内置主题颜色
1.安装 yarn add craco-less
2.新建 craro.config.js
const CracoLessPlugin = require('craco-less');
module.exports = {
  plugins: [
    {
      plugin: CracoLessPlugin,
      options: {
        lessLoaderOptions: {
          lessOptions: {
            modifyVars: { '@primary-color': '#1DA57A' },
            javascriptEnabled: true,
          },
        },
      },
    },
  ],

}
3.修改主入口文件index.js
// import 'antd/dist/antd.css';
import 'antd/dist/antd.less';
修改项目的别名
//craco.config.js
const CracoLessPlugin = require('craco-less');
const path = require('path');
const resolve = dir => path.resolve(__dirname, dir)

module.exports = {
  plugins: [
    {
      plugin: CracoLessPlugin,
      options: {
        lessLoaderOptions: {
          lessOptions: {
            modifyVars: { '@primary-color': '#1DA57A' },
            javascriptEnabled: true,
          },
        },
      },
    },
  ],
  webpack: {
    alias:{
      "@":resolve("src"),
      "components":resolve("src/components"),
      "assets":resolve("src/assets"),
      "pages":resolve("src/pages")


    }

  }
};
动画
yarn add react-transition-group
react-transition-group主要包含4个内置组件
Transition:用的不多
CSSTransition 过渡效果
SwitchTransition 两个组件的显示和隐藏切换效果
TransitionGroup包裹多个组件
CSSTransition:淡入淡出效果
classNames:自定义类名
unmountOnExit:隐藏是否卸载组件,默认不会卸载,
appear:首次进入是否加入动画,默认是不加的,其实不加动画也可以
render() {
    return (
      <div>
        <Button type="primary" onClick={e => this.change()}>显示/隐藏(透明度opacity改变 scale大小缩放)</Button>

        <CSSTransition in={this.state.isShow} classNames='demo-card' timeout={300} unmountOnExit={true} appear>
          <Card
            style={{  300 }}
            cover={
              <img
                alt="example"
                src="https://gw.alipayobjects.com/zos/rmsportal/JiqGstEfoWAOHiTxclqi.png" />
            }
            actions={[
              <SettingOutlined key="setting" />,
              <EditOutlined key="edit" />,
              <EllipsisOutlined key="ellipsis" />,
            ]}
          >
            <Meta
              avatar={<Avatar src="https://zos.alipayobjects.com/rmsportal/ODTLcjxAfvqbxHnVXCYX.png" />}
              title="Card title"
              description="This is the description"
            />
          </Card>

        </CSSTransition>
        <div>hhhaha</div>
      </div>
    )
  }
//备注 transform-origin: 50% 50%;默认scale缩放是以中心点。但是根据效果可以改比如 transform-origin:0 0;以左上角缩放
.demo-card-enter,.demo-card-appear{
  opacity: 0;
  transform: scale(.6);
}
.demo-card-enter-active,.demo-card-appear-active{
  opacity: 1;
  transition: opacity 300ms, transform 300ms;
  transform: scale(1);

}
.demo-card-enter-done,.demo-card-appear-done{


}

.demo-card-exit{
  opacity: 1;
  transform:scale(1);

}
.demo-card-exit-active{
  opacity: 0;
  transform:scale(.6);
  transition: opacity 300ms, transform 300ms;
}
.demo-card-exit-done{
  opacity: 0;
}
SwitchTransition:组件来回切换效果
SwitchTransition要配合CSSTransition使用。并且使用key
//isOn:true
render() {
    return (
      <div>
        <h4>switchTransition</h4>
        <span>nihioa</span>
        <SwitchTransition mode="out-in">
          <CSSTransition key={this.state.isOn ? 'on' : 'off'} classNames='btn' timeout={600}>
            <Button type="primary"
              onClick={e => this.setState({ isOn: !this.state.isOn })}
            >{this.state.isOn ? 'on' : 'off'}</Button>
          </CSSTransition>
        </SwitchTransition>

      </div>
    )
  }
//SwichTransition效果1

.btn-enter{
  opacity: 0;
}
.btn-enter-active{
  opacity: 1;
  transition:opacity 600ms;
}

.btn-exit{
  opacity: 1;
}
.btn-exit-active{
  opacity: 0;
  transition:opacity 600ms;
}
//SwitchTransition效果2
.btn-enter{
  opacity: 0;
  transform:translateX(100%)
}
.btn-enter-active{
  opacity: 1;
  transform:translateX(0);
  transition:opacity 600ms,transform 600ms;
}

.btn-exit{
  opacity: 1;
  transform:translateX(0)
}
.btn-exit-active{
  opacity: 0;
  transform:translateX(-100%);
  transition:opacity 600ms,transform 600ms;
}
TransitionGroup
TransitionGroup添加列表动画
export default class Son3 extends PureComponent {
  constructor(props) {
    super(props)
    this.state = {
      list: ['zs', 'lisi', 'wangwu']
    }
  }
  render() {
    return (
      <div>
        <h4>son3</h4>
        <button onClick={e => this.addNames()}>addName</button>
          <TransitionGroup>
            {this.state.list.map((v, i) => {
              return (
                <CSSTransition key={i} timeout={300} classNames='demo-item'>
                  <div>{v}</div>
                </CSSTransition>
              )
            })}
          </TransitionGroup>
      </div>
    )
  }
  addNames() {
    this.setState({
      list: [...this.state.list, 'shunzi']
    })
  }
}
.demo-item-enter {
  opacity: 0;
  transform: scale(.6);
  transform-origin:0 0;


}

.demo-item-enter-active {
  opacity: 1;
  transform: scale(1);
  transition: opacity 300ms, transform 300ms;
  transform-origin:0 0;


}

.demo-item-enter-done {
  /* color:red; */
}

.demo-item-exit {
  opacity: 1;
  transform: scale(1)
}

.demo-item-exit-active {
  opacity: 0;
  transform: scale(.6);
  transition: opacity 300ms, transform 300ms;
}

.demo-item-exit-done {
  opacity: 0;
}
纯函数
纯函数:函数返回值只依赖它的参数(不依赖外部变量),并且在函数执行过程中没有任何的副作用。
副作用:是说函数在执行过程中产生了外部可观察变化。
比如:发送HTTP请求;操作DOM;修改外部数据;console.log()输出打印;调用Date.now和Math.random函数。
所有的React组件都必须像纯函数一样,保护它们的props不被修改(不能修改外部数据)。
redux
redux最基本的使用
redux最基本的使用,已经实现了核心 dispatch->reducer->subscribe(callback)
// import redux from 'redux';
import { createStore } from 'redux'

const initialState = {
  counter: 0
}
// reducer  很类似reduce函数啊
function reducer(state = initialState, action) { //state给个默认值
  switch (action.type) {
    case 'INCREMENT':
      return { ...state, counter: state.counter + 1 } //返回新的state
    case 'DECREMENT':
      return { ...state, counter: state.counter - 1 }
    case 'ADD_NUMBER':
      return { ...state, counter: state.counter + action.num }
    case 'SUB_NUMBER':
      return { ...state, counter: state.counter - action.num }

    default:
      return state //如果没有匹配就把state原路返回
  }

}

const store = createStore(reducer)

//订阅在定义dispatch之前   dispatch->reducer->subscribe(callback)
store.subscribe(() => {
  console.log(store.getState());
  console.log(store.getState().counter);
  console.log('------------------------------');
})


//定义action action是普通对象
const action1 = { type: 'INCREMENT' } //递增1
const action2 = { type: 'DECREMENT' } //递减1
const action3 = { type: 'ADD_NUMBER', num: 10 }
const action4 = { type: 'SUB_NUMBER', num: 20 }

//每次派发action,都会触发reducer函数
store.dispatch(action1) //执行reducer
store.dispatch(action2)
store.dispatch(action3)
store.dispatch(action4)
redux目录划分

redux在react里面的简单使用
import React, { PureComponent } from 'react'
import store from './store'
import { subAction } from './store/actionCreators'
export default class S2 extends PureComponent {
  constructor(props) {
    super(props)
    this.state = {
      counter: store.getState().counter //绑定store里面的值
    }
  }
  render() {
    return (
      <div>
        <h4>son2</h4>
        {/* 改变store里面的值 */}
        <button onClick={e => store.dispatch(subAction(20))}>-20</button>
        <h4>{this.state.counter}</h4>
      </div>
    )
  }

  componentDidMount() {
    // store里面的值一旦改变,subscribe里面回调函数执行。执行调用setState保持与store值同步
    this.unsubscribe = store.subscribe(() => {
      this.setState({
        counter: store.getState().counter
      })
    })
  }
  componentWillUnmount() {
    this.unsubscribe() //取消订阅 返回一个函数
  }
}
封装connect函数简化代码
//connect.js
import { PureComponent } from "react"
import store from '../08redux/store'
//react 和connect连接在一起
export function connect(mapStateToProps, mapDispatchToProps) {
  return function enhanceHOC(Wrapper) {
    return class extends PureComponent {
      constructor(props) {
        super(props)
        this.state = {
          storeState: mapStateToProps(store.getState())
        }
      }
      render() {
        return (
          <Wrapper
            {...this.props}
            {...mapStateToProps(store.getState())}
            {...mapDispatchToProps(store.dispatch)} ></Wrapper>
        )
      }
      componentDidMount() {
        this.unsubscribe = store.subscribe(() => {
          this.setState({
            storeState: mapStateToProps(store.getState())
          })

        })

      }
      componentWillUnmount() {
        this.unsubscribe()
      }
    }
  }
}
//use connect
import React, { PureComponent } from 'react'
import { connect } from '../utils/connect'
import { addAction } from './store/actionCreators'

function S1(props) {
  return (
    <div>
      <h4>son1</h4>
      <h4>'state.counter'--????{props.counter}</h4>
      <button onClick={e => props.addTen(10)}>+10</button>
    </div>
  )
}

const mapStateToProps = state => {
  return {
    counter: state.counter
  }
}
const mapDispatchToProps = dispatch => ({ //return简写方式 还是返回一个对象而已
  addTen(num) {
    dispatch(addAction(num))
  }
})
export default connect(mapStateToProps, mapDispatchToProps)(S1) //重点是这里
react-redux
//1使用Provider
import store from './08redux/store'
import { Provider } from 'react-redux'
import App from './08redux/Fa'

ReactDOM.render(
  <Provider store={store}>
    <App />
  </Provider>,

  document.getElementById('root')
);


//2
import React, { PureComponent } from 'react'
// import { connect } from '../utils/connect' //把自己写的注释掉
import {connect} from 'react-redux' //直接用react-redux的connect函数 其他都不变
import { addAction } from './store/actionCreators'

function S1(props) {
  return (
    <div>
      <h4>son1</h4>
      <h4>'state.counter'--????{props.counter}</h4>
      <button onClick={e => props.addTen(10)}>+10</button>
    </div>
  )
}

const mapStateToProps = state => {
  return {
    counter: state.counter
  }
}
const mapDispatchToProps = dispatch => ({
  addTen(num) {
    dispatch(addAction(num))
  }
})
export default connect(mapStateToProps, mapDispatchToProps)(S1)
redux结合异步操作
中间件Middleware
使用中间件:在redux的dispatch和reducer之间,扩展;一些额外的功能。比如异步数据接口,日志,添加代码调试逻辑等
redux-thunk
//store.js/index.js
import { createStore, applyMiddleware } from 'redux'
import thunkMiddleware from 'redux-thunk' //异步请求middleware
import reducer from './reducer'
// 中间件 applyMiddleware(中1,中2,中3)
const storeEnhancer = applyMiddleware(thunkMiddleware)
const store = createStore(reducer, storeEnhancer)

export default store
//store/actionCreators.js 定义getHomeMultiDataAction发送网络请求
import axios from 'axios'
//dispatch是redux-thunk传的参数
export const getHomeMultiDataAction = (dispatch, getState) => {
  // console.log(getState()); 上一次的getState
  axios({
    url: 'http://123.207.32.32:8000/home/multidata'
  }).then(res => {
    const data = res.data.data
    dispatch(changeBannerAction(data.banner.list))
    dispatch(changeRecommendAction(data.recommend.list))
  })

}
//use
import { getHomeMultiDataAction } from './store/actionCreators'
//class组件
 componentDidMount() {
    this.props.getHomeMultiData()

  }

const mapDispatchToProps = dispatch => ({
  //看这里
  getHomeMultiData(){
    dispatch(getHomeMultiDataAction) //看清楚 传入getHomeMultiDataAction函数,而不是将它执行
  }
})
export default connect(mapStateToProps, mapDispatchToProps)(S3)
redux-devtools-extension
调试工具而已
//store.js
import { createStore, applyMiddleware } from 'redux'
import { composeWithDevTools } from 'redux-devtools-extension';
import thunkMiddleware from 'redux-thunk' //异步请求middleware
import reducer from './reducer'
// 中间件 applyMiddleware(中1,中2,中3)
const storeEnhancer = applyMiddleware(thunkMiddleware)
const store=createStore(reducer,composeWithDevTools(storeEnhancer))

export default store
generator结合promise
function* bar() {
  const result = yield new Promise((resolve, reject) => {
    setTimeout(() => {
      resolve(100);
    }, 3000)
  })
  console.log(result); //3000
}
const iter1 = bar()

iter1.next().value.then(res => {
  iter1.next(res)
})
redux-saga 异步请求
其实也是拦截dispatch->reducer中间的步骤加入redux-sage的逻辑
//store.js

import { createStore, applyMiddleware } from 'redux'
import { composeWithDevTools } from 'redux-devtools-extension';
import createSagaMiddleware from 'redux-saga' //异步请求middleware
import reducer from './reducer'
import saga from './saga'
const sagaMiddleware = createSagaMiddleware()


// 中间件 applyMiddleware(中1,中2,中3)
const storeEnhancer = applyMiddleware( sagaMiddleware)
const store = createStore(reducer, composeWithDevTools(storeEnhancer))

sagaMiddleware.run(saga)

export default store
//cpnstansant.js
export const FETCH_HOME_NUMTIDATA= 'FETCH_HOME_NUMTIDATA'

//actionCreators
import {  FETCH_HOME_NUMTIDATA } from './constants'
export const fetchHomeMultiDataAction = {
  type: FETCH_HOME_NUMTIDATA
}
//saga.js
//导出一个生成器函数
import axios from 'axios'
import { takeEvery, put, all, takeLatest } from 'redux-saga/effects'
import { FETCH_HOME_NUMTIDATA } from './constants'
import { changeBannerAction, changeRecommendAction } from './actionCreators'

//自定义迭代器函数
function* fetchHomeNumtiData(action) {
  const res = yield axios({
    url: 'http://123.207.32.32:8000/home/multidata'
  })
  const data = res.data.data
  yield all([
    yield put(changeBannerAction(data.banner.list)),
    yield put(changeRecommendAction(data.recommend.list))

  ])

}
//主函数
export default function* saga() {
  yield takeEvery(FETCH_HOME_NUMTIDATA, fetchHomeNumtiData)


}
//use
import { fetchHomeMultiDataAction } from './store/actionCreators'

const mapDispatchToProps = dispatch => ({

  fetchHomeMultiData(){
    dispatch(fetchHomeMultiDataAction)
  }
})
export default connect(mapStateToProps, mapDispatchToProps)(S3)


componentDidMount() {
    this.props.fetchHomeMultiData()

  }