
有一幅以 m x n 的二维整数数组表示的图画 image ,其中 image[i][j] 表示该图画的像素值大小。
你也被给予三个整数 sr , sc 和 newColor 。你应该从像素 image[sr][sc] 开始对图像进行 上色填充 。
为了完成 上色工作 ,从初始像素开始,记录初始坐标的 上下左右四个方向上 像素值与初始坐标相同的相连像素点,接着再记录这四个方向上符合条件的像素点与他们对应 四个方向上 像素值与初始坐标相同的相连像素点,……,重复该过程。将所有有记录的像素点的颜色值改为 newColor 。
最后返回 经过上色渲染后的图像 。
示例 1:
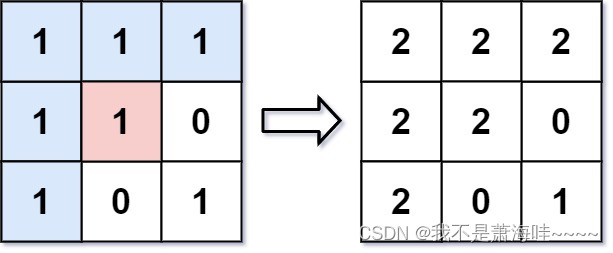
输入: image = [[1,1,1],[1,1,0],[1,0,1]],sr = 1, sc = 1, newColor = 2
输出: [[2,2,2],[2,2,0],[2,0,1]]
解析: 在图像的正中间,(坐标(sr,sc)=(1,1)),在路径上所有符合条件的像素点的颜色都被更改成2。
注意,右下角的像素没有更改为2,因为它不是在上下左右四个方向上与初始点相连的像素点。
示例 2:
输入: image = [[0,0,0],[0,0,0]], sr = 0, sc = 0, newColor = 2
输出: [[2,2,2],[2,2,2]]
提示:
- m == image.length
- n == image[i].length
- 1 <= m, n <= 50
- 0 <= image[i][j], newColor < 216
- 0 <= sr < m
- 0 <= sc < n
主要思路:
利用递归解决+map
这边出现个小问题:自定义结构体作为map时,不知道怎么处理唯一性,我这边出现键值相同的(有待处理)
Code:
class Solution {
public:
    typedef struct pos
    {
        int x;
        int y;
        bool operator < (const pos &o) const
        {

            if((x==o.x)&&(y==o.y))
                return false;

            return true;

        }
    }pos;
    map<pos,int>posMap;
    pair<map<pos,int>::iterator, bool> ret;

    void fss(vector<vector<int>>& image,int x,int y,int num)
    {
        if(x<0)
            return;
        if(x>=image.size())
            return;
        if(y<0)
            return;
        if(y>=image[0].size())
            return;
        if(image[x][y]==num)
        {
            //     cout<<"x="<<x<<" y="<<y<<endl;
            pos p;
            p.x=x;
            p.y=y;
            ret= posMap.insert(pair<pos,int>(p,1));
            if(!ret.second)
            {
                return;
            }
            fss(image,x-1,y,num);//左递归
            fss(image,x+1,y,num);//右递归
            fss(image,x,y-1,num);//上递归
            fss(image,x,y+1,num);//左递归

        }
    }
    vector<vector<int>> floodFill(vector<vector<int>>& image, int sr, int sc, int newColor) {

        int num=image[sr][sc];
        vector<vector<int>>  res;
        fss(image,sr,sc,num);
        map<pos,int>::iterator it;
        for(it=posMap.begin();it!=posMap.end();++it)
        {
            //      cout<<it->first.x<<"++"<<it->first.y<<endl;
            image[it->first.x][it->first.y]=newColor;
        }
        return image;
    }

};