在开始这章之前,先做个说明,从这篇开始,我所使用的xcode更新成了最新的版本,版本是4.6.1(4H512),如下: 
大家可以打开自己电脑上的App Store,然后搜索xcode,第一个出现的就是Xcode,然后直接点击安装就行,很方便且智能,如果你的电脑上有旧版本的xcode,它还会提示你删除,反正整个过程我按住下来还是很容易的。 
另外,从这篇开始,我使用的教程也做了相应的升级,现在使用的教程为  这个大家去搜一下就可以找到,很方便。
好了,其他的没什么不同,下面开始我们这一篇的学习。
1)Storyboard简介 这次学习的内容是在iOS 5的时候才加入的一个新的东西:Storyboard,简单的翻译成“故事版”(好吧,我觉得这个名字蛮挫的),它简化了一些开发app时的一些步骤,例如自动为我们添加必要的delegate/dataSource,在多个view之间的切换,使用图和线连接各个view,让我们能够清晰的看到各个view之间的前后关系。这样的好处是减轻了我们在管理view之前切换时的工作量,能够让我们把更多的注意力集中在具体的功能实现上,然后是我们对整个的app view之间的关系有一个整体的了解。
Storyboard还是基于xib(Xcode's Interface Builder),但是一个Storyboard中又可以包含多个xib,每个xib都一个它自己的controller绑定。好像,下面先举一个简单的例子,来直观的感受一下什么是Storyboard。
2)Create a Simple Storyboard 创建一个project,左边选择Application,右边选择Single View Application,点击Next 
将项目命名为“Simple Storyboard”,然后选中Use Storyboards,单击Next 
找个地方保存新建的项目,完成创建 
在project navigator中,默认帮我们创建的文件有很多都是和之前一样的,有BIDAppDelegate,BIDViewController,但是我们没有发现xib文件,取而代之的是一个MainStoryboard.storyboard,在这个storyboard中,藏着一个系统默认帮我们创建的xib,选中MainStoryboard.storyboard,在editor area中,会出现一个xib,而整个xib的controller文件正是BIDViewController,至此所有默认创建的文件都已经对上号了。 
打开dock,选中View Controller节点并展开,你会发现,在layout area下的一个黑色区域中显示的图标和dock中是一样的,这个黑色区域和上方的view组成了一个场景,叫做scene。(在scene中还有一个Exit,这个就不作介绍了,因为书本里面也是省略的)在view的左边有一个大大的箭头,这个箭头是用来说明该app的起始view是哪个。 
在layout area的右下方有一个小图标 ,这个是用来切换iphone4和iphone5的(我们的这个例子还是基于iphone4的界面)

好了,简单的介绍就到这里,下面继续我们这个例子,从Object library中拖一个Label放到view的中间,双击Label,输入“Simple” 
好了编译运行你的程序,一个最简单的Storyboard app完成了 
当我们使用Storyboard开发app的时候,很多事情程序都会帮我们完成,包括如何载入默认的xib。如果你选中project navigator中的项目名称  在editing pane中你可以找到程序默认载入的storyboard,这里例子中默认的storyboard是MainStoryboard.storyboard
3)Storyboard with UITableViewController 在之前几篇的例子中,我们已经很多次的使用到了UITableViewController,对其操作的方式应该已经很熟悉了,一般是tableview中包含很多个cell,每个cell有一个identifier,创建cell的时候用到的方法是cellForRowAtIndexPath。在storyboard中,还是会用到这些,但是会相对简单一些,下面我们接着上面的例子做下去。
选中Project navigator中的Simple Storyboard文件夹,单击鼠标右键,选择“New File...”,在弹出的窗口中,左边选择Cocoa Touch,右边选择Objective-C class,点击Next按钮,在下一个窗口中将class命名为BIDTaskListController,Subclass of命名为UITableViewController,点击Next按钮,完成创建。 
接着选中MainStoryboard.storyboard,从Object library中拖一个Table View Controller 到layout area
在dock中,选中刚才拖入的Table View Controller(这样能够抱着我们选中的是layout area中整个的Table View Controller)  打开Identity inspector,将Class设置为BIDTaskListController,当设置完成后,dock中的table view会变成Task List Controller
  这样我们新加的TableViewController就和它的类对应起来了,tableview也知道它可以去哪里取得它所需要的数据。
在拖入的Table View Controller上,有一个默认的cell(Prototype Cells),我们可以为其添加identifier,在其上面定制自己的cell样式(注意,我们可以添加任意多个Prototype Cells,每个cell用identifier来区分,定制不同的样式,这里的cell只是一个原型,根据原型cell生成正式的cell,之后会有一个这样的例子)。我们选中整个默认的cell,并打开attributes inspector,找到Identifier,输入plainCell 
然后从object library中,拖一个Label放到原型cell上,Label如何布局看个人爱好,选中Label,在attributes inspector中找到Tag,将其值设为1,这样在code中就可以通过Tag的值找到Label了。 
接着,我们选中整个的cell,你也可以到dock中去选,这样比较准确,然后按Command + D,或者从菜单栏中选择Edit>Duplicate,复制一个cell,这样在table view中就有2个prototype cell了 
(这里有一个非常有用的小技巧,当你想直接在view中选择自己想要的元素时,但是又碍于一个view上叠加的元素太多很难直接选中,那么在这时,你同时按住键盘上的shift和control键,然后在你想选择的元素上点击鼠标,会弹出一个窗口,上面罗列了鼠标点击的位置下所有存在的元素,然后你再去进行选择会变的异常的简单。 例如我在cell中的Label上点鼠标  鼠标点击的位置一共有4个层叠元素
如果我们在cell上点击鼠标  Label不见了,只有三个元素。
这么样,用这样的方法去选择元素很简单吧,还是蛮佩服苹果在细节方面的考虑和设计的。)
选中新加的cell,在attributes inspector中将Identifier赋值为attentionCell 
选中Label,在attributes inspector中将其颜色设置为红色 
好了,对于这个table view的操作全部完成,在开始具体的编写代码之前,还有一件事情,将layout area中的那个大大的箭头移到这个table view上,这样程序在载入的时候默认的会显示这个view 
保存一下MainStoryboard.storyboard,下面开始具体的编码。
打开BIDTaskListController.m文件,你会发现很多常用的方法已经存在: viewDidLoad didReceiveMemoryWarning numberOfSectionsInTableView numberOfRowsInSection cellForRowAtIndexPath didSelectRowAtIndexPath 我们只要直接往这些方法中填代码就可以了,添加如下代码

#import "BIDTaskListController.h"

@interface BIDTaskListController ()
@property (strong, nonatomic) NSArray *tasks;
@end

@implementation BIDTaskListController

......

- (void)viewDidLoad
{
    [super viewDidLoad];

    // Uncomment the following line to preserve selection between presentations.
    // self.clearsSelectionOnViewWillAppear = NO;

    // Uncomment the following line to display an Edit button in the navigation bar for this view controller.
    // self.navigationItem.rightBarButtonItem = self.editButtonItem;

    self.tasks = @[@"Walk the dog",
                   @"URGENT: Buy milk",
                   @"Clean hidden lair",
                   @"Invent miniature dolphins",
                   @"Find new henchmen",
                   @"Get revenge on do-gooder heroes",
                   @"URGENT: Fold laundry",
                   @"Hold entire world hostage",
                   @"Manicure"];
}

......

#pragma mark - Table view data source

- (NSInteger)numberOfSectionsInTableView:(UITableView *)tableView
{
#warning Potentially incomplete method implementation.
    // Return the number of sections.
    return 1;
}

- (NSInteger)tableView:(UITableView *)tableView numberOfRowsInSection:(NSInteger)section
{
#warning Incomplete method implementation.
    // Return the number of rows in the section.
    return [self.tasks count];
}
首先和之前一样,定义一个NSArray类型的tasks,用于保存table view中的行,然后在viewDidLoad中对tasks进行赋值(这里的语法和之前我看到的赋值方法有点不同,越到后面,语句写的越是精炼啊),在numberOfSectionsInTableView中,返回1,表示只有一个section,在numberOfRowsInSection中返回section中row的数量。这些都很简单,接着添加代码
- (UITableViewCell *)tableView:(UITableView *)tableView cellForRowAtIndexPath:(NSIndexPath *)indexPath
{
    static NSString *CellIdentifier = @"Cell";
    UITableViewCell *cell = [tableView dequeueReusableCellWithIdentifier:CellIdentifier forIndexPath:indexPath];

    NSString *identifier = nil;
    NSString *task = [self.tasks objectAtIndex:indexPath.row];
    NSRange urgentRange = [task rangeOfString:@"URGENT"];
    if (urgentRange.location == NSNotFound) {
        identifier = @"plainCell";
    } else {
        identifier = @"attentionCell";
    }
    UITableViewCell *cell = [tableView dequeueReusableCellWithIdentifier:identifier];

    // Configure the cell...

    UILabel *cellLabel = (UILabel *)[cell viewWithTag:1];
    NSMutableAttributedString *richTask = [[NSMutableAttributedString alloc] initWithString:task];
    NSDictionary *urgentAttributes = @{NSFontAttributeName : [UIFont fontWithName:@"Courier" size:24],
                                       NSStrokeWidthAttributeName : @3.0};
    [richTask setAttributes:urgentAttributes range:urgentRange];
    cellLabel.attributedText = richTask;

    return cell;
}
代码一开始定义了一个identifier,然后根据indexPath获得tasks中的task,NSRange可以认为是一个范围或者一种排列,它根据这个范围或者排列到另一个对象去寻找,如果找到了就返回开始的位置,如果没有找到就返回NSNotFound。NSRange的对象urgentRange定义了一个字段“URGENT”,它在task中进行匹配,如果存在,那么这个cell就把plainCell赋给identifier,如果不存在则将attentionCell赋给identifier。然后根据identifier从tableView的方法dequeueReusableCellWithIdentifier中得到相应的cell。
之后的一段是对cell上的label进行操作,还记得刚才我们在attributes inspector中将Label的Tag设置为1了吗?这里就用到了,使用viewWithTag的方法在cell中找到Label,然后对Label进行赋值,之后的一些操作是对特定的字符串“URGENT”进行操作,更改它的字体属性。这些就一笔带过吧,毕竟我们的注意力不是集中在这个上面,对Label操作完后,将其赋给cellLabel,最后返回cell。
好了,编译运行(编译时会有warning产生,这个不用去理会,编译还是会成功,这些warning是告诉你在Storyboard中有xib是没有被使用的,我们的箭头没有指向它且和当前的view又没有联系,所以不会对其进行操作,有warning是正常的),效果如下 
如果task中包含字符串“URGENT”那么将会使用identifier为attentionCell的cell,否则就使用identifier为plainCell的cell。
4)Static Cells 在大部分的情况下,table view中的cell都是需要动态生成了,app运行时,根据source的不同生成不同数量或者样式的cell,但是在某些情况下,我们可以事先知道将要生成的cell是什么样子的,且它是固定不变的,我们把这样的cell称之为Static Cells,与其对应的则是dynamic cell。在这里我们举一个简单的例子来说明这种情况。
我们不用创建一个新的project,直接在上面的程序中接着添加代码。选中Project navigator中的Simple Storyboard文件夹,单击鼠标右键,选择“New File...”,在弹出的窗口中,左边选择Cocoa Touch,右边选择Objective-C class,点击Next按钮,在下一个窗口中将class命名为BIDStaticCellsController,Subclass of命名为UITableViewController,点击Next按钮,完成创建。 
选中MainStoryboard.storyboard,再从Object library中拖一个Table View Controller到layout area,就放在原有2个view的右边,接着将箭头指向这个新添加的view  图中最右边的是新添加的view,这些view看上去比较小,是因为我了layout area右下角的
 ,这样可以方便观察每一个view(当然在缩小的状态下,是没有办法对view进行操作的,只能移动其位置,要操作view,必须将view放大回正常的大小)
选中刚才添加的controller中的table view,打开attributes inspector,找到Content,在其下拉框中选择“Static Cells”,找到Style,在其下拉框中选择“Grouped” 
table view的样式也随之发生了变化,出现了3行row,section的样式变成了一个圆角矩形 
选中section,在其attributes inspector设置如下,Rows改为2,Header中填写“Silliest Clock Ever” 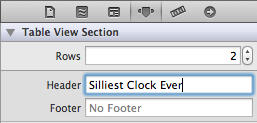
改完后的section 
下面对2个cell进行设置,选中第一个cell,在attributes inspector中将其Style设置为“Left Detail” 
 然后双击Title,改成“The Date”,重复上面的步骤,将第二个cell的Title改成“The Time”,改完后的效果
之后,我们将创建两个outlet对象,分别指向2个Detail,这样在app运行后,就可以改变它们的值了。
现在先关联这个table view controller和它的类,在dock中选中Table View Controller,然后打开identity inspector,在Class中输入“BDIStaticCellsController”,dock中的名字也随之发生改变 
还是在dock中选中controller的状态下,将Editor的模式设置成Assistant editor ,这样BIDStaticCellsController.h文件会打开(如果打开的不是这个文件,那么就手动打开吧),选中第一个cell中的Detail,然后control-drag到BIDStaticCellsController.h中并释放,会弹出个窗口,将Name命名为“dateLabel”
对第二个cell中的Detail进行相同的操作,将Name命名为“timeLabel”,添加完成后的BIDStaticCellsController.h
#import <UIKit/UIKit.h>

@interface BIDStaticCellsController : UITableViewController
@property (weak, nonatomic) IBOutlet UILabel *dateLabel;
@property (weak, nonatomic) IBOutlet UILabel *timeLabel;

@end
下面开始编写代码,打开BIDStaticCellsController.m,先将下面三个方法删除
- (NSInteger)numberOfSectionsInTableView:(UITableView *)tableView
{
#warning Potentially incomplete method implementation.
    // Return the number of sections.
    return 0;
}

- (NSInteger)tableView:(UITableView *)tableView numberOfRowsInSection:(NSInteger)section
{
#warning Incomplete method implementation.
    // Return the number of rows in the section.
    return 0;
}

- (UITableViewCell *)tableView:(UITableView *)tableView cellForRowAtIndexPath:(NSIndexPath *)indexPath
{
    static NSString *CellIdentifier = @"Cell";
    UITableViewCell *cell = [tableView dequeueReusableCellWithIdentifier:CellIdentifier forIndexPath:indexPath];

    // Configure the cell...

    return cell;
}
因为我们使用的是static cell,因此table view中section的数量,section中cell的数量都是固定不变的,我们也不需要从新创建cell,cell一共才2个,会一直显示在屏幕上。
接着添加下面的代码
- (void)viewDidLoad
{
    [super viewDidLoad];

    // Uncomment the following line to preserve selection between presentations.
    // self.clearsSelectionOnViewWillAppear = NO;

    // Uncomment the following line to display an Edit button in the navigation bar for this view controller.
    // self.navigationItem.rightBarButtonItem = self.editButtonItem;

    NSDate *now = [NSDate date];
    self.dateLabel.text = [NSDateFormatter
                           localizedStringFromDate:now
                           dateStyle:NSDateFormatterLongStyle
                           timeStyle:NSDateFormatterNoStyle];

    self.timeLabel.text = [NSDateFormatter
                           localizedStringFromDate:now
                           dateStyle:NSDateFormatterNoStyle
                           timeStyle:NSDateFormatterLongStyle];
}
在viewDidLoad中,分别对dateLabel和timeLabel进行了设置,至于NSDate和NSDateFormatter的说明大家就去google一下吧,这里不做详细解释了。
编译运行,效果如下 