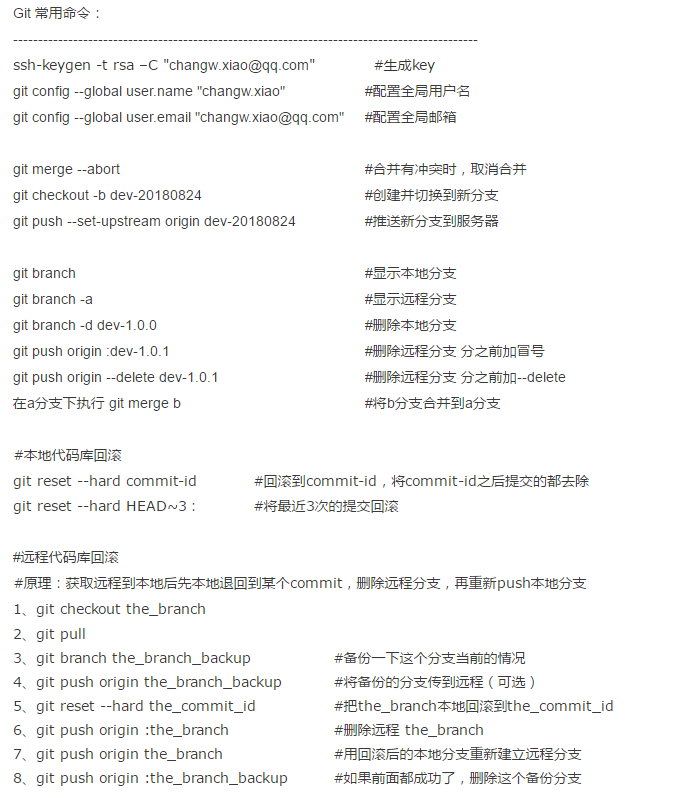
继上次保存了git 多个key共存配置(https://www.cnblogs.com/xiaochangwei/p/9155195.html)后,今天把常见的git命令备份下(最近我的云笔记账号经常出问题)
下面是解决基本的冲突办法
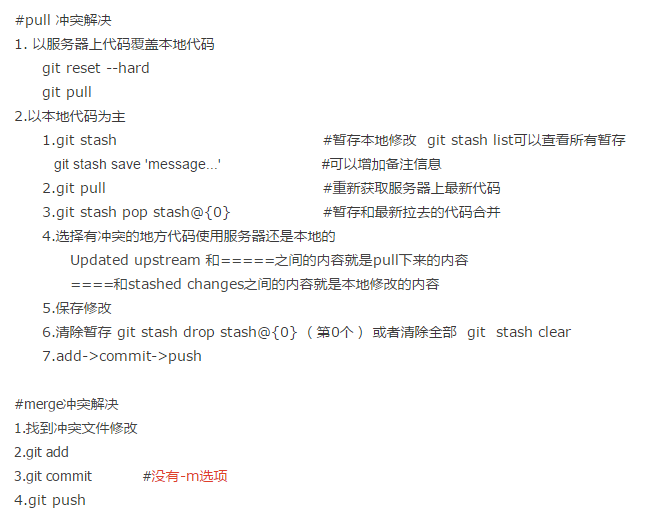
遇到冲突要冷静,如果不确定怎么操作是对的,就请教周围的高手,退一万步来说,先把自己的本地代码打包备份再说下一步.....
曾经一个年少 ”无知” 的刚毕业的同事,pull代码冲突了,自己不知道怎么操作了,就瞎搞一通,后来搞不定了求助于我,我一看,怎么远程分支都被删了!!! 晕!
请教别人各类问题并没啥,脸皮厚 吃个够 O(∩_∩)O哈哈~
##############################GIT 使用#########################
#1.generate ssh-key and config on gitlab
ssh-keygen -t rsa -f ljkj028Key -C "myLjkj028Key"
#-f :use custom fileName default name is [id_rsa]
#-C :to remark this key in order to distinguish to other key
#such as: ssh-keygen -t rsa -C "ljkj028Key"
# and if you used -f and not the default file name,you should do more work following:
#a:open ssh-agent through [ssh-agent -s] if you use github bash or use [eval $(ssh-agent -s)] if you use other bash
#b:add private key through [ssh-add ~/.ssh/ljkj028Key]
#then you can use git to clone code from the gitlab which you public key configured
#if you has more than one pulic key for different gitlab, you should config it at file named config
Host git.ljkj028.com
HostName git.ljkj028.com
PreferredAuthentications publickey
IdentityFile ~/.ssh/ljkj028Key
User ljkj028
Host github.com
HostName github.com
PreferredAuthentications publickey
IdentityFile ~/.ssh/githubKey
User xiaochangwei
#notice: you should do [ssh-add ~/.ssh/ljkj028Key] for each key
#2.全局信息设置
git config --global user.name "xiaochangwei"
git config --global user.email "changw.xiao@qq.com"
#项目克隆与提交
#3.1克隆项目到新目录修改并提交
git clone git@gitee.com:xiaochangwei/testCode.git
cd testCode
touch README2.md
git add README2.md
git commit -m "add README2"
git push -u origin master
#3.2.将本地未和任何仓库关联的代码推送到远程仓库
cd myLocalDir
git init
git remote add origin git@gitee.com:xiaochangwei/testCode.git
git pull git@gitee.com:xiaochangwei/testCode.git master
touch t.txt
git add .
git commit -m "Initial commit"
git push -u origin master
#3.3.将本地已经和其它仓库关联的代码推送到新仓库
cd myLocalDir
git remote rename origin old-origin
git remote add origin git@gitee.com:xiaochangwei/ci-demo.git
git pull git@gitee.com:xiaochangwei/ci-demo.git master
#注意是否有冲突
git push -u origin --all
git push -u origin --tags
#########normal develop##########
git checkout develop
#each developer checkout one or more feature to develop
git checkout -b sprintXfeatureX
#sprintXfeatureX related develop complete and passed developer self test
git add .
git commit -am "sprintXfeatureX completed"
#git push -u origin sprintXfeatureX (可以只在本地保留分支信息,不推送到远端)
#merge to develop and tell testers that they can start work
git checkout develop
git pull
git merge sprintXfeatureX
git push
#after this sprint onlined, you can delete functional branch. However, it is suggested that branches be retained more than half a year.
#git push origin :sprintXfeatureX
#git branch -d sprintXfeatureX
#testers start work
#testers shoud clone a new branch from develop at the each sprint start
git checkout dev
git checkout -b releaseSpringX
#if has cloned the releaseSpringX
git checkout releaseSpringX
git merge develop
git push
#if there is some bug, developer shoud checkout a new branch from releaseSpringX
git checkout releaseSpringX
git checkout -b releaseSpringXBug01
#do something
git add .
git comit -am "Bug01 fixed";
#git push -u origin releaseSpringXBug01(可以只在本地保留分支信息,不推送到远端)
#notice tester merge code to releaseSpringX bug
git checkout releaseSpringX
git pull
git merge releaseSpringXBug01
git push
#after passed test, tester merge releaseSpringX to master && develop and give a tag
git checkout master
git merge releaseSpringX
git push
git tag releaseSpringX OR git tag -a releaseSpringX -m 'SpringX external release' OR git tag -a releaseSpringX CommitID
git push origin releaseSpringX OR git push origin --tags
git checkout develop
git merge releaseSpringX
git push
#search and view tag detail
git tag OR git tag -l 'releaseSpringX*'
git show releaseSpringX
#and also you can delete local and remote tag same as branch operation
git tag -d releaseSpringX
git push origin :releaseSpringX
#########when online bug need fix##########
git checkout master
git checkout -b hotfix01
#do sth
git add .
git commit -am "hotfix01 fixed"
#git push -u origin hotfix01 (可以只在本地保留分支信息,不推送到远端)
#test passed at hotfix01
git checkout master
git pull
git merge hotfix01
#merge hotfix01 code to branch develop
git checkout develop
git pull
git merge hotfix01
git push
#delete branch hotfix01(local&remote)
git branch -d hotfix01
git push origin :hotfix01 or use: git push origin --delete hotfix01
#when the tester encountered conflict at the operation of pull or merge, it must be confirm with developer which one is correct
#查看最近n次提交日志且以单行显示
git log -n --oneline
#######撤销与恢复某些文件#############
#conflict and reset
#如果你只是修改了文件而且还没有用git add将修改加入提交,想恢复到修改之前
git checkout -- t.txt
#可以模糊匹配
git checkout -- '*.txt'
#如果已经通过 git add t.txt 将修改了的文件加入了提交
git reset HEAD -- t.txt
#如果要恢复到某个已经commit的版本
git reset commitID -- fileName
#这时候commitID对应的文件已经放到了暂存区,需要checkout到工作区
git checkout fileName
#修改后add commit push
#checkout后,之前工作区的内容将被覆盖,工作区和暂存区的内容均为commitID对应的
##########恢复整个分支到某一历史版本#################
#通过git log判断某个commitID是属于哪一个分支
git branch -r --contains 4560a9f
#恢复之前一定要备份当前分支并确定CommidID属于当前分支,否则会恢复到其它分支,
#!!!恢复后历史版本后的提交记录都将不存在,【但之前打的tag是存在的】
git reset --hard d7ed38b
git push -f -u origin master
##########拉取某个tag###########
#可以通过git checkout tagName 获取指定tagName处的代码,获取之后分支号显示为:((tagName))
#但当前指针处在分离头指针状态,这个时候的修改是很危险的,在切换回主线时,之前的修改提交基本都会丢失
#在add commit之后 分支号显示为:((CommitID))
#这时候是无法push的,因为未和任何分支关联
#git也会提示根据commitID创建分支来进行操作 git branch <new-branch-name> CommitID
#所以一般都基于tagName来新建一个分支,修改完毕后合并到某个分支,但合并时需要注意别让旧代码覆盖了新代码
git checkout -b newBranch tagName
#######同步所有信息###########
git fetch origin
#####查看remote 地址######
git remote -v
git@gitee.com:xiaochangwei/merge.git
git@gitee.com:xiaochangwei/rebase.git
#############分支合并###############
1.从develop拉取开发分支
git checkout develop
git checkout -b feature01
2.开发....
3.git add .
4.git commit -am "remark"
#获取develop最新代码,并本地合并测试
git checkout develop
git pull
git checkout feature01
git rebase -i HEAD~2 ---->合并提交 --- 2表示合并两个
#将本地的多次提交合并为一个,以简化提交历史。本地有多个提交时,如果不进行这一步,在git rebase develop时会多次解决冲突(最坏情况下,每一个提交都会相应解决一个冲突)
git rebase develop ---->解决冲突--->git rebase --continue
#合并develop的最新代码后自测通过
#合并代码到develop
git checkout develop
git merge feature01
git push
#如果有冲突且没使用git rebase -i,则冲突是一个一个报出来,不像merge一次性全部报出来
#所以解决了一个冲突后需要执行下列命令,继续rebase ,故推荐使用git rebase -i
git add -u
git rebase --continue
#终止rebase,恢复到rebase前的状态
git rebase --abort