一、类加载器
类加载器(ClassLoader),顾名思义,即加载类的东西。在我们使用一个类之前,JVM需要先将该类的字节码文件(.class文件)从磁盘、网络或其他来源加载到内存中,并对字节码进行解析生成对应的Class对象,这就是类加载器的功能。我们可以利用类加载器,实现类的动态加载。
二、类的加载机制
在Java中,采用双亲委派机制来实现类的加载。那什么是双亲委派机制?在Java Doc中有这样一段描述:
The ClassLoader class uses a delegation model to search for classes and resources. Each instance of ClassLoader has an associated parent class loader. When requested to find a class or resource, a ClassLoader instance will delegate the search for the class or resource to its parent class loader before attempting to find the class or resource itself. The virtual machine's built-in class loader, called the "bootstrap class loader", does not itself have a parent but may serve as the parent of a ClassLoader instance.
从以上描述中,我们可以总结出如下四点:
1、类的加载过程采用委托模式实现
2、每个 ClassLoader 都有一个父加载器。
3、类加载器在加载类之前会先递归的去尝试使用父加载器加载。
4、虚拟机有一个内建的启动类加载器(bootstrap ClassLoader),该加载器没有父加载器,但是可以作为其他加载器的父加载器。
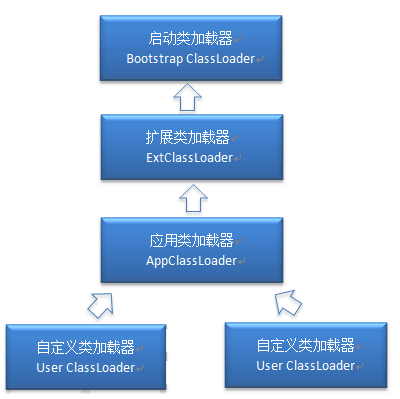
Java 提供三种类型的系统类加载器。第一种是启动类加载器,由C++语言实现,属于JVM的一部分,其作用是加载 <Java_Runtime_Home>/lib 目录中的文件,并且该类加载器只加载特定名称的文件(如 rt.jar),而不是该目录下所有的文件。另外两种是 Java 语言自身实现的类加载器,包括扩展类加载器(ExtClassLoader)和应用类加载器(AppClassLoader),扩展类加载器负责加载<Java_Runtime_Home>libext目录中或系统变量 java.ext.dirs 所指定的目录中的文件。应用程序类加载器负责加载用户类路径中的文件。用户可以直接使用扩展类加载器或系统类加载器来加载自己的类,但是用户无法直接使用启动类加载器,除了这两种类加载器以外,用户也可以自定义类加载器,加载流程如下图所示:

注意:这里父类加载器并不是通过继承关系来实现的,而是采用组合实现的。
我们可以通过一段程序来验证这个过程:
|
1
2
3
4
5
6
7
8
9
10
11
12
13
|
public class Test {}public class TestMain { public static void main(String[] args) { ClassLoader loader = Test.class.getClassLoader(); while (loader!=null){ System.out.println(loader); loader = loader.getParent(); } }} |
上面程序的运行结果如下所示:

从结果我们可以看出,默认情况下,用户自定义的类使用 AppClassLoader 加载,AppClassLoader 的父加载器为 ExtClassLoader,但是 ExtClassLoader 的父加载器却显示为空,这是什么原因呢?究其缘由,启动类加载器属于 JVM 的一部分,它不是由 Java 语言实现的,在 Java 中无法直接引用,所以才返回空。但如果是这样,该怎么实现 ExtClassLoader 与 启动类加载器之间双亲委派机制?我们可以参考一下源码:
|
1
2
3
4
5
6
7
8
9
10
11
12
13
14
15
16
17
18
19
20
21
22
23
24
25
26
27
28
29
30
31
32
33
34
35
36
37
|
protected Class<?> loadClass(String name, boolean resolve) throws ClassNotFoundException { synchronized (getClassLoadingLock(name)) { // First, check if the class has already been loaded Class<?> c = findLoadedClass(name); if (c == null) { long t0 = System.nanoTime(); try { if (parent != null) { c = parent.loadClass(name, false); } else { c = findBootstrapClassOrNull(name); } } catch (ClassNotFoundException e) { // ClassNotFoundException thrown if class not found // from the non-null parent class loader } if (c == null) { // If still not found, then invoke findClass in order // to find the class. long t1 = System.nanoTime(); c = findClass(name); // this is the defining class loader; record the stats sun.misc.PerfCounter.getParentDelegationTime().addTime(t1 - t0); sun.misc.PerfCounter.getFindClassTime().addElapsedTimeFrom(t1); sun.misc.PerfCounter.getFindClasses().increment(); } } if (resolve) { resolveClass(c); } return c; } } |
从源码可以看出,ExtClassLoader 和 AppClassLoader都继承自 ClassLoader 类,ClassLoader 类中通过 loadClass 方法来实现双亲委派机制。整个类的加载过程可分为如下三步:
1、查找对应的类是否已经加载。
2、若未加载,则判断当前类加载器的父加载器是否为空,不为空则委托给父类去加载,否则调用启动类加载器加载(findBootstrapClassOrNull 再往下会调用一个 native 方法)。
3、若第二步加载失败,则调用当前类加载器加载。
通过上面这段程序,可以很清楚的看出扩展类加载器与启动类加载器之间是如何实现委托模式的。
现在,我们再验证另一个问题。我们将刚才的Test类打成jar包,将其放置在 <Java_Runtime_Home>libext 目录下,然后再次运行上面的代码,结果如下:

现在,该类就不再通过 AppClassLoader 来加载,而是通过 ExtClassLoader 来加载了。如果我们试图把jar包拷贝到<Java_Runtime_Home>lib,尝试通过启动类加载器加载该类时,我们会发现编译器无法识别该类,因为启动类加载器除了指定目录外,还必须是特定名称的文件才能加载。
三、自定义类加载器
通常情况下,我们都是直接使用系统类加载器。但是,有的时候,我们也需要自定义类加载器。比如应用是通过网络来传输 Java 类的字节码,为保证安全性,这些字节码经过了加密处理,这时系统类加载器就无法对其进行加载,这样则需要自定义类加载器来实现。自定义类加载器一般都是继承自 ClassLoader 类,从上面对 loadClass 方法来分析来看,我们只需要重写 findClass 方法即可。下面我们通过一个示例来演示自定义类加载器的流程:
|
1
2
3
4
5
6
7
8
9
10
11
12
13
14
15
16
17
18
19
20
21
22
23
24
25
26
27
28
29
30
31
32
33
34
35
36
37
38
39
40
41
42
43
44
45
46
47
48
49
50
51
52
53
54
55
56
57
58
59
60
61
62
63
64
65
66
|
package com.paddx.test.classloading;import java.io.*;/** * Created by liuxp on 16/3/12. */public class MyClassLoader extends ClassLoader { private String root; protected Class<?> findClass(String name) throws ClassNotFoundException { byte[] classData = loadClassData(name); if (classData == null) { throw new ClassNotFoundException(); } else { return defineClass(name, classData, 0, classData.length); } } private byte[] loadClassData(String className) { String fileName = root + File.separatorChar + className.replace('.', File.separatorChar) + ".class"; try { InputStream ins = new FileInputStream(fileName); ByteArrayOutputStream baos = new ByteArrayOutputStream(); int bufferSize = 1024; byte[] buffer = new byte[bufferSize]; int length = 0; while ((length = ins.read(buffer)) != -1) { baos.write(buffer, 0, length); } return baos.toByteArray(); } catch (IOException e) { e.printStackTrace(); } return null; } public String getRoot() { return root; } public void setRoot(String root) { this.root = root; } public static void main(String[] args) { MyClassLoader classLoader = new MyClassLoader(); classLoader.setRoot("/Users/liuxp/tmp"); Class<?> testClass = null; try { testClass = classLoader.loadClass("com.paddx.test.classloading.Test"); Object object = testClass.newInstance(); System.out.println(object.getClass().getClassLoader()); } catch (ClassNotFoundException e) { e.printStackTrace(); } catch (InstantiationException e) { e.printStackTrace(); } catch (IllegalAccessException e) { e.printStackTrace(); } }} |
运行上面的程序,输出结果如下:

自定义类加载器的核心在于对字节码文件的获取,如果是加密的字节码则需要在该类中对文件进行解密。由于这里只是演示,我并未对class文件进行加密,因此没有解密的过程。这里有几点需要注意:
1、这里传递的文件名需要是类的全限定性名称,即com.paddx.test.classloading.Test格式的,因为 defineClass 方法是按这种格式进行处理的。
2、最好不要重写loadClass方法,因为这样容易破坏双亲委托模式。
3、这类 Test 类本身可以被 AppClassLoader 类加载,因此我们不能把 com/paddx/test/classloading/Test.class 放在类路径下。否则,由于双亲委托机制的存在,会直接导致该类由 AppClassLoader 加载,而不会通过我们自定义类加载器来加载。
四、总结
双亲委派机制能很好地解决类加载的统一性问题。对一个 Class 对象来说,如果类加载器不同,即便是同一个字节码文件,生成的 Class 对象也是不等的。也就是说,类加载器相当于 Class 对象的一个命名空间。双亲委派机制则保证了基类都由相同的类加载器加载,这样就避免了同一个字节码文件被多次加载生成不同的 Class 对象的问题。但双亲委派机制仅仅是Java 规范所推荐的一种实现方式,它并不是强制性的要求。近年来,很多热部署的技术都已不遵循这一规则,如 OSGi 技术就采用了一种网状的结构,而非双亲委派机制。