一、概述
在之前的文章中,链接如下:https://www.cnblogs.com/xiao987334176/p/14313471.html
介绍了ElementUI 分页,前端请求一次接口,获取所有数据,由ElementUI 分页组件实现分页,也就是说由前端来完成了分页功能。
但是,在实际项目中,不可能一次性返回所有数据,比如几十万条数据。
比较理想的方案是,前端配合后端,一起来实现分页功能。大概思路如下:
1. 默认访问api,比如:http://127.0.0.1:8000/api/book/list/ ,接口返回10条数据。
2. 前端点击页码时,比如第二页,请求接口:http://127.0.0.1:8000/api/book/list/?page=2,这里的page=2,表示当前页码数,接口返回10条数据。
3. 后面的以此类推,总之,每点击一次,请求一次接口,返回10条数据。
效果如下:

二、前端代码
test.vue

<template>
  <div>
    <!-- 表格 -->
    <el-table :data="tableData.list" style=" 100%">
      <el-table-column
        prop="id"
        label="编号"
        width="120">
      </el-table-column>           <!--设置列标-->
      <el-table-column
        prop="title"
        label="书名"
        width="120">
      </el-table-column>
      <el-table-column
        prop="price"
        label="价格"
        width="120">
      </el-table-column>
      <el-table-column
        prop="pub_date"
        label="出版日期"
        width="200">
      </el-table-column>
      <el-table-column
        prop="publish"
        label="出版社"
        width="120">
      </el-table-column>
    </el-table>
    <!-- 分页器 -->
    <div class="block" style="margin-top:15px;">
      <el-pagination
        @size-change="handleSizeChange"
        @current-change="handleCurrentChange"
        :current-page="currentPage"
        :page-sizes="[10, 15, 20, 25]"
        :page-size="pageSize"
        layout="total, prev, pager, next, jumper"
        :total="total">
      </el-pagination>
    </div>
  </div>
</template>

<script>
  import axios from 'axios'

  export default {
    name: "test2",
    data() {
      return {
        tableData: {},
        currentPage: 1, // 当前页码
        total: 20, // 总条数
        pageSize: 2 // 每页的数据条数
      };
    },
    mounted() {
      this.getlivestockInfo(1);
    },
    methods: {
      //每页条数改变时触发 选择一页显示多少行
      handleSizeChange(val) {
        console.log(`每页 ${val} 条`);
        this.currentPage = 1;
        this.pageSize = val;
      },
      //当前页改变时触发 跳转其他页
      handleCurrentChange(val) {
        console.log(`当前页: ${val}`);
        this.currentPage = val;
        this.getlivestockInfo(val);
      },
      // 请求api,获取信息
      getlivestockInfo(num1) {
        var that = this;
        var params = new URLSearchParams();
        params.append('page', num1);
        // console.log("params",params)
        let url = "http://127.0.0.1:8000/api/book/list/?page=" + that.currentPage
        axios.get(url, params)    //补上后台接口即可
          .then(response => {  // 请求成功
            // console.log('请求成功');
            that.tableData = response.data.data;
            that.currentPage = num1;
            that.pageSize = that.tableData.pageSize;
            that.total = that.tableData.total;
            console.log('请求成功, 获取' + that.tableData.list.length + "条数据");
          }).catch(error => {  // 请求失败
          console.log('请求失败');
          console.log(error);
        })
      }
    }
  }
</script>

<style scoped>

</style>
代码解释:
<el-pagination
        @size-change="handleSizeChange"
        @current-change="handleCurrentChange"
        :current-page="currentPage"
        :page-sizes="[10, 15, 20, 25]"
        :page-size="pageSize"
        layout="total, prev, pager, next, jumper"
        :total="total">
      </el-pagination>
其中:
:current-page的值表示当前是第几页;
:page-sizes的值表示可以选择一页多少条;
:page-size的值表示当前一页显示几条;
layout的值表示分页需要显示的内容,例如“total” 表示总数、“next” 表示下一页等;
:total的值表示共几页;
因为currentPage、pageSize并不是具体的值,所以需要在script标签中的data()中为其进行赋值。于是在上面说到的slice大家都应该知道其作用了吧。在当所有的值都存在时,在界面上会自动把分的页显示出来,如效果图中的:1、2、3……6
其他代码就不做解释了,注释里面写的比较清楚。
三、后端代码
这里以django 3.1.5为后端
安装模块
pip3 install django-cors-headers djangorestframework
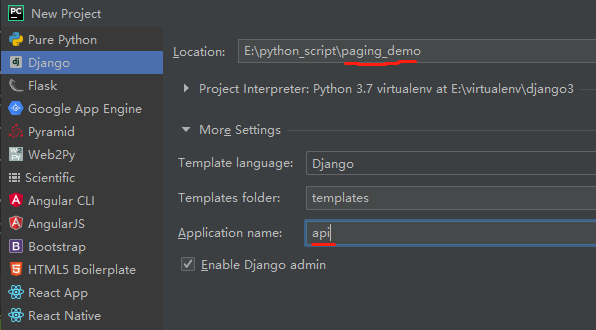
新建一个项目:paging_demo

修改paging_demo/settings.py
注册corsheaders和channels,corsheaders主要是用来解决跨域问题的。
INSTALLED_APPS = [
    'django.contrib.admin',
    'django.contrib.auth',
    'django.contrib.contenttypes',
    'django.contrib.sessions',
    'django.contrib.messages',
    'django.contrib.staticfiles',
    'api.apps.ApiConfig',
    'corsheaders',  # 注册应用cors
]
修改paging_demo/settings.py
注册中间件
MIDDLEWARE = [
    'django.middleware.security.SecurityMiddleware',
    'django.contrib.sessions.middleware.SessionMiddleware',
    'django.middleware.common.CommonMiddleware',
    'django.middleware.csrf.CsrfViewMiddleware',
    'django.contrib.auth.middleware.AuthenticationMiddleware',
    'django.contrib.messages.middleware.MessageMiddleware',
    'django.middleware.clickjacking.XFrameOptionsMiddleware',
    'corsheaders.middleware.CorsMiddleware',  # 注册组件cors
]
修改paging_demo/settings.py
最后一行增加以下内容

REST_FRAMEWORK = {
    'DEFAULT_VERSIONING_CLASS':"rest_framework.versioning.URLPathVersioning",
    'DEFAULT_VERSION': 'v1',
    'ALLOWED_VERSIONS': ['v1', 'v2'],
    'VERSION_PARAM': 'version',
    'DEFAULT_PAGINATION_CLASS': 'rest_framework.pagination.PageNumberPagination',
    'PAGE_SIZE':2  # 默认分页大小
}

#跨域增加忽略
CORS_ALLOW_CREDENTIALS = True
CORS_ORIGIN_ALLOW_ALL = True
# CORS_ORIGIN_WHITELIST = (
#     '*'
# )

CORS_ALLOW_METHODS = (
    'DELETE',
    'GET',
    'OPTIONS',
    'PATCH',
    'POST',
    'PUT',
    'VIEW',
)

CORS_ALLOW_HEADERS = (
    'XMLHttpRequest',
    'X_FILENAME',
    'accept-encoding',
    'authorization',
    'content-type',
    'dnt',
    'origin',
    'user-agent',
    'x-csrftoken',
    'x-requested-with',
    'Pragma',
)
注意:PAGE_SIZE 根据实际情况修改
修改paging_demo/urls.py
增加路由
from django.contrib import admin
from django.urls import path
from api import views

urlpatterns = [
    path('admin/', admin.site.urls),
    path('api/book/list/', views.BookView.as_view({'get':'list'}),name='books_list'),
]
修改api/views.py

from django.shortcuts import render
from rest_framework.views import APIView
import json
from rest_framework.viewsets import ViewSetMixin
from django.shortcuts import render, HttpResponse
from rest_framework.response import Response
from rest_framework import status
from django.http import JsonResponse
from api import models
from api.serializers.book import BookSerializer
from rest_framework.pagination import PageNumberPagination
from django.db import transaction
from paging_demo import settings

# 书籍
class BookView(ViewSetMixin, APIView):
    """书籍"""
    # 查看书籍列表
    def list(self, request, *args, **kwargs):
        queryset = models.Book.objects.all()
        serializer_class = BookSerializer
        # 排序
        queryset = queryset.order_by('id')
        # 分页
        page = PageNumberPagination()
        course_list = page.paginate_queryset(queryset, self.request, self)
        # 分页之后的结果执行序列化
        ser = serializer_class(instance=course_list, many=True)
        data = ser.data
        # print("data",data)
        if not data:
            return JsonResponse({'status': status.HTTP_501_NOT_IMPLEMENTED, 'data': data, 'msg': '数据为空'},
                                status=status.HTTP_501_NOT_IMPLEMENTED)

        # 封装返回数据格式
        data = {
            'list':data,
            'pageSize': settings.REST_FRAMEWORK['PAGE_SIZE'],
            'total':queryset.count()
        }

        return JsonResponse({'status': status.HTTP_200_OK, 'data': data},
                            status=status.HTTP_200_OK)
修改api/models.py

from django.db import models

# Create your models here.
class Book(models.Model):
    title = models.CharField(max_length=32, unique=True,verbose_name="名称")
    price = models.DecimalField(max_digits=8, decimal_places=2,verbose_name="价格")
    pub_date = models.DateField(verbose_name="出版日期")
    publish = models.CharField(max_length=32, verbose_name="出版社")
在api目录下,创建文件夹serializers,并在此文件下创建 book.py
# !/usr/bin/python3
# -*- coding: utf-8 -*-
from rest_framework import serializers
from api import models


class BookSerializer(serializers.ModelSerializer):

    class Meta:
        model = models.Book
        fields = '__all__'
生成数据库,使用以下命令:
python manage.py makemigrations
python manage.py migrate
默认使用的是sqlite3数据库,使用Navicat软件打开数据库,使用以下命令插入数据:

INSERT INTO "main"."api_book" ("id", "title", "price", "pub_date", "publish", "ROWID") VALUES (1, 'python 高级开发实战', 98.63, '2020-05-06', '工业出版社', 1);
INSERT INTO "main"."api_book" ("id", "title", "price", "pub_date", "publish", "ROWID") VALUES (2, 'python 开发实战', 97.5, '2020-05-05', '工业出版社', 2);
INSERT INTO "main"."api_book" ("id", "title", "price", "pub_date", "publish", "ROWID") VALUES (3, '活着', 56, '2020-06-01', '工业出版社', 3);
INSERT INTO "main"."api_book" ("id", "title", "price", "pub_date", "publish", "ROWID") VALUES (4, '兄弟', 47, '2020-06-02', '工业出版社', 4);
INSERT INTO "main"."api_book" ("id", "title", "price", "pub_date", "publish", "ROWID") VALUES (5, '进化心理学', 52, '2020-06-03', '工业出版社', 5);
INSERT INTO "main"."api_book" ("id", "title", "price", "pub_date", "publish", "ROWID") VALUES (6, '包法利夫人', 39, '2020-06-04', '工业出版社', 6);
INSERT INTO "main"."api_book" ("id", "title", "price", "pub_date", "publish", "ROWID") VALUES (7, '谈美', 46, '2020-06-05', '工业出版社', 7);
INSERT INTO "main"."api_book" ("id", "title", "price", "pub_date", "publish", "ROWID") VALUES (8, '局外人', 43, '2020-06-05', '工业出版社', 8);
INSERT INTO "main"."api_book" ("id", "title", "price", "pub_date", "publish", "ROWID") VALUES (9, '傲慢与偏见', 58, '2020-06-07', '工业出版社', 9);
INSERT INTO "main"."api_book" ("id", "title", "price", "pub_date", "publish", "ROWID") VALUES (10, '变形记', 36, '2020-06-08', '工业出版社', 10);
启动django项目即可
最后,访问vue页面,效果就是本文开始的动态图。
这里说明一下接口调用问题,由于django rest framework使用PageNumberPagination进行分页,它必须是get请求才行。如果使用post,需要修改源码才行。
前端调用接口,比如:http://127.0.0.1:8000/api/book/list/?page=2。注意:由于PageNumberPagination默认接收分页参数为page,因此前端这里必须是page。
如果不是page,需要对PageNumberPagination进行手动封装才行。
本文参考链接:
https://blog.csdn.net/weixin_46214344/article/details/104051480
