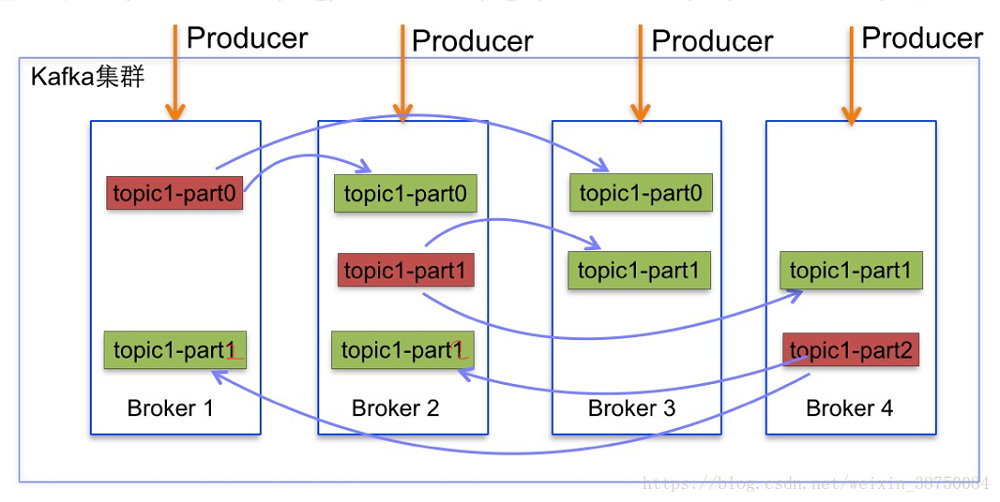
一、kafka的副本机制
由于Producer和Consumer都只会与Leader角色的分区副本相连,所以kafka需要以集群的组织形式提供主题下的消息高可用。kafka支持主备复制,所以消息具备高可用和持久性。
一个分区可以有多个副本,这些副本保存在不同的broker上。每个分区的副本中都会有一个作为Leader。当一个broker失败时,Leader在这台broker上的分区都会变得不可用,kafka会自动移除Leader,再其他副本中选一个作为新的Leader。
在通常情况下,增加分区可以提供kafka集群的吞吐量。然而,也应该意识到集群的总分区数或是单台服务器上的分区数过多,会增加不可用及延迟的风险。
关于副本的更多信息,请参考链接:
https://blog.csdn.net/weixin_38750084/article/details/82942564
二、概述
目前的kakfa集群有3个节点,server.properties 关于topic的配置为:
offsets.topic.replication.factor=1
transaction.state.log.replication.factor=1
transaction.state.log.min.isr=1
目前的设置为1个副本,这样不健全。如果有一台服务器挂掉了,那么就会造成数据丢失!
因此,需要将副本数改为3,也就是每台服务器都有一个副本,这样才是稳妥的!
三、动态扩容
kafka-topics.sh 不能用来增加副本因子replication-factor。实际应该使用kafka bin目录下面的kafka-reassign-partitions.sh
查看topic详情
首先查看kafka的所有topic
/kafka/bin/kafka-topics.sh --zookeeper zookeeper-1.default.svc.cluster.local:2181 --list
输出:
test
...
查看topic为test的详细信息
/kafka/bin/kafka-topics.sh --describe --zookeeper zookeeper-1.default.svc.cluster.local:2181 --topic test
输出:
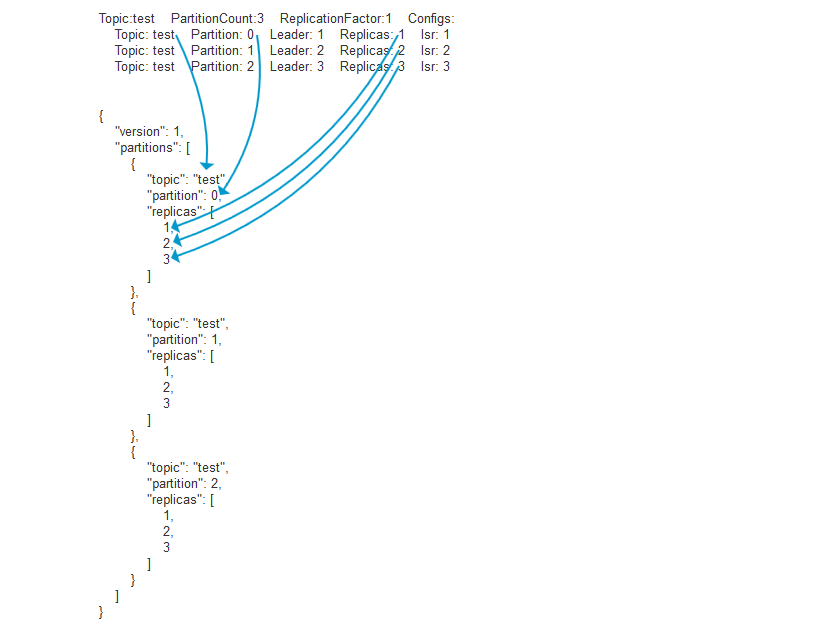
Topic:test    PartitionCount:3    ReplicationFactor:1    Configs:
    Topic: test    Partition: 0    Leader: 1    Replicas: 1    Isr: 1
    Topic: test    Partition: 1    Leader: 2    Replicas: 2    Isr: 2
    Topic: test    Partition: 2    Leader: 3    Replicas: 3    Isr: 3
可以看到test的副本数为1
扩容副本
kafka-reassign-partitions.sh 执行时,依赖一个json文件。
创建 test.json
{
    "version": 1,
    "partitions": [
        {
            "topic": "test",
            "partition": 0,
            "replicas": [
                1,
                2,
                3
            ]
        },
        {
            "topic": "test",
            "partition": 1,
            "replicas": [
                1,
                2,
                3
            ]
        },
        {
            "topic": "test",
            "partition": 2,
            "replicas": [
                1,
                2,
                3
            ]
        }
    ]
}
注意:这个json文件和上面查看的test详情,是有关联的!否则会导致执行失败
关系图
正式执行脚本
/kafka/bin/kafka-reassign-partitions.sh --zookeeper zookeeper-1.default.svc.cluster.local:2181 --reassignment-json-file test.json --execute
参数解释:
--reassignment-json-file 带有分区的JSON文件
--execute 按规定启动重新分配通过---重新分配JSON文件选择权。
执行输出:
Current partition replica assignment

{"version":1,"partitions":[{"topic":"test","partition":2,"replicas":[1],"log_dirs":["any"]},{"topic":"test","partition":1,"replicas":[3],"log_dirs":["any"]},{"topic":"test","partition":0,"replicas":[2],"log_dirs":["any"]}]}
出现 Successfully 表示成功了!
再次查看topic为test的partition详情
/kafka/bin/kafka-topics.sh --describe --zookeeper zookeeper-1.default.svc.cluster.local:2181 --topic test
输出:
Topic:test    PartitionCount:3    ReplicationFactor:3    Configs:
    Topic: test    Partition: 0    Leader: 2    Replicas: 1,2,3    Isr: 2,3,1
    Topic: test    Partition: 1    Leader: 3    Replicas: 1,2,3    Isr: 3,1,2
    Topic: test    Partition: 2    Leader: 1    Replicas: 1,2,3    Isr: 1,3,2
可以发现,副本已经改为3了!
默认配置
在java代码或者python代码中,是直接发送生产者消息。topic的名字是动态生成的(当kafka发现topic不存在时,会自动创建),那么它的partitions和replication-factor的数量是由服务端决定的
因为kafka集群有3个节点,所有需要改成3个
offsets.topic.replication.factor=3
transaction.state.log.replication.factor=3
transaction.state.log.min.isr=3
num.partitions=1
default.replication.factor=3
参数解释:
offsets.topic.replication.factor 用于配置offset记录的topic的partition的副本个数
transaction.state.log.replication.factor 事务主题的复制因子
transaction.state.log.min.isr 覆盖事务主题的min.insync.replicas配置
num.partitions 新建Topic时默认的分区数
default.replication.factor 自动创建topic时的默认副本的个数
注意:这些参数,设置得更高以确保高可用性!
其中 default.replication.factor 是真正决定,topi的副本数量的
关于kafka配置文件的更多解释,请参考链接:
https://blog.csdn.net/memoordit/article/details/78850086
那么默认参数,如何测试呢?
很简单,由于在应用代码,是不会主动创建topic的,由kafka集群自动创建topic。
那么由代码进行一次,生产者和消费者,就可以了!
Python测试
这个脚本是普通版的kafka消息测试,没有ACL配置!
test.py


#!/usr/bin/env python3
# coding: utf-8
import sys
import io

def setup_io():  # 设置默认屏幕输出为utf-8编码
    sys.stdout = sys.__stdout__ = io.TextIOWrapper(sys.stdout.detach(), encoding='utf-8', line_buffering=True)
    sys.stderr = sys.__stderr__ = io.TextIOWrapper(sys.stderr.detach(), encoding='utf-8', line_buffering=True)
setup_io()

import time
from kafka import KafkaProducer
from kafka import KafkaConsumer

class KafkaClient(object):
    def __init__(self, kafka_server, port, topic, content):
        self.kafka_server = kafka_server  # kafka服务器ip地址
        self.port = port  # kafka端口
        self.topic = topic  # topic名
        self.content = content # 内容

    def producer(self):
        producer = KafkaProducer(bootstrap_servers=['%s:%s' % (kafka_server, port)])
        producer.send(topic, content)
        producer.flush()  # flush确保所有meg都传送给broker
        producer.close()
        return producer

    def consumer(self):
        consumer = KafkaConsumer(topic, group_id='test_group', bootstrap_servers=['%s:%s' % (kafka_server, port)])
        # consumer.close()
        return consumer

    def main(self):
        startime = time.time()  # 开始时间

        client = KafkaClient(self.kafka_server, self.port, self.topic, self.content)  # 实例化客户端

        client.producer()  # 执行生产者
        print("已执行生产者")
        consumer = client.consumer()  # 执行消费者
        print("已执行消费者")
        print("等待结果输出...")
        flag = False
        for msg in consumer:
            # recv = "%s:%d:%d: key=%s value=%s" % (msg.topic, msg.partition, msg.offset, msg.key, msg.value)
            # 判断生产的消息和消费的消息是否一致
            print(msg.value)
            # print(self.content)
            if msg.value == self.content:
                flag = True
                break

        consumer.close()  # 关闭消费者对象
        endtime = time.time()  # 结束时间

        if flag:
            # %.2f %(xx) 表示保留小数点2位
            return "kafka验证消息成功,花费时间", '%.2f 秒' % (endtime - startime)
        else:
            return "kafka验证消息失败,花费时间", '%.2f 秒' % (endtime - startime)


if __name__ == '__main__':
    kafka_server = "kafka-1.default.svc.cluster.local"
    port = "9092"
    topic = "test_xxx"
    content = "hello honey".encode('utf-8')

    client = KafkaClient(kafka_server,port,topic,content)  # 实例化客户端
    print(client.main())
这里指定的topic为 test_xxx
执行Python脚本,然后到服务器上面,查看topic为test_xxx的详细信息
/kafka/bin/kafka-topics.sh --describe --zookeeper zookeeper-1.default.svc.cluster.local:2181 --topic test_xxx
输出如下:
Topic:test_xxx    PartitionCount:3    ReplicationFactor:3    Configs:
    Topic: test_xxx    Partition: 0    Leader: 2    Replicas: 1,2,3    Isr: 2,3,1
    Topic: test_xxx    Partition: 1    Leader: 3    Replicas: 1,2,3    Isr: 3,1,2
    Topic: test_xxx    Partition: 2    Leader: 1    Replicas: 1,2,3    Isr: 1,3,2
可以发现副本为3,说明默认配置生效了!