Vue 测试版本:Vue.js v2.5.13
做了个 demo,把父子组件的数据都绑定到 Vue 实例 app 上,注释中的 template 相对好理解些
<div id="app">
        <myele :level="level">
        </myele>
        <child :level="level">
            <p>para default</p>
            <span slot="span">a span</span>
            <div slot="div">a div</div>
            <div slot="footer" slot-scope="props">{{props.text}}</div>
        </child>
    </div>
window.onload = function() {
    Vue.component('myele', {
        render(createElement) {
            return createElement('child', {
                props: { level: this.level },
                scopedSlots: {
                    footer: function(props) {
                        return createElement('div', [createElement('span', props.text)]);
                    }
                }
            }, [createElement('span', 'hello'), 'world']);
        },
        /* template:`
           <child :level="level">
             <span>hello</span>world
             <div slot="footer" slot-scope="props">
               <span>{{props.text}}</span>
             </div>
           </child>
         `,*/
        props: ['level']
    });

    Vue.component('child', {
        render(createElement) {
            let nodes0 = this.$slots.default;
            let nodes1 = this.$slots.span;
            let nodes2 = this.$slots.div;
            let nodes3 = this.$scopedSlots.footer({
                text: 'scopedSlots-foooter'
            });
            return createElement('h' + this.level, [nodes0, nodes1, nodes2, nodes3]);
        },
        props: ['level']
    });

    new Vue({
        el: '#app',
        data: {
            level: 1
        }
    });
};
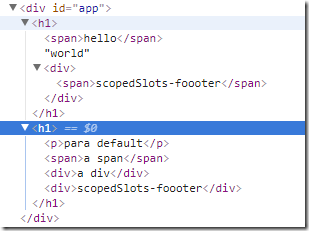
效果如下:
其实最初不是这样写的,js 是这样:
window.onload = function() {
    Vue.component('myele', {
        render(createElement) {
          //复杂的作用域插槽单独拎出来;
            let scopedSlotsNode = createElement('div', {
                scopedSlots: {
                    footer: function(props) {
                        return createElement('span', props.text);
                    }
                }
            });
            return createElement('child', {
                props: { level: this.level }
            }, [createElement('span', 'hello'), 'world', scopedSlotsNode]);
        },
        /* template:`
           <child :level="level">
             <span>hello</span>world
             <div>
               <span slot="footer" slot-scope="props">
                {{props.text}}
               </span>
             </div>
           </child>
         `,*/
        props: ['level']
    });

    Vue.component('child', {
        render(createElement) {
            let nodes0 = this.$slots.default;
            let nodes1 = this.$slots.span;
            let nodes2 = this.$slots.div;
            let nodes3 = this.$scopedSlots.footer({
                text: 'scopedSlots-foooter'
            });
            return createElement('h' + this.level, [nodes0, nodes1, nodes2, nodes3]);
        },
        props: ['level']
    });

    new Vue({
        el: '#app',
        data: {
            level: 1
        }
    });
};
结果报错,
半天没反应过来,后来想想,明白了,解释就在 template 里,不明白的话,再看看;
参考文档:

