Vue实例初始化完成后,启动加载($mount)模块数据。
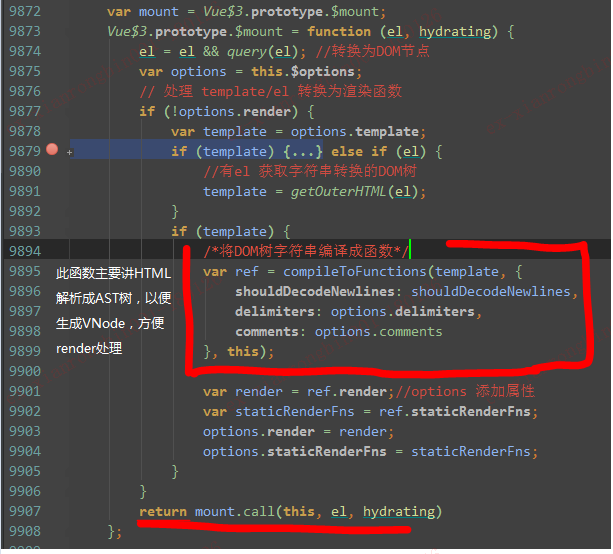
(一)Vue$3.protype.$mount

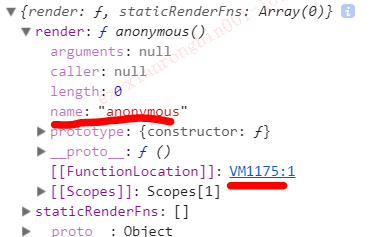
标红的函数 compileToFunctions 过于复杂,主要是生AST 树,返回的 ref 如下:

render 是浏览器虚拟机编译出来的一个函数。我们点进入可以看到如下代码(自己调整后空格换行后的数据)
(function(){
   with(this){
    return _c('div',{
    attrs:{"id":"app"}},
    [_c('input',{directives:[{name:"model",rawName:"v-model",value:(message),expression:"message"}],
    attrs:{"type":"text"},domProps:{"value":(message)},
    on:{"input":function($event){
      if($event.target.composing)return;message=$event.target.value}}}),
      _v(_s(message)+"
")])
   }
})
跳过这个复杂的函数。
这里作者涉及的很奇妙,因为 mount.call(this, el, hydrating) 中的 mount 定义如下
var mount = Vue$3.prototype.$mount;
 Vue$3.prototype.$mount = function (el, hydrating) {
        el = el && inBrowser ? query(el) : undefined;
        return mountComponent(this, el, hydrating) //vm._watcher 赋值
    };
后来又重写了$mount 方法:
Vue$3.prototype.$mount = function (el, hydrating) { }
(二)mountComponent () 函数
组件安装
 1 function mountComponent(vm, el, hydrating) {
 2         vm.$el = el;
 3         if (!vm.$options.render) {
 4             //如果不存咋,则创建一个空的虚拟节点
 5             vm.$options.render = createEmptyVNode;
 6         }
 7         callHook(vm, 'beforeMount');
 8
 9         var updateComponent;
10         if ("development" !== 'production' && config.performance && mark) {
11             //此处另一种 updateComponent = 。。。。
12         } else {
13             updateComponent = function () {
14                 vm._update(vm._render(), hydrating); //渲染DOM
15             };
16         }
17         //noop 空函数,
18         vm._watcher = new Watcher(vm, updateComponent, noop); //生成中间件 _watcher
19         hydrating = false;
20
21         // $vnode不存在,,则手动安装实例,自启动
22         // mounted is called for render-created child components in its inserted hook
23         if (vm.$vnode == null) {
24             vm._isMounted = true;
25             callHook(vm, 'mounted');
26         }
27         return vm //调用 实例加载钩子函数,返回vue实例
28     }
Watcher是一个十分复杂的对象,是沟通 Observer与 Compile 的桥梁作用。
(3)Watcher对象
1、构造函数
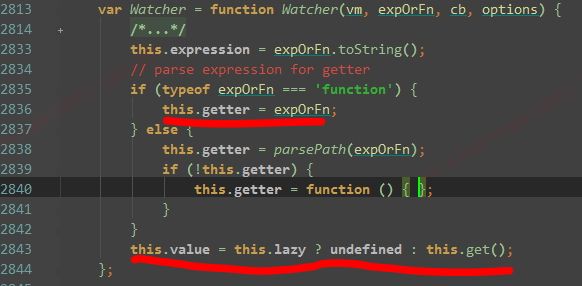
Watcher的构造函数并不复杂,主要是为当前Watcher 初始化各种属性,比如depIds,newDeps,getter 等,
最后调用 Watcher.prototype.get(),让Dep收集此Wather实例。

Watcher构造函数会将 传入的第二个参数转换 this.getter 属性;
由于 this.lazy=false,会立即进入 Watcher.prototype.get()。
2、Watcher.prototype.get()
绕了一大圈,这个函数其实也就调用了 传入构造函数的第二个参数。
 1 Watcher.prototype.get = function get() {
 2         pushTarget(this);
 3         var value;
 4         var vm = this.vm;
 5         try {
 6             //初始化时 最终 调用我们传入的 updateComponent
 7             // vm._update(vm._render(), hydrating)
 8             value = this.getter.call(vm, vm);
 9         } catch (e) {
10         } finally {
11             if (this.deep) {
12                 traverse(value);
13             }
14             popTarget();
15             this.cleanupDeps();
16         }
17         return value
18     };
此时 this.getter = vm._update(vm._render(), hydrating); 开始渲染渲染DOM,这里十分重要。
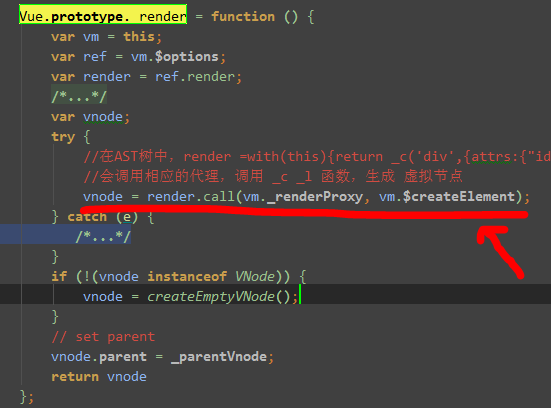
先 执行 Vue.prototype._render(),代码如下

这里 render 便是生成的AST代码。
接下来会按照 如下顺序 触发各种函数:
代理函数 proxyGetter() ==> reactiveGetter() => 执行 render里面的函数 _c ;
执行完后,将创建的vnode直接返回。
让我们再仔细看看 defineReactive$$1() 函数,为元素自定义get/set方法。

 1  function defineReactive$$1(obj, key, val, customSetter, shallow) {
 2         var dep = new Dep();//依赖管理
 3         /* 此时obj 是带有__ob__属性的对象,key是msg  */
 4         var property = Object.getOwnPropertyDescriptor(obj, key);//返回键描述信息
 5         if (property && property.configurable === false) {
 6             //不可以修改直接返回
 7             return
 8         }
 9
10         var getter = property && property.get;
11         var setter = property && property.set;
12
13         var childOb = !shallow && observe(val);
14         Object.defineProperty(obj, key, {
15             enumerable: true,
16             configurable: true,
17             get: function reactiveGetter() {
18                 var value = getter ? getter.call(obj) : val;
19                 if (Dep.target) {
20                     dep.depend();
21                     if (childOb) {
22                         childOb.dep.depend();
23                         if (Array.isArray(value)) {
24                             dependArray(value);
25                         }
26                     }
27                 }
28                 return value
29             },
30             set: function reactiveSetter(newVal) {
31                 var value = getter ? getter.call(obj) : val; //获取当前值,是前一个值
32                 if (newVal === value || (newVal !== newVal && value !== value)) {
33                     //值没有发生变化,不再做任何处理
34                     return
35                 }
36                 /* eslint-enable no-self-compare */
37                 if ("development" !== 'production' && customSetter) {
38                     customSetter();
39                 }
40                 if (setter) {
41                     setter.call(obj, newVal);//调用默认setter方法或将新值赋给当前值
42                 } else {
43                     val = newVal;
44                 }
45                 childOb = !shallow && observe(newVal);
46                 dep.notify();//赋值后通知依赖变化
47             }
48         });
49     }
说的不太清楚,下篇文章继续说。
