最近公司项目在用uni-app做小程序商城,其中商品和个人需要生成图片海报,经过摸索记录后将一些重点记录下来。这里有两种方式来生成
1、后台控制生成
2、前端用canvas合成图片
这里我们只讲使用canvas合成图片的方法,canvas包括绘制文字、图片、图形以及图片显示处理。
一、初始化canvas画布
通过createCanvasContext方法来创建画布
var _this = this;
_this.ctx = uni.createCanvasContext('canvasid', this);
const C_W = 650; //canvas宽度,使用的手机屏幕
_this.canvasW = C_W; //
_this.canvasH = 420; // 设置画布高度
_this.ctx.setFillStyle('#545a7a'); //canvas背景颜色
_this.ctx.fillRect(0, 0, _this.canvasW, _this.canvasH); //canvas画布大小
二、画布绘制文字
画布绘制完成后就需要我们把海报需要的元素绘制到画布上,第一步:添加店铺名称,ShopName为定义的店铺名称或者说推广人名称,店铺名称,店铺名称显示使用文字处理:
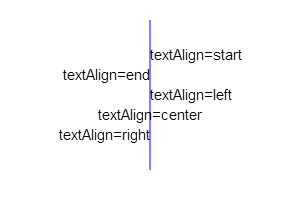
文字排列方式包含:
1、textAlign = 'start'
2、textAlign = 'end'
3、textAlign = 'left'
4、textAlign = 'right'
5、textAlign = 'center'

在通过setFillStyle设置文字颜色,setFontSize设置字体大小
let _strlineW = 0; //文本宽度
let _strHeight = C_P * 2 + 10; //绘制字体距离canvas顶部的初始高度
if (_this.ShopName != '') {
    //店铺名
    _this.ctx.textAlign = 'center';
    _this.ctx.setFillStyle(_this.TitleColor);
    _this.ctx.setFontSize(uni.upx2px(40));
    _this.ctx.fillText(_this.ShopName, _this.canvasW / 2, _strHeight);
    _strlineW += _this.ctx.measureText(_this.ShopName).width + uni.upx2px(10);
}
超长文字换行处理
//设置文本
            _this.ctx.setFontSize(uni.upx2px(28)); //设置标题字体大小
            _this.ctx.setFillStyle(_this.TitleColor); //设置标题文本颜色
            let _strLastIndex = 0; //每次开始截取的字符串的索引
            let _strHeight = r[1] + C_P * 2 + 10; //绘制字体距离canvas顶部的初始高度
            let _num=1;
            for (let i = 0; i < _this.Title.length; i++) {
                _strlineW += _this.ctx.measureText(_this.Title[i]).width;
                if (_strlineW > r[0]) {
                    if(_num == 2&&_this.LineType){
                        //文字换行数量大于二进行省略号处理
                        _this.ctx.fillText(_this.Title.substring(_strLastIndex, i-8)+'...', C_P, _strHeight);
                        _strlineW = 0;
                        _strLastIndex = i;
                        _num++;
                        break;
                    }else{
                        _this.ctx.fillText(_this.Title.substring(_strLastIndex, i), C_P, _strHeight);
                        _strlineW = 0;
                        _strHeight += 20;
                        _strLastIndex = i;
                        _num++;
                    }
                }else if (i == _this.Title.length - 1) {
                    _this.ctx.fillText(_this.Title.substring(_strLastIndex, i + 1), C_P, _strHeight);
                    _strlineW = 0;
                }
            }
            //设置文本 end
三、绘制图片
微信里面绘制图片需要先将图片地址转为临时图片地址使用方法如下:
async getImageInfo({ imgSrc }) {
            return new Promise((resolve, errs) => {
                uni.getImageInfo({
                    src: imgSrc,
                    success: function(image) {
                        resolve(image);
                    },
                    fail(err) {
                        errs(err);
                    }
                });
            });
        }


// 调用方法
let _imgInfo = await _this.getImageInfo({ imgSrc: _this.HeadImg }); //头像图
// 参数1 图片地址, 参数2 绘图x坐标, 参数3 绘图 y坐标 ,参数4 图片宽度, 参数5 图片高度
_this.ctx.drawImage(_imgInfo.path, (C_W - q[1])/2, _strHeight+5, q[1], q[1]);
有时候我们的图片需要处理下在显示,比如把头像做成圆形。
drawCircular(ctx, url, x, y, width, height) {
            //画圆形头像
            var avatarurl_width = width;
            var avatarurl_heigth = height;
            var avatarurl_x = x;
            var avatarurl_y = y;
            ctx.save();
            ctx.beginPath();
            ctx.arc(avatarurl_width / 2 + avatarurl_x, avatarurl_heigth / 2 + avatarurl_y, avatarurl_width / 2, 0, Math.PI * 2, false);
            ctx.clip();
            ctx.drawImage(url, avatarurl_x, avatarurl_y, avatarurl_width, avatarurl_heigth);
            ctx.restore();
        }
ctx为画布对象,url为图片地址,x为画布x轴位置,y为画布y轴位置,width为图像宽度,height为图像高度。
四、绘制圆角矩形/线条
fillRoundRect(cxt, x, y, width, height, radius, /*optional*/ fillColor) {
            //圆的直径必然要小于矩形的宽高
            if (2 * radius > width || 2 * radius > height) {
                return false;
            }

            cxt.save();
            cxt.translate(x, y);
            //绘制圆角矩形的各个边
            _this.drawRoundRectPath(cxt, width, height, radius);
            cxt.fillStyle = fillColor || '#000'; //若是给定了值就用给定的值否则给予默认值
            cxt.fill();
            cxt.restore();
        },
        drawRoundRectPath(cxt, width, height, radius) {
            cxt.beginPath(0);
            //从右下角顺时针绘制,弧度从0到1/2PI
            cxt.arc(width - radius, height - radius, radius, 0, Math.PI / 2);

            //矩形下边线
            cxt.lineTo(radius, height);

            //左下角圆弧,弧度从1/2PI到PI
            cxt.arc(radius, height - radius, radius, Math.PI / 2, Math.PI);

            //矩形左边线
            cxt.lineTo(0, radius);

            //左上角圆弧,弧度从PI到3/2PI
            cxt.arc(radius, radius, radius, Math.PI, (Math.PI * 3) / 2);

            //上边线
            cxt.lineTo(width - radius, 0);

            //右上角圆弧
            cxt.arc(width - radius, radius, radius, (Math.PI * 3) / 2, Math.PI * 2);

            //右边线
            cxt.lineTo(width, height - radius);
            cxt.closePath();
        }