这次给大家带来的是CoreData多表操作的使用.
首先我们要对CoreData来进行多表操作我们先要创建至少两个实体在工程中。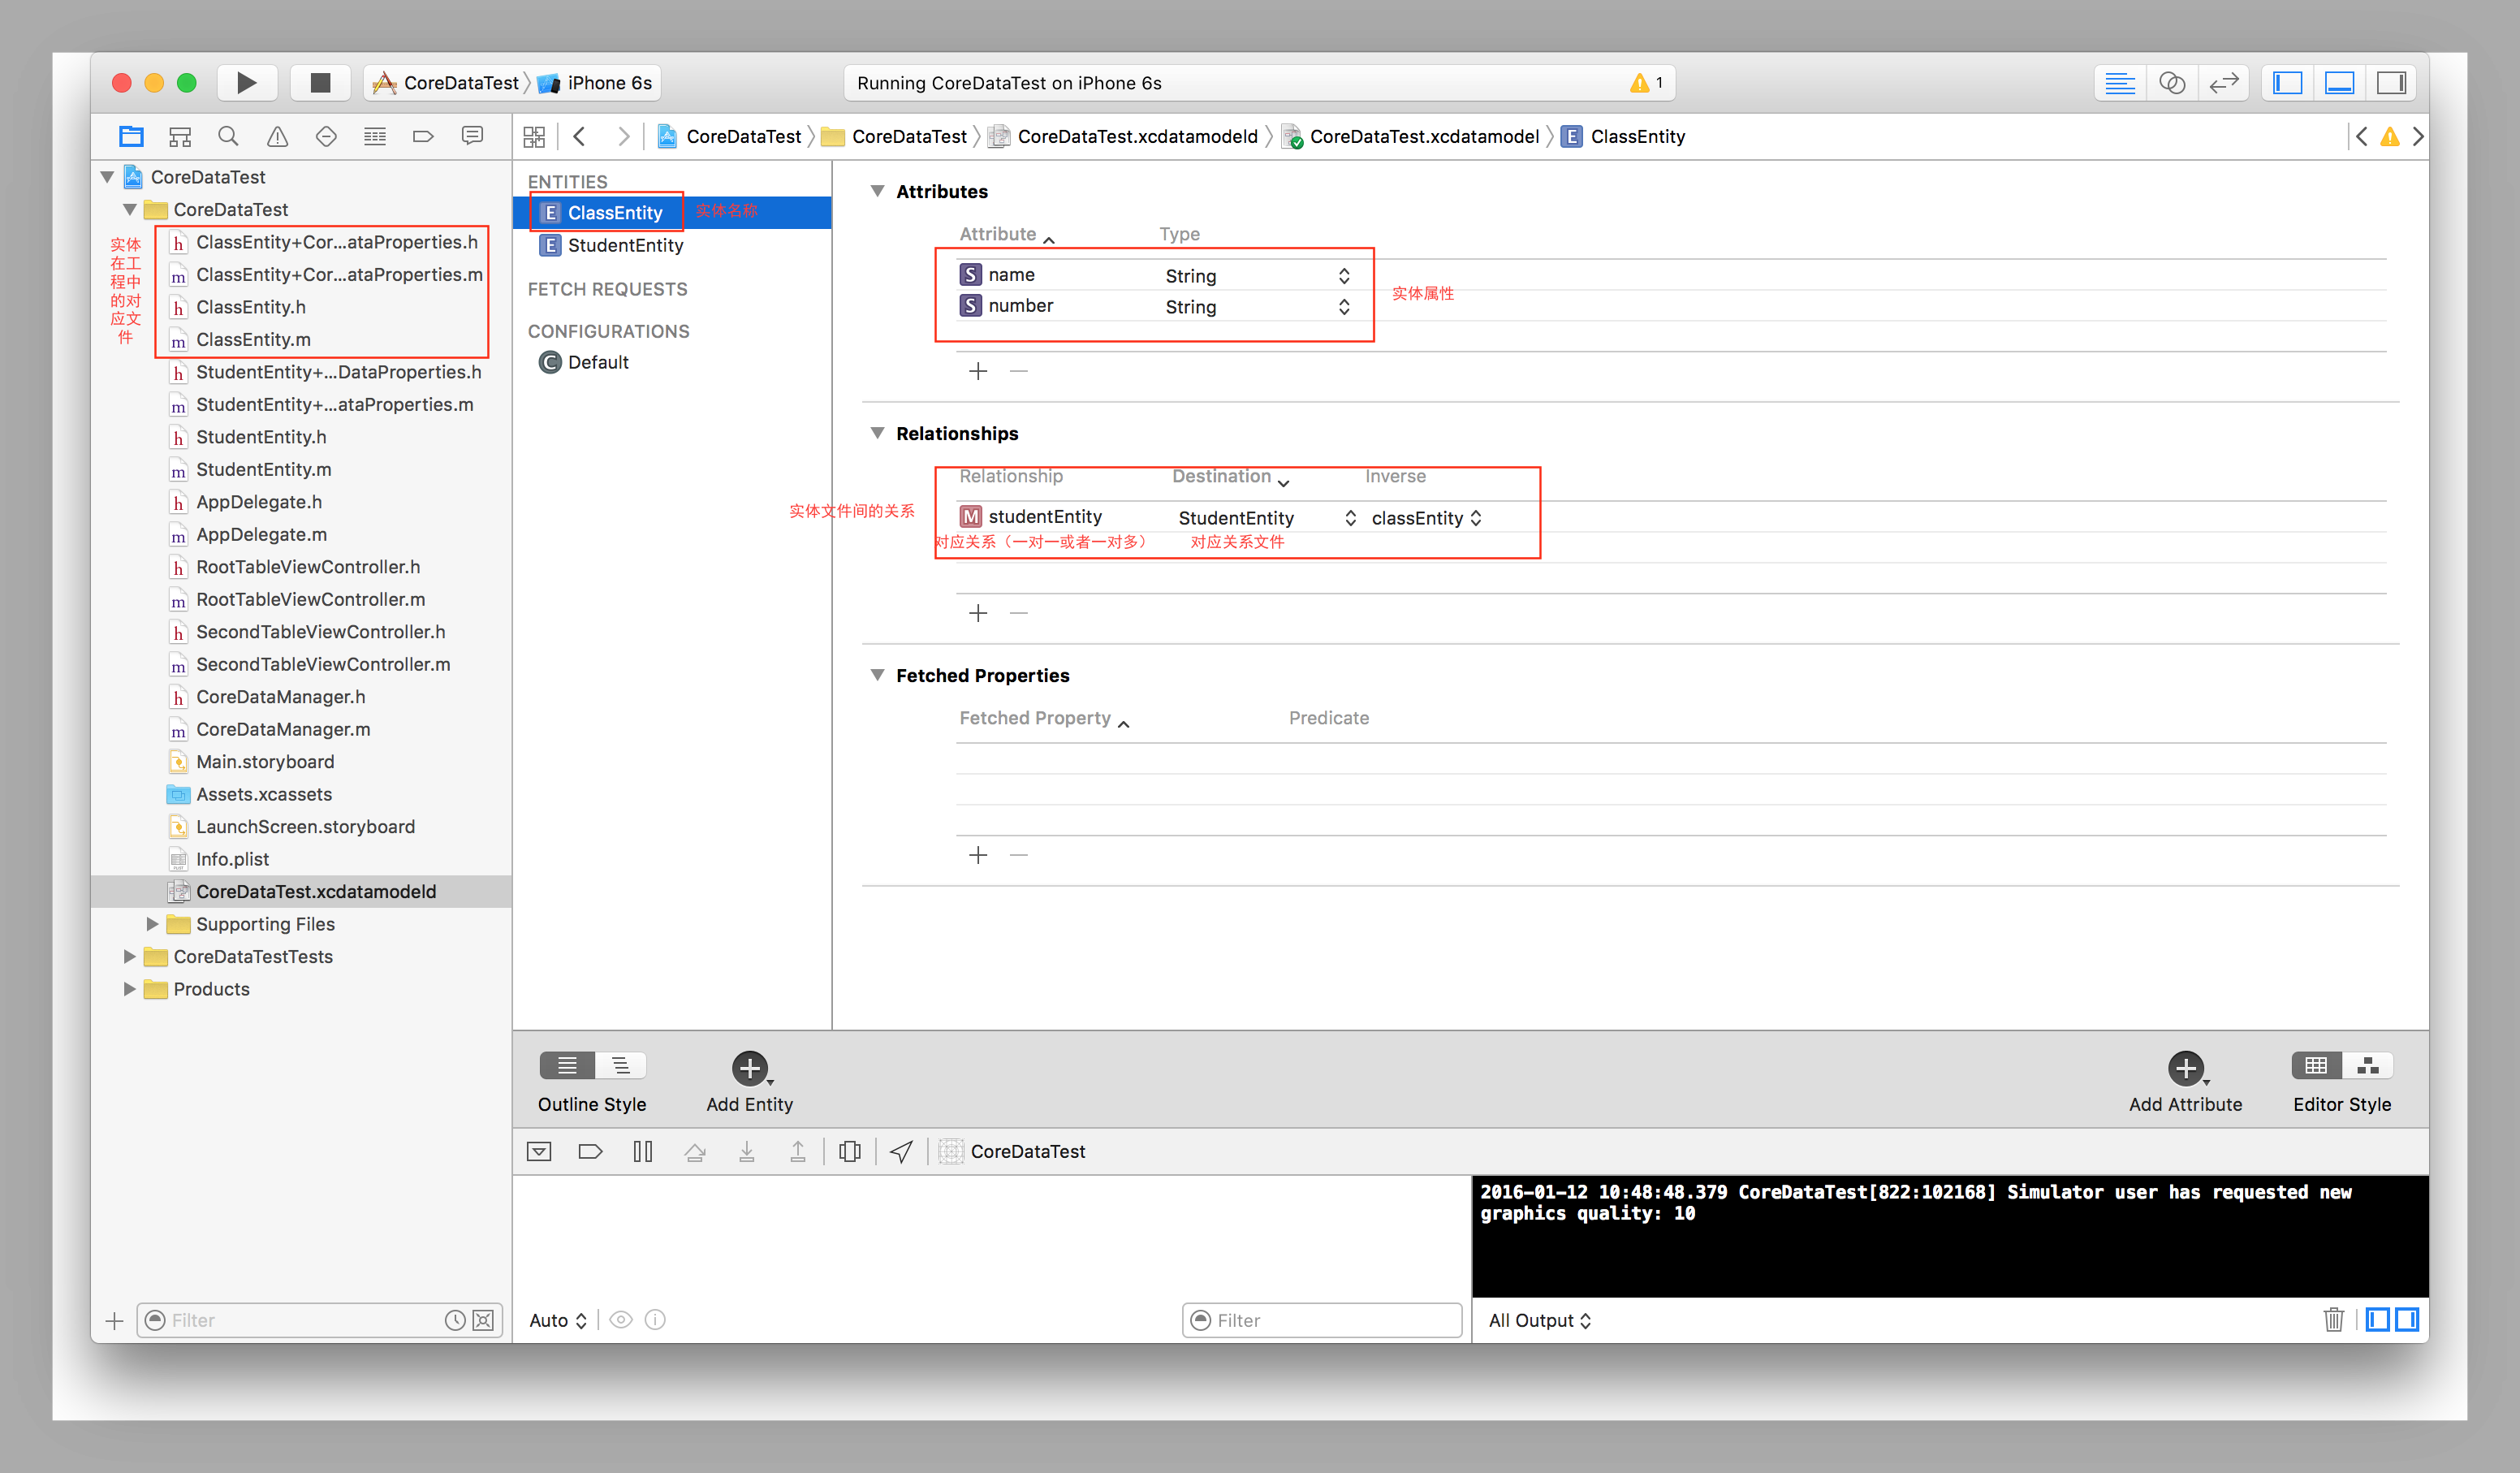

在创建完成这两个对应的工程实体文件和工程中的类文件后我们现在需要创建一个整体的管理文件来管理这两个文件中的对应的model文件的添加删除和修改。一般我们创建的的管理文件大多都是单例类所以我们现在来创建一个类文件继承与NSObject名字叫做CoreDataManager。

创建完成后在内部添加学生和班级的添加删除和查询的方法,一般我们创建学生时要确定学生对应的班级所以添加学生的时候需要有对应班级的参数。而创建班级时我们只需要指定好班级名称就可以。以下是这些方法的内部实现
//使用GCD创建单例
+(CoreDataManager *)shareManager
{
    static CoreDataManager *manager = nil;
    static dispatch_once_t queue;
    dispatch_once(&queue, ^{
        manager = [[CoreDataManager alloc] init];
    });
  return manager;
}

//添加班级
-(void)addClassEntity:(NSString *)string
{
    //创建班级实体的描述
    NSEntityDescription *entityDescription = [NSEntityDescription entityForName:@"ClassEntity" inManagedObjectContext:[kAppdelegate managedObjectContext]];
    //创建班级实体
    ClassEntity *classEntity = [[ClassEntity alloc] initWithEntity:entityDescription insertIntoManagedObjectContext:[kAppdelegate managedObjectContext]];
    //给班级实体的属性命名
    classEntity.name = string;
    //循环创建班级中对应的学生
    for (int i = 0; i < 10; i++) {
        //调用学生的创建方法来创建学生实体
        [classEntity addStudentEntityObject:[self addStudentWithString:@"张三" class:classEntity]];
    }
    //保存到真实地数据库中
    [kAppdelegate saveContext];
}

-(StudentEntity *)addStudentWithString:(NSString *)string class:(ClassEntity *)classEntity
{
    //创建学生的实体描述
    NSEntityDescription *entityDescription = [NSEntityDescription entityForName:@"StudentEntity" inManagedObjectContext:[kAppdelegate managedObjectContext]];
    //创建学生实体
    StudentEntity *student = [[StudentEntity alloc] initWithEntity:entityDescription insertIntoManagedObjectContext:[kAppdelegate managedObjectContext]];
    //给学生的实体属性赋值
    student.name = string;
    //给到指定的班级中
    student.classEntity = classEntity;
    //保存到真实的数据库中
    [kAppdelegate saveContext];
    //返回创建的好的学生
    return student;
}

//查询班级
-(NSArray *)selectClassEntity
{
    //创建查询请求
    NSFetchRequest *fetchRequest = [[NSFetchRequest alloc] initWithEntityName:@"ClassEntity"];
    //获取查询结果
    NSArray *arr = [[kAppdelegate managedObjectContext] executeFetchRequest:fetchRequest error:nil];
    //返回结果
    return arr;
}

//删除班级

-(void)deleteClassEntity
{
    //获取当前所有的班级
    NSArray *arr = [self selectClassEntity];
    //循环遍历所有的班级并删除
    for (ClassEntity *classEntity in arr) {
        //实体删除方法
        [[kAppdelegate managedObjectContext] deleteObject:classEntity];
    }
    //修改真实数据库
    [kAppdelegate saveContext];
}

- (void)modifyClassEntity
{
    //通过查询语句获取当前所有的班级
    NSArray *arr = [self selectClassEntity];
    //forin遍历所有的班级
    for (ClassEntity *classEntyity in arr) {
        //修改所有班级的名称
        classEntyity.name = @"BJS166666";
    }
    //保存当前的修改到真实数据库中
    [kAppdelegate saveContext];
}

//根据班级添加学生
-(void)addStudentWithClass:(ClassEntity *)classEntity
{
    //创建学生实体描述
    NSEntityDescription *entityDescription = [NSEntityDescription entityForName:@"StudentEntity" inManagedObjectContext:[kAppdelegate managedObjectContext]];
    //创建学生实体
    StudentEntity *student = [[StudentEntity alloc] initWithEntity:entityDescription insertIntoManagedObjectContext:[kAppdelegate managedObjectContext]];
    //给学生实体属性赋值
    student.name = @"李四";
    //指定学生实体所属的班级
    student.classEntity = classEntity;
    //保存到真实数据库中
    [kAppdelegate saveContext];
}

//根据班级查询学生
- (NSMutableArray *)selectStudentEntityWithClassEntity:(ClassEntity *)classEntity
{
    //创建可变数组来存放班级中存在的学生
    NSMutableArray *arr = [NSMutableArray array];
    //直接通过上级传入的班级获取班级中所有的学生
    for (StudentEntity *student in classEntity.studentEntity) {
        //在数组中添加学生实体
        [arr addObject:student];
    }
    //添加完成后返回存放学生的数组
    return arr;
}


//根据班级删除学生
-(void)deleteStudentEntityWithClassEntity:(ClassEntity *)classEntity
{
    //遍历当前班级下的所有学生
    for (StudentEntity *studentEntity in classEntity.studentEntity) {
        //删除当前班级下的学生
        [[kAppdelegate managedObjectContext] deleteObject:studentEntity];
    }
    //修改真实数据库中的文件
    [kAppdelegate saveContext];
}
在这些文件内的方法都实现后我们就可以直接在你想要实现的控制器中去使用这些方法了
创建班级类然后在班级类的ViewDidLoad中创建添加删除和修改的按钮
- (void)viewDidLoad {
    [super viewDidLoad];

    // Uncomment the following line to preserve selection between presentations.
    // self.clearsSelectionOnViewWillAppear = NO;

    // Uncomment the following line to display an Edit button in the navigation bar for this view controller.
    // self.navigationItem.rightBarButtonItem = self.editButtonItem;


    //创建添加班级的按钮
    UIBarButtonItem *bar = [[UIBarButtonItem alloc] initWithBarButtonSystemItem:UIBarButtonSystemItemAdd target:self action:@selector(addClass)];
    self.navigationItem.rightBarButtonItem = bar;

    //创建删除班级的按钮
    UIBarButtonItem *bar1 = [[UIBarButtonItem alloc] initWithBarButtonSystemItem:UIBarButtonSystemItemAdd target:self action:@selector(deleteClass)];
    self.navigationItem.leftBarButtonItem = bar1;
    //获取当前所有的班级
    [self selectClassEntity];
    //创建修改班级的按钮
    UIButton *modifyButton = [UIButton buttonWithType:UIButtonTypeSystem];
    [modifyButton addTarget:self action:@selector(modifyClass) forControlEvents:UIControlEventTouchUpInside];
    [modifyButton setTitle:@"修改" forState:UIControlStateNormal];
    self.navigationItem.titleView = modifyButton;
}
然后再控制器中去实现对应的方法
//点击按钮添加班级
- (void)addClass
{
    [[CoreDataManager shareManager] addClassEntity:[NSString stringWithFormat:@"BJS150%03d",arc4random()%100+1]];
    [self selectClassEntity];

}

//查询班级并刷新界面
-(void)selectClassEntity
{
    self.classArr = [[CoreDataManager shareManager] selectClassEntity];
    [self.tableView reloadData];
}

//删除班级
- (void)deleteClass
{
    [[CoreDataManager shareManager] deleteClassEntity];
    [self selectClassEntity];
}

//修改班级
- (void)modifyClass
{
    [[CoreDataManager shareManager] modifyClassEntity];
    [self selectClassEntity];
}
在查询结束后使用查询完成后的结果
//
- (NSInteger)numberOfSectionsInTableView:(UITableView *)tableView {
    return 1;
}

- (NSInteger)tableView:(UITableView *)tableView numberOfRowsInSection:(NSInteger)section {
    return self.classArr.count;
}


- (UITableViewCell *)tableView:(UITableView *)tableView cellForRowAtIndexPath:(NSIndexPath *)indexPath {
    static NSString *identifier = @"cell";
    UITableViewCell *cell = [tableView dequeueReusableCellWithIdentifier:identifier];
    if (!cell) {
        cell = [[UITableViewCell alloc] initWithStyle:UITableViewCellStyleDefault reuseIdentifier:identifier];
    }
    cell.textLabel.text = [self.classArr[indexPath.row] name];
    // Configure the cell...
    return cell;
}
在给每个cell赋完值后我们就可以实现班级界面向学生界面的跳转了
-(void)tableView:(UITableView *)tableView didSelectRowAtIndexPath:(NSIndexPath *)indexPath
{
    SecondTableViewController *secondVC = [SecondTableViewController new];
    secondVC.studentArr = [NSMutableArray array];
//读取当前班级下的所有的学生并传到下级界面
    for (StudentEntity *student in [self.classArr[indexPath.row] studentEntity]) {
        [secondVC.studentArr addObject:student];
    }
//将当前的班级整体传到下级界面等待下级界面的操作使用
    secondVC.classEntity = self.classArr[indexPath.row];
    [self.navigationController pushViewController:secondVC animated:YES];
}
然后创建学生类的控制器并在ViewDidLoad中实现学生的增删改查
- (void)viewDidLoad {
    [super viewDidLoad];
    // Uncomment the following line to preserve selection between presentations.
    // self.clearsSelectionOnViewWillAppear = NO;

    // Uncomment the following line to display an Edit button in the navigation bar for this view controller.
    // self.navigationItem.rightBarButtonItem = self.editButtonItem;

    //创建添加学生的按钮
    UIBarButtonItem *bar = [[UIBarButtonItem alloc] initWithBarButtonSystemItem:UIBarButtonSystemItemAdd target:self action:@selector(addStudent)];
    self.navigationItem.rightBarButtonItem = bar;
    //创建删除学生的按钮
    UIButton *button = [UIButton buttonWithType:UIButtonTypeSystem];
    [button setTitle:@"删除" forState:UIControlStateNormal];
    [button addTarget:self action:@selector(deleteStudent) forControlEvents:UIControlEventTouchUpInside];
    button.frame = CGRectMake(0, 0, 100, 30);
    self.navigationItem.titleView = button;

}
实现这些后实现每个按钮的点击事件
//添加学生
- (void)addStudent
{
    [[CoreDataManager shareManager] addStudentWithClass:self.classEntity];
    [self seleteStudentEntity];
}
//查询学生
- (void)seleteStudentEntity
{
    self.studentArr = [[CoreDataManager shareManager] selectStudentEntityWithClassEntity:self.classEntity];
    [self.tableView reloadData];
}

//删除学生
- (void)deleteStudent
{
    [[CoreDataManager shareManager] deleteStudentEntityWithClassEntity:self.classEntity];
    [self seleteStudentEntity];

}
在查询到学生的数据后给对应的cell赋值
- (NSInteger)numberOfSectionsInTableView:(UITableView *)tableView {
    return 1;
}

- (NSInteger)tableView:(UITableView *)tableView numberOfRowsInSection:(NSInteger)section {
    return self.studentArr.count;
}


- (UITableViewCell *)tableView:(UITableView *)tableView cellForRowAtIndexPath:(NSIndexPath *)indexPath {
    static NSString *identifier = @"cell1";
    UITableViewCell *cell = [tableView dequeueReusableCellWithIdentifier:identifier];
    if (!cell) {
        cell = [[UITableViewCell alloc] initWithStyle:UITableViewCellStyleDefault reuseIdentifier:identifier];
    }
    cell.textLabel.text = [self.studentArr[indexPath.row] name];
    // Configure the cell...

    return cell;
}
好的在做完这几部操作后咱们对多表CoreData的操作就完成了.