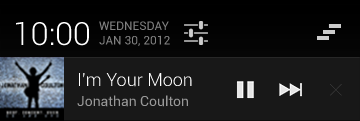
通知栏的自定义布局:转:http://blog.csdn.net/vipzjyno1/article/details/25248021
拓展
实现自定义的通知栏效果:
这里要用到RemoteViews这个类。实现以下2种自定义布局。
Notification的自定义布局是RemoteViews,和其他RemoteViews一样,在自定义视图布局文件中,仅支持FrameLayout、LinearLayout、RelativeLayout三种布局控件和AnalogClock、Chronometer、Button、ImageButton、ImageView、ProgressBar、TextView、ViewFlipper、ListView、GridView、StackView和AdapterViewFlipper这些显示控件,不支持这些类的子类或Android提供的其他控件。否则会引起ClassNotFoundException异常
步骤如下:
1)创建自定义视图
2)获取远程视图对象(注:Notification的contentView不能为空)
3)设置PendingIntent(来响应各种事件)
4)发起Notification
大体4步骤这里就不详细说了,下面就把DEMO中的列子拿出来说下
样式:
1.自定义带按钮通知栏(如下样式)
正在进行的
“正在进行的”通知使用户了解正在运行的后台进程。例如,音乐播放器可以显示正在播放的音乐。也可以用来显示需要长时间处理的操作,例如下载或编码视频。“正在进行的”通知不能被手动删除。

- /**
- * 带按钮的通知栏
- */
- public void showButtonNotify(){
- NotificationCompat.Builder mBuilder = new Builder(this);
- RemoteViews mRemoteViews = new RemoteViews(getPackageName(), R.layout.view_custom_button);
- mRemoteViews.setImageViewResource(R.id.custom_song_icon, R.drawable.sing_icon);
- //API3.0 以上的时候显示按钮,否则消失
- mRemoteViews.setTextViewText(R.id.tv_custom_song_singer, "周杰伦");
- mRemoteViews.setTextViewText(R.id.tv_custom_song_name, "七里香");
- //如果版本号低于(3。0),那么不显示按钮
- if(BaseTools.getSystemVersion() <= 9){
- mRemoteViews.setViewVisibility(R.id.ll_custom_button, View.GONE);
- }else{
- mRemoteViews.setViewVisibility(R.id.ll_custom_button, View.VISIBLE);
- }
- //
- if(isPlay){
- mRemoteViews.setImageViewResource(R.id.btn_custom_play, R.drawable.btn_pause);
- }else{
- mRemoteViews.setImageViewResource(R.id.btn_custom_play, R.drawable.btn_play);
- }
- //点击的事件处理
- Intent buttonIntent = new Intent(ACTION_BUTTON);
- /* 上一首按钮 */
- buttonIntent.putExtra(INTENT_BUTTONID_TAG, BUTTON_PREV_ID);
- //这里加了广播,所及INTENT的必须用getBroadcast方法
- PendingIntent intent_prev = PendingIntent.getBroadcast(this, 1, buttonIntent, PendingIntent.FLAG_UPDATE_CURRENT);
- mRemoteViews.setOnClickPendingIntent(R.id.btn_custom_prev, intent_prev);
- /* 播放/暂停 按钮 */
- buttonIntent.putExtra(INTENT_BUTTONID_TAG, BUTTON_PALY_ID);
- PendingIntent intent_paly = PendingIntent.getBroadcast(this, 2, buttonIntent, PendingIntent.FLAG_UPDATE_CURRENT);
- mRemoteViews.setOnClickPendingIntent(R.id.btn_custom_play, intent_paly);
- /* 下一首 按钮 */
- buttonIntent.putExtra(INTENT_BUTTONID_TAG, BUTTON_NEXT_ID);
- PendingIntent intent_next = PendingIntent.getBroadcast(this, 3, buttonIntent, PendingIntent.FLAG_UPDATE_CURRENT);
- mRemoteViews.setOnClickPendingIntent(R.id.btn_custom_next, intent_next);
- mBuilder.setContent(mRemoteViews)
- .setContentIntent(getDefalutIntent(Notification.FLAG_ONGOING_EVENT))
- .setWhen(System.currentTimeMillis())// 通知产生的时间,会在通知信息里显示
- .setTicker("正在播放")
- .setPriority(Notification.PRIORITY_DEFAULT)// 设置该通知优先级
- .setOngoing(true)
- .setSmallIcon(R.drawable.sing_icon);
- Notification notify = mBuilder.build();
- notify.flags = Notification.FLAG_ONGOING_EVENT;
- mNotificationManager.notify(notifyId, notify);
- }
- //先设定RemoteViews
- RemoteViews view_custom = new RemoteViews(getPackageName(), R.layout.view_custom);
- //设置对应IMAGEVIEW的ID的资源图片
- view_custom.setImageViewResource(R.id.custom_icon, R.drawable.icon);
- // view_custom.setInt(R.id.custom_icon,"setBackgroundResource",R.drawable.icon);
- view_custom.setTextViewText(R.id.tv_custom_title, "今日头条");
- view_custom.setTextViewText(R.id.tv_custom_content, "金州勇士官方宣布球队已经解雇了主帅马克-杰克逊,随后宣布了最后的结果。");
- <span style="font-family: Arial, Helvetica, sans-serif;">mBuilder.setContent(view_custom)</span>
实现:大视图风格通知(注:4.1之前的版本不支持大视图)
只在通知被展开时显示
何时展开:通知处在顶端,或者用户通过收拾展开
收件箱风格的通知:
相比普通视图,只多出:7. 详情区域
效果图如下:

1.NotificationCompat.BigPictureStyle 大图片风格:详情区域包含一个256dp高度的位图
2.NotificationCompat.BigTextStyle 大文字风格:显示一个大的文字块
3.NotificationCompat.InboxStyle 收件箱风格:显示多行文字
各种风格都具有以下常规视图不具有的内容选项:
1.大标题:在展开视图时替代普通视图的标记
2.总结文字:允许你在详情区域之下增加一行内容
- NotificationCompat.BigPictureStyle inboxStyle = new NotificationCompat.InboxStyle();
- String[] events = new String[5];
- // Sets a title for the Inbox style big view
- inboxStyle.setBigContentTitle("大视图内容:");
- // Moves events into the big view
- for (int i=0; i < events.length; i++) {
- inboxStyle.addLine(events[i]);
- }
- mBuilder.setContentTitle("测试标题")
- .setContentText("测试内容")
- // .setNumber(number)//显示数量
- .setStyle(inboxStyle)//设置风格
- .setTicker("测试通知来啦");
开发中碰到的问题
(注:下面所指的低版本是指2.3及2.3以下版本)
1.如何取消掉通知栏上的通知
(1)设置对应的flags,让用户点击既被消除:
notification.flags = FLAG_AUTO_CANCEL;
(2) 通过手动消除某项或则全部通知
mNotificationMgr.cancle(NOTIFICATION_ID);//消除对应ID的通知
mNotificationMgr.cancleAll();//消除创建的所有通知
2.低版本中的部分方法已经被弃用的
(1)Notification.Builder(this).getNotification()
(2)mNotification.setLatestEventInfo(this, "title", "content", null);
这些方法都已经被启用,虽然还有效果,可是不建议使用。所以开发过程中尽量使用NotificationCompat.Builder(this)的构建方法去创建一个通知类。
3.低版本中会报的错误及解决方案:
(1)错误代码:java.lang.IllegalArgumentException: contentIntent required: pkg=com.example.notifications id=100 notification=Notification(vibrate=default,sound=null,defaults=0x2,flags=0x0)
解决方案:如果在高版本不会出错,而在2.3上面报了这个错误,通过开发文档中的以下知道你可以找打:
For this reason, you should always ensure that UI controls in a notification are also available in an Activity in your app, and you should always start that Activity when users click the notification. To do this, use the setContentIntent() method.
你就应该知道,缺少了setContentIntent() 这个方法,在2.3及更低的版本中,必须给它设置设置contentIntent,如果你点击没有意图,可以在赋值的的Intent中设置为new Intent()既可,切记contentIntent不能为空。
代码如下:
- public PendingIntent getDefalutIntent(int flags){
- PendingIntent pendingIntent= PendingIntent.getActivity(this, 1, new Intent(), flags);
- return pendingIntent;
- }
(2)错误代码:android.app.RemoteServiceException: Bad notification posted from package com.example.notifications: Couldn't expand RemoteViews for: StatusBarNotification(package=com.example.notifications id=101 tag=null notification=Notification(vibrate=null,sound=null,defaults=0x0,flags=0x2))
解决方法:
在自定义的时候,发现了这个问题,解决:每次更新时都必须把RemoteViews给new出来才行,不能利用已有的notification.contentView直接操作!
4.低版本中,自定义的通知栏中如果带有按钮,可能按钮点击事件会失灵
解决方法:看其它的应用,好像在低版本都会隐藏掉那些按钮,就是为了不影响用户体验,所以应该就这么解决,判断版本号在去决定是否现在按钮。
5.低版本中,自定义布局中的字体颜色看不清
如右图:
解决方案:
由于2.3及之前版本,背景设是白色的那我们定义字体颜色为系统预设的颜色:
?android:attr/textColorPrimary
在资源的src/values目录中的style.xml文件中设置它标题和内容的样式为:
- <?xml version="1.0" encoding="utf-8"?>
- <resources>
- <style name="NotificationContent">
- <item name="android:textColor">?android:attr/textColorPrimary</item>
- </style>
- <style name="NotificationTitle">
- <item name="android:textColor">?android:attr/textColorPrimary</item>
- <item name="android:textStyle">bold</item>
- </style>
- </resources>
在2.3之后的版本中(即API >=9的版本中),在资源文件下的src/values-v9目录中的style.xml文件中设置它标题和内容的样式为:
- <?xml version="1.0" encoding="utf-8"?>
- <resources>
- <style name="NotificationContent" parent="android:TextAppearance.StatusBar.EventContent" />
- <style name="NotificationTitle" parent="android:TextAppearance.StatusBar.EventContent.Title" />
- </resources>
最后赋给自定义布局中的对应标题和内容对应的style即可。
对应解决网址:
1.http://stackoverflow.com/questions/6250356/how-to-use-default-notification-style
2.http://stackoverflow.com/questions/4867338/custom-notification-layouts-and-text-colors/7320604#7320604
3.http://developer.android.com/guide/topics/ui/notifiers/notifications.html#CustomExpandedView (官方文档)
http://developer.android.com/about/versions/android-2.2-highlights.html
6.低版本中mBuilder.setProgress(100, progress, false);没用,不显示进度条
解决方法:此方法在4.0及以后版本才有用,如果为早期版本:需要自定义通知布局,其中包含ProgressBar视图
7.自定义布局的时候,不同版本方法不一样。(弄了半天,在2.3版本不显示,原来是方法不兼容)
2.3及2.3之前:
通过
- Notification notify = mBuilder.build();
- notify.contentView = view_custom;
- mNotificationManager.notify(notifyId, notify)
方法赋予VIEW。
2.3之后:
通过Builder以下方法赋于自定义布局。
mBuilder.setContent(view_custom)
这里就不贴DEMO中的代码了,大家可以下个DEMO自己看,里面也都有注释的,可能有的地方会有错误,忘大家指出,以便及时修改,谢谢。
一个DEMO让你更懂Notification
DEMO截图:


转:http://www.cnblogs.com/zenfly/archive/2012/02/09/2343923.html
Android消息通知(notification)和PendingIntent传值
Android支持Toast和NotificationManager两种通知方式,前者相当于一个定时关闭的对话框,后者是在状态栏上显示一条消息。Toast和Notification都可以随时取消。
Toast
A toast is a view containing a quick little message for the user. The toast class helps you create and show those. Toast的使用很简单:
Toast.makeText(this, "Service destroyed…", Toast.LENGTH_LONG).show();
NotificationManager
NotificationManager负责通知用户事件的发生。
NotificationManager有三个公共方法:
1. cancel(int id) 取消以前显示的一个通知.假如是一个短暂的通知,试图将隐藏,假如是一个持久的通知,将从状态条中移走.
2. cancelAll() 取消以前显示的所有通知。
3. notify(int id, Notification notification) 把通知持久的发送到状态条上.
//初始化NotificationManager:
 NotificationManager nm = (NotificationManager)getSystemService(NOTIFICATION_SERVICE);
Notification代表着一个通知.
Notification的属性:
audioStreamType 当声音响起时,所用的音频流的类型
contentIntent 当通知条目被点击,就执行这个被设置的Intent.
contentView 当通知被显示在状态条上的时候,同时这个被设置的视图被显示.
defaults 指定哪个值要被设置成默认的.
deleteIntent 当用户点击"Clear All Notifications"按钮区删除所有的通知的时候,这个被设置的Intent被执行.
icon 状态条所用的图片.
iconLevel 假如状态条的图片有几个级别,就设置这里.
ledARGB LED灯的颜色.
ledOffMS LED关闭时的闪光时间(以毫秒计算)
ledOnMS LED开始时的闪光时间(以毫秒计算)
number 这个通知代表事件的号码
sound 通知的声音
tickerText 通知被显示在状态条时,所显示的信息
vibrate 振动模式.
when 通知的时间戳.
Notification的公共方法:
describeContents() Describe the kinds of special objects contained in this Parcelable's marshalled representation.
setLatestEventInfo(Context context, CharSequence contentTitle, CharSequence contentText, PendingIntent contentIntent) 设置Notification留言条的参数
writeToParcel(Parcel parcel, int flags) Flatten this notification from a parcel.
toString() …………….
将Notification发送到状态条上:
Notification notification = new Notification(R.drawable.icon, "Service started", System.currentTimeMillis());

PendingIntent contentIntent = PendingIntent.getActivity(this, 0, new Intent(this, Main.class), 0);

 // must set this for content view, or will throw a exception

notification.setLatestEventInfo(this, "Test Service", "Service started", contentIntent);

nm.notify(R.string.hello, notification);
Notification的取消
nm.cancel(R.string.hello);
完整代码实现
public static void addNotificaction(String pId,String pTtitle,String pContent) {
        NotificationManager manager = (NotificationManager)getSystemService(NOTIFICATION_SERVICE);
        // 创建一个Notification
        Notification notification = new Notification();
        // 设置显示在手机最上边的状态栏的图标
        notification.icon = R.drawable.icon;
        // 当当前的notification被放到状态栏上的时候,提示内容
        notification.tickerText = pTtitle;

        /***
         * notification.contentIntent:一个PendingIntent对象,当用户点击了状态栏上的图标时,该Intent会被触发
         * notification.contentView:我们可以不在状态栏放图标而是放一个view
         * notification.deleteIntent 当当前notification被移除时执行的intent
         * notification.vibrate 当手机震动时,震动周期设置
         */
        // 添加声音提示
        notification.defaults=Notification.DEFAULT_SOUND;
        // audioStreamType的值必须AudioManager中的值,代表着响铃的模式
        notification.audioStreamType= android.media.AudioManager.ADJUST_LOWER;

        //下边的两个方式可以添加音乐
        //notification.sound = Uri.parse("file:///sdcard/notification/ringer.mp3");
        //notification.sound = Uri.withAppendedPath(Audio.Media.INTERNAL_CONTENT_URI, "6");
        Intent intent = new Intent(this, AndroidMain.class);
        PendingIntent pendingIntent = PendingIntent.getActivity(this, 0, intent, PendingIntent.FLAG_ONE_SHOT);
        // 点击状态栏的图标出现的提示信息设置
        notification.setLatestEventInfo(this, pTtitle, pContent, pendingIntent);
        manager.notify(id, notification);
    }
Pendingintent传值问题
pendingintent传值经常获取到的值是第一次的值或者null,这个跟第二个参数和最后一个参数选择有关系。
PendingIntent pendingIntent = PendingIntent.getActivity(this, id, intent, PendingIntent.FLAG_UPDATE_CURRENT);
注:如果所要启动的Activity是单例模式,其传值方法请看onNewIntent调用时机
总结一下pendingIntent的常用FLAG标签:
FLAG_ONE_SHOT:this PendingIntent can only be used once. If set, after send() is called on it, it will be automatically canceled for you and any future attempt to send through it will fail.
FLAG_NO_CREATE:if the described PendingIntent does not already exist, then simply return null instead of creating it.
FLAG_CANCEL_CURRENT:if the described PendingIntent already exists, the current one is canceled before generating a new one. You can use this to retrieve a new PendingIntent when you are only changing the extra data in the Intent; by canceling the previous pending intent, this ensures that only entities given the new data will be able to launch it. If this assurance is not an issue, consider FLAG_UPDATE_CURRENT.
FLAG_UPDATE_CURRENT: if the described PendingIntent already exists, then keep it but its replace its extra data with what is in this new Intent. This can be used if you are creating intents where only the extras change, and don't care that any entities that received your previous PendingIntent will be able to launch it with your new extras even if they are not explicitly given to it.
上面4个flag中最经常使用的是FLAG_UPDATE_CURRENT,因为描述的Intent有更新的时候需要用到这个flag去更新你的描述,否则组件在下次事件发生或时间到达的时候extras永远是第一次Intent的extras。使用FLAG_CANCEL_CURRENT也能做到更新extras,只不过是先把前面的extras清除,另外FLAG_CANCEL_CURRENT和FLAG_UPDATE_CURRENT的区别在于能否新new一个Intent,FLAG_UPDATE_CURRENT能够新new一个Intent,而FLAG_CANCEL_CURRENT则不能,只能使用第一次的Intent。
另外两flag就比较少用,利用FLAG_ONE_SHOT获取的PendingIntent只能使用一次,再使用PendingIntent也将失败,利用FLAG_NO_CREAT获取的PendingIntent若描述的Intent不存在则返回NULL值.


