原创文章与源码,如果转载请注明来源。
开发环境:Myeclipse,依赖包:apache-httpclient 、 Jsoup、base64
一、概述


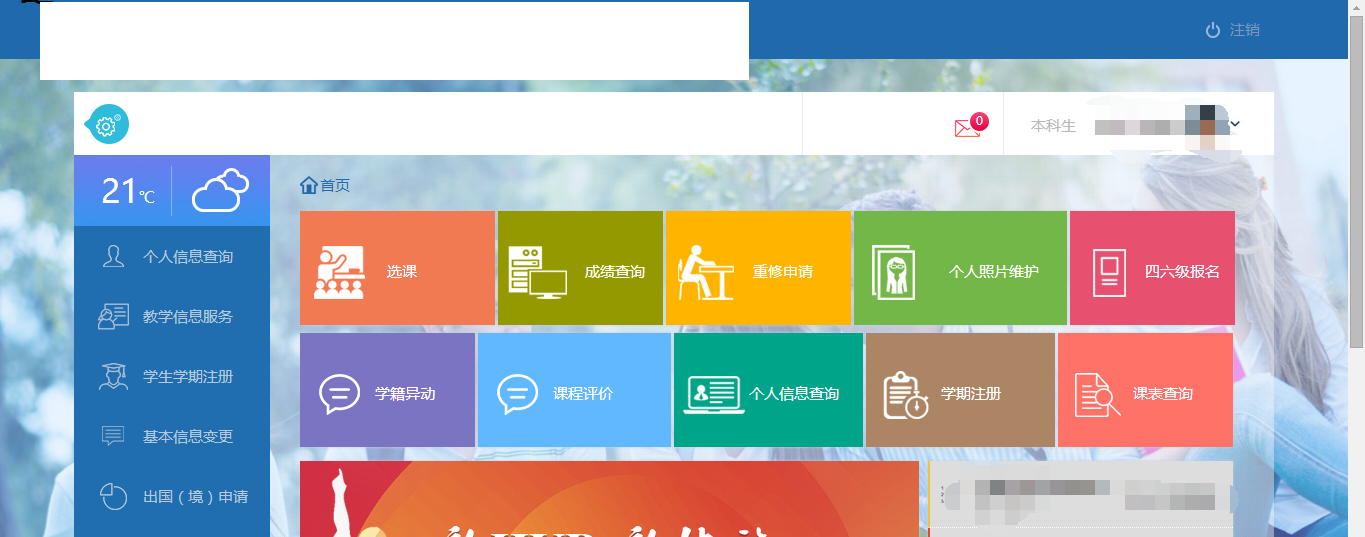
整个系统用Java开发。我们现在要做的是类似于超级课程表、课程格子之类的功能:输入一个学生的教务系统账号、密码,得到Ta的课程表信息。点击进入课表查询,我们发现了这样的页面:

这就是我们需要的结果。其实思路很简单,用java访问这个链接,拿到Html字符串,然后解析链接等需要的数据。
这个页面的URL是http://s.hub.hust.edu.cn/aam/report/scheduleQuery.jsp
因此,我们发送HTTP请求GET http://s.hub.hust.edu.cn/aam/report/scheduleQuery.jsp,这样就可以等到课表的内容了。但是,这个页面必须是在登录之后才能访问的,如果直接发送GET请求的话,系统会认为你没有登录,所以会拒绝你的请求(跳转到登录页面),所以,在发送GET请求之前,必须实现模拟登录。
二、JAVA中GET/POST请求的实现
在进行模拟登录之前,我们需要了解一些基本知识。
首先请看关于HTTP请求的基础知识:http://www.cnblogs.com/yin-jingyu/archive/2011/08/01/2123548.html
在java中,实现执行http请求有多种方式,比如使用urlconnection等等,不过在这里我们使用apache-httpclient。HttpClient 是 Apache Jakarta Common 下的子项目,可以用来提供高效的、最新的、功能丰富的支持 HTTP 协议的客户端编程工具包,并且它支持 HTTP 协议最新的版本和建议。
 1 //1. 首先创建一个CookieStore用于存储Cookie数据
 2
 3 CookieStore cookieStore = new BasicCookieStore();
 4
 5 //2.创建httpclient,并关联CookieStore
 6
 7 DefaultHttpClient client = new DefaultHttpClient();
 8 client.setCookieStore(cookieStore);
 9
10 client.getParams().setParameter(CookieSpecPNames.DATE_PATTERNS, Arrays.asList("EEE, dd MMM yyyy HH:mm:ss z")); //该代码用于设置cookie中的expires时间日期格式。添加该代码是因为华科网站使用的cookie日期格式不是标准格式。
创建GET请求:
1 HttpGet get = new HttpGet("http://xxxx");
2 get.setHeader("xxx","xxx");
3 get.setHeader("xxxx","xxxx");
4 get.setHeader("Cookie","cookie");
5 HttpResponse response = client.execute(get);
6 get.releaseConnection();
创建POST请求:
        HttpPost post = new HttpPost("http://xxxx");
        post.setHeader("xxx","xxxx");
        post.setHeader("xxxx","xxxx");
        post.setHeader("Cookie","cookie");

        //对post请求发送参数
        List<NameValuePair> nvps = new ArrayList<NameValuePair>();
        nvps.add(new BasicNameValuePair("username", "111"));
        nvps.add(new BasicNameValuePair("password", "xxx"));
        post.setEntity(new UrlEncodedFormEntity(nvps,"utf-8"));
HttpResponse response = client.execute(post);
从CookieStore得到Cookie字符串
1         StringBuilder stringBuilder = new StringBuilder();
2         for(Cookie cookie:cookieStore.getCookies()){
3             String key =cookie.getName();
4             String value = cookie.getValue();
5             stringBuilder.append(key).append("=").append(value).append(";");
6         }
7
8         return stringBuilder.toString();
从HttpResponse对象中获取执行的结果(输入流)
1         InputStream inputStream = response.getEntity().getContent();
2         //获取结果的输入流
从输入流中获取字符串,可以用如下的函数(注意编码问题)
1     public static String in2Str(InputStream in) throws IOException{
2         BufferedReader rd = new BufferedReader(new InputStreamReader(in,"utf-8"));
3         String line = null;
4         StringBuilder sb = new StringBuilder();
5         while ((line=rd.readLine())!=null) {
6             sb.append(line).append("
");
7         }
8         return sb.toString();
9     }
Jsoup解析
参考资料:http://www.open-open.com/jsoup/
以上几段程序代码就是我们程序工作的核心了,在我的源码中,对这些代码进行了封装,你可以轻松找到它们(在spider包中)。
三、模拟登录的实现
一般地,在java web中,登录可以由类似于如下的代码实现:
前台html的代码如下:
1 <form action="/login.action" method="post" >
2     <label for="username">用户名</label>
3     <input id="username" name=“username" type="text" />
4     <label for="password">密码</label>
5     <input id="password" name=“password" type="password" />
6     <input type="submit" value="登录" />
7
8
9 </form>
后台action如下(spring mvc):
 1 @RequestMapping("/login.action")
 2     public String loginSubmit(HttpServletRequest request,HttpServletResponse response,
 3   @RequestParam("username") String username,@RequestParam("password") String password) {
 4
 5
 6     if(username==null||password==null){
 7            request.setAttribute("msg", "您的输入有误!");
 8            return "/login";
 9     }
10      if(username.equals("")||password.equals("")){
11             request.setAttribute("msg", "您的输入有误!");
12             return "/login";
13     }
14   User user = userDao.getUser(username, password);
15   if(user==null){
16        //TODO 登录失败
17        return "xxx";
18   }else{
19       request.getSession().setAttribute("loginUser",user); //保存登录后的用户到session
20       //TODO 登录成功
21        return "xxx";
22   }
23
24 }
其实登录也就是发送POST请求,服务器接收到POST请求(Request)后,对其处理(查询数据库等),返回Response。
其中最关键的与身份验证有关的操作就是request.getSession().setAttribute("loginUser",user) 了。将登录后的用户保存到session中,这样,在访问其他需要身份验证的页面时,服务器只需要判断session中是否有该用户,如果有就表示身份验证通过,如果没有则表示身份验证失败。而java中对于session的实现是依赖于cookie中的jsessionid属性的(参考文档),如果模拟出登录请求后(也就是模拟一个POST请求),得到cookie(也就是得到jsessionid),下次请求时将cookie发送给服务器以表明身份,不就可以访问带有权限的URL了么?
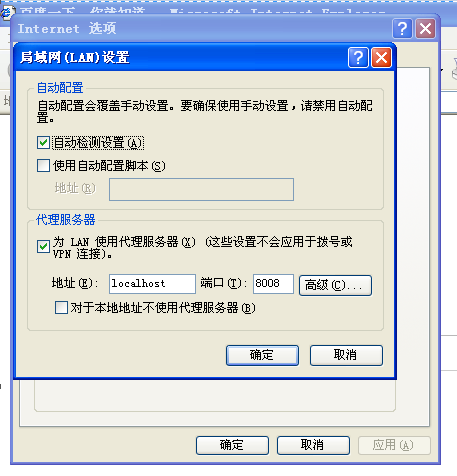
首先我们需要下载webscrab,这个软件有多强大这里就不细说了,大家可以自行百度下载地址。下载后是.jar格式,怎么运行不用我多说了吧。关于webscrab的使用见webscrab.pdf

(webscrab的核心设置)
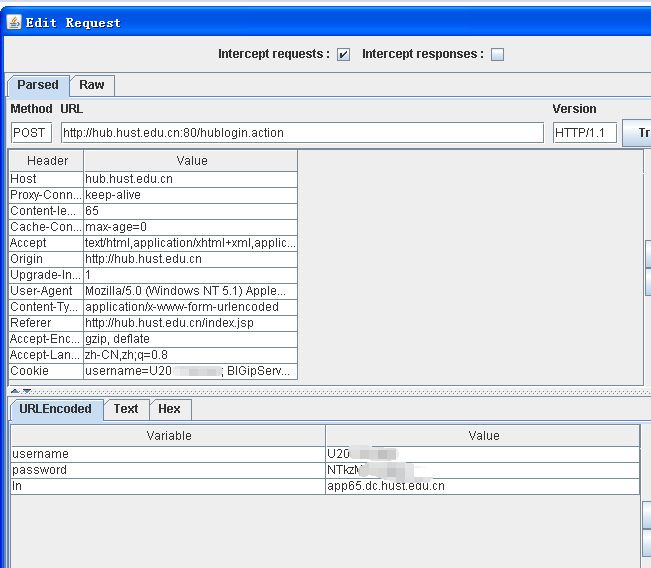
1.拦截登录时的POST请求:(如果不会请参考使用说明或者百度webscrab的使用)

这里我们需要这两种信息:Parsed和URLEncoded,其中,Parsed是POST请求的URL和Header,而URLEncoded则是该请求发送的参数。
我们先看Parsed部分,Parsed部分是由Method、URL和响应头(以<Header,Value>表示的Map型结构)组成。Method表示该请求是POST请求还是GET请求;响应头对应了HttpGet/HttpPost类中的setHeader方法,大多数Header不是必须的,但是在请求时,最好加上相同的Header,以免出现一些问题。例如:如果没有Host(该值表示域名,例如url是http://www.abc.com/login.action,则该值就是www.abc.com)或者Referer头(表示发起请求时的页面,告诉服务器我是从哪里过来的,比如是http://www.abc.com/login.html),在某些情况下可能会出现404错误。【这可能是由于服务器设置了防盗链机制】
因此,最好的处理是将拦截到的Header,都添加到HttpGet/HttpPost中。
或者以一个HashMap的方式存储:(spider.tools.hub.HubEventAdapter和SHubEventAdapter)
1         HashMap<String, String > map = new HashMap<>();
2         map.put("Accept","text/html,application/xhtml+xml,application/xml;q=0.9,image/webp,*/*;q=0.8");
3         map.put("Referer", "http://hub.hust.edu.cn/index.jsp");
4         map.put("Accept-Language","zh-CN,zh;q=0.8");
5         map.put("User-Agent", useragent);
6         map.put("Accept-Encoding", "gzip, deflate");
7         map.put("Host", "hub.hust.edu.cn");
8         map.put("Proxy-Connection", "Keep-Alive");
9         map.put("Pragma", "no-cache");
遍历它们,调用setHeader方法。
下面我们再来看URLEncoded部分,该部分表示POST请求发送给服务器的数据。我们发现,其中有三项数据username、password、ln。
我们发现,这里的password值并不是我们刚刚输入的密码,而似乎是一种加密之后的结果,查看http://hub.hust.edu.cn/index.jsp的源代码,发现如下代码:(第210行)
                    var password = $("input[name='password']").val();
                    if(password==""){
                        alert("请输入用户密码(Password)");
                        $("input[name='password']").focus();
                        return false;
                    }


                    $("input[name='password']").val($.base64.encode(password)); //我们要找的东西在这里!!!
很明显,$.base64,这是base64加密,所以在我们发送POST请求之前,应该对密码进行一次base64加密后再发送。(可以根据密码长度判断是什麼加密类型,一般都是base64加密,32位一般是MD5加密,再长一些则可能是AES加密,如果结果非常长则很可能是RSA加密。)
而ln值,你可以尝试反复刷新页面,反复提交、拦截,会发现每次ln值都会改变,对于这样每次会改变的值,我们采取这样的方式:
GET /index.jsp -> cookie、ln - >POST /login.action
首先对首页执行GET方法,获取首页的HTML内容,并保存cookie。、
接下来用Jsoup解析首页的html内容,得到ln值。
最后将ln值与cookie,加上用户输入的用户名、密码一起POST到/login.action 。
3.中转登录
在发送POST请求后,使用(二)中提供的in2Str方法,得到返回结果,居然发现结果如下:
 1 <body>
 2     <form action="" method="post" name="form1">
 3         <input type="hidden" id="usertype" name="usertype" value="xs">
 4         <input type="hidden" id="username" name="username" value="U2013">
 5         <input type="hidden" id="password" name="password" value="1061d0c  (这里为了用户隐私我没有显示)
 6 269c">
 7         <input type="hidden" id="url" name="url" value="http://s.hub.hust.edu.cn/">
 8         <input type="hidden" name="key1" value="367265"/>
 9         <input type="hidden" name="key2" value="a261ab7e0cecb430651868727cd3fb35"/>
10         <input type="hidden" name="F_App" value="From kslgin. App:app61.dc.hust.edu.cn
11 |app614|IP:10.10.10.247"/>
12     </form>
13     <script type="text/javascript">
14     var url = document.getElementById("url").value;
15     document.form1.action=url+'hublogin.action';
16     document.form1.submit();
17     </script>
18 </body>
原来这就是华科中转登录的机制啊。还是一样的发送POST请求
POST http://s.hub.hust.edu.cn/hublogin.action
usertype,username,password,url,key1,key2,F_App。
注意:此时的域名已经改为http://s.hub.hust.edu.cn/了,那么Header中的Host和Refer值最好也改为http://s.hub.hust.edu.cn/。
4.返回
使用下面代码获取POST执行后的整型返回值:
int code = response.getStatusLine().getStatusCode();
如果code=302则登录成功,否则登录失败。(302也就是表示登录已经成功,可以跳转到其他页面了。)
四、课表的获取
在第三部登录成功之后,我们发现GET http://s.hub.hust.edu.cn/aam/report/scheduleQuery.jsp 似乎不包含我想要的课表信息,于是继续使用webscrab。
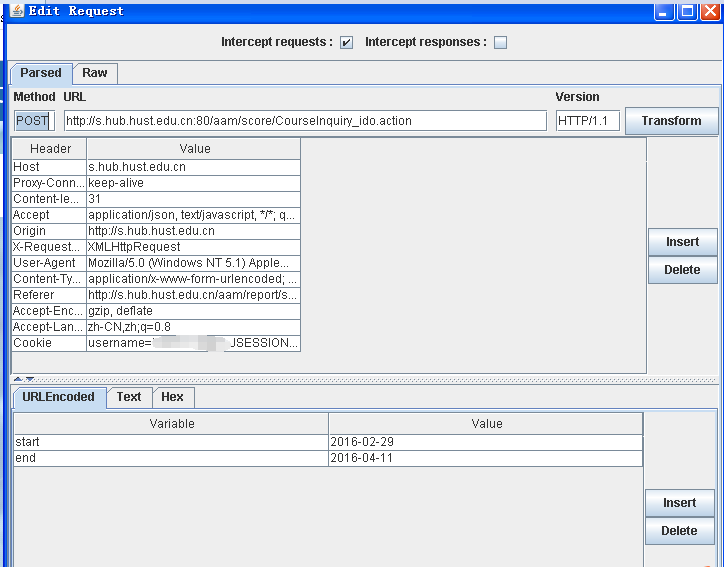
点击“课表查询”,继续拦截请求,通过几次拦截,发现有一个请求应该包含我需要的课表信息。

因此,还是使用跟之前类似的方法,发送POST请求
POST http://s.hub.hust.edu.cn:80/aam/score/CourseInquiry_ido.action
start = 2016-02-29
end = 2016-04-11
别忘记带上第三步(登录后)的Cookie!
最后得到的结果如下:
当当~~当————

点击下一月,URLEncoded变成了:

这样的日期似乎比较乱啊,
如果将start设置为2016-03-01,end设置为2016-03-31,获取的就是3月的课表。

至此,华科大教务系统课表爬取完成!
五、总结
我的代码的编程思路:(用抽象语言表述)
 1 //整体代码用抽象Java语言表示,这些代码只是表示设计思路。不能运行
 2
 3 Header header1 = {"refer","http://hub.hust.edu.cn/index.jsp","host":"hub.hust.edu.cn"}; //响应头header1
 4 Header header2 = {"refer","http://s.hub.hust.edu.cn/index.jsp","host","s.hub.hust.edu.cn"}; //响应头header2
 5
 6 Get get = new Get ("http://hub.hust.edu.cn/index.jsp").header(header1);   //进入首页
 7 Response res1 = get.execute();
 8 String content1 = res1.getContent();  //获取index.jsp的html代码
 9 String ln = getln(Jsoup.parse(content1));  //使用jsoup解析index.jsp的html代码,从中获取出ln(input hidden name='ln'的value)
10
11 Post post = new Post("http://hub.hust.edu.cn/hubulogin.action").header(header1);   //准备模拟登录的,POST提交
12
13 //添加post数据
14 post.add("username","123456789");
15 post.add("password",base64encode("mypassword"));
16 post.add("ln",ln)
17
18 Response res2 = post.execute();  //执行post请求
19
20 Post post2 = new Post("http://s.hub.hust.edu.cn/hublogin.action").header(header2); //中转登录,注意header的变化
21 Document dform = Jsoup.parse(res2.getContent());  //得到返回的动态表单内容
22 post.add("usertype",getUserType(d));
23 post.add("username",getUserName(d));
24 post.add("password",getPassword(d));
25 post.add("url",getURL(d));
26 post.add("key1",getKey1(d));
27 post.add("key2",getKey2(d));
28 post.add("F_App",getFApp(d));
29
30 Response res3 = post2.execute();
31
32 if(res3.getStatusLine().getStatusCode()==302){
33     syso("登录成功");
34 }else{
35     syso("登录失败");
36     return;
37 }
38
39
40 Post kbPost = new Post("http://s.hub.hust.edu.cn:80/aam/score/CourseInquiry_ido.action").header(header2); //获取课表的post请求
41 kbPost.add("start","2016-03-01");
42 kbPost.add("end","2016-03-30");
43 Response res4 = kbPost.execute();
44 if(res4.getStatusLine().getStatusCode()==200){
45     syso(res4.getContent());
46 }else{
47     syso("服务器异常!");
48 }
扩展:
你可以直接在我的基础上扩展,适用于其他学校的“课程格子”。
你可以选择继承AbstractTask类来表示一项POST/GET请求任务,用getEvent方法来表示该任务的具体内容,最好是对SpiderTaskEvent使用适配器模式。
示例代码如下:(这是基于另一个学校的教务系统实现)
 1 public abstract class JwxtEventAdapter implements SpiderTaskEvent{
 2
 3     private static final String useragent = "Mozilla/5.0 (Windows NT 10.0; WOW64; Trident/7.0; rv:11.0) like Gecko";
 4     List<StringHeader> headers;
 5
 6     private Cookies cookies;
 7     public JwxtEventAdapter(Cookies cookies){
 8         HashMap<String, String> map = new HashMap<>();
 9         map.put("Accept","text/html, application/xhtml+xml, image/jxr, */*");
10         map.put("Referer", "http://jwxt.hubu.edu.cn/");
11         map.put("Accept-Language","zh-Hans-CN,zh-Hans;q=0.8,en-GB;q=0.5,en;q=0.3");
12         map.put("User-Agent", useragent);
13         map.put("Accept-Encoding", "gzip, deflate");
14         map.put("Host", "jwxt.hubu.edu.cn");
15         map.put("Proxy-Connection", "Keep-Alive");
16         map.put("Pragma", "no-cache");
17
18         headers = StringHeader.build(map);
19         this.cookies = cookies;
20     }
21     public JwxtEventAdapter(){
22         this(null);
23     }
24
25     @Override
26     public void beforeExecute(SpiderRequest request) throws IOException {
27         request.setTimeout(20000);
28         request.setHeaders(headers);
29         if(cookies!=null){
30             request.setCookie(cookies);
31         }
32     }
33
34     @Override
35     public void afterExecute(SpiderRequest request, SpiderResponse response)
36             throws IOException {
37
38
39     }
40
41 }
 1 public class JwxtRandomTask extends AbstractTask {
 2
 3     private String random;
 4
 5     private Image image;
 6
 7     public Image getImage(){
 8         return image;
 9     }
10
11     /**
12      * @param client
13      */
14     public JwxtRandomTask(HttpClient client) {
15         super(client);
16
17     }
18
19     public String getRandom() {
20         return random;
21     }
22
23     @Override
24     public Method getMethod() {
25
26         return Method.GET;
27     }
28
29     @Override
30     public String getURL() {
31
32         return "http://jwxt.hubu.edu.cn/verifycode.servlet";
33     }
34
35
36
37     @Override
38     public SpiderTaskEvent getEvent() {
39
40         return new JwxtEventAdapter() {
41
42             @Override
43             public void afterExecute(SpiderRequest request,
44                     SpiderResponse response) throws IOException {
45                 image = ImageIO.read(response.getContentStream());
46
47             }
48         };
49     }
我在写这个程序的时候,确实遇到了一些麻烦,就比如本文提到的404的问题;以及我可能是有点急躁吧,一开始没有注意到其实这个登录action是有一次中转的,导致后面的GET操作都被系统提示为非法操作。
确实做这个让自己感慨万千,大学几年来一直难以踏踏实实的做一些事情,太浮躁,C语言、算法、Java等等都是不精,只学了一点皮毛。一个大三学生班门弄斧,满纸荒唐言,如有错误还请各位大神批评和指出,非常感谢!最后感谢一下提供账号的同学d=====( ̄▽ ̄*)b。
希望以后能越走越远!import java.*;