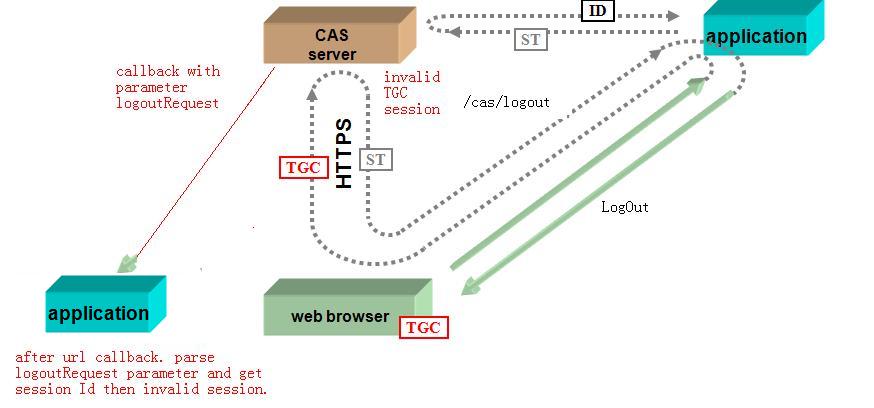
ok,如今開始本文的重点内容解说,先来了解一下cas 实现single sign out的原理,如图所看到的:

图一

图二
第一张图演示了单点登陆的工作原理。
第二张图演示了单点登出的工作原理。
从第一张图中。当一个web浏览器登录到应用server时,应用server(application)会检測用户的session,假设没有session,则应用server会把url跳转到CASserver上,要求用户登录,用户登录成功后,CASserver会记请求的application的url和该用户的sessionId(在应用server跳转url时,通过參数传给CASserver)。此时在CASserver会种下TGC Cookie值到webbrowser.拥有该TGCCookie的webbrowser能够无需登录进入全部建立sso服务的应用serverapplication。
在第二张图中,当一个web浏览器要求登退应用server。应用server(application)会把url跳转到CAS server上的/cas/logout url资源上,
CAS server接受请求后,会检測用户的TCG Cookie。把相应的session清除,同一时候会找到全部通过该TGCsso登录的应用服务器URL提交请求,全部的回调请求中,包括一个參数logoutRequest,内容格式例如以下:
<samlp:LogoutRequest ID="[RANDOM ID]" Version="2.0" IssueInstant="[CURRENT DATE/TIME]">
<saml:NameID>@NOT_USED@</saml:NameID>
<samlp:SessionIndex>[SESSION IDENTIFIER]</samlp:SessionIndex>
</samlp:LogoutRequest>
全部收到请求的应用serverapplication会解析这个參数,取得sessionId。依据这个Id取得session后。把session删除。
这样就实现单点登出的功能。
知道原理后,以下是结合源码来讲述一下内部的代码怎么实现的。
首先,要实现single sign out在 应用serverapplication端的web.xml要增加下面配置
<filter>
<filter-name>CAS Single Sign Out Filter</filter-name>
<filter-class>org.jasig.cas.client.session.SingleSignOutFilter</filter-class>
</filter>
<filter-mapping>
<filter-name>CAS Single Sign Out Filter</filter-name>
<url-pattern>
31 protected static SessionMappingStorage getSessionMappingStorage() {
32 return SingleSignOutFilter.getSessionMappingStorage();
33 }
34 }
接下来,我们来看一下CAS server端回调是怎么实现的
先来看一下配置,我们知道CASserver全部的用户登录,登出操作,都是由CentralAuthenticationServiceImpl对象来管理。
我们就先把到CentralAuthenticationServiceImpl的spring配置,在applicationContext.xml文件里
<!-- CentralAuthenticationService -->
<bean id="centralAuthenticationService" class="org.jasig.cas.CentralAuthenticationServiceImpl"
p:ticketGrantingTicketExpirationPolicy-ref="grantingTicketExpirationPolicy"
p:serviceTicketExpirationPolicy-ref="serviceTicketExpirationPolicy"
p:authenticationManager-ref="authenticationManager"
p:ticketGrantingTicketUniqueTicketIdGenerator-ref="ticketGrantingTicketUniqueIdGenerator"
p:ticketRegistry-ref="ticketRegistry"
p:servicesManager-ref="servicesManager"
p:persistentIdGenerator-ref="persistentIdGenerator"
p:uniqueTicketIdGeneratorsForService-ref="uniqueIdGeneratorsMap" />
配置使用了spring2.0的xsd。CentralAuthenticationServiceImpl有一个属性叫uniqueTicketIdGeneratorsForService,它是一个map对象
它的key值是全部实现org.jasig.cas.authentication.principal.Service接口的类名,用于保存Principal对象和进行单点登出回调
application server时使用value值为org.jasig.cas.util.DefaultUniqueTicketIdGenerator对象,用于生成唯一的TGCticket。
该属性引用的uniqueIdGeneratorsMap bean在uniqueIdGenerators.xml配置文件里。
<util:map id="uniqueIdGeneratorsMap">
<entry
key="org.jasig.cas.authentication.principal.SimpleWebApplicationServiceImpl"
value-ref="serviceTicketUniqueIdGenerator" />
<entry
key="org.jasig.cas.support.openid.authentication.principal.OpenIdService"
value-ref="serviceTicketUniqueIdGenerator" />
<entry
key="org.jasig.cas.authentication.principal.SamlService"
value-ref="samlServiceTicketUniqueIdGenerator" />
<entry
key="org.jasig.cas.authentication.principal.GoogleAccountsService"
value-ref="serviceTicketUniqueIdGenerator" />
</util:map>
那CentralAuthenticationServiceImpl是怎么调用的呢?
我们跟踪一下代码,在创建ticket的方法 public StringcreateTicketGrantingTicket(final Credentials credentials)中
能够找到下面这样一段代码:
1 //创建 TicketGrantingTicketImpl 实例
2 final TicketGrantingTicket ticketGrantingTicket = new TicketGrantingTicketImpl(
3 this.ticketGrantingTicketUniqueTicketIdGenerator
4 .getNewTicketId(TicketGrantingTicket.PREFIX),
5 authentication, this.ticketGrantingTicketExpirationPolicy);
6 //并把该对象保存到 ticketRegistry中
7 this.ticketRegistry.addTicket(ticketGrantingTicket);
上面的代码,看到ticketRegistry对象保存了创建的TicketGrantingTicketImpl对象,以下我们看一下当ticket销毁的时候。会做什么
事情,代码例如以下:
1 public void destroyTicketGrantingTicket(final String ticketGrantingTicketId) {
2 Assert.notNull(ticketGrantingTicketId);
3
4 if (log.isDebugEnabled()) {
5 log.debug("Removing ticket [" + ticketGrantingTicketId
6 + "] from registry.");
7 }
8 //从 ticketRegistry对象中。取得TicketGrantingTicket对象
9 final TicketGrantingTicket ticket = (TicketGrantingTicket) this.ticketRegistry
10 .getTicket(ticketGrantingTicketId, TicketGrantingTicket.class);
11
12 if (ticket == null) {
13 return;
14 }
15
16 if (log.isDebugEnabled()) {
17 log.debug("Ticket found. Expiring and then deleting.");
18 }
19 ticket.expire();//调用expire()方法,让ticket过期失效
20 this.ticketRegistry.deleteTicket(ticketGrantingTicketId);//从ticketRegistry中删除的ticket 对象
21 }
我们看到,它是从ticketRegistry对象中取得TicketGrantingTicket对象后,调用expire方法。接下来。要关心的就是expire方法做什么事情
1 public synchronized void expire() {
2 this.expired.set(true);
3 logOutOfServices();
4 }
5
6 private void logOutOfServices() {
7 for (final Entry<String, Service> entry : this.services.entrySet()) {
8 entry.getValue().logOutOfService(entry.getKey());
9 }
10 }
从代码能够看到,它是遍历每一个 Service对象,并运行logOutOfService方法。參数是StringsessionIdentifier
如今我们能够相应中,它存放的Service就是在uniqueIdGeneratorsMap bean定义中的那些实现类
由于logOutOfService方法的实现。全部实现类都是由它们继承的抽象类AbstractWebApplicationService来实现。我们来看一下
AbstractWebApplicationService的logOutOfService方法,就能够终于找出,实现singlesign out的真正实现代码,以下是主要代码片段:
1 public synchronized boolean logOutOfService(final String sessionIdentifier) {
2 if (this.loggedOutAlready) {
3 return true;
4 }
5
6 LOG.debug("Sending logout request for: " + getId());
7 //组装 logoutRequest參数内容
8 final String logoutRequest = "<samlp:LogoutRequest xmlns:samlp="urn:oasis:names:tc:SAML:2.0:protocol" ID=""
9 + GENERATOR.getNewTicketId("LR")
10 + "" Version="2.0" IssueInstant="" + SamlUtils.getCurrentDateAndTime()
11 + ""><saml:NameID
12
13 xmlns:saml="urn:oasis:names:tc:SAML:2.0:assertion">@NOT_USED@</saml:NameID><samlp:SessionIndex>"
14 + sessionIdentifier + "</samlp:SessionIndex></samlp:LogoutRequest>";
15
16 this.loggedOutAlready = true;
17 //回调全部的application,getOriginalUrl()是取得回调的application url
18 if (this.httpClient != null) {
19 return this.httpClient.sendMessageToEndPoint(getOriginalUrl(), logoutRequest);
20 }
21
22 return false;
23 }
至此。已经通过源码把 CAS实现 single signout的实现原理和方法完整叙述了一遍,希望对CAS感兴趣的朋友有所帮忙。

