集群备份与恢复实战
背景
在日常 k8s 维护使用过程,难免会有下面场景:
- 集群异常,etcd集群挂了,如何恢复数据?
- 使用者或管理员误删了命名空间或重要应用,如何快速恢复数据?
- 如何快速备份、迁移集群?
本文介绍两种备份还原工具:etcdctl 和 velero
使用etcdctl
安装etcdctl
脚本可参考 etcdctl.sh
#!/bin/bash
ETCD_VER=v3.4.3
ETCD_DIR=etcd-download
DOWNLOAD_URL=https://github.com/coreos/etcd/releases/download

# Download
mkdir ${ETCD_DIR}
cd ${ETCD_DIR}
wget ${DOWNLOAD_URL}/${ETCD_VER}/etcd-${ETCD_VER}-linux-amd64.tar.gz
tar -xzvf etcd-${ETCD_VER}-linux-amd64.tar.gz

# install
cd etcd-${ETCD_VER}-linux-amd64
cp etcdctl /usr/local/bin/
备份etcd
etcd 集群中各数据是一致的,因此只需要对其中一个节点做备份就行,恢复可用同一个快照来恢复,核心流程:
#执行备份
ETCDCTL_API=3 etcdctl snapshot save /var/etcd-snapshot/snapshot.db

#检查备份文件
ETCDCTL_API=3 etcdctl --write-out=table snapshot status /var/etcd-snapshot/snapshot.db
+----------+----------+------------+------------+
|   HASH   | REVISION | TOTAL KEYS | TOTAL SIZE |
+----------+----------+------------+------------+
| f2023283 |    38511 |       1143 |     4.6 MB |
+----------+----------+------------+------------+
恢复etcd
kubeadm
kubeadm 部署的集群中的 etcd 是以静态容器的方式运行的,静态容器的配置文件存放目录是 /etc/kubernetes/manifests/。
核心流程就是:停止 api-server 和 etcd 服务 -> 执行还原 -> 重启 api-server 和 etcd 服务
#停止 api-server 和 etcd 服务
mv /etc/kubernetes/manifests/{kube-apiserver.yaml,etcd.yaml} /tmp/etcd/manifests/

#执行备份
ETCDCTL_API=3 etcdctl snapshot restore /var/etcd-snapshot/snapshot.db \
  --name=etcd-name \
  --data-dir=/raid/etcd \
  --initial-advertise-peer-urls="https://xxx.xxx.x.xx:2380" \
  --initial-cluster="etcd-name=https://xxx.xxx.x.xx1:2380"

#恢复 api-server 和 etcd 服务
mv /tmp/etcd/manifests/{kube-apiserver.yaml,etcd.yaml} /etc/kubernetes/manifests
二进制
etcd 集群以服务的形式在多台服务器运行,与容器方式不同的仅仅是服务的 endpoints 不一样,备份与 kubeadm 相同。
需要先手动停止 kube-apiserver 和 etcd 服务:
systmectl stop kube-apiserver
systemctl stop etcd
恢复需要在每个 etcd 节点进行恢复。
# 每个etcd依次恢复,需要修改 name, initialadvertise-peer-urls等参数
ETCDCTL_API=3 etcdctl snapshot restore snap.db \
  --name etcd-1 \   # 每台节点name不一样,根据当前节点etcd配置文件即可
  --initial-cluster="etcd-1=https://192.168.1.11:2380,etcd-1=https://192.168.1.12:2380,etcd-1=https://192.168.1.13:2380" \
  --initial-cluster-token=etcd-cluster \
  --initialadvertise-peer-urls=https://192.168.1.11:2380 \  # 修改为当前节点ip
  --data-dir=/vaf/lib/default.etcd
最后启动 kube-apiserver 和 etcd 服务:
systemctl start kube-apiserver
systemctl start etcd
提示:
1.备份还原后集群会出现短暂的不可用现象,原因是重启 apiserver 和 etcd 服务。
2.etcdctl 为快照备份,不会记录最新写入的数据,因此从备份恢复可能会丢失最新的数据。
3.etcd 不能备份存储在 PV 数据卷的业务数据。
4.etcd 为全局备份,不能针对某个命名空间做备份还原。
使用velero
Velero(以前的Heptio Ark)提供了备份和恢复 Kubernetes 集群资源和持久卷的工具,支持:
- 对集群进行备份,并在发生丢失时进行恢复
- 将集群资源迁移到其他集群。
- 将生产集群复制到开发和测试集群。
Velero包括:
- 在集群上运行的服务器
- 本地运行的命令行客户端
备份工作流程
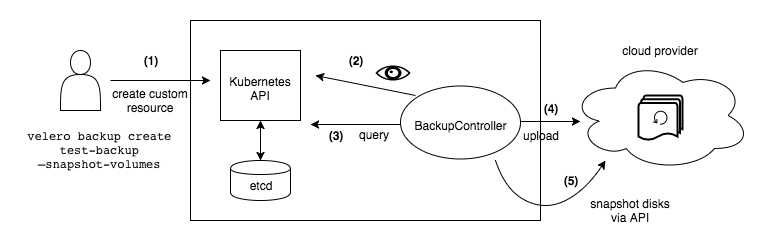
1.Velero 客户端调用 Kubernetes API 服务器创建备份对象。
2.BackupController 监听备份对象并执行验证。
3.BackupController 执行备份程序,通过查询 API 服务器获取要收集要备份的数据。
4.BackupController 调用对象存储服务 - 例如,AWS S3 - 上传备份文件。
安装velero客户端
1.下载 velero-v1.7.1-linux-amd64.tar.gz
2.解压 tar -xvf velero-v1.7.1-linux-amd64.tar.gz
3.移动 velero 二进制文件到 /usr/local/bin
脚本参考 velero.sh
安装minio
这里使用 minio 来代替云环境的对象存储,在上面解压的压缩包中包含一个 examples/minio/00-minio-deployment.yaml
的资源清单文件,将其中的 Service 更改为 NodePort 类型,并且配置 console-address 端口。
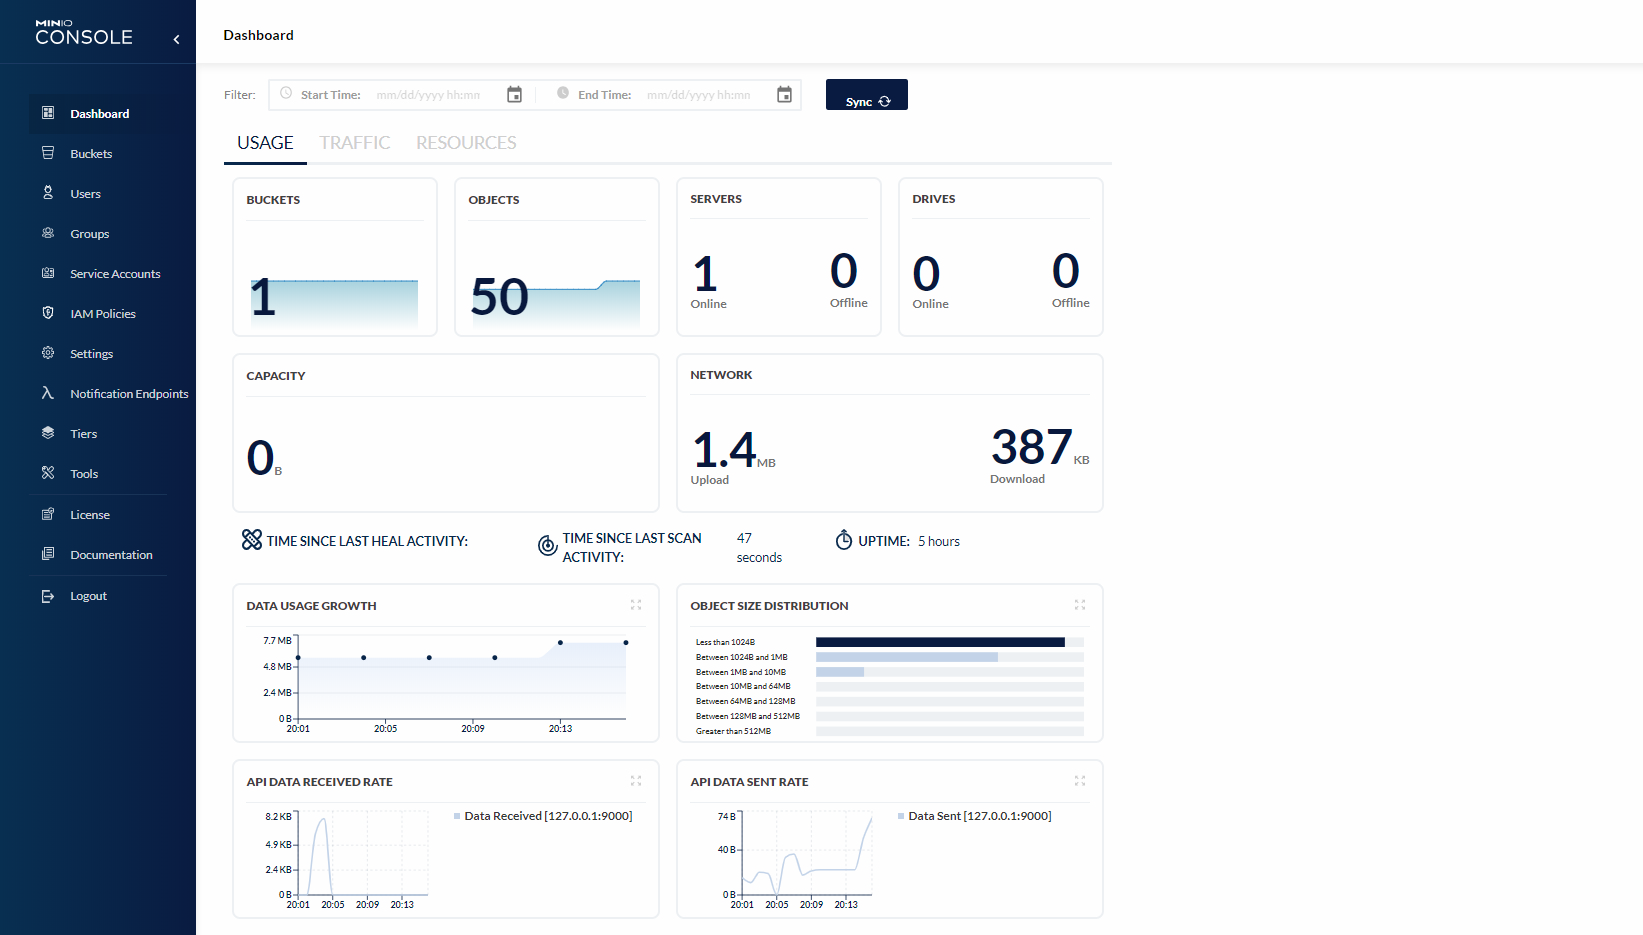
在 minio 控制台可以管理 bucket,并且有监控统计、审计日志、权限控制等功能。
安装:
# Copyright 2017 the Velero contributors.
#
# Licensed under the Apache License, Version 2.0 (the "License");
# you may not use this file except in compliance with the License.
# You may obtain a copy of the License at
#
#     http://www.apache.org/licenses/LICENSE-2.0
#
# Unless required by applicable law or agreed to in writing, software
# distributed under the License is distributed on an "AS IS" BASIS,
# WITHOUT WARRANTIES OR CONDITIONS OF ANY KIND, either express or implied.
# See the License for the specific language governing permissions and
# limitations under the License.

---
apiVersion: v1
kind: Namespace
metadata:
  name: minio

---
apiVersion: apps/v1
kind: Deployment
metadata:
  namespace: minio
  name: minio
  labels:
    component: minio
spec:
  strategy:
    type: Recreate
  selector:
    matchLabels:
      component: minio
  template:
    metadata:
      labels:
        component: minio
    spec:
      volumes:
      - name: storage
        emptyDir: {}
      - name: config
        emptyDir: {}
      containers:
      - name: minio
        image: minio/minio:latest
        imagePullPolicy: IfNotPresent
        args:
        - server
        - /storage
        - --config-dir=/config
        - --console-address=:9001
        env:
        - name: MINIO_ROOT_USER
          value: "minio"
        - name: MINIO_ROOT_PASSWORD
          value: "minio123"
        ports:
        - containerPort: 9000
        - containerPort: 9001
        volumeMounts:
        - name: storage
          mountPath: "/storage"
        - name: config
          mountPath: "/config"

---
apiVersion: v1
kind: Service
metadata:
  namespace: minio
  name: minio
  labels:
    component: minio
spec:
  # ClusterIP is recommended for production environments.
  # Change to NodePort if needed per documentation,
  # but only if you run Minio in a test/trial environment, for example with Minikube.
  type: NodePort
  ports:
    - name: api
      port: 9000
      targetPort: 9000
    - name: console
      port: 9001
      targetPort: 9001
  selector:
    component: minio

---
apiVersion: batch/v1
kind: Job
metadata:
  namespace: minio
  name: minio-setup
  labels:
    component: minio
spec:
  template:
    metadata:
      name: minio-setup
    spec:
      restartPolicy: OnFailure
      volumes:
      - name: config
        emptyDir: {}
      containers:
      - name: mc
        image: minio/mc:latest
        imagePullPolicy: IfNotPresent
        command:
        - /bin/sh
        - -c
        - "mc --config-dir=/config config host add velero http://minio.minio:9000 minio minio@123 && mc --config-dir=/config mb -p velero/velero"
        volumeMounts:
        - name: config
          mountPath: "/config"
PS:
- minio 的数据和配置可以用比如 cephfs 来做持久化。
- 一般推荐部署在集群外部。
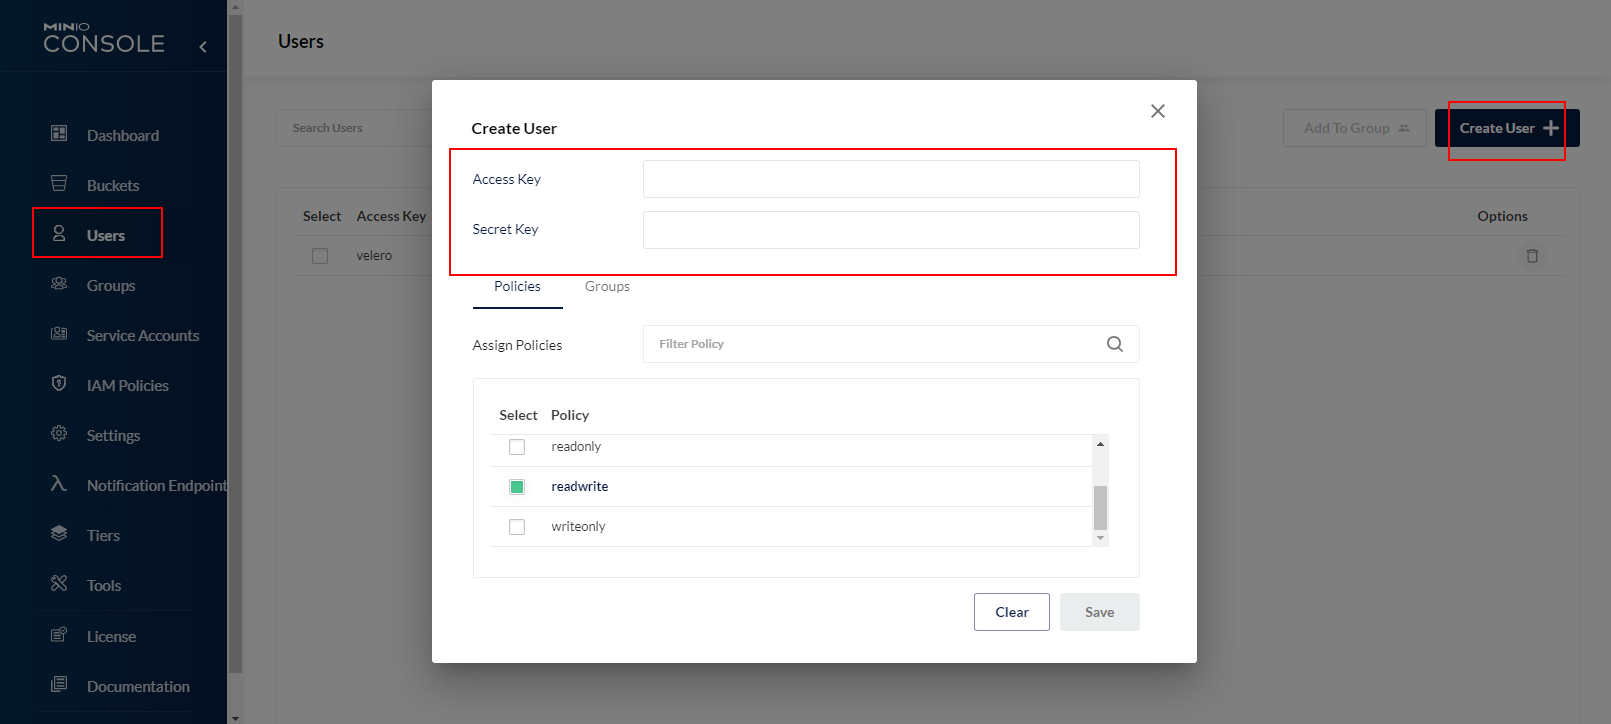
安装完成后使用yaml里的帐密登录,可选择创建一个 Buckets, 然后需要创建 User (记住id和key) 授权到对应 bucket 才能正常上传:
安装velero服务端
创建 minio 认证文件,使用上边创建的具有 readwrite 权限的用户:
cat > credentials-velero <<EOF
[default]
aws_access_key_id=velero
aws_secret_access_key=velero@202112
EOF
# 修改bucket、s3Url地址(上面 minio 的地址,这里用 nodeport)
velero install \
  --plugins velero/velero-plugin-for-aws:latest \
  --provider aws \
  --bucket mybar \
  --secret-file ./credentials-velero \
  --namespace velero \
  --use-volume-snapshots=false \
  --use-restic \
  --backup-location-config region=minio,s3ForcePathStyle="true",s3Url=http://192.168.1.31:30900
部署验证应用
velero 解压出来的文件有 /examples/nginx-app,下面 base.yaml 或 with-pv.yaml
修改 with-pv.yaml,使用 local-storage 模拟持久化卷:
apiVersion: v1
kind: Namespace
metadata:
  name: nginx-example
  labels:
    app: nginx
---
kind: StorageClass
apiVersion: storage.k8s.io/v1
metadata:
  name: local-storage
provisioner: kubernetes.io/no-provisioner
volumeBindingMode: WaitForFirstConsumer
---
kind: PersistentVolume
apiVersion: v1
metadata:
  name: nginx-pv
  labels:
    app: nginx
spec:
  capacity:
    storage: 50Mi
  local:
    path: /mnt/local-storage
  accessModes:
    - ReadWriteOnce
  storageClassName: local-storage
  nodeAffinity:
    required:
      nodeSelectorTerms:
        - matchExpressions:
            - key: kubernetes.io/os
              operator: In
              values:
                - linux
---
kind: PersistentVolumeClaim
apiVersion: v1
metadata:
  name: nginx-logs
  namespace: nginx-example
  labels:
    app: nginx
spec:
  # Optional:
  storageClassName: local-storage
  accessModes:
    - ReadWriteOnce
  resources:
    requests:
      storage: 50Mi
  volumeName: nginx-pv
  selector:
    matchLabels:
      app: nginx
---
apiVersion: apps/v1
kind: Deployment
metadata:
  name: nginx-deployment
  namespace: nginx-example
spec:
  replicas: 1
  selector:
    matchLabels:
      app: nginx
  template:
    metadata:
      labels:
        app: nginx
      annotations:
        pre.hook.backup.velero.io/container: fsfreeze
        pre.hook.backup.velero.io/command: '["/sbin/fsfreeze", "--freeze", "/var/log/nginx"]'
        post.hook.backup.velero.io/container: fsfreeze
        post.hook.backup.velero.io/command: '["/sbin/fsfreeze", "--unfreeze", "/var/log/nginx"]'
    spec:
      volumes:
        - name: nginx-logs
          persistentVolumeClaim:
           claimName: nginx-logs
      containers:
      - image: nginx:1.17.6
        name: nginx
        ports:
        - containerPort: 80
        volumeMounts:
          - mountPath: "/var/log/nginx"
            name: nginx-logs
            readOnly: false
      - image: ubuntu:bionic
        name: fsfreeze
        securityContext:
          privileged: true
        volumeMounts:
          - mountPath: "/var/log/nginx"
            name: nginx-logs
            readOnly: false
        command:
          - "/bin/bash"
          - "-c"
          - "sleep infinity"
# 部署 nginx
kubectl apply -f with-pv.yaml
手动备份
备支持全量备份、指定命名空间备份、指定选择器备份等方式,详细可以通过 velero backup create -h 查看帮助。
velero backup create nginx-backup --include-namespaces nginx-example --default-volumes-to-restic
# 输出
Backup request "nginx-backup" submitted successfully.
Run `velero backup describe nginx-backup` or `velero backup logs nginx-backup` for more details.
常用参数:
- --include-namespaces: 指定命名空间来备份,多个逗号隔开
- --include-resources:指定资源类型来备份,多个逗号隔开比如configmap,secret
- --include-cluster-resources: 设置为 true 表示备份包含集群级别的资源,多个逗号隔开
- --exclude-namespaces: 排查指定命名空间,多个逗号隔开
- --exclude-resources: 排除指定某些资源类型
velero backup get 查看备份
velero backup describe <backup name> --details 查看备份数据清单
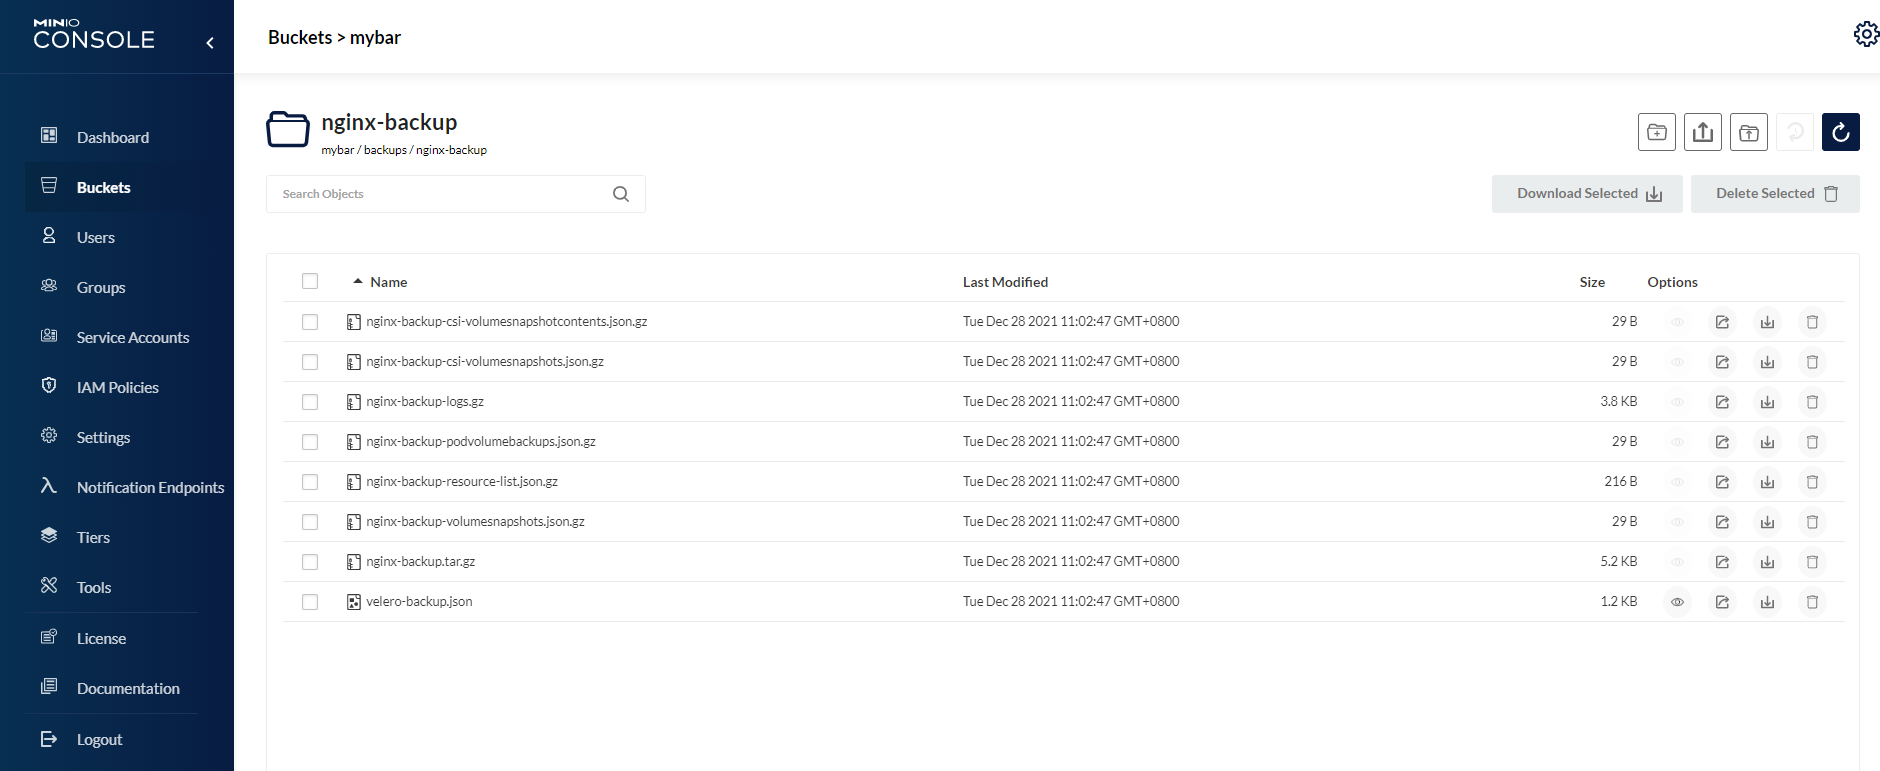
备份完可在 minio 对应 buckets-backup 里看到备份文件:
定时备份
最实用的就是定时备份计划。
# 每六个小时备份一次,备份保留 1 个月
velero create schedule NAME --schedule="0 */6 * * *" --ttl 720h

# 使用 @every 表达式,每 24 小时 备份 web 命名空间下的资源
velero create schedule NAME --schedule="@every 24h" --include-namespaces web

# 从 schedule 最新一次的 backup 还原
velero restore create --from-schedule NAME
还原
只要有了备份数据文件就可以恢复,备份可以恢复,也可以指定命名空间或选择器进行单独恢复。
备份后手动删除命名空间,模拟集群数据丢失,此时 nginx 服务不可访问。
kubectl delete ns nginx-example
从刚刚备份的 backup 还原:
velero restore create --from-backup nginx-backup
#输出
Restore request "nginx-backup-20211228110902" submitted successfully.
Run `velero restore describe nginx-backup-20211228110902` or `velero restore logs nginx-backup-20211228110902` for more details.
常用参数:
- --namespace-mappings: 还原到与源不同的命名空间,比如old-ns-1:new-ns-1,old-ns-2:new-ns-2
- --include-resources:指定资源类型来还原,多个逗号隔开比如configmap,secret
- --include-namespaces: 指定命名空间来还原,多个逗号隔开
- --exclude-namespaces: 排查指定命名空间,多个逗号隔开
- --exclude-resources: 排除指定某些资源类型
备份完可以通过
velero restore get 查看备份
velero restore describe <backup name> --details 查看备份数据清单
还可以在 minio 对应 buckets-restore 里看到备份文件:

常见问题
问题一: restore pv 一直处于 Released、pod 一直处于 Padding 状态
使用 local-storage 存储卷 restore 后,原先的 pv 卷 会处于 Released 状态,pod 会一直 Pending,错误如下:
error while running "VolumeBinding" filter plugin for pod "nginx-deployment-f96b7fd86-m6fwt": pod has unbound immediate PersistentVolumeClaims
解决办法:
修改 pv 卷 spec.claimRef 字段,手动解除与pvc的绑定,恢复为 Available 状态,等一会就会自动与pvc再次绑定,数据不会丢失。
spec:
  capacity:
    storage: 50Mi
  # 直接删除 claimRef 字段
  claimRef:
    kind: PersistentVolumeClaim
再次检查 nginx 服务,访问正常。
问题二:minio dashboard 无法用 prometheus 采集数据
参考Collect MinIO Metrics Using Prometheus
使用 prometheus-operator,需要创建serviceMonitor
创建后一直抓取不到指标数据,可检查:
1.Minio 环境变量配置
env:
  - name: MINIO_PROMETHEUS_URL
    value: <prometheus_server_url>
  - name: MINIO_PROMETHEUS_JOB_ID
    value: <prometheus_config_job_name>
  - name: MINIO_PROMETHEUS_AUTH_TYPE
    value: public
2.Prometheus ClusterRole
查看prometheus日志若出现 cannot list resource \"pods\" in API group \"\" in the namespace,表示没权限获取资源
解决:更改prometheus集群访问权限即可
apiVersion: rbac.authorization.k8s.io/v1
kind: ClusterRole
metadata:
  name: prometheus-k8s
rules:
- apiGroups:
  - ""
  resources:
  - nodes/metrics
  verbs:
  - get
- nonResourceURLs:
  - /metrics
  verbs:
  - get
# 新增
- apiGroups:
  - ""
  resources:
  - services
  - pods
  - endpoints
  verbs:
  - get
  - list
  - watch