引言:一直好奇怎么实现图片放大,之前使用过 css动画 放大缩放,今天了解了下如何用 JavaScript 实现的图片放大。直接上效果图:
(效果图如上)
实现原理还是很容易理解的,在布局上可以看到有是是三个区域,左边原图区,以及取图区,右边的展示区,我使用了 relative 与 absolute进行定位布局。 使用这个,我个人认为是为了防止展示区占用文档位置,所以脱离文档流定位。
根据行为可以了解到大概会涉及到三个事件,鼠标移动(onmousemove),鼠标移入(.onmouseenter),鼠标移出(onmouseleave)。实现原理:当鼠标移入原图区触发移入事件,右边展示区 display :block 展示,鼠标事件触发,通过 clientWidth 以及 clientHeight 属性以及clientX 和clientY 获取相应的坐标值,最后计算出left属性,即取图区的left 为多少,右边展示区移动 (-left*原图和展示区图片比例),取负数是为了让展示区图片能够根据鼠标相对移动能“配合”取图与视图一直。直接说原理好乱,特别是这个left 的计算,所以直接上代码分析吧。
 1     *{margin:0;padding:0;}
 2     #smallWrap{350px;height:230px;margin:50px;border:1px solid #ccc;position:relative;cursor:move;overflow: hidden}
 3     #getPoint{175px;height:175px;position:absolute;background-color: rgba(125,251,125,0.19)}
 4     #bigWrap{400px;height:280px;position:absolute;left:450px;top:50px;border:1px solid #ccc;background-image: url("img/img2/eb.png");background-repeat: no-repeat}
 5 </style>
 6 </head>
 7
 8 <body>
 9 <div id='smallWrap'>
10     <img src='img/img2/es.png'>
11 </div>
12 <div id='bigWrap'style="text-align: center;color:#47acab; line-height: 280px">中秋快乐</div>
13
14     <script>
15         window.onload=function () {
16            var smallWrap=document.getElementById("smallWrap");
17            var swWidth=smallWrap.clientWidth; // 获取包裹图片的宽,此处直接就是图片宽度
18            var swHeight=smallWrap.clientHeight; //获取图片高度
19            var bigWrap=document.getElementById("bigWrap");
20
21             smallWrap.onmouseenter=function (event) { //当鼠标移入,动态创建取图区,
22
23              var  getPoint=document.createElement("div");
24              getPoint.id="getPoint";
25              smallWrap.appendChild(getPoint);
26              setPlay(event);
27             }
28
29             smallWrap.onmouseleave=function () {
30                 bigWrap.style.display="none";
31                 smallWrap.removeChild(getPoint); // 鼠标移出后移除取图区
32             }
33
34             smallWrap.onmousemove=function (event) { //鼠标移动方法,调用setPlay函数
35                 setPlay(event);
36             }
37
38
39            function setPlay() { // 鼠标移入和移动都触发此方法
40                bigWrap.style.display="block"; // 右边展示区显示
41
42                var width=getPoint.clientWidth; // 取图区的宽
43                var height=getPoint.clientHeight;// 取图区的高
44                var pos=getPosition(event,smallWrap); // 该方法返回鼠标焦点到图片边缘值
45
46                var left=pos.x-width/2;
47                var top=pos.y-height/2;
48
49                if(left<0){left=0;} // 当鼠标移动到图片边缘,将取图区的left 设置0,
50                if(left+width>swWidth){left=swWidth-width;} //当取图区移动到图片最右端,left=图片宽-取图区宽,这样的方式是固定取图区,防止随鼠标一起移出图片区
51                if(top<0){top=0}; // 与left 同理
52                if (top+height>swHeight){top=smallWrap-height};
53
54                getPoint.style.left=left+"px"; // 鼠标移动,取图区的left 和top变化,取图区跟着移动
55                getPoint.style.top=top+'px';
56
57                bigWrap.style.backgroundPosition=-left*2+'px'+" "+-top*2+'px'; //我这里的展示图片与原图比例是 2:1 所以原图left移动时展示区移动2倍left,此时通过获取left 与 top 展示图也会相对移动
58            }
59
60            function getPosition(event,elem) {
61                 return{
62                     x:event.clientX-elem.getBoundingClientRect().left, // 鼠标到浏览器的距离减去图片区的 left(对应效果图就是焦点到边距减去图片到边距的) 得出鼠标焦点到图片边缘值
63                     y:event.clientY-elem.getBoundingClientRect().top
64                 }
65            }
66         }
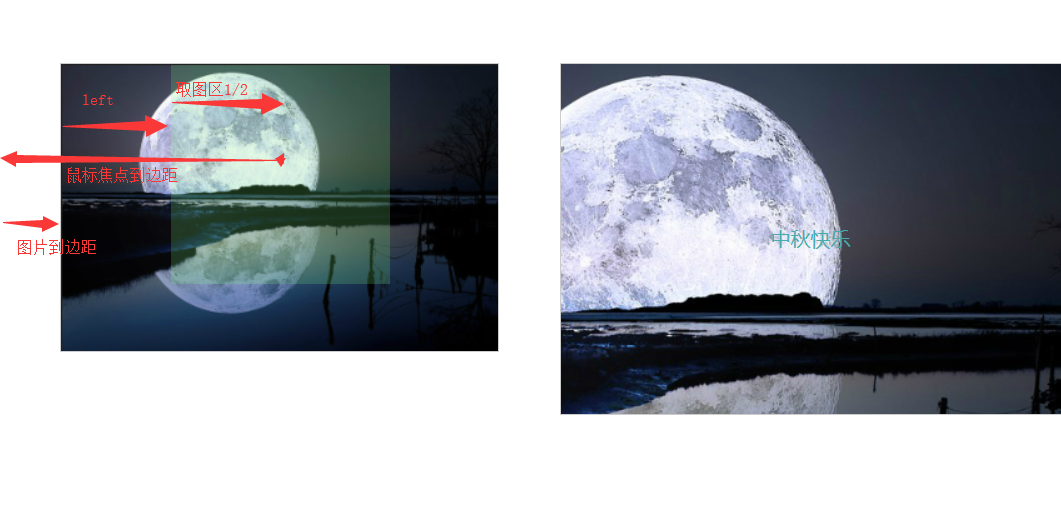
实现原理可以看代码分析,关于 left (取图区的left) 值的计算方式,可以通过效果图 看出
先是: x:event.clientX-elem.getBoundingClientRect().left 获取鼠标焦点到图片边缘距离。
其次: left=pos.x-width/2 鼠标焦点到图片边缘距离减去取图区的 1/2 宽,获得left 值。 top 值原理一样。
最后只要通过(左边原图 与右边大图图片比例*left )再取负数就可以实现右边展示区的大图的相对移动展示啦。
PS :
因为截图工具只支持箭头所以用箭头线来表示距离,这里直接忽视把箭头当做直线就好。