一、前端路由有两种实现方式
- hash模式的实现原理
1、早期的前端路由的实现就是基于 window.location.hash 来实现的,其实现的原理十分简单,window.location.hash 的值就是 URL 中的 # 后面的值,例如:http://localhost:3000/#/orange 这个路由的 window.location.hash 为 #/orange;
-
- hash路由
/**
 * hash路由:通过监听url中的hash变化来进行路由跳转
 * 当hash发生变化时,浏览器更新视图并不会重新发起请求,
 * 而是会触发 hashchange 事件
 * 优点:浏览器兼容性较好,连 IE8 都支持
 * 缺点:路径在井号 # 的后面,比较丑,问题在于url中一直存在#不够美观
 * 而且hash路由更像是Hack而非标准,相信随着发展更加标准化的History API
 * 会逐步蚕食掉hash路由的市场
 */
- 实现主要基于以下几个方面的特性
1、URL 中的 hash 值只是客户端的一种状态,也就是说当向服务器发出请求时,hash 部分不会被发送;
2、hash 值的改变,都会在浏览器的访问历史中增加一个记录,因此我们能通过浏览器的回退,前进按钮控制 hash 的切换;
3、可以通过设置a标签,并通过设置 href 属性,例如href = ‘#/blue’,当点击标签的时候,url的 hash 值会发生改变,在当前url的后面增加上’#/blue’,
   同时触发hashchange,再回调函数中进行处理;
4、前进后退的时候,可以直接通过js来对 location.hash 进行赋值,改变url的 hash 值,例如 location.hash = ‘#/blue’即可,此时url会改变,
   也会触发hashchange事件。
5、因此我们可以使用 hashchange 事件来监听 hash 值得变化,从而对页面进行跳转(渲染); - 实现方案:
-
html代码:
<!DOCTYPE html>
<html lang="en">
<head>
  <meta charset="UTF-8">
  <meta http-equiv="X-UA-Compatible" content="IE=edge">
  <meta name="viewport" content="width=device-width, initial-scale=1.0">
  <title>前端路由</title>
</head>
<body>
  <h1>hello , Hash router!!!</h1>
  <div style="margin-bottom:100px">
    <ul>
      <li><a href="#/">turn white</a></li>
      <li><a href="#/blue">turn blue</a></li>
      <li><a href="#/green">turn green</a>
      <li><a href="#/red">turn red</a></li>
      <li><a href="#/orange">turn orange</a>
    </ul>
    <button id="btn">回退</button>
    <div id="app" style="margin-top:50px;height:100px">

    </div>
  </div>

  <script>
    function render() {
       app.innerHTML = '渲染容器'+window.location.hash;
       app.style.backgroundColor="pink"
    }
    window.addEventListener('hashchange', render)
  </script>
  <script src="./js/router.js"></script>
</body>
</html>
- js代码
class Router {
  constructor() {
    /**
     * 以键值对的形式存储路由
     */
    this.routers = new Object();
    /**
     * 当前路由的URL
     */
    this.currentUrl = "";
    /**
     * 记录出现过的hash
     */
    this.history = [];
    /**
     * 作为指针,默认指向this.history的末尾,根据后退前进指向history中不同的hash
     */
    this.currentIndex = this.history.length - 1;
    /**
     * 默认不是后退操作
     */
    this.isBack = false;
  }
  /**
   * 都定义在原型上,后面的覆盖前面的,这个不执行
   */
  route(path, callback) {
    console.log(1);
  }
}

/**
 * 将路由的hash以及对应的callback函数储存
 * @param {*} path
 * @param {*} callback
 */
Router.prototype.route = function (routes) {
  for (let route of routes) {
    this.routers[route.path] = route.callback || function () {};
  }
};

/**
 * 当页面刷新的时候
 */
Router.prototype.refresh = function () {
  /**
   * 获取当前页面中的hash路径
   */
  this.currentUrl = window.location.hash.slice("1") || "/";
  /**
   * 不是后退才执行
   */
  if (!this.isBack) {
    if (this.currentIndex < this.history.length - 1)
      this.history = this.history.slice(0, this.currentIndex + 1);
    /**
     * 将当前hash路由推入数组储存,指针向前移动
     */
    this.history.push(this.currentUrl);
    this.currentIndex++;
  }
  this.isBack = false;
  /**
   * 执行当前hash路径的回调函数
   */
  this.routers[this.currentUrl]();
  console.log("refresh");
  console.log(this.history);
  console.log(this.currentIndex);
};

/**
 * 当页面后退,回退的过程中会触发hashchange,将hash重新放入,索引增加
 */
Router.prototype.back = function () {
  console.log("back");
  console.log(this.history);
  console.log(this.currentIndex);
  // 后退操作设置为true
  this.isBack = true;
  /**
   * 如果指针小于0的话就不存在对应hash路由了,因此锁定指针为0即可
   */
  this.currentIndex <= 0
    ? (this.currentIndex = 0)
    : (this.currentIndex = this.currentIndex - 1);
  /**
   * 随着后退,location.hash也应该随之变化
   * 并执行指针目前指向hash路由对应的callback
   */
  location.hash = `#${this.history[this.currentIndex]}`;
  this.routers[this.history[this.currentIndex]]();
};

/**
 * 初始化,监听页面的加载与hash只的变化
 */
Router.prototype.init = function () {
  /**
   * 修改this指向,否则指向window
   */
  window.addEventListener("load", this.refresh.bind(this), false);
  window.addEventListener("hashchange", this.refresh.bind(this), false);
};

const route = new Router();
/**
 * 初始化
 */
route.init();
const routes = [
  {
    path: "/",
    callback: function () {
      let el = document.body;
      el.style.backgroundColor = "#fff";
    },
  },
  {
    path: "/blue",
    callback: function () {
      let el = document.body;
      el.style.backgroundColor = "blue";
    },
  },
  {
    path: "/green",
    callback: function () {
      let el = document.body;
      el.style.backgroundColor = "green";
    },
  },
  {
    path: "/red",
    callback: function () {
      let el = document.body;
      el.style.backgroundColor = "red";
    },
  },
  {
    path: "/orange",
    callback: function () {
      let el = document.body;
      el.style.backgroundColor = "orange";
    },
  },
];
/**
 * 将hash值与cb绑定
 */
route.route(routes);
window.onload = function () {
  let btn = document.getElementById("btn");
  btn.addEventListener("click", route.back.bind(route), false);
};
-
- hash路由
- history模式的实现原理
HTML5 提供了 History API 来实现 URL 的变化,其中最主要的 API 有以下两个:
1、history.pushState() 新增一个历史记录;
2、history.replaceState() 直接替换当前历史记录;
相同点:可以在不进行刷新的情况下,操作浏览器的历史记录
-
- history.pushState / replaceState 方法接受三个参数,依次为:
state:一个与指定网址相关的状态对象,popstate事件触发时,该对象会传入回调函数。如果不需要这个对象,此处可以填null。
title:新页面的标题,但是所有浏览器目前都忽略这个值,因此这里可以填null。
url:新的网址,必须与当前页面处在同一个域。浏览器的地址栏将显示这个网址。

eg:
window.history.pushState(null, null, path);window.history.replaceState(null, null, path); - history路由模式的实现主要基于以下几个方面的特性
1、pushState / replaceState 两个 API 来操作实现 URL 的变化;
2、我们可以使用 popstate 事件来监听 URL 的变化,从而对页面进行跳转(渲染);
3、pushState / replaceState 或 <a> 标签 并不会触发 popstate 事件,只有用户点击浏览器倒退按钮和前进按钮,或者使用 JavaScript 调用back、forward、go方法时才会触发,好在我们可以拦截 pushState/replaceState的调用和<a>标签的点击事件来检测 URL 变化 所以我们需要手动触发页面跳转(渲染); - history模式的问题
1、history 路由模式虽然好看,但是这种模式要玩儿好,还需要后台配置支持,因为我们的应用是个单页的客户端应用,如果后台没有正确的配置,当用户在浏览器直接访问一些没有
   配置的路径就会返回404,但因为没有 # 号,所以当用户刷新页面之类的操作时,浏览器还是会给服务器发送请求。为了避免出现这种情况,所以这个实现需要服务器的支持,
   需要把所有路由都重定向到根页面;
2、所以呢,你要在服务端增加一个覆盖所有情况的候选资源,如果 URL 匹配不到任何静态资源,应该返回同一个 index.html 页面,这个页面就是你app依赖的页面; - 参考链接:https://router.vuejs.org/zh/guide/essentials/history-mode.html
- 实现方案:
- html代码:
<!DOCTYPE html>
<html lang="en">
<head>
  <meta charset="UTF-8">
  <meta http-equiv="X-UA-Compatible" content="IE=edge">
  <meta name="viewport" content="width=device-width, initial-scale=1.0">
  <title>前端路由</title>
</head>
<body>
  <h1>hello , History router!!!</h1>
  <ul>
    <li><a href="/">turn white</a></li>
    <li><a href="http://localhost:3000/color/blue">turn blue</a></li>
    <li><a href="http://localhost:3000/color/green">turn green</a>
    <li><a href="http://localhost:3000/color/red">turn red</a></li>
    <li><a href="http://localhost:3000/color/orange">turn orange</a>
  </ul>

  <script src="./js/history.js"></script>
</body>
</html>
- js代码
/**
 * history路由
 */
class Router {
  constructor() {
    /**
     * 以键值对的形式存储路由
     */
    this.routers = new Object();
  }
}

/**
 * 监听页面的popstate事件
 */
Router.prototype.bindPopState = function (e) {
  const path = e.state && e.state.path;
  this.routers[path] && this.routers[path]();
};

/**
 * 将路由的path以及对应的callback函数储存
 * @param {*} path
 * @param {*} callback
 */
Router.prototype.route = function (routes) {
  for (let route of routes) {
    this.routers[route.path] = route.callback || function () {};
  }
};

/**
 * 初始化,直接替换当前历史纪录,并用状态对象进行存储
 */
Router.prototype.init = function (path) {
  window.history.replaceState({ path: path }, null, path);
  this.routers[path] && this.routers[path]();
  /**
   * 加入事件监听
   */
  window.addEventListener("popstate", this.bindPopState.bind(this), false);
};

/**
 * 更新页面,新增一个历史纪录
 */
Router.prototype.go = function (path) {
  window.history.pushState({ path: path }, null, path);
  this.routers[path] && this.routers[path]();
};

const route = new Router();
route.init(window.location.href);
const routes = [
  {
    path: "http://localhost:3000/",
    callback: function () {
      let el = document.body;
      el.style.backgroundColor = "#fff";
    },
  },
  {
    path: "http://localhost:3000/color/blue",
    callback: function () {
      let el = document.body;
      el.style.backgroundColor = "blue";
    },
  },
  {
    path: "http://localhost:3000/color/green",
    callback: function () {
      let el = document.body;
      el.style.backgroundColor = "green";
    },
  },
  {
    path: "http://localhost:3000/color/red",
    callback: function () {
      let el = document.body;
      el.style.backgroundColor = "red";
    },
  },
  {
    path: "http://localhost:3000/color/orange",
    callback: function () {
      let el = document.body;
      el.style.backgroundColor = "orange";
    },
  },
];
/**
 * 将hash值与cb绑定
 */
route.route(routes);

/**
 * a标签会跳转页面,阻止
 */
window.addEventListener(
  "click",
  function (e) {
    var e = e || window.event;
    var target = e.target || e.srcElement;
    if ((target.tagName = "A")) {
      e.preventDefault();
      route.go(e.target.getAttribute("href"));
    }
  },
  false
);
- html代码:
- history.pushState / replaceState 方法接受三个参数,依次为:
二、vue-router出现的问题
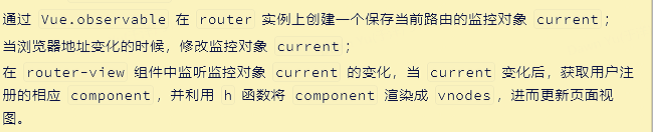
- vue-router的核心是,通过 vue.use 注册插件,在插件的 install 方法中获取用户配置的 router 对象,当浏览器的 URL 发生变化的时候,根据 router 对象匹配相应的路由,获取组件,并将组件渲染到视图上;
- 如何渲染 router-view 组件?
- 如何在 install 方法中获取vue实例上的router属性???
