本文地址:http://www.cnblogs.com/wuyudong/p/5947504.html,转载请注明出处。
在之前的文章中,实现了导航界面1布局编写与相关的逻辑代码,如下图所示:

点击“下一页”
public class Setup1Activity extends Activity{
    @Override
    protected void onCreate(Bundle savedInstanceState) {
        super.onCreate(savedInstanceState);
        setContentView(R.layout.activity_setup1);
    }

    public void nextPage(View view) {
        Intent intent = new Intent(getApplicationContext(), Setup2Activity.class);
        startActivity(intent);
        finish();
    }
}
进入新的activity:
可以看到,布局和之前的类似,代码如下:
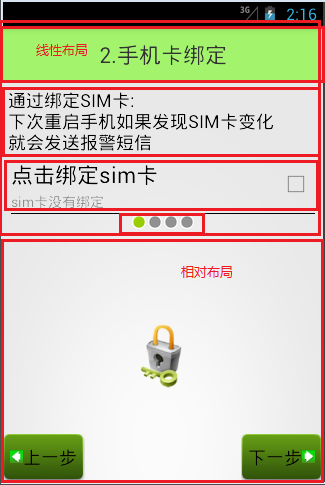
<?xml version="1.0" encoding="utf-8"?>
<LinearLayout xmlns:android="http://schemas.android.com/apk/res/android"
    android:layout_width="match_parent"
    android:layout_height="match_parent"
    android:orientation="vertical">

    <TextView
        style="@style/TitleStyle"
        android:text="2.手机卡绑定" />

    <TextView
        android:layout_width="wrap_content"
        android:layout_height="wrap_content"
        android:textColor="#000"
        android:textSize="18sp"
        android:layout_margin="5dp"
        android:text="通过绑定SIM卡:
下次重启手机如果发现SIM卡发生变化
就会发送报警短信" />
    <com.wuyudong.mobilesafe.view.SettingItemView
        xmlns:mobilesafe="http://schemas.android.com/apk/res/com.wuyudong.mobilesafe"
        android:id="@+id/siv_sim_bound"
        android:layout_width="match_parent"
        android:layout_height="wrap_content"
        mobilesafe:destitle="点击绑定sim卡"
        mobilesafe:desoff="sim卡未绑定"
        mobilesafe:deson="sim卡已绑定" >
    </com.wuyudong.mobilesafe.view.SettingItemView>

    <!-- 让内部点的空间水平居中 -->
    <LinearLayout
        android:layout_width="match_parent"
        android:layout_height="wrap_content"
        android:gravity="center_horizontal">

        <ImageView
            android:layout_width="wrap_content"
            android:layout_height="wrap_content"
            android:background="@android:drawable/presence_invisible" />
        <ImageView
            android:layout_width="wrap_content"
            android:layout_height="wrap_content"
            android:background="@android:drawable/presence_online" />

        <ImageView
            android:layout_width="wrap_content"
            android:layout_height="wrap_content"
            android:background="@android:drawable/presence_invisible" />

        <ImageView
            android:layout_width="wrap_content"
            android:layout_height="wrap_content"
            android:background="@android:drawable/presence_invisible" />
    </LinearLayout>

    <RelativeLayout
        android:layout_width="match_parent"
        android:layout_height="match_parent">

        <ImageView
            android:layout_width="wrap_content"
            android:layout_height="wrap_content"
            android:layout_centerInParent="true"
            android:background="@mipmap/bind" />
        <!-- 图片选择器,在选中和未选中的过程中,切换展示图片 -->
        <Button style="@style/preBtn" />
        <Button style="@style/nextBtn" />

    </RelativeLayout>

</LinearLayout>
效果如下:
