一、服务发现架构
服务发现架构通常具有下面 4 个概念:
- 服务注册:服务如何使用服务发现代理进行注册?
- 服务地址的客户端查找:服务客户端查找服务信息的方法是什么?
- 信息共享:如何跨节点共享服务信息?
- 健康监测:服务如何将它的健康信息传回给服务发现代理?
下图展示了这 4 个概念的流程,以及在服务发现模式实现中通常发生的情况:
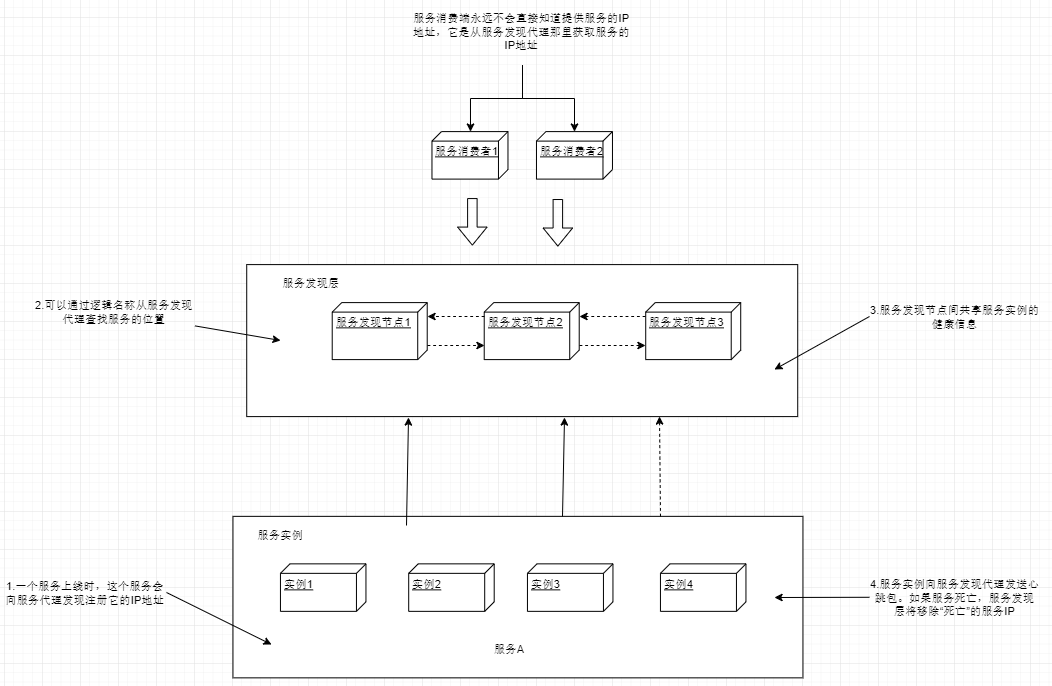
通常服务实例都只向一个服务发现实例注册,服务发现实例之间再通过数据传输,让每个服务实例注册到所有的服务发现实例中。
服务在向服务发现实例注册后,这个服务就能被服务消费者调用了。服务消费者可以使用多种模型来"发现"服务。
- 每次调用服务时,通过服务发现层来获取目标服务地址并进行调用。这种用的比较少,弊端较多。首先是每次服务调用都通过服务发现层来完成,耗时会比直接调用高。最主要的是这种方法很脆弱,消费端完全依赖于服务发现层来查找和调用服务。
- 更健壮的方法是使用所谓的客户端负载均衡。
如下图所示:
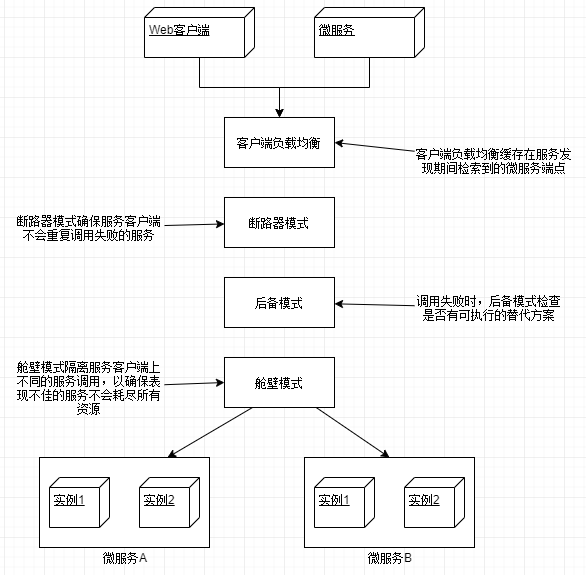
在这个模型中,当服务消费者需要调用一个服务时:
(1)联系服务发现层,获取所请求服务的所有服务实例,然后放到本地缓存中。
(2)每次调用该服务时,服务消费者从缓存中取出一个服务实例的位置,通常这个'取出'使用简单的复制均衡算法,如“轮询”,“随机",以确保服务调用分布在所有实例之间。
(3)客户端将定期与服务发现层进行通信,并刷新服务实例的缓存。
(4)如果在调用服务的过程中,服务调用失败,那么本地缓存将从服务发现层中刷新数据,再次尝试。
二、spring cloud 实战
使用 spring cloud 和 Netflix Eureka 搭建服务发现实例。
1、构建 Spring Eureka 服务
eurekasvr POM 主要配置如下:
<!-- 其他依赖省略 -->
<dependency>
    <groupId>org.springframework.cloud</groupId>
    <artifactId>spring-cloud-starter-eureka-server</artifactId>
</dependency>
applicaiton.yml 配置如下:
server:
  port: 8761

eureka:
  client:
    #不注册自己
    register-with-eureka: false
    #不在本地缓存注册表信息
    fetch-registry: false
  server:
    #接受请求前的等待实际,开发模式下不要开启
    #wait-time-in-ms-when-sync-empty: 5
最后在启动类上加入注释@SpringBootApplication即可启动服务中心。服务中心管理页面:http://localhost:8761
2、将服务注册到服务中心
这里我们编写一个新服务注册到服务中心,organizationservice:组织服务。并将上一篇的两个服务:confsvr:配置中心服务,licensingservice:授权服务注册到服务中心。
a、confvr 注册
首先修改 POM 文件:
<dependency>
    <groupId>org.springframework.cloud</groupId>
    <artifactId>spring-cloud-config-server</artifactId>
</dependency>
<dependency>
    <groupId>org.springframework.cloud</groupId>
    <artifactId>spring-cloud-starter-eureka</artifactId>
</dependency>
然后修改配置文件 application.yml:
server:
  port: 8888

eureka:
  instance:
    #注册服务的IP,而不是服务器名
    prefer-ip-address: true
  client:
    #向eureka注册服务
    register-with-eureka: true
    #拉取注册表的本地副本
    fetch-registry: true
    service-url:
      #Eureka服务的位置(如果有多个注册中心,使用,分隔)
      defaultZone: http://localhost:8761/eureka/

spring:
  profiles:
    # 使用文件系统来存储配置信息,需要设置为native
    active: native
  application:
    name: confsvr
  cloud:
    config:
      server:
        native:
          # 使用文件来存放配置文件,为每个应用程序提供用逗号分隔的文件夹列表
          searchLocations: file:///D:/configFolder/licensingservice,file:///D:/configFolder/organizationservice
最后在启动类加入注解@EnableDiscoveryClient,启动即可在 eureka 管理页面发现。
b、licensingservice 注册
首先修改 POM
<dependency>
    <groupId>org.springframework.cloud</groupId>
    <artifactId>spring-cloud-starter-eureka</artifactId>
</dependency>
<dependency>
    <groupId>org.springframework.cloud</groupId>
    <artifactId>spring-cloud-config-client</artifactId>
</dependency>
然后修改配置文件 bootstrap.yml
spring:
  application:
    #指定名称,以便spring cloud config客户端知道查找哪个配置
    name: licensingservice
  profiles:
    #指定环境
    active: dev
  cloud:
    config:
      #设为true便会自动获取从配置中心获取配置文件
      enabled: true
eureka:
  instance:
    prefer-ip-address: true
  client:
    register-with-eureka: true
    fetch-registry: true
    service-url:
      defaultZone: http://localhost:8761/eureka/
最后在启动类加入注解@EnableDiscoveryClient,启动即可在 eureka 管理页面发现本服务实例。
c、创建 organizationservice
首先在文件夹file:///D:/configFolder/organizationservice下创建两个配置文件:organizationservice.yml,organizationservice-dev.yml,内容分别为:
#organizationservice-dev.yml
server:
  port: 10012
#organizationservice.yml
spring:
  application:
    name: organizationservice
主要 POM 配置如下:
<dependency>
    <groupId>org.springframework.cloud</groupId>
    <artifactId>spring-cloud-starter-eureka</artifactId>
</dependency>
<dependency>
    <groupId>org.springframework.cloud</groupId>
    <artifactId>spring-cloud-config-client</artifactId>
</dependency>
然后修改配置文件,bootstrap.yml
spring:
  application:
    #指定名称,以便spring cloud config客户端知道查找哪个配置
    name: organizationservice
  profiles:
    #指定环境
    active: dev
  cloud:
    config:
      enabled: true
eureka:
  instance:
    prefer-ip-address: true
  client:
    register-with-eureka: true
    fetch-registry: true
    service-url:
      defaultZone: http://localhost:8761/eureka/
最后在启动类加入注解@EnableDiscoveryClient,启动。
3、使用服务发现来查找服务
现在已经有两个注册服务了,现在来让许可证服务调用组织服务,获取组织信息。首先在 organizationservice 服务中的 controller 包中加入一个 controller 类,让它能够响应请求:
//OrganizationController.java
@RestController
public class OrganizationController {

    @GetMapping(value = "/organization/{orgId}")
    public Object getOrganizationInfo(@PathVariable("orgId") String orgId) {
        Map<String, String> data = new HashMap<>(2);
        data.put("id", orgId);
        data.put("name", orgId + "公司");
        return data;
    }
}
接下来让许可证服务通过 Eureka 来找到组织服务的实际位置,然后调用该接口。为了达成目的,我们将要学习使用 3 个不同的 Spring/Netflix 客户端库,服务消费者可以使用它们来和 Ribbon 进行交互。从最低级别到最高级别,这些库包含了不同的与 Ribbon 进行交互的抽象封装层次:
- Spring DiscoveryClient
- 启用了 RestTemplate 的 Spring DiscoveryClient
- Neflix Feign 客户端
a、使用 Spring DiscoveryClient
该工具提供了对 Ribbon 和 Ribbon 中缓存的注册服务最低层次的访问,可以查询通过 Eureka 注册的所有服务以及这些服务对应的 URL。
首先在 licensingservice 的启动类中加入@EnableDiscoveryClient注解来启用 DiscoveryClient 和 Ribbon 库。
然后在 service 包下创建 OrganizationService.java
@Service
public class OrganizationService {

    private static final String SERVICE_NAME = "organizationservice";
    private DiscoveryClient discoveryClient;

    @Autowired
    public OrganizationService(DiscoveryClient discoveryClient) {
        this.discoveryClient = discoveryClient;
    }

    /**
     * 使用Spring DiscoveryClient查询
     *
     * @param id
     * @return
     */
    public Organization getOrganization(String id) {
        RestTemplate restTemplate = new RestTemplate();
        List<ServiceInstance> instances = discoveryClient.getInstances(SERVICE_NAME);
        if (instances.size() == 0) {
            throw new RuntimeException("无可用的服务");
        }
        String serviceUri = String.format("%s/organization/%s", instances.get(0).getUri().toString(), id);
        ResponseEntity<Organization> responseEntity = restTemplate.exchange(serviceUri, HttpMethod.GET
                , null, Organization.class, id);
        return responseEntity.getBody();
    }
}
接着在 controller 包中新建 LicensingController.java
@RestController
public class LicensingController {

    private OrganizationService organizationService;

    @Autowired
    public LicensingController(OrganizationService organizationService) {
        this.organizationService = organizationService;
    }

    @GetMapping("/licensing/{orgId}")
    public Licensing getLicensing(@PathVariable("orgId") String orgId) {
        Licensing licensing = new Licensing();
        licensing.setValid(false);
        licensing.setOrganization(organizationService.getOrganization(orgId));
        return licensing;
    }
}
启动所有项目,访问localhost:10011/licensing/12,可以看到返回如下结果:
{
  "organization": {
    "id": "12",
    "name": "12公司"
  },
  "valid": false
}
在实际开发中,基本上是用不到这个的,除非是为了查询 Ribbon 以获取某个服务的所有实例信息,才会直接使用。如果直接使用它存在以下两个问题:
- 没有利用 Ribbon 的客户端负载均衡
- 和业务无关的代码写得太多
b、使用带 Ribbon 功能的 Spring RestTemplate 调用服务
这种方法是较为常用的微服务通信机制之一。要启动该功能,需要使用 Spring Cloud 注解@LoadBanced 来定义 RestTemplate bean 的构造方法。方便起见直接在启动类中定义 bean:
#LicensingserviceApplication.java
@SpringBootApplication
@EnableDiscoveryClient  //使用不带Ribbon功能的Spring RestTemplate,其他情况下可删除
public class LicensingserviceApplication {

    /**
     * 使用带有Ribbon 功能的Spring RestTemplate,其他情况可删除
     */
    @LoadBalanced
    @Bean
    public RestTemplate getRestTemplate(){
        return new RestTemplate();
    }

    public static void main(String[] args) {
        SpringApplication.run(LicensingserviceApplication.class, args);
    }
}
接着 service 包下增加一个类:OrganizationByRibbonService.java
@Component
public class OrganizationByRibbonService {

    private RestTemplate restTemplate;

    @Autowired
    public OrganizationByRibbonService(RestTemplate restTemplate) {
        this.restTemplate = restTemplate;
    }

    public Organization getOrganizationWithRibbon(String id) {
        ResponseEntity<Organization> responseEntity = restTemplate.exchange("http://organizationservice/organization/{id}",
                HttpMethod.GET, null, Organization.class, id);
        return responseEntity.getBody();
    }
}
最后就是在 LicensingController.js 中加一个访问路径:
//不要忘记注入OrganizationByRibbonService服务
@GetMapping("/licensingByRibbon/{orgId}")
    public Licensing getLicensingByRibbon(@PathVariable("orgId") String orgId) {
        Licensing licensing = new Licensing();
        licensing.setValid(false);
        licensing.setOrganization(organizationService.getOrganization(orgId));
        return licensing;
    }
}
访问localhost:10011/licensingByRibbon/113,即可看到结果。
c、使用 Netflix Feign 客户端调用
Feign 客户端是 Spring 启用 Ribbon 的 RestTemplate 类的替代方案。开发人员只需定义一个接口,然后使用 Spring 注解来标注接口,即可调用目标服务。除了编写接口定义无需编写其他辅助代码。
首先启动类上加一个@EnableFeignClients注解启用 feign 客户端。然后在 POM 中加入 Feign 的依赖
<dependency>
  <groupId>org.springframework.cloud</groupId>
  <artifactId>spring-cloud-starter-feign</artifactId>
</dependency>
然后在 client 包下新建 OrganizationFeignClient.java
@FeignClient("organizationservice")//使用FeignClient注解指定目标服务
public interface OrganizationFeignClient {

    /**
     * 获取组织信息
     *
     * @param orgId 组织id
     * @return Organization
     */
    @RequestMapping(method = RequestMethod.GET, value = "/organization/{orgId}", consumes = "application/json")
    Organization getOrganization(@PathVariable("orgId") String orgId);
}
最后修改LicensingController.java,加入一个路由调用 Feign。
//注入OrganizationFeignClient,使用构造注入

@GetMapping("/licensingByFeign/{orgId}")
public Licensing getLicensingByFeign(@PathVariable("orgId") String orgId) {
    Licensing licensing = new Licensing();
    licensing.setValid(false);
    licensing.setOrganization(organizationFeignClient.getOrganization(orgId));
    return licensing;
}
访问localhost:10011/licensingByFeign/11313,即可看到结果。
总结
这一节磨磨蹭蹭写了好几天,虽然例子很简单,但是相信应该是能够看懂的。由于篇幅原因代码没有全部贴上,想要查看完整代码,可以访问这个链接:点击跳转。