先安装docker的注册服务器:
[root@VM_0_7_centos ~]# docker run -d -p 5000:5000 --restart=always --name registry2 registry:2
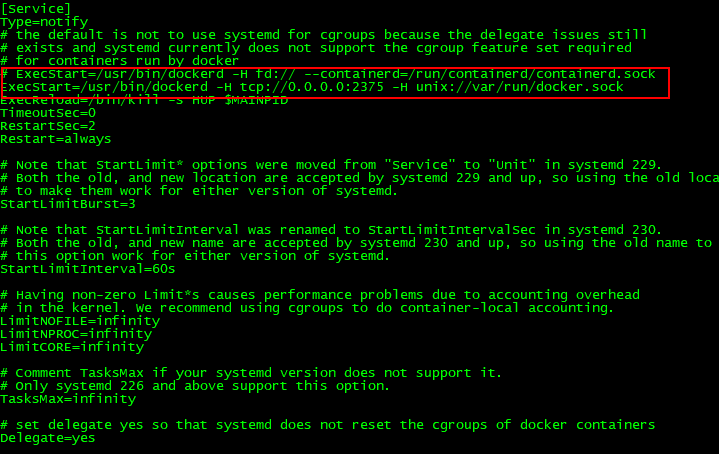
开启docker远程api:
[root@VM_0_7_centos ~]# vi /usr/lib/systemd/system/docker.service
原来文件描述符fd方式改为tcp,指定端口2375:

让docker支持http上传镜像文件(我们本地的jar包):
[root@VM_0_7_centos ~]# echo '{ "insecure-registries":["110.111.119.10:5000"] }' > /etc/docker/daemon.json
注意:这里的110.111.119.10是你docker所在服务器的ip。
重启docker:
[root@VM_0_7_centos ~]# systemctl daemon-reload && systemctl restart docker
本地jar包的pom文件引入docker插件:
    <build>
        <plugins>
            <plugin>
                <groupId>org.springframework.boot</groupId>
                <artifactId>spring-boot-maven-plugin</artifactId>
            </plugin>
            <plugin>
                <groupId>com.spotify</groupId>
                <artifactId>docker-maven-plugin</artifactId>
                <version>1.1.0</version>
                <executions>
                    <execution>
                        <id>build-image</id>
                        <phase>package</phase>
                        <goals>
                            <goal>build</goal>
                        </goals>
                    </execution>
                </executions>
                <configuration>
                    <imageName>wlf/${project.artifactId}:${project.version}</imageName>
                    <dockerHost>http://110.111.119.10:2375</dockerHost>
                    <baseImage>java:8</baseImage>
                    <entryPoint>["java", "-jar", "-Dspring.profiles.active=prod","/${project.build.finalName}.jar"]
                    </entryPoint>
                    <resources>
                        <resource>
                            <targetPath>/</targetPath>
                            <directory>${project.build.directory}</directory>
                            <include>${project.build.finalName}.jar</include>
                        </resource>
                    </resources>
                </configuration>
            </plugin>
        </plugins>
    </build>
注意:dockerHost的ip就是docker所在服务器的ip,端口号是2375。直接跑maven:
[INFO] Building wlf-test 1.0-SNAPSHOT
[INFO] ------------------------------------------------------------------------
[INFO]
[INFO] --- maven-resources-plugin:3.1.0:resources (default-resources) @ wlf-test ---
[INFO] Using 'UTF-8' encoding to copy filtered resources.
[INFO] Copying 3 resources
[INFO] Copying 1 resource
[INFO]
[INFO] --- maven-compiler-plugin:3.8.1:compile (default-compile) @ wlf-test ---
[INFO] Nothing to compile - all classes are up to date
[INFO]
[INFO] --- maven-resources-plugin:3.1.0:testResources (default-testResources) @ wlf-test ---
[INFO] Using 'UTF-8' encoding to copy filtered resources.
[INFO] skip non existing resourceDirectory E:workspacewlfwlf-testsrc	est
esources
[INFO]
[INFO] --- maven-compiler-plugin:3.8.1:testCompile (default-testCompile) @ wlf-test ---
[INFO] Nothing to compile - all classes are up to date
[INFO]
[INFO] --- maven-surefire-plugin:2.22.2:test (default-test) @ wlf-test ---
[INFO] Tests are skipped.
[INFO]
[INFO] --- maven-jar-plugin:3.1.2:jar (default-jar) @ wlf-test ---
[INFO] Building jar: E:workspacewlfwlf-test	argetwlf-test-1.0-SNAPSHOT.jar
[INFO]
[INFO] --- spring-boot-maven-plugin:2.1.7.RELEASE:repackage (repackage) @ wlf-test ---
[INFO] Replacing main artifact with repackaged archive
[INFO]
[INFO] --- docker-maven-plugin:1.1.0:build (build-image) @ wlf-test ---
[INFO] Using authentication suppliers: [ConfigFileRegistryAuthSupplier]
[INFO] Copying E:workspacewlfwlf-test	argetwlf-test-1.0-SNAPSHOT.jar -> E:workspacewlfwlf-test	argetdockerwlf-test-1.0-SNAPSHOT.jar
[INFO] Building image wlf/wlf-test:1.0-SNAPSHOT
Step 1/3 : FROM java:8

 ---> d23bdf5b1b1b
Step 2/3 : ADD /wlf-test-1.0-SNAPSHOT.jar //

 ---> 1c5c2b47b5fb
Step 3/3 : ENTRYPOINT ["java", "-jar", "-Dspring.profiles.active=prod","/wlf-test-1.0-SNAPSHOT.jar"]

 ---> Running in 3a0ae2be2945
Removing intermediate container 3a0ae2be2945
 ---> 372d06d19472
ProgressMessage{id=null, status=null, stream=null, error=null, progress=null, progressDetail=null}
Successfully built 372d06d19472
Successfully tagged wlf/wlf-test:1.0-SNAPSHOT